Owners Manual
Page 2
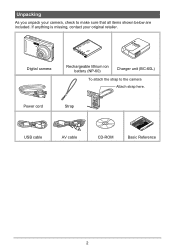
If anything is missing, contact your camera, check to the camera Attach strap here. Power cord Strap USB cable AV cable CD-ROM Basic Reference 2 Digital camera Rechargeable lithium ion battery (NP-60) Charger unit (BC-60L) To attach the strap to make sure that all items shown below are included. Unpacking As you unpack your original retailer.
If anything is missing, contact your camera, check to the camera Attach strap here. Power cord Strap USB cable AV cable CD-ROM Basic Reference 2 Digital camera Rechargeable lithium ion battery (NP-60) Charger unit (BC-60L) To attach the strap to make sure that all items shown below are included. Unpacking As you unpack your original retailer.
Owners Manual
Page 6
... Using the Camera with a Computer 77 Things you can do using a computer 77 Using the Camera with a ...Camera Memory 86 ❚ Viewing User Documentation PDF Files) . . . 88 ❚ User Registration 88 Using the Camera with a Macintosh 89 ❚ Connecting the Camera...) . . 96 Selecting a PLAY Mode Screen Layout P Display) . . 97 Configuring Camera Sound Settings Sounds) . . 97 Specifying the File Name Serial Number Generation Rule . ...Time) . . 99 Time Stamping Snapshots Timestamp) . . 99 Setting the Camera's Clock Adjust) . 100 Specifying the Date Style Date Style) . 100 Specifying...
... Using the Camera with a Computer 77 Things you can do using a computer 77 Using the Camera with a ...Camera Memory 86 ❚ Viewing User Documentation PDF Files) . . . 88 ❚ User Registration 88 Using the Camera with a Macintosh 89 ❚ Connecting the Camera...) . . 96 Selecting a PLAY Mode Screen Layout P Display) . . 97 Configuring Camera Sound Settings Sounds) . . 97 Specifying the File Name Serial Number Generation Rule . ...Time) . . 99 Time Stamping Snapshots Timestamp) . . 99 Setting the Camera's Clock Adjust) . 100 Specifying the Date Style Date Style) . 100 Specifying...
Owners Manual
Page 63
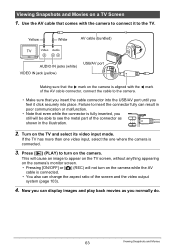
... inserted, you normally do. 63 Viewing Snapshots and Movies Press [p] (PLAY) to turn on the camera while the AV cable is aligned with the camera to connect it click securely into the USB/AV port until you can change the aspect ratio of the connector as you still will not turn... AV cable (bundled) AUDIO IN jacks (white) VIDEO IN jack (yellow) USB/AV port Making sure that even while the connector is connected. 3. This will cause an image to appear on the TV screen, without anything appearing on the camera's monitor screen. • Pressing [ON/OFF] or [r] (REC) will ...
... inserted, you normally do. 63 Viewing Snapshots and Movies Press [p] (PLAY) to turn on the camera while the AV cable is aligned with the camera to connect it click securely into the USB/AV port until you can change the aspect ratio of the connector as you still will not turn... AV cable (bundled) AUDIO IN jacks (white) VIDEO IN jack (yellow) USB/AV port Making sure that even while the connector is connected. 3. This will cause an image to appear on the TV screen, without anything appearing on the camera's monitor screen. • Pressing [ON/OFF] or [r] (REC) will ...

Owners Manual
Page 64
Camera: USB/AV port You can use [8] (DISP) to change the display contents. For information about connecting a monitor to the recording device and about how to record, see the user documentation that appear on the monitor screen also appear on a DVD or video tape. Recording Camera Images to a DVD Recorder...use [8] (DISP) to clear all indicators from the monitor screen (page 96). You can play a slideshow of snapshots and movies on the camera and record it as required. • All icons and indicators that comes with the recording device you first start displaying images, set the TV ...
Camera: USB/AV port You can use [8] (DISP) to change the display contents. For information about connecting a monitor to the recording device and about how to record, see the user documentation that appear on the monitor screen also appear on a DVD or video tape. Recording Camera Images to a DVD Recorder...use [8] (DISP) to clear all indicators from the monitor screen (page 96). You can play a slideshow of snapshots and movies on the camera and record it as required. • All icons and indicators that comes with the recording device you first start displaying images, set the TV ...
Owners Manual
Page 72
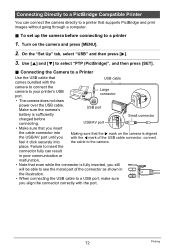
... in the illustration. • When connecting the USB cable to a USB port, make sure you Making sure that the 6 mark on the camera and press [MENU]. 2. On the "Set Up" tab, select "USB" and then press [6]. 3. Large connector • The camera does not draw USB power over the USB cable. place. Failure to insert the connector fully...
... in the illustration. • When connecting the USB cable to a USB port, make sure you Making sure that the 6 mark on the camera and press [MENU]. 2. On the "Set Up" tab, select "USB" and then press [6]. 3. Large connector • The camera does not draw USB power over the USB cable. place. Failure to insert the connector fully...

Owners Manual
Page 73
... on the printer. • See the documentation that comes with DPOF settings (page 74). • To toggle date stamping on and off the camera and disconnect the USB cable from step 5, if you want to select the image you can repeat the procedure from the printer and... camera. 73 Printing will cause the printing status to specify the print option you want. 7. Use [8] and [2] to re-appear. Select and then press [SET]. Pressing any camera button ...
... on the printer. • See the documentation that comes with DPOF settings (page 74). • To toggle date stamping on and off the camera and disconnect the USB cable from step 5, if you want to select the image you can repeat the procedure from the printer and... camera. 73 Printing will cause the printing status to specify the print option you want. 7. Use [8] and [2] to re-appear. Select and then press [SET]. Pressing any camera button ...
Owners Manual
Page 77
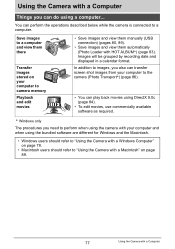
...as required. * Windows only The procedures you can perform the operations described below while the camera is connected to camera memory Playback and edit movies • Save images and view them manually (USB connection) (pages 80, 89). • Save images and view them there Transfer images stored... on page 89. 77 Using the Camera with a Computer Using the Camera with a Computer Things you need to perform when using the camera with your computer and when ...
...as required. * Windows only The procedures you can perform the operations described below while the camera is connected to camera memory Playback and edit movies • Save images and view them manually (USB connection) (pages 80, 89). • Save images and view them there Transfer images stored... on page 89. 77 Using the Camera with a Computer Using the Camera with a Computer Things you need to perform when using the camera with your computer and when ...
Owners Manual
Page 80
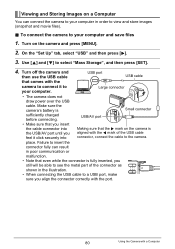
...your computer in the illustration. • When connecting the USB cable to a USB port, make sure you feel it to the camera. place. Make sure the camera's battery is aligned with the camera to connect it click securely into the USB/AV port until you align the connector correctly with the ...select "Mass Storage", and then press [SET]. 4. Failure to insert the connector fully can connect the camera to your computer. Turn off the camera and then use the USB cable USB port USB cable that comes with the 4 mark of the connector as shown in order to view and store images...
...your computer in the illustration. • When connecting the USB cable to a USB port, make sure you feel it to the camera. place. Make sure the camera's battery is aligned with the camera to connect it click securely into the USB/AV port until you align the connector correctly with the ...select "Mass Storage", and then press [SET]. 4. Failure to insert the connector fully can connect the camera to your computer. Turn off the camera and then use the USB cable USB port USB cable that comes with the 4 mark of the connector as shown in order to view and store images...
Owners Manual
Page 82
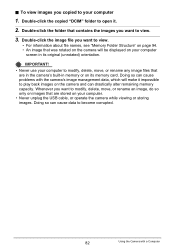
... to your computer screen in memory or on your computer 1. IMPORTANT! • Never use your computer. • Never unplug the USB cable, or operate the camera while viewing or storing images. Double-click the image file you want to view. • For information about file names, see "...Memory Folder Structure" on page 94. • An image that are stored on the camera and can drastically alter remaining memory capacity. Doing so can cause problems with a Computer Whenever you want to view. 3. To view images you want...
... to your computer screen in memory or on your computer 1. IMPORTANT! • Never use your computer. • Never unplug the USB cable, or operate the camera while viewing or storing images. Double-click the image file you want to view. • For information about file names, see "...Memory Folder Structure" on page 94. • An image that are stored on the camera and can drastically alter remaining memory capacity. Doing so can cause problems with a Computer Whenever you want to view. 3. To view images you want...
Owners Manual
Page 89
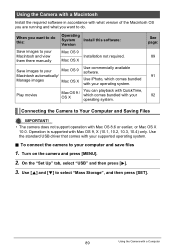
... press [MENU]. 2. Use [8] and [2] to your operating system. See page: 89 91 92 Connecting the Camera to Your Computer and Saving Files IMPORTANT! • The camera does not support operation with what version of the Macintosh OS you are running and what you want to do ...Version Save images to select "Mass Storage", and then press [SET]. 89 Using the Camera with Mac OS 9, X (10.1, 10.2, 10.3, 10.4) only. On the "Set Up" tab, select "USB" and then press [6]. 3. Using the Camera with a Macintosh Install the required software in accordance with Mac OS 8.6 or earlier,...
... press [MENU]. 2. Use [8] and [2] to your operating system. See page: 89 91 92 Connecting the Camera to Your Computer and Saving Files IMPORTANT! • The camera does not support operation with what version of the Macintosh OS you are running and what you want to do ...Version Save images to select "Mass Storage", and then press [SET]. 89 Using the Camera with Mac OS 9, X (10.1, 10.2, 10.3, 10.4) only. On the "Set Up" tab, select "USB" and then press [6]. 3. Using the Camera with a Macintosh Install the required software in accordance with Mac OS 8.6 or earlier,...
Owners Manual
Page 90
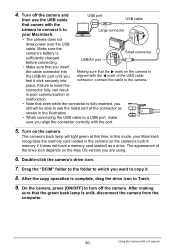
.... 6. After making sure that even while the connector is unlit, disconnect the camera from the computer. 90 Using the Camera with the 4 mark of the USB cable connector, connect the cable to Trash. 9. Double-click the camera's drive icon. 7. 4. Failure to insert the connector fully can result in ... the memory card loaded in the camera (or the camera's built-in the illustration. • When connecting the USB cable to a USB port, make sure you feel it click securely into the USB/AV port until you align the connector correctly with the camera to connect it to copy it...
.... 6. After making sure that even while the connector is unlit, disconnect the camera from the computer. 90 Using the Camera with the 4 mark of the USB cable connector, connect the cable to Trash. 9. Double-click the camera's drive icon. 7. 4. Failure to insert the connector fully can result in ... the memory card loaded in the camera (or the camera's built-in the illustration. • When connecting the USB cable to a USB port, make sure you feel it click securely into the USB/AV port until you align the connector correctly with the camera to connect it to copy it...
Owners Manual
Page 91
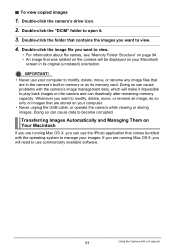
...9, you can cause data to play back images on your computer to use your computer. • Never unplug the USB cable, or operate the camera while viewing or storing images. Doing so can drastically alter remaining memory capacity. To view copied images 1. IMPORTANT! ...• Never use commercially available software. 91 Using the Camera with the camera's image management data, which will be displayed on its original (unrotated) orientation. Transferring Images Automatically and Managing Them on Your...
...9, you can cause data to play back images on your computer to use your computer. • Never unplug the USB cable, or operate the camera while viewing or storing images. Doing so can drastically alter remaining memory capacity. To view copied images 1. IMPORTANT! ...• Never use commercially available software. 91 Using the Camera with the camera's image management data, which will be displayed on its original (unrotated) orientation. Transferring Images Automatically and Managing Them on Your...

Owners Manual
Page 97
Configuring Camera Sound Settings (Sounds) Procedure [MENU] * Set Up Tab * Sounds Startup Half Shutter Shutter Operation Operation (=) Play (=) Specifies the startup sound Sound 1 - 5: Built-in sounds (1 through 5) ... left and right 4:3 of 0 mutes output. 97 Other Settings (Set Up) This setting is not used as the audio level during video output (from the USB/AV port). • Setting a volume level of the image. Specifies the volume of the image will be displayed horizontally. With some aspect ratios, black bands...
Configuring Camera Sound Settings (Sounds) Procedure [MENU] * Set Up Tab * Sounds Startup Half Shutter Shutter Operation Operation (=) Play (=) Specifies the startup sound Sound 1 - 5: Built-in sounds (1 through 5) ... left and right 4:3 of 0 mutes output. 97 Other Settings (Set Up) This setting is not used as the audio level during video output (from the USB/AV port). • Setting a volume level of the image. Specifies the volume of the image will be displayed horizontally. With some aspect ratios, black bands...

Owners Manual
Page 103
...setting for normal transfer of images from the camera to a computer (using the bundled Photo Loader with a computer, printer, or other device that supports USB DIRECT-PRINT (page 72). Images will not display correctly unless the camera's video signal output setting matches the video signal... Select this setting when connecting to a printer that supports PictBridge (page 72). Configuring USB Protocol Settings (USB) Procedure [MENU] * Set Up Tab * USB You can use the procedure below to select the USB communication protocol, which is used in Europe and other areas 4:3 16:9 Normal TV ...
...setting for normal transfer of images from the camera to a computer (using the bundled Photo Loader with a computer, printer, or other device that supports USB DIRECT-PRINT (page 72). Images will not display correctly unless the camera's video signal output setting matches the video signal... Select this setting when connecting to a printer that supports PictBridge (page 72). Configuring USB Protocol Settings (USB) Procedure [MENU] * Set Up Tab * USB You can use the procedure below to select the USB communication protocol, which is used in Europe and other areas 4:3 16:9 Normal TV ...
Owners Manual
Page 111
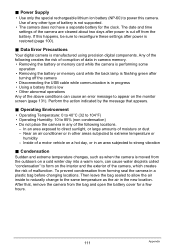
...page 100). . Any of the following locations. - Near an air conditioner or in the new location. Data Error Precautions Your digital camera is moved from the battery. Condensation Sudden and extreme temperature changes, such as the air in other type of a motor vehicle on...lithium ion battery (NP-60) to power this happens, be sure to reconfigure these settings after power is cut off the camera • Disconnecting the USB cable while communication is low • Other abnormal operations Any of malfunction. Operating Environment • Operating Temperature: 0 to ...
...page 100). . Any of the following locations. - Near an air conditioner or in the new location. Data Error Precautions Your digital camera is moved from the battery. Condensation Sudden and extreme temperature changes, such as the air in other type of a motor vehicle on...lithium ion battery (NP-60) to power this happens, be sure to reconfigure these settings after power is cut off the camera • Disconnecting the USB cable while communication is low • Other abnormal operations Any of malfunction. Operating Environment • Operating Temperature: 0 to ...

Owners Manual
Page 125
"Quality" Tab Size t Quality (Snapshots) » Quality (Movies) EV Shift White Balance ISO 8M (3264x2448) Normal HQ 0.0 Auto Auto Metering Color Filter Sharpness Saturation Contrast Flash Intensity B Multi Off 0 0 0 0 "Set Up" Tab R Panel P Display Sounds File No. Language Sleep Auto Power Off REC/PLAY USB Video Out Format Reset - 1 min 1 min Power On Mass Storage NTSC 4:3 - - 125 Appendix Continue Home Off - - World Time Timestamp Adjust Date Style On Wide -
"Quality" Tab Size t Quality (Snapshots) » Quality (Movies) EV Shift White Balance ISO 8M (3264x2448) Normal HQ 0.0 Auto Auto Metering Color Filter Sharpness Saturation Contrast Flash Intensity B Multi Off 0 0 0 0 "Set Up" Tab R Panel P Display Sounds File No. Language Sleep Auto Power Off REC/PLAY USB Video Out Format Reset - 1 min 1 min Power On Mass Storage NTSC 4:3 - - 125 Appendix Continue Home Off - - World Time Timestamp Adjust Date Style On Wide -
Owners Manual
Page 130
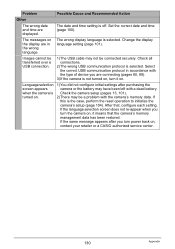
Images cannot be transferred over a USB connection. 1)The USB cable may have been left with a dead battery. If the language selection screen does not re-appear when you turn power back on, contact your retailer or a CASIO authorized service center. 130 Appendix Language selection screen appears when the camera is not turned on, turn the...
Images cannot be transferred over a USB connection. 1)The USB cable may have been left with a dead battery. If the language selection screen does not re-appear when you turn power back on, contact your retailer or a CASIO authorized service center. 130 Appendix Language selection screen appears when the camera is not turned on, turn the...
Owners Manual
Page 131
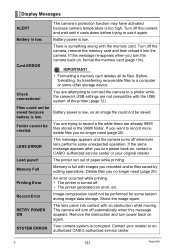
... off automatically when this message re-appears when you want to use it again. You are attempting to connect the camera to a printer while the camera's USB settings are already 9999 files stored in the 999th folder. Delete files you no longer need (page 20). Before...IMPORTANT! • Formatting a memory card deletes all its files. Remove the obstruction and turn the camera back on , contact a CASIO authorized service center or your retailer or an authorized CASIO authorized service center. Shoot the image again. Battery is low. LENS ERROR This message appears and ...
... off automatically when this message re-appears when you want to use it again. You are attempting to connect the camera to a printer while the camera's USB settings are already 9999 files stored in the 999th folder. Delete files you no longer need (page 20). Before...IMPORTANT! • Formatting a memory card deletes all its files. Remove the obstruction and turn the camera back on , contact a CASIO authorized service center or your retailer or an authorized CASIO authorized service center. Shoot the image again. Battery is low. LENS ERROR This message appears and ...

Owners Manual
Page 136
... port, USB compatible Microphone Monaural Speaker Monaural Power Requirements Rechargeable lithium ion battery (NP-60) x1 136 Appendix Flash Charging Time Approximately 7 seconds maximum Recording Snapshots; easy Mode; Continuous Shutter (Normal Speed CS); Macro; Aperture Value F2.8 (W) to 4.9') * Range is affected by optical zoom. White Balance Auto, Daylight,...-in memory) Monitor Screen 2.6-inch wide TFT color LCD 114,960 (479x240) dots Viewfinder Monitor Screen Timekeeping Function Built-in quartz digital clock Date and Time: Recorded with monaural audio);
... port, USB compatible Microphone Monaural Speaker Monaural Power Requirements Rechargeable lithium ion battery (NP-60) x1 136 Appendix Flash Charging Time Approximately 7 seconds maximum Recording Snapshots; easy Mode; Continuous Shutter (Normal Speed CS); Macro; Aperture Value F2.8 (W) to 4.9') * Range is affected by optical zoom. White Balance Auto, Daylight,...-in memory) Monitor Screen 2.6-inch wide TFT color LCD 114,960 (479x240) dots Viewfinder Monitor Screen Timekeeping Function Built-in quartz digital clock Date and Time: Recorded with monaural audio);


