Owners Manual
Page 1
K844FCM1DMX E Digital Camera EX-Z850 User's Guide Thank you for purchasing this CASIO product. • Before using it, be sure to read the precautions contained in this User's Guide. • Keep the User's Guide in a safe place for future reference. • For the most up-to-date information about this product, visit the official EXILIM Website at http://www.exilim.com/.
K844FCM1DMX E Digital Camera EX-Z850 User's Guide Thank you for purchasing this CASIO product. • Before using it, be sure to read the precautions contained in this User's Guide. • Keep the User's Guide in a safe place for future reference. • For the most up-to-date information about this product, visit the official EXILIM Website at http://www.exilim.com/.
Owners Manual
Page 3
...charge the battery 37 To replace the battery 41 Power Supply Precautions 42 Turning the Camera On and Off 45 Configuring Power Saving Settings 47 Using the On-screen Menus 48 Configuring Display Language and Clock Settings ... 51 To ...configure display language and clock settings 52 54 BASIC IMAGE RECORDING Recording an Image 54 Specifying the Recording Mode 54 Aiming the Camera 55 Recording an Image 56 Using the Optical Viewfinder 62 Using Zoom 63 Optical Zoom 63 Digital Zoom...
...charge the battery 37 To replace the battery 41 Power Supply Precautions 42 Turning the Camera On and Off 45 Configuring Power Saving Settings 47 Using the On-screen Menus 48 Configuring Display Language and Clock Settings ... 51 To ...configure display language and clock settings 52 54 BASIC IMAGE RECORDING Recording an Image 54 Specifying the Recording Mode 54 Aiming the Camera 55 Recording an Image 56 Using the Optical Viewfinder 62 Using Zoom 63 Optical Zoom 63 Digital Zoom...
Owners Manual
Page 4
... Exposure Settings Manually 96 Exposure Mode Recording Precautions 97 Using Continuous Shutter 97 Using the Normal-Speed Continuous Shutter Mode 98 Using the High-Speed Continuous Shutter Mode 99 Using the Flash Continuous Shutter Mode 99 Using the Zoom Continuous Shutter Mode 100 25-shot Stop Action Images (Using the Multi Continuous Shutter Mode) 101 Continuous Shutter...
... Exposure Settings Manually 96 Exposure Mode Recording Precautions 97 Using Continuous Shutter 97 Using the Normal-Speed Continuous Shutter Mode 98 Using the High-Speed Continuous Shutter Mode 99 Using the Flash Continuous Shutter Mode 99 Using the Zoom Continuous Shutter Mode 100 25-shot Stop Action Images (Using the Multi Continuous Shutter Mode) 101 Continuous Shutter...
Owners Manual
Page 5
... Color Saturation 146 Specifying Contrast 146 Date Stamping Snapshots 147 Resetting the Camera 148 Using the Shortcut Menu (EX Menu 149 150 PLAYBACK Basic Playback Operation 150 Playing an Audio Snapshot 151 Zooming the Display Image 152 Resizing an Image 153 Cropping an Image 154... Keystone Correction 156 Using Color Restoration to Correct the Color of an Old Photograph 157 Adjusting ...
... Color Saturation 146 Specifying Contrast 146 Date Stamping Snapshots 147 Resetting the Camera 148 Using the Shortcut Menu (EX Menu 149 150 PLAYBACK Basic Playback Operation 150 Playing an Audio Snapshot 151 Zooming the Display Image 152 Resizing an Image 153 Cropping an Image 154... Keystone Correction 156 Using Color Restoration to Correct the Color of an Old Photograph 157 Adjusting ...
Owners Manual
Page 6
INTRODUCTION Adding Audio to a Snapshot 177 To re-record audio 178 Playing Back a Voice Recording File 179 Displaying Camera Images on a TV Screen 180 Selecting the Video Output System 181 183 DELETING FILES Deleting a Single File 183 Deleting All Files 184 185 FILE MANAGEMENT ...Folders 185 Memory Folders and Files 185 Protecting Files 186 To protect a single file 186 To protect all files in memory 187 Using the FAVORITE Folder 187 To copy a file to the FAVORITE folder 187 To display a file in the FAVORITE folder 189 To delete a file from the...
INTRODUCTION Adding Audio to a Snapshot 177 To re-record audio 178 Playing Back a Voice Recording File 179 Displaying Camera Images on a TV Screen 180 Selecting the Video Output System 181 183 DELETING FILES Deleting a Single File 183 Deleting All Files 184 185 FILE MANAGEMENT ...Folders 185 Memory Folders and Files 185 Protecting Files 186 To protect a single file 186 To protect all files in memory 187 Using the FAVORITE Folder 187 To copy a file to the FAVORITE folder 187 To display a file in the FAVORITE folder 189 To delete a file from the...
Owners Manual
Page 7
INTRODUCTION 203 USING A MEMORY CARD Using a Memory Card 204 To insert a memory card into the camera 204 To replace the memory card 205 Formatting a Memory Card 206 Copying Files 207 To copy all the files in built-in memory to...USB DIRECT-PRINT 214 Date Printing 218 PRINT Image Matching III 219 Exif Print 219 220 VIEWING IMAGES ON A COMPUTER Using the Camera with a Windows Computer ........ 220 Using the Camera with a Macintosh Computer ....... 228 Using a Memory Card to Transfer Images to a Computer 233 Memory Data 234 DCF Protocol 234 Memory Folder Structure 235 ...
INTRODUCTION 203 USING A MEMORY CARD Using a Memory Card 204 To insert a memory card into the camera 204 To replace the memory card 205 Formatting a Memory Card 206 Copying Files 207 To copy all the files in built-in memory to...USB DIRECT-PRINT 214 Date Printing 218 PRINT Image Matching III 219 Exif Print 219 220 VIEWING IMAGES ON A COMPUTER Using the Camera with a Windows Computer ........ 220 Using the Camera with a Macintosh Computer ....... 228 Using a Memory Card to Transfer Images to a Computer 233 Memory Data 234 DCF Protocol 234 Memory Folder Structure 235 ...
Owners Manual
Page 8
...Playing a Movie 247 Editing a Movie 250 Viewing User Documentation (PDF Files) 252 User Registration 252 Exiting the Menu Application 252 Using the Camera with a Macintosh Computer ....... 253 Selecting the Software You Need 253 Computer System Requirements 254 Managing Images on a Macintosh 255 Playing ...Back a Movie on your Macintosh 256 Viewing User Documentation (PDF Files) 258 To register as a camera user 258 259 APPENDIX Menu Reference 259 Indicator Lamp Reference 262 Troubleshooting Guide 265 If you have problems installing the USB ...
...Playing a Movie 247 Editing a Movie 250 Viewing User Documentation (PDF Files) 252 User Registration 252 Exiting the Menu Application 252 Using the Camera with a Macintosh Computer ....... 253 Selecting the Software You Need 253 Computer System Requirements 254 Managing Images on a Macintosh 255 Playing ...Back a Movie on your Macintosh 256 Viewing User Documentation (PDF Files) 258 To register as a camera user 258 259 APPENDIX Menu Reference 259 Indicator Lamp Reference 262 Troubleshooting Guide 265 If you have problems installing the USB ...
Owners Manual
Page 9
...held liable for any third party due to the use of Photo Loader and/or Photohands. • CASIO COMPUTER CO., LTD. assumes no responsibility for any damage or loss resulting from the use or malfunction of the EX-Z850. • CASIO COMPUTER CO., LTD. assumes no responsibility for any...CO., LTD. 9 INTRODUCTION IMPORTANT! • The contents of this User's Guide may differ somewhat by the screens and configuration of the actual camera. • The SD logo is a registered trademark. • Windows, Internet Explorer, Windows Media, and DirectX are registered trademarks of Microsoft...
...held liable for any third party due to the use of Photo Loader and/or Photohands. • CASIO COMPUTER CO., LTD. assumes no responsibility for any damage or loss resulting from the use or malfunction of the EX-Z850. • CASIO COMPUTER CO., LTD. assumes no responsibility for any...CO., LTD. 9 INTRODUCTION IMPORTANT! • The contents of this User's Guide may differ somewhat by the screens and configuration of the actual camera. • The SD logo is a registered trademark. • Windows, Internet Explorer, Windows Media, and DirectX are registered trademarks of Microsoft...
Owners Manual
Page 10
... remain turned on a TV screen (page 180), and to transfer images to use. • AF assist light (page 59) Improves auto focus accuracy when shooting under dim lighting. • 24X zoom (page 63) 3X optical zoom, 8X digital zoom • Flash Assist (page 71) This feature compensates when flash intensity is... on the cradle (page 174). • REC mode or PLAY mode power up (page 45) Press [ ] (REC) or [ ] (PLAY) to turn on the camera and enter the mode...
... remain turned on a TV screen (page 180), and to transfer images to use. • AF assist light (page 59) Improves auto focus accuracy when shooting under dim lighting. • 24X zoom (page 63) 3X optical zoom, 8X digital zoom • Flash Assist (page 71) This feature compensates when flash intensity is... on the cradle (page 174). • REC mode or PLAY mode power up (page 45) Press [ ] (REC) or [ ] (PLAY) to turn on the camera and enter the mode...
Owners Manual
Page 11
...simple way to restore an old, faded photograph with the color provided by modern digital camera technology. • ID Photo Feature (page 116) After recording a portrait,...whiteboard, or similar subjects from an angle. • Restoring an Old Photograph (page 113) You can use the procedure in this section to set up to repeat three times, automatically. • Auto Macro (...Focus to normal-speed continuous shutter, you can also select high-speed continuous shutter, flash continuous shutter, zoom continuous shutter, or multi continuous shutter. • BEST SHOT (page 103) Simply select one ....
...simple way to restore an old, faded photograph with the color provided by modern digital camera technology. • ID Photo Feature (page 116) After recording a portrait,...whiteboard, or similar subjects from an angle. • Restoring an Old Photograph (page 113) You can use the procedure in this section to set up to repeat three times, automatically. • Auto Macro (...Focus to normal-speed continuous shutter, you can also select high-speed continuous shutter, flash continuous shutter, zoom continuous shutter, or multi continuous shutter. • BEST SHOT (page 103) Simply select one ....
Owners Manual
Page 12
... that are suitable for printing. • Calendar screen (page 171) A simple operation displays a full-month calendar on the camera's monitor screen. You can also use the MOVIE BEST SHOT mode to make searching for a particular file quicker and easier. • World Time (page 196) ... overall image brightness, which makes shooting under difficult lighting conditions easier than ever before. • EX Menu (page 149) EX Menu gives you short-cut menu access to four frequently-used settings. • Keystone Correction (page 156) A simple operation corrects for keystoning, which helps ...
... that are suitable for printing. • Calendar screen (page 171) A simple operation displays a full-month calendar on the camera's monitor screen. You can also use the MOVIE BEST SHOT mode to make searching for a particular file quicker and easier. • World Time (page 196) ... overall image brightness, which makes shooting under difficult lighting conditions easier than ever before. • EX Menu (page 149) EX Menu gives you short-cut menu access to four frequently-used settings. • Keystone Correction (page 156) A simple operation corrects for keystoning, which helps ...
Owners Manual
Page 13
...(mode setting and other camera setup information). INTRODUCTION • Support for SD memory cards and MMC (MultiMedia Cards) for memory expansion (page 203) • Digital Print Order Format (DPOF) (page 211) Images can be used when specifying images and quantities...digital camera and printers. • Bundled with Photo Loader and Photohands (pages 242, 245, 255) Your camera comes bundled with Photohands, and application that automatically loads images from your camera to your images come out just the way you intended when you can also be printed easily in the sequence you want using...
...(mode setting and other camera setup information). INTRODUCTION • Support for SD memory cards and MMC (MultiMedia Cards) for memory expansion (page 203) • Digital Print Order Format (DPOF) (page 211) Images can be used when specifying images and quantities...digital camera and printers. • Bundled with Photo Loader and Photohands (pages 242, 245, 255) Your camera comes bundled with Photohands, and application that automatically loads images from your camera to your images come out just the way you intended when you can also be printed easily in the sequence you want using...
Owners Manual
Page 14
... of this manual to "camera" refer to the CASIO EX-Z850 Digital Camera. • Never try to open the case of a person operating a motor vehicle. If swallowed accidentally, contact your physician immediately. • Never fire the flash in the direction of the camera or attempt your nearest CASIO authorized service center for repair. Using the camera under these conditions creates...
... of this manual to "camera" refer to the CASIO EX-Z850 Digital Camera. • Never try to open the case of a person operating a motor vehicle. If swallowed accidentally, contact your physician immediately. • Never fire the flash in the direction of the camera or attempt your nearest CASIO authorized service center for repair. Using the camera under these conditions creates...
Owners Manual
Page 15
...the wall socket while an image is prohibited. Next, remove the camera's battery and/or unplug the AC adaptor power cord from the power outlet, and contact your dealer or nearest CASIO authorized service center. • Never use is being recorded. Doing so will not only make storage of... the current image impossible, it off. Never use any other AC adaptor besides the one that comes with this camera. • Never cover the AC ...
...the wall socket while an image is prohibited. Next, remove the camera's battery and/or unplug the AC adaptor power cord from the power outlet, and contact your dealer or nearest CASIO authorized service center. • Never use is being recorded. Doing so will not only make storage of... the current image impossible, it off. Never use any other AC adaptor besides the one that comes with this camera. • Never cover the AC ...
Owners Manual
Page 16
... the USB cradle, or disconnecting the AC adaptor from the USB cradle while a data communication operation is manufactured using the camera! I Test for proper operation before using precision digital components. Other abnormal operations Any of the above conditions can cause an error message to eliminate the cause of data in file memory. - Removing the...
... the USB cradle, or disconnecting the AC adaptor from the USB cradle while a data communication operation is manufactured using the camera! I Test for proper operation before using precision digital components. Other abnormal operations Any of the above conditions can cause an error message to eliminate the cause of data in file memory. - Removing the...
Owners Manual
Page 17
In areas subject to conditions that might cause condensation. • To keep the camera in temperatures ranging from the camera and leave the battery cover open for use or keep condensation from forming, place the camera into a plastic bag before moving it into a location that condensation can cause malfunction of a closed vehicle, especially one parked...
In areas subject to conditions that might cause condensation. • To keep the camera in temperatures ranging from the camera and leave the battery cover open for use or keep condensation from forming, place the camera into a plastic bag before moving it into a location that condensation can cause malfunction of a closed vehicle, especially one parked...

Owners Manual
Page 18
...cloth. • Fingerprints, dirt, and other type of the camera. INTRODUCTION I Lens • Never apply too much force when cleaning the surface of the lens. Be sure to power this camera. I Power Supply • Use only the special NP-40 rechargeable lithium ion battery to reconfigure these... settings after power is not supported. • This camera does not have a separate battery for the clock. Avoid ...
...cloth. • Fingerprints, dirt, and other type of the camera. INTRODUCTION I Lens • Never apply too much force when cleaning the surface of the lens. Be sure to power this camera. I Power Supply • Use only the special NP-40 rechargeable lithium ion battery to reconfigure these... settings after power is not supported. • This camera does not have a separate battery for the clock. Avoid ...
Owners Manual
Page 20
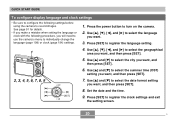
...8226; If you make a mistake when setting the language or clock with the following settings before using the camera to turn on the camera. 2. Use and [̈] to select the language you will need to use the camera's menu to individually change the language (page 198) or clock (page 194) settings. 1.... Press [SET] to register the language setting. 4. Press [SET] to register the clock settings and exit the setting screen. 20 C Use and [̈] to select ...
...8226; If you make a mistake when setting the language or clock with the following settings before using the camera to turn on the camera. 2. Use and [̈] to select the language you will need to use the camera's menu to individually change the language (page 198) or clock (page 194) settings. 1.... Press [SET] to register the language setting. 4. Press [SET] to register the clock settings and exit the setting screen. 20 C Use and [̈] to select ...
Owners Manual
Page 21
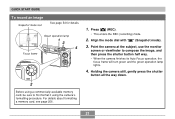
...3 4 Focus frame 1. Point the camera at the subject, use the monitor screen or viewfinder to first format it using a commercially available memory card, be sure to compose the image, and then press the shutter button half way. • When the camera finishes its Auto Focus operation, the... lamp lights. 4. Press [ ] (REC). • This enters the REC (recording) mode. 2. Holding the camera still, gently press the shutter button all the way down. 2 Before using the camera's formatting procedure. For details about formatting a memory card, see page 206. 21 Align the mode dial with " ...
...3 4 Focus frame 1. Point the camera at the subject, use the monitor screen or viewfinder to first format it using a commercially available memory card, be sure to compose the image, and then press the shutter button half way. • When the camera finishes its Auto Focus operation, the... lamp lights. 4. Press [ ] (REC). • This enters the REC (recording) mode. 2. Holding the camera still, gently press the shutter button all the way down. 2 Before using the camera's formatting procedure. For details about formatting a memory card, see page 206. 21 Align the mode dial with " ...
Owners Manual
Page 22
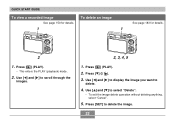
Use [̇] and [̈] to select "Delete". • To exit the image delete operation without deleting anything, select "Cancel". 5. Use [̆] and [̄] to scroll through the images. 2, 3, 4, 5 1. Use [̇] and [̈] to display the image you want to delete the image. 22 Press [̄] ( ). 3. Press [SET] to delete. 4. Press [ ] (PLAY). 2. Press [ ] (PLAY). • This enters the PLAY (playback) mode. 2. QUICK START GUIDE To view a recorded image To delete an image See page 150 for details. 1 1 See page 183 for details. 2 1.
Use [̇] and [̈] to select "Delete". • To exit the image delete operation without deleting anything, select "Cancel". 5. Use [̆] and [̄] to scroll through the images. 2, 3, 4, 5 1. Use [̇] and [̈] to display the image you want to delete the image. 22 Press [̄] ( ). 3. Press [SET] to delete. 4. Press [ ] (PLAY). 2. Press [ ] (PLAY). • This enters the PLAY (playback) mode. 2. QUICK START GUIDE To view a recorded image To delete an image See page 150 for details. 1 1 See page 183 for details. 2 1.


