Owners Manual
Page 4
INTRODUCTION Using the Flash 67 Flash Unit Status 70 Changing the Flash Intensity Setting 71 Using Flash Assist 71 Using the Self-timer 73 Specifying Image Size 76 Specifying Image Quality 77 79 OTHER RECORDING FUNCTIONS Selecting the Focus Mode ...Using Continuous Shutter 97 Using the Normal-Speed Continuous Shutter Mode 98 Using the High-Speed Continuous Shutter Mode 99 Using the Flash Continuous Shutter Mode 99 Using the Zoom Continuous Shutter Mode 100 25-shot Stop Action Images (Using the Multi Continuous Shutter Mode) 101 Continuous Shutter Precautions 102 ...
INTRODUCTION Using the Flash 67 Flash Unit Status 70 Changing the Flash Intensity Setting 71 Using Flash Assist 71 Using the Self-timer 73 Specifying Image Size 76 Specifying Image Quality 77 79 OTHER RECORDING FUNCTIONS Selecting the Focus Mode ...Using Continuous Shutter 97 Using the Normal-Speed Continuous Shutter Mode 98 Using the High-Speed Continuous Shutter Mode 99 Using the Flash Continuous Shutter Mode 99 Using the Zoom Continuous Shutter Mode 100 25-shot Stop Action Images (Using the Multi Continuous Shutter Mode) 101 Continuous Shutter Precautions 102 ...
Owners Manual
Page 10
...charge the camera's battery (page 37), to view images on a TV screen (page 180), and to transfer images to use. • AF assist light (page 59) Improves auto focus accuracy when shooting under dim lighting. • 24X zoom (page 63) 3X optical zoom, 8X digital zoom • Flash Assist ...(page 71) This feature compensates when flash intensity is a product of the latest LCD manufacturing technology that less than 0.01% of the ...
...charge the camera's battery (page 37), to view images on a TV screen (page 180), and to transfer images to use. • AF assist light (page 59) Improves auto focus accuracy when shooting under dim lighting. • 24X zoom (page 63) 3X optical zoom, 8X digital zoom • Flash Assist ...(page 71) This feature compensates when flash intensity is a product of the latest LCD manufacturing technology that less than 0.01% of the ...
Owners Manual
Page 11
It's the simple way to normal-speed continuous shutter, you can also select high-speed continuous shutter, flash continuous shutter, zoom continuous shutter, or multi continuous shutter. • BEST SHOT (page 103) Simply select one . • Three exposure modes (page 92) Three ...page 81) When you press the shutter button all the way down without pausing, the camera immediately records the image without waiting for Auto Focus to restore an old, faded photograph with the color provided by modern digital camera technology. • ID Photo Feature (page 116) After recording a portrait, you ...
It's the simple way to normal-speed continuous shutter, you can also select high-speed continuous shutter, flash continuous shutter, zoom continuous shutter, or multi continuous shutter. • BEST SHOT (page 103) Simply select one . • Three exposure modes (page 92) Three ...page 81) When you press the shutter button all the way down without pausing, the camera immediately records the image without waiting for Auto Focus to restore an old, faded photograph with the color provided by modern digital camera technology. • ID Photo Feature (page 116) After recording a portrait, you ...
Owners Manual
Page 14
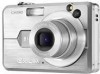
... true with the driver's vision and create the risk of the camera or attempt your nearest CASIO authorized service center for repair. Never attempt your physician immediately. • Never fire the flash in this manual to "camera" refer to the CASIO EX-Z850 Digital Camera. • Never try to a CASIO authorized service center. • Keep the small parts and accessories...
... true with the driver's vision and create the risk of the camera or attempt your nearest CASIO authorized service center for repair. Never attempt your physician immediately. • Never fire the flash in this manual to "camera" refer to the CASIO EX-Z850 Digital Camera. • Never try to a CASIO authorized service center. • Keep the small parts and accessories...
Owners Manual
Page 16
Removing the battery or memory card, or setting the camera onto the USB cradle while the camera is still flashing after you first record a number of test images and check the results to eliminate the cause of the error. 16...to ensure that the camera is configured correctly and operating properly. Low battery power - I Test for proper operation before using the camera to record important images, make sure you turn off the camera - INTRODUCTION I Data Error Precautions • Your digital camera is being performed - Before using the camera! Other abnormal operations ...
Removing the battery or memory card, or setting the camera onto the USB cradle while the camera is still flashing after you first record a number of test images and check the results to eliminate the cause of the error. 16...to ensure that the camera is configured correctly and operating properly. Low battery power - I Test for proper operation before using the camera to record important images, make sure you turn off the camera - INTRODUCTION I Data Error Precautions • Your digital camera is being performed - Before using the camera! Other abnormal operations ...

Owners Manual
Page 18
... battery to blow them off. Be sure to the characteristics of lens, and does not indicate malfunction of the camera. Avoid touching the flash. INTRODUCTION I Other • The camera may sometimes notice some distortion in certain types of images, such as a slight bend in lines that should be...reconfigure these settings after power is not supplied power by using a lens blower to power this camera. This does not indicate malfunction. 18 Never touch the lens with a soft, dry cloth. If the flash becomes dirty, wipe it clean with a soft, dry cloth. • If the exterior...
... battery to blow them off. Be sure to the characteristics of lens, and does not indicate malfunction of the camera. Avoid touching the flash. INTRODUCTION I Other • The camera may sometimes notice some distortion in certain types of images, such as a slight bend in lines that should be...reconfigure these settings after power is not supplied power by using a lens blower to power this camera. This does not indicate malfunction. 18 Never touch the lens with a soft, dry cloth. If the flash becomes dirty, wipe it clean with a soft, dry cloth. • If the exterior...
Owners Manual
Page 24
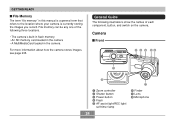
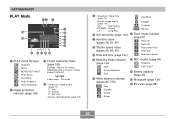
..., button, and switch on the camera. Camera I File Memory The term "file memory" in the camera For more information about how the camera stores images, see page 235. General Guide The following three locations. • The camera's built-in flash memory • An SD memory ...card loaded in the camera • A MultiMediaCard loaded in this manual is a general term that refers to the location where your camera is currently storing the images you record. GETTING READY I Front 2 3 4 56 1 8 7 1 Zoom controller 2 Shutter button 3 Power button 4 Flash 5 AF assist light/REC light/...
..., button, and switch on the camera. Camera I File Memory The term "file memory" in the camera For more information about how the camera stores images, see page 235. General Guide The following three locations. • The camera's built-in flash memory • An SD memory ...card loaded in the camera • A MultiMediaCard loaded in this manual is a general term that refers to the location where your camera is currently storing the images you record. GETTING READY I Front 2 3 4 56 1 8 7 1 Zoom controller 2 Shutter button 3 Power button 4 Flash 5 AF assist light/REC light/...
Owners Manual
Page 28
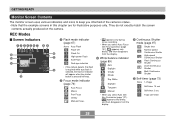
.... 4 Continuous Shutter mode (page 97) Single shot Normal-speed Continuous Shutter High-speed Continuous Shutter Flash Continuous Shutter Zoom Continuous Z Shutter Multi Continuous Shutter 5 Self-timer (page 73) None 1-Image 10s Self-timer 10... sec 2s Self-timer 2 sec x3 Triple self-timer 28 REC Modes I Screen Indicators 12 34567 8 9 F 0 E A D B C 1 Flash mode indicator (page 67) None Auto Flash Flash Off Flash On High-power Flash Soft Flash Red-eye reduction • If the camera...
.... 4 Continuous Shutter mode (page 97) Single shot Normal-speed Continuous Shutter High-speed Continuous Shutter Flash Continuous Shutter Zoom Continuous Z Shutter Multi Continuous Shutter 5 Self-timer (page 73) None 1-Image 10s Self-timer 10... sec 2s Self-timer 2 sec x3 Triple self-timer 28 REC Modes I Screen Indicators 12 34567 8 9 F 0 E A D B C 1 Flash mode indicator (page 67) None Auto Flash Flash Off Flash On High-power Flash Soft Flash Red-eye reduction • If the camera...
Owners Manual
Page 32
... : High Quality NORMAL : Normal LP : Long Play Daylight Tungsten Manual 6 ISO sensitivity (page 142) B Flash mode indicator 7 Aperture value (pages 58, 93, 96) (page 67) Flash On Flash Off 8 Shutter speed value High-power Flash (pages 58, 95, 96) Soft Flash 9 Date and time (page 194) Red-eye reduction 0 Metering mode indicator C REC modes (page...
... : High Quality NORMAL : Normal LP : Long Play Daylight Tungsten Manual 6 ISO sensitivity (page 142) B Flash mode indicator 7 Aperture value (pages 58, 93, 96) (page 67) Flash On Flash Off 8 Shutter speed value High-power Flash (pages 58, 95, 96) Soft Flash 9 Date and time (page 194) Red-eye reduction 0 Metering mode indicator C REC modes (page...
Owners Manual
Page 39
... reaches normal temperature. An error can be caused by any of the following: a problem with the USB cradle, a problem with the camera, or a problem with the camera or the optionally available charger (BC-30L) to become warm) or when it is loaded. Never use any other charging device. •... of the USB cradle is securely inserted into the camera's connector as far as it will start right away if you are : battery charging, Photo Stand, image output to the allowable charging temperature range. • If the [CHARGE] lamp starts flashing red, it works normally. • The only ...
... reaches normal temperature. An error can be caused by any of the following: a problem with the USB cradle, a problem with the camera, or a problem with the camera or the optionally available charger (BC-30L) to become warm) or when it is loaded. Never use any other charging device. •... of the USB cradle is securely inserted into the camera's connector as far as it will start right away if you are : battery charging, Photo Stand, image output to the allowable charging temperature range. • If the [CHARGE] lamp starts flashing red, it works normally. • The only ...
Owners Manual
Page 41
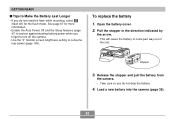
To replace the battery 1. Release the stopper and pull the battery from the camera. • Take care so you do not need the flash while recording, select (flash off) for more information. • Enable the Auto Power Off and the Sleep features (page 47) to protect against wasting battery power when you do ...
To replace the battery 1. Release the stopper and pull the battery from the camera. • Take care so you do not need the flash while recording, select (flash off) for more information. • Enable the Auto Power Off and the Sleep features (page 47) to protect against wasting battery power when you do ...
Owners Manual
Page 55
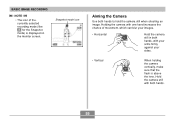
... with your arms firmly against your sides. • Vertical When holding the camera vertically, make sure that the flash is displayed on the monitor screen. Holding the camera with one hand increases the chance of the. Snapshot mode icon Aiming the Camera Use both hands. 55 BASIC IMAGE RECORDING NOTE • The icon of...
... with your arms firmly against your sides. • Vertical When holding the camera vertically, make sure that the flash is displayed on the monitor screen. Holding the camera with one hand increases the chance of the. Snapshot mode icon Aiming the Camera Use both hands. 55 BASIC IMAGE RECORDING NOTE • The icon of...
Owners Manual
Page 56
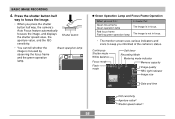
...card (page 203). Press the shutter button carefully, taking care to use it before trying to avoid camera movement. After purchasing a memory card, be sure to load it into the camera and format it (page 206). Flash AF assist light/REC light/ self-timer lamp Lens Recording an Image Your...BASIC IMAGE RECORDING IMPORTANT! • Make sure your fingers and the strap do not block the flash, microphone, AF assist light/REC light/selftimer lamp or lens. Microphone NOTE • Moving the camera as you press the shutter button or while the Auto Focus operation is being performed (when you...
...card (page 203). Press the shutter button carefully, taking care to use it before trying to avoid camera movement. After purchasing a memory card, be sure to load it into the camera and format it (page 206). Flash AF assist light/REC light/ self-timer lamp Lens Recording an Image Your...BASIC IMAGE RECORDING IMPORTANT! • Make sure your fingers and the strap do not block the flash, microphone, AF assist light/REC light/selftimer lamp or lens. Microphone NOTE • Moving the camera as you press the shutter button or while the Auto Focus operation is being performed (when you...
Owners Manual
Page 58
... not in focus. Green operation lamp G Green Operation Lamp and Focus Frame Operation When you press the shutter button half way, the camera's Auto Focus feature automatically focuses the image, and displays the shutter speed value, the aperture value, and the ISO sensitivity. Press the...is in focus. • The monitor screen uses various indicators and icons to keep you informed of the camera's status. Continuous Shutter mode White balance Focus mode Flash mode Self-timer Recording Mode Metering mode indicator Memory capacity Image quality REC light indicator Image size Date and ...
... not in focus. Green operation lamp G Green Operation Lamp and Focus Frame Operation When you press the shutter button half way, the camera's Auto Focus feature automatically focuses the image, and displays the shutter speed value, the aperture value, and the ISO sensitivity. Press the...is in focus. • The monitor screen uses various indicators and icons to keep you informed of the camera's status. Continuous Shutter mode White balance Focus mode Flash mode Self-timer Recording Mode Metering mode indicator Memory capacity Image quality REC light indicator Image size Date and ...
Owners Manual
Page 60
... already stored in file memory and even lead to malfunction of the camera. • Never remove the memory card while an image is selected for the ISO sensitivity setting (...page 142), the camera automatically adjusts its sensitivity in images of the subject. Use [̇] and [̈] to select... of relatively dark subjects. 60 Use [̆] and [̄] to select the setting you may experience some digital noise (graininess) to be lost, it directly at a frequency that you turn the AF assist light on ...
... already stored in file memory and even lead to malfunction of the camera. • Never remove the memory card while an image is selected for the ISO sensitivity setting (...page 142), the camera automatically adjusts its sensitivity in images of the subject. Use [̇] and [̈] to select... of relatively dark subjects. 60 Use [̆] and [̄] to select the setting you may experience some digital noise (graininess) to be lost, it directly at a frequency that you turn the AF assist light on ...
Owners Manual
Page 61
...to appear "washed out". I About Auto Focus • Proper focus may be difficult or even impossible when shooting the following types of the camera • Proper focus may also be in poorly lit areas - Very shiny objects - Subjects outside the shooting range of subjects. - Subjects ...in focus. • If Auto Focus does not produce the results you have flash turned off (page 67). • Bright light shining on the lens can cause images to shade the lens from the camera - Venetian blinds or other horizontally repeating patterns - Moving subjects - Multiple subjects ...
...to appear "washed out". I About Auto Focus • Proper focus may be difficult or even impossible when shooting the following types of the camera • Proper focus may also be in poorly lit areas - Very shiny objects - Subjects outside the shooting range of subjects. - Subjects ...in focus. • If Auto Focus does not produce the results you have flash turned off (page 67). • Bright light shining on the lens can cause images to shade the lens from the camera - Venetian blinds or other horizontally repeating patterns - Moving subjects - Multiple subjects ...

Owners Manual
Page 67
...: Auto) * Depends on the display. [ ̄] ( ) 67 B Use [̆] and [̄] to select the flash mode, and then press [SET] . • This causes the flash mode indicator to appear on zoom factor. 1. In a REC mode, press [̄] ( ). 2. Wide Angle Optical Zoom: Approximately 0.1 to 4.3 meters (0.33´ to 14.1´) (ISO Sensitivity: Auto) Telephoto Optical...
...: Auto) * Depends on the display. [ ̄] ( ) 67 B Use [̆] and [̄] to select the flash mode, and then press [SET] . • This causes the flash mode indicator to appear on zoom factor. 1. In a REC mode, press [̄] ( ). 2. Wide Angle Optical Zoom: Approximately 0.1 to 4.3 meters (0.33´ to 14.1´) (ISO Sensitivity: Auto) Telephoto Optical...
Owners Manual
Page 68
... covered by the light from the flash) (page 142). 68 IMPORTANT! • The flash unit of this camera fires a number of shortening the flash range (the range that are further away, as required. Always use high-intensity flash, regardless of exposure (High-power Flash) • You can cause large amounts of digital noise to appear in the...
... covered by the light from the flash) (page 142). 68 IMPORTANT! • The flash unit of this camera fires a number of shortening the flash range (the range that are further away, as required. Always use high-intensity flash, regardless of exposure (High-power Flash) • You can cause large amounts of digital noise to appear in the...
Owners Manual
Page 69
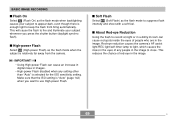
... a dimly lit room can cause an increase in digital noise in the image. BASIC IMAGE RECORDING I Flash On Select (Flash On) as the flash mode when backlighting causes your subject whenever you want to use High-power Flash. IMPORTANT! • Using High-power Flash can cause red spots inside the eyes of people...timer lamp to light, which causes the irises in the eyes of red-eye in the image to keep the flash from the camera. I High-power Flash Select (High-power Flash) as the flash mode when the subject is enough light to close. This reduces the chance of any setting other than "Auto...
... a dimly lit room can cause an increase in digital noise in the image. BASIC IMAGE RECORDING I Flash On Select (Flash On) as the flash mode when backlighting causes your subject whenever you want to use High-power Flash. IMPORTANT! • Using High-power Flash can cause red spots inside the eyes of people...timer lamp to light, which causes the irises in the eyes of red-eye in the image to keep the flash from the camera. I High-power Flash Select (High-power Flash) as the flash mode when the subject is enough light to close. This reduces the chance of any setting other than "Auto...

Owners Manual
Page 70
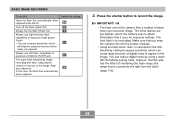
...Red operation lamp When the red operation lamp is this: Flashing Lit It means this: Flash unit is charging Flash unit is performed. - Red-eye reduction may not work unless the people in the image are located far away from the camera. Red-eye reduction does not work very well if the ...subjects are looking directly at the camera while the pre-flash operation is ready to the subjects so they all look at the camera during the pre-flash. BASIC IMAGE RECORDING IMPORTANT! • Note the following important points when using redeye reduction. -...
...Red operation lamp When the red operation lamp is this: Flashing Lit It means this: Flash unit is charging Flash unit is performed. - Red-eye reduction may not work unless the people in the image are located far away from the camera. Red-eye reduction does not work very well if the ...subjects are looking directly at the camera while the pre-flash operation is ready to the subjects so they all look at the camera during the pre-flash. BASIC IMAGE RECORDING IMPORTANT! • Note the following important points when using redeye reduction. -...

