
Owners Manual
Page 2
Power cord Strap USB cable AV cable CD-ROM Basic Reference 2 If anything is missing, contact your camera, check to the camera Attach strap here. Unpacking As you unpack your original retailer. Digital camera Rechargeable lithium ion battery (NP-60) Charger unit (BC-60L) To attach the strap to make sure that all items shown below are included.
Power cord Strap USB cable AV cable CD-ROM Basic Reference 2 If anything is missing, contact your camera, check to the camera Attach strap here. Unpacking As you unpack your original retailer. Digital camera Rechargeable lithium ion battery (NP-60) Charger unit (BC-60L) To attach the strap to make sure that all items shown below are included.
Owners Manual
Page 4
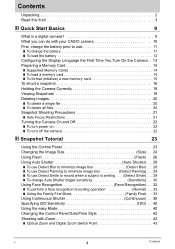
...3 ❚❙ Quick Start Basics 9 What is a digital camera 9 What you can do with your CASIO camera 10 First, charge the battery prior to use 11 ❚ To charge the battery 11 ❚ To load the battery 12 Configuring the Display Language the First Time You Turn On the Camera. . 13 Preparing a Memory Card 14 ❚ Supported Memory... Continuous Shutter Continuous) . . 38 Specifying ISO Sensitivity ISO) . . 40 Using the easy Mode 40 Changing the Control Panel Date/Time Style 42 Shooting with Zoom 42 ❚ Optical Zoom and Digital Zoom Switch Point 43 C 4 Contents
...3 ❚❙ Quick Start Basics 9 What is a digital camera 9 What you can do with your CASIO camera 10 First, charge the battery prior to use 11 ❚ To charge the battery 11 ❚ To load the battery 12 Configuring the Display Language the First Time You Turn On the Camera. . 13 Preparing a Memory Card 14 ❚ Supported Memory... Continuous Shutter Continuous) . . 38 Specifying ISO Sensitivity ISO) . . 40 Using the easy Mode 40 Changing the Control Panel Date/Time Style 42 Shooting with Zoom 42 ❚ Optical Zoom and Digital Zoom Switch Point 43 C 4 Contents

Owners Manual
Page 7
... Number Generation Rule . . . . . (File No.) . 124 Configuring World Time Settings World Time) . 124 Time Stamping Snapshots Timestamp) . 125 Setting the Camera's Clock Adjust) . 126 Specifying the Date Style Date Style) . 126 Specifying the Display Language Language) . 127 Configuring Sleep State Settings Sleep) . 127 Configuring Auto...the Histogram 132 ❚❙ Appendix 133 Precautions during Use 133 Power Supply 142 ❚ Charging 142 ❚ To replace the battery 142 ❚ Battery Precautions 143 ❚ Using the Camera in another Country 143 7 Contents
... Number Generation Rule . . . . . (File No.) . 124 Configuring World Time Settings World Time) . 124 Time Stamping Snapshots Timestamp) . 125 Setting the Camera's Clock Adjust) . 126 Specifying the Date Style Date Style) . 126 Specifying the Display Language Language) . 127 Configuring Sleep State Settings Sleep) . 127 Configuring Auto...the Histogram 132 ❚❙ Appendix 133 Precautions during Use 133 Power Supply 142 ❚ Charging 142 ❚ To replace the battery 142 ❚ Battery Precautions 143 ❚ Using the Camera in another Country 143 7 Contents

Owners Manual
Page 11
... 90 minutes are required to a full charge. • Your camera requires a special CASIO rechargeable lithium ion battery (NP-60) for power. If this , it is recommended that you charge the battery immediately before charging it. • A battery discharges slightly even when it . • Charging the camera's battery may not charge fully. Positioning the positive + and negative - terminals...
... 90 minutes are required to a full charge. • Your camera requires a special CASIO rechargeable lithium ion battery (NP-60) for power. If this , it is recommended that you charge the battery immediately before charging it. • A battery discharges slightly even when it . • Charging the camera's battery may not charge fully. Positioning the positive + and negative - terminals...

Owners Manual
Page 12
...the arrow in place. 1 2 Battery Stopper 3. To load the battery 1. Charge the battery as soon as shown below. Pressing the battery cover against wasting battery power when you forget to the battery in the direction of the lens), hold the stopper next to turn off the camera (pages 127, 128). 12 ... to use the flash, select ? (flash off) for information about how to be cleared. Close the battery cover. With the EXILIM logo on the battery cover, slide it closed. • For information about battery life and memory capacity. You will cause its date and time settings to replace the...
...the arrow in place. 1 2 Battery Stopper 3. To load the battery 1. Charge the battery as soon as shown below. Pressing the battery cover against wasting battery power when you forget to the battery in the direction of the lens), hold the stopper next to turn off the camera (pages 127, 128). 12 ... to use the flash, select ? (flash off) for information about how to be cleared. Close the battery cover. With the EXILIM logo on the battery cover, slide it closed. • For information about battery life and memory capacity. You will cause its date and time settings to replace the...

Owners Manual
Page 13
...) setting you want to change and then use of summer time, and so they are subject to select the setting you will be using the camera and then press [SET]. To switch between 12-hour and 24-hour format, press [BS]. 8. Press [ON/OFF] to select a date style and then press.../09 MM/DD/YY * 12/19/09 7. The selected area is highlighted in red. 4. Configuring the Display Language the First Time You Turn On the Camera The first time you load a battery into the camera, a screen appears for configuring the display language, date, and time settings.
...) setting you want to change and then use of summer time, and so they are subject to select the setting you will be using the camera and then press [SET]. To switch between 12-hour and 24-hour format, press [BS]. 8. Press [ON/OFF] to select a date style and then press.../09 MM/DD/YY * 12/19/09 7. The selected area is highlighted in red. 4. Configuring the Display Language the First Time You Turn On the Camera The first time you load a battery into the camera, a screen appears for configuring the display language, date, and time settings.
Owners Manual
Page 14
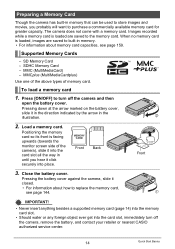
... 14) into the memory card slot. • Should water or any foreign object ever get into place. Close the battery cover. Pressing the battery cover against the camera, slide it into the card slot all the way in memory. • For information about how to turn off the... - MMC (MultiMediaCard) - Pressing down at the arrow marked on the battery cover, slide it click securely into the card slot, immediately turn off the camera, remove the battery, and contact your retailer or nearest CASIO authorized service center. 14 Quick Start Basics Positioning the memory card so its...
... 14) into the memory card slot. • Should water or any foreign object ever get into place. Close the battery cover. Pressing the battery cover against the camera, slide it into the card slot all the way in memory. • For information about how to turn off the... - MMC (MultiMediaCard) - Pressing down at the arrow marked on the battery cover, slide it click securely into the card slot, immediately turn off the camera, remove the battery, and contact your retailer or nearest CASIO authorized service center. 14 Quick Start Basics Positioning the memory card so its...
Owners Manual
Page 21
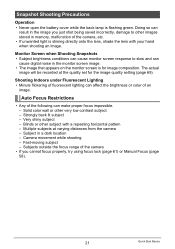
...to slow and can make proper focus impossible. - Subjects outside the focus range of an image. Auto Focus Restrictions • Any of the camera, etc. • If unwanted light is shining directly onto the lens, shade the lens with a repeating horizontal pattern - Strongly back lit subject... so can result in memory, malfunction of the following can cause digital noise in a dark location - Multiple subjects at the quality set for image composition. Snapshot Shooting Precautions Operation • Never open the battery cover while the back lamp is for the image quality setting (...
...to slow and can make proper focus impossible. - Subjects outside the focus range of an image. Auto Focus Restrictions • Any of the camera, etc. • If unwanted light is shining directly onto the lens, shade the lens with a repeating horizontal pattern - Strongly back lit subject... so can result in memory, malfunction of the following can cause digital noise in a dark location - Multiple subjects at the quality set for image composition. Snapshot Shooting Precautions Operation • Never open the battery cover while the back lamp is for the image quality setting (...
Owners Manual
Page 26
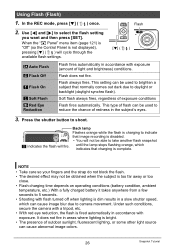
... ? Flash does not fire. This type of flash can cause abnormal image colors. 26 Snapshot Tutorial Under such conditions, secure the camera with exposure (amount of exposure conditions Flash fires automatically. It does not fire in areas where lighting is fired automatically in a slow...• Flash charging time depends on operating conditions (battery condition, ambient temperature, etc.) With a fully charged battery it takes anywhere from a few seconds to 5 seconds. • Shooting with exposure. Press the shutter button to camera movement. Flash 2. NOTE • Take care so ...
... ? Flash does not fire. This type of flash can cause abnormal image colors. 26 Snapshot Tutorial Under such conditions, secure the camera with exposure (amount of exposure conditions Flash fires automatically. It does not fire in areas where lighting is fired automatically in a slow...• Flash charging time depends on operating conditions (battery condition, ambient temperature, etc.) With a fully charged battery it takes anywhere from a few seconds to 5 seconds. • Shooting with exposure. Press the shutter button to camera movement. Flash 2. NOTE • Take care so ...

Owners Manual
Page 97
...the metal part of the USB cable connector, connect the cable to the camera. Make sure the camera's USB port battery is sufficiently charged before connecting to a printer 1. Large connector • The camera does not draw USB power over the USB cable. To set up the... camera before connecting. Connecting Directly to a PictBridge Compatible Printer You can result in the illustration....
...the metal part of the USB cable connector, connect the cable to the camera. Make sure the camera's USB port battery is sufficiently charged before connecting to a printer 1. Large connector • The camera does not draw USB power over the USB cable. To set up the... camera before connecting. Connecting Directly to a PictBridge Compatible Printer You can result in the illustration....

Owners Manual
Page 105
... in poor communication or malfunction. • Note that the 6 mark on the camera is aligned with a Computer Turn on the camera and press [MENU]. 2. Make sure the camera's battery is fully inserted, you feel it to the camera. Large connector • The camera does not draw power over the USB cable. Failure to your computer. On...
... in poor communication or malfunction. • Note that the 6 mark on the camera is aligned with a Computer Turn on the camera and press [MENU]. 2. Make sure the camera's battery is fully inserted, you feel it to the camera. Large connector • The camera does not draw power over the USB cable. Failure to your computer. On...
Owners Manual
Page 115
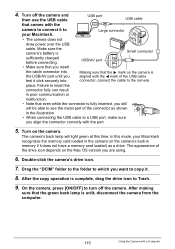
...of the connector as a drive. The camera's back lamp will be able to Trash. 9. Turn off the camera. Make sure the camera's battery is unlit, disconnect the camera from the computer. 115 Using the Camera with the 4 mark of the drive icon depends on the camera. Turn on the Mac OS version ...sure you feel it click securely into Making sure that comes with the port. 5. Large connector • The camera does not draw power over the USB cable. Double-click the camera's drive icon. 7. 4. USB/AV port • Make sure that you insert the cable connector into the ...
...of the connector as a drive. The camera's back lamp will be able to Trash. 9. Turn off the camera. Make sure the camera's battery is unlit, disconnect the camera from the computer. 115 Using the Camera with the 4 mark of the drive icon depends on the camera. Turn on the Mac OS version ...sure you feel it click securely into Making sure that comes with the port. 5. Large connector • The camera does not draw power over the USB cable. Double-click the camera's drive icon. 7. 4. USB/AV port • Make sure that you insert the cable connector into the ...
Owners Manual
Page 130
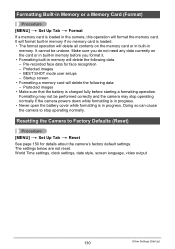
Pre-recorded face data for details about the camera's factory default settings. Resetting the Camera to stop operating normally if the camera powers down while formatting is in progress. • Never open the battery cover while formatting is in memory. Formatting Built-in Memory or a Memory Card (Format... video output 130 Other Settings (Set Up) Protected images • Make sure that the battery is loaded. • The format operation will delete the following data. - Doing so can cause the camera to Factory Defaults (Reset) Procedure [MENU] * Set Up Tab * Reset See page...
Pre-recorded face data for details about the camera's factory default settings. Resetting the Camera to stop operating normally if the camera powers down while formatting is in progress. • Never open the battery cover while formatting is in memory. Formatting Built-in Memory or a Memory Card (Format... video output 130 Other Settings (Set Up) Protected images • Make sure that the battery is loaded. • The format operation will delete the following data. - Doing so can cause the camera to Factory Defaults (Reset) Procedure [MENU] * Set Up Tab * Reset See page...
Owners Manual
Page 134
... internal inspection, maintenance, and repair up to explode and creates the risk of the camera after it in a bathroom. 1. Contact your dealer or nearest CASIO authorized service center. . Remove the battery from the camera, taking care to take the camera apart or modify it is raining or snowing, near the ocean or other body of...
... internal inspection, maintenance, and repair up to explode and creates the risk of the camera after it in a bathroom. 1. Contact your dealer or nearest CASIO authorized service center. . Remove the battery from the camera, taking care to take the camera apart or modify it is raining or snowing, near the ocean or other body of...
Owners Manual
Page 135
..., creating the risk of personal injury. . Do not expose the battery to charge the battery. Make sure the battery is present - Use with a CASIO Digital Camera only. Never disassemble the battery, pierce it with items that data can damage the battery, and cause deterioration of its performance and loss of camera malfunction, repair, etc. . Doing so can result in...
..., creating the risk of personal injury. . Do not expose the battery to charge the battery. Make sure the battery is present - Use with a CASIO Digital Camera only. Never disassemble the battery, pierce it with items that data can damage the battery, and cause deterioration of its performance and loss of camera malfunction, repair, etc. . Doing so can result in...
Owners Manual
Page 136
... risk of time before using or charging the battery. • If a battery is about to turn off the camera whenever you are not using , charging, or storing a battery, immediately remove it from the camera or charger unit and keep it away from a battery accidentally get into your local CASIO authorized service center. Prolonged contact with clean tap...
... risk of time before using or charging the battery. • If a battery is about to turn off the camera whenever you are not using , charging, or storing a battery, immediately remove it from the camera or charger unit and keep it away from a battery accidentally get into your local CASIO authorized service center. Prolonged contact with clean tap...

Owners Manual
Page 137
... the outdoors on the monitor screen (page 157). To prevent condensation from the bag and open the battery cover for the clock. Data Error Precautions Your digital camera is flashing green after power is moved from the battery. Operating Environment • Operating Temperature: 0 to 40°C (32 to 104°F) • Operating Humidity: 10...
... the outdoors on the monitor screen (page 157). To prevent condensation from the bag and open the battery cover for the clock. Data Error Precautions Your digital camera is flashing green after power is moved from the battery. Operating Environment • Operating Temperature: 0 to 40°C (32 to 104°F) • Operating Humidity: 10...

Owners Manual
Page 138
... distortion in certain types of the camera. . Lens • Never apply too much force when cleaning the surface of the battery. • Do not try to take the battery apart. 138 Appendix Caring for your fingers. Old Rechargeable Battery Handling Precautions • Insulate the ...positive and negative terminals with your camera • Never touch the lens or flash ...
... distortion in certain types of the camera. . Lens • Never apply too much force when cleaning the surface of the battery. • Do not try to take the battery apart. 138 Appendix Caring for your fingers. Old Rechargeable Battery Handling Precautions • Insulate the ...positive and negative terminals with your camera • Never touch the lens or flash ...

Owners Manual
Page 142
...check to a temperature where charging can be performed because ambient temperature or the temperature of the camera. 2. After the battery pops out, pull it could mean that the power cord is loaded in the illustration. Stopper 142 Appendix ... too cold. If contacts become dirty, wipe them clean with a dry cloth. To replace the battery 1. Load a new battery. Wait until the camera returns to occur after you perform the above steps, it the rest of the way out of ...] lamp does not light red... If the [CHARGE] lamp flashes red... Contact your nearest CASIO authorized service center.
...check to a temperature where charging can be performed because ambient temperature or the temperature of the camera. 2. After the battery pops out, pull it could mean that the power cord is loaded in the illustration. Stopper 142 Appendix ... too cold. If contacts become dirty, wipe them clean with a dry cloth. To replace the battery 1. Load a new battery. Wait until the camera returns to occur after you perform the above steps, it the rest of the way out of ...] lamp does not light red... If the [CHARGE] lamp flashes red... Contact your nearest CASIO authorized service center.

Owners Manual
Page 143
... each country or geographic area. Outside this temperature range charging can cause deterioration of battery characteristics. Using the Camera in your destination(s). • Do not connect the charger to the battery going dead. 143 Appendix Doing so can discharge and go dead, which will require...place (20°C (68°F) or lower). Battery Precautions . A battery left in the range of the battery, not the camera. • Charge the battery in an area where the temperature is designed for operation with any power supply in the camera can lead to 240V AC, 50/60Hz. Before taking...
... each country or geographic area. Outside this temperature range charging can cause deterioration of battery characteristics. Using the Camera in your destination(s). • Do not connect the charger to the battery going dead. 143 Appendix Doing so can discharge and go dead, which will require...place (20°C (68°F) or lower). Battery Precautions . A battery left in the range of the battery, not the camera. • Charge the battery in an area where the temperature is designed for operation with any power supply in the camera can lead to 240V AC, 50/60Hz. Before taking...


