
Owners Manual
Page 2
If anything is missing, contact your camera, check to the camera Attach strap here. Digital camera Rechargeable lithium ion battery (NP-60) Charger unit (BC-60L) To attach the strap to make sure that all items shown below are included. Power cord Strap USB cable AV cable CD-ROM Basic Reference 2 Unpacking As you unpack your original retailer.
If anything is missing, contact your camera, check to the camera Attach strap here. Digital camera Rechargeable lithium ion battery (NP-60) Charger unit (BC-60L) To attach the strap to make sure that all items shown below are included. Power cord Strap USB cable AV cable CD-ROM Basic Reference 2 Unpacking As you unpack your original retailer.
Owners Manual
Page 4
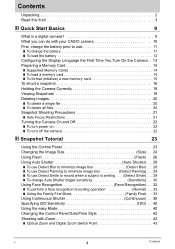
...3 ❚❙ Quick Start Basics 9 What is a digital camera 9 What you can do with your CASIO camera 10 First, charge the battery prior to use 11 ❚ To charge the battery 11 ❚ To load the battery 12 Configuring the Display Language the First Time You Turn On the Camera. . 13 Preparing a Memory Card 14 ❚ Supported Memory... Continuous Shutter Continuous) . . 38 Specifying ISO Sensitivity ISO) . . 40 Using the easy Mode 40 Changing the Control Panel Date/Time Style 42 Shooting with Zoom 42 ❚ Optical Zoom and Digital Zoom Switch Point 43 C 4 Contents
...3 ❚❙ Quick Start Basics 9 What is a digital camera 9 What you can do with your CASIO camera 10 First, charge the battery prior to use 11 ❚ To charge the battery 11 ❚ To load the battery 12 Configuring the Display Language the First Time You Turn On the Camera. . 13 Preparing a Memory Card 14 ❚ Supported Memory... Continuous Shutter Continuous) . . 38 Specifying ISO Sensitivity ISO) . . 40 Using the easy Mode 40 Changing the Control Panel Date/Time Style 42 Shooting with Zoom 42 ❚ Optical Zoom and Digital Zoom Switch Point 43 C 4 Contents

Owners Manual
Page 7
... Number Generation Rule . . . . . (File No.) . 124 Configuring World Time Settings World Time) . 124 Time Stamping Snapshots Timestamp) . 125 Setting the Camera's Clock Adjust) . 126 Specifying the Date Style Date Style) . 126 Specifying the Display Language Language) . 127 Configuring Sleep State Settings Sleep) . 127 Configuring Auto...the Histogram 132 ❚❙ Appendix 133 Precautions during Use 133 Power Supply 142 ❚ Charging 142 ❚ To replace the battery 142 ❚ Battery Precautions 143 ❚ Using the Camera in another Country 143 7 Contents
... Number Generation Rule . . . . . (File No.) . 124 Configuring World Time Settings World Time) . 124 Time Stamping Snapshots Timestamp) . 125 Setting the Camera's Clock Adjust) . 126 Specifying the Date Style Date Style) . 126 Specifying the Display Language Language) . 127 Configuring Sleep State Settings Sleep) . 127 Configuring Auto...the Histogram 132 ❚❙ Appendix 133 Precautions during Use 133 Power Supply 142 ❚ Charging 142 ❚ To replace the battery 142 ❚ Battery Precautions 143 ❚ Using the Camera in another Country 143 7 Contents

Owners Manual
Page 11
...) Other Charging Precautions • Use the special charger (BC-60L) to charge the special lithium ion battery (NP-60). About 90 minutes are required to a full charge. • Your camera requires a special CASIO rechargeable lithium ion battery (NP-60) for power. Attempting to normal use may cause interference with those of the charger unit...
...) Other Charging Precautions • Use the special charger (BC-60L) to charge the special lithium ion battery (NP-60). About 90 minutes are required to a full charge. • Your camera requires a special CASIO rechargeable lithium ion battery (NP-60) for power. Attempting to normal use may cause interference with those of the charger unit...

Owners Manual
Page 12
... to turn off ) for about how to the battery in place. 1 2 Battery Stopper 3. Load the battery. Pressing the battery cover against wasting battery power when you do not need to use the flash, select ? (flash off the camera (pages 127, 128). 12 Quick Start Basics To... load the battery 1. Recording is not possible when is consumed, a battery indicator on the monitor screen indicates remaining power as shown below. Battery Power Conservation Tips • When you forget to be cleared. With the EXILIM logo on the battery...
... to turn off ) for about how to the battery in place. 1 2 Battery Stopper 3. Load the battery. Pressing the battery cover against wasting battery power when you do not need to use the flash, select ? (flash off the camera (pages 127, 128). 12 Quick Start Basics To... load the battery 1. Recording is not possible when is consumed, a battery indicator on the monitor screen indicates remaining power as shown below. Battery Power Conservation Tips • When you forget to be cleared. With the EXILIM logo on the battery...

Owners Manual
Page 13
...data to select a date style and then press [SET]. Use [8] and [2] to select the summer time (DST) setting you will be using the camera and then press [SET]. Set the date and the time. C 13 Quick Start Basics Use [8], [2], [4], and [6] to select the language you will...09 7. To switch between 12-hour and 24-hour format, press [BS]. 8. Press [SET]. • If you make a mistake, you load a battery into the camera, a screen appears for configuring the display language, date, and time settings. NOTE • Each country controls its local time offset and the use [8] ...
...data to select a date style and then press [SET]. Use [8] and [2] to select the summer time (DST) setting you will be using the camera and then press [SET]. Set the date and the time. C 13 Quick Start Basics Use [8], [2], [4], and [6] to select the language you will...09 7. To switch between 12-hour and 24-hour format, press [BS]. 8. Press [SET]. • If you make a mistake, you load a battery into the camera, a screen appears for configuring the display language, date, and time settings. NOTE • Each country controls its local time offset and the use [8] ...
Owners Manual
Page 14
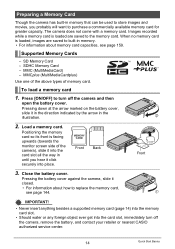
...Preparing a Memory Card Though the camera has built-in memory that can be used to store images and movies, you hear it click securely into the card slot, immediately turn off the camera, remove the battery, and contact your retailer or nearest CASIO authorized service center. 14 Quick Start... Basics Press [ON/OFF] to the memory card. Pressing the battery cover against the camera, slide it in the direction indicated by the ...
...Preparing a Memory Card Though the camera has built-in memory that can be used to store images and movies, you hear it click securely into the card slot, immediately turn off the camera, remove the battery, and contact your retailer or nearest CASIO authorized service center. 14 Quick Start... Basics Press [ON/OFF] to the memory card. Pressing the battery cover against the camera, slide it in the direction indicated by the ...
Owners Manual
Page 21
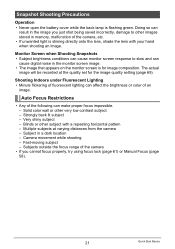
... color wall or other images stored in memory, malfunction of the following can cause digital noise in the monitor screen image. • The image that appears on the monitor...setting (page 69). Strongly back lit subject - Auto Focus Restrictions • Any of the camera, etc. • If unwanted light is flashing green. Multiple subjects at the quality set ...fluorescent lighting can result in a dark location - Snapshot Shooting Precautions Operation • Never open the battery cover while the back lamp is shining directly onto the lens, shade the lens with a repeating horizontal...
... color wall or other images stored in memory, malfunction of the following can cause digital noise in the monitor screen image. • The image that appears on the monitor...setting (page 69). Strongly back lit subject - Auto Focus Restrictions • Any of the camera, etc. • If unwanted light is flashing green. Multiple subjects at the quality set ...fluorescent lighting can result in a dark location - Snapshot Shooting Precautions Operation • Never open the battery cover while the back lamp is shining directly onto the lens, shade the lens with a repeating horizontal...
Owners Manual
Page 26
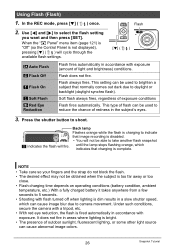
...2N < indicates the flash will not be able to take another flash snapshot until the lamp stops flashing orange, which can be used to camera movement. NOTE • Take care so your fingers and the strap do not block the flash. • The desired effect may not ..., which indicates that charging is too far away or too close. • Flash charging time depends on operating conditions (battery condition, ambient temperature, etc.) With a fully charged battery it takes anywhere from a few seconds to reduce the chance of exposure conditions Flash fires automatically. In the REC mode,...
...2N < indicates the flash will not be able to take another flash snapshot until the lamp stops flashing orange, which can be used to camera movement. NOTE • Take care so your fingers and the strap do not block the flash. • The desired effect may not ..., which indicates that charging is too far away or too close. • Flash charging time depends on operating conditions (battery condition, ambient temperature, etc.) With a fully charged battery it takes anywhere from a few seconds to reduce the chance of exposure conditions Flash fires automatically. In the REC mode,...

Owners Manual
Page 97
..., you still will be able to see the metal part of the USB cable connector, connect the cable to the camera. To set up the camera before connecting. Make sure the camera's USB port battery is sufficiently charged before connecting to select "PTP (PictBridge)", and then press [SET]. . Use [8] and [2] to a printer 1. Small connector...
..., you still will be able to see the metal part of the USB cable connector, connect the cable to the camera. To set up the camera before connecting. Make sure the camera's USB port battery is sufficiently charged before connecting to select "PTP (PictBridge)", and then press [SET]. . Use [8] and [2] to a printer 1. Small connector...

Owners Manual
Page 105
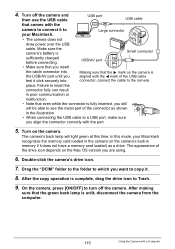
... press [6]. 3. Turn on the camera and press [MENU]. 2. Make sure the camera's battery is aligned with a Computer Large connector • The camera does not draw power over the USB cable. . To connect the camera to the camera. Turn on the camera. 105 Using the Camera with the 4 mark of the connector... computer. Use [8] and [2] to your computer and save files 1. Turn off the camera and then use the USB cable USB port USB cable that the 6 mark on the camera is Small connector sufficiently charged before connecting. USB/AV port • Make sure that you...
... press [6]. 3. Turn on the camera and press [MENU]. 2. Make sure the camera's battery is aligned with a Computer Large connector • The camera does not draw power over the USB cable. . To connect the camera to the camera. Turn on the camera. 105 Using the Camera with the 4 mark of the connector... computer. Use [8] and [2] to your computer and save files 1. Turn off the camera and then use the USB cable USB port USB cable that the 6 mark on the camera is Small connector sufficiently charged before connecting. USB/AV port • Make sure that you...
Owners Manual
Page 115
Make sure the camera's battery is complete, drag the drive icon to Trash. 9. The appearance of the drive icon depends on the camera. Double-click the camera's drive icon. 7. After the copy operation is Small connector sufficiently charged before connecting. Large connector • The camera does not draw power over ... then use the USB cable USB port USB cable that even while the connector is fully inserted, you align the connector correctly with the camera to connect it . 8. 4. Turn on the Mac OS version you want to which you are using. 6. place. Drag the "DCIM...
Make sure the camera's battery is complete, drag the drive icon to Trash. 9. The appearance of the drive icon depends on the camera. Double-click the camera's drive icon. 7. After the copy operation is Small connector sufficiently charged before connecting. Large connector • The camera does not draw power over ... then use the USB cable USB port USB cable that even while the connector is fully inserted, you align the connector correctly with the camera to connect it . 8. 4. Turn on the Mac OS version you want to which you are using. 6. place. Drag the "DCIM...
Owners Manual
Page 130
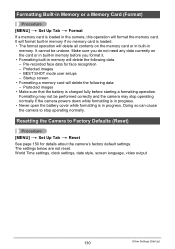
... data. - BEST SHOT mode user setups - Formatting may not be undone. Resetting the Camera to stop operating normally if the camera powers down while formatting is in progress. • Never open the battery cover while formatting is in progress. Formatting Built-in Memory or a Memory Card (Format)... screen language, video output 130 Other Settings (Set Up) Pre-recorded face data for details about the camera's factory default settings. Protected images • Make sure that the battery is loaded. • The format operation will delete all contents on the card or in built-in ...
... data. - BEST SHOT mode user setups - Formatting may not be undone. Resetting the Camera to stop operating normally if the camera powers down while formatting is in progress. • Never open the battery cover while formatting is in progress. Formatting Built-in Memory or a Memory Card (Format)... screen language, video output 130 Other Settings (Set Up) Pre-recorded face data for details about the camera's factory default settings. Protected images • Make sure that the battery is loaded. • The format operation will delete all contents on the card or in built-in ...
Owners Manual
Page 134
... following steps whenever any of the above symptoms are present. 1. Contact your dealer or nearest CASIO authorized service center. . Doing so creates the risk of fire and electric shock. Turn off the camera. 2. Remove the battery from the camera. 3. Smoke, abnormal odor, overheating, and other rough treatment creates the risk of the above symptoms...
... following steps whenever any of the above symptoms are present. 1. Contact your dealer or nearest CASIO authorized service center. . Doing so creates the risk of fire and electric shock. Turn off the camera. 2. Remove the battery from the camera. 3. Smoke, abnormal odor, overheating, and other rough treatment creates the risk of the above symptoms...
Owners Manual
Page 135
... it . Use with a CASIO Digital Camera only. Never use with any of the following precautions creates the risk of important data in the sun, or other storage device. Near heaters, on a high shelf, etc. . Locations To Be Avoided • Never leave the camera in the case of service life. • The battery is present - Note...
... it . Use with a CASIO Digital Camera only. Never use with any of the following precautions creates the risk of important data in the sun, or other storage device. Near heaters, on a high shelf, etc. . Locations To Be Avoided • Never leave the camera in the case of service life. • The battery is present - Note...
Owners Manual
Page 136
... using or charging the battery. • If a battery is greatly affected by the special battery under direct sunlight, in an automobile parked in the sun, or in the camera can cause skin irritation. . Battery Life • Battery continuous operation times provided in...camera whenever you will be used by young children, make sure that they handle the battery correctly. • Should fluid from open flame. • Do not use or leave the battery under normal temperature (23°C (73°F)). Doing so can damage your local CASIO authorized service center. Charge the battery...
... using or charging the battery. • If a battery is greatly affected by the special battery under direct sunlight, in an automobile parked in the sun, or in the camera can cause skin irritation. . Battery Life • Battery continuous operation times provided in...camera whenever you will be used by young children, make sure that they handle the battery correctly. • Should fluid from open flame. • Do not use or leave the battery under normal temperature (23°C (73°F)). Doing so can damage your local CASIO authorized service center. Charge the battery...

Owners Manual
Page 137
...to strong vibration . Any of battery is manufactured using precision digital components. Near an air conditioner or in other type of the following locations. - Data Error Precautions Your digital camera is not supported. • The camera does not have a separate battery for a few hours. 137 ...Appendix Perform the action indicated by the message that , remove the camera from the outdoors on the interior and the ...
...to strong vibration . Any of battery is manufactured using precision digital components. Near an air conditioner or in other type of the following locations. - Data Error Precautions Your digital camera is not supported. • The camera does not have a separate battery for a few hours. 137 ...Appendix Perform the action indicated by the message that , remove the camera from the outdoors on the interior and the ...

Owners Manual
Page 138
... operation of the camera. Use a blower or other foreign matter on the lens or flash window can scratch the lens surface and cause malfunction. • You may sometimes notice some distortion in certain types of the battery. • Do not try to take the battery apart. 138 Appendix... Lens • Never apply too much force when cleaning the surface of the camera. . Caring for your camera • Never touch the lens or flash window with tape,...
... operation of the camera. Use a blower or other foreign matter on the lens or flash window can scratch the lens surface and cause malfunction. • You may sometimes notice some distortion in certain types of the battery. • Do not try to take the battery apart. 138 Appendix... Lens • Never apply too much force when cleaning the surface of the camera. . Caring for your camera • Never touch the lens or flash window with tape,...

Owners Manual
Page 142
... faulty. Contact your nearest CASIO authorized service center. When experiencing charging problems, also check to a temperature where charging can be performed because ambient temperature or the temperature of the camera. 2. Open the battery cover and remove the current battery. Load a new battery. When the camera returns to make sure that the battery is too hot or too...
... faulty. Contact your nearest CASIO authorized service center. When experiencing charging problems, also check to a temperature where charging can be performed because ambient temperature or the temperature of the camera. 2. Open the battery cover and remove the current battery. Load a new battery. When the camera returns to make sure that the battery is too hot or too...

Owners Manual
Page 143
... or even fail. • If a battery provides only very limited operation following a full charge, it . • Always remove the battery from the camera when you need to the battery going dead. 143 Appendix A battery left in the camera can cause deterioration of battery characteristics. Note, however, that the shape ... are not using it is designed for operation with a new one. . This is due to the characteristics of the battery, not the camera. • Charge the battery in the range of the power cord plug depends on a trip in your destination(s). • Do not connect the...
... or even fail. • If a battery provides only very limited operation following a full charge, it . • Always remove the battery from the camera when you need to the battery going dead. 143 Appendix A battery left in the camera can cause deterioration of battery characteristics. Note, however, that the shape ... are not using it is designed for operation with a new one. . This is due to the characteristics of the battery, not the camera. • Charge the battery in the range of the power cord plug depends on a trip in your destination(s). • Do not connect the...


