Owners Manual
Page 2
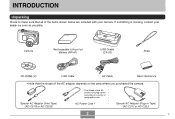
AC Power Cord * Special AC Adaptor (Plug-in Type) (AD-C51J or AD-C52J) 2 B Camera Rechargeable Lithium Ion Battery (NP-40) USB Cradle (CA-26) Strap CD-ROMs (2) USB Cable AV Cable Basic Reference • Note that all of the items shown below are included with your dealer ...as soon as possible. If something is missing, contact your camera. Special AC Adaptor (Inlet Type) (AD-C51G or AD...
AC Power Cord * Special AC Adaptor (Plug-in Type) (AD-C51J or AD-C52J) 2 B Camera Rechargeable Lithium Ion Battery (NP-40) USB Cradle (CA-26) Strap CD-ROMs (2) USB Cable AV Cable Basic Reference • Note that all of the items shown below are included with your dealer ...as soon as possible. If something is missing, contact your camera. Special AC Adaptor (Inlet Type) (AD-C51G or AD...
Owners Manual
Page 3
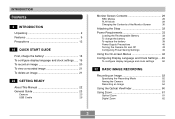
... record an image 20 To view a recorded image 21 To delete an image 21 22 GETTING READY About This Manual 22 General Guide 23 Camera 23 USB Cradle 25 Monitor Screen Contents 26 REC Modes 26 PLAY Mode 29 Changing the Contents of the Monitor Screen 30 Attaching the Strap 32 Power... Settings ... 49 To configure display language and clock settings 50 52 BASIC IMAGE RECORDING Recording an Image 52 Specifying the Recording Mode 52 Aiming the Camera 53 Recording an Image 54 Using the Optical Viewfinder 60 Using Zoom 61 Optical Zoom 61 Digital Zoom 62 3
... record an image 20 To view a recorded image 21 To delete an image 21 22 GETTING READY About This Manual 22 General Guide 23 Camera 23 USB Cradle 25 Monitor Screen Contents 26 REC Modes 26 PLAY Mode 29 Changing the Contents of the Monitor Screen 30 Attaching the Strap 32 Power... Settings ... 49 To configure display language and clock settings 50 52 BASIC IMAGE RECORDING Recording an Image 52 Specifying the Recording Mode 52 Aiming the Camera 53 Recording an Image 54 Using the Optical Viewfinder 60 Using Zoom 61 Optical Zoom 61 Digital Zoom 62 3

Owners Manual
Page 9
... enjoyment, unauthorized copying of snapshot files, movie files, and audio files violates copyright laws and international contracts. I LCD Panel The LCD panel is on the cradle (page 149). • REC mode or PLAY mode power up (page 43) Press [ ] (REC) or [ ] (PLAY) to turn on or ... recording and playback between charges. • Bundled with a USB Cradle The bundled USB cradle can be used to charge the camera's battery (page 34), to view images on the camera and enter the mode you view images while the camera is a product of the latest LCD manufacturing technology that less than...
... enjoyment, unauthorized copying of snapshot files, movie files, and audio files violates copyright laws and international contracts. I LCD Panel The LCD panel is on the cradle (page 149). • REC mode or PLAY mode power up (page 43) Press [ ] (REC) or [ ] (PLAY) to turn on or ... recording and playback between charges. • Bundled with a USB Cradle The bundled USB cradle can be used to charge the camera's battery (page 34), to view images on the camera and enter the mode you view images while the camera is a product of the latest LCD manufacturing technology that less than...
Owners Manual
Page 15
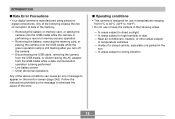
.... In areas subject to high humidity or dust - Removing the battery or memory card, or setting the camera onto the USB cradle while the camera is being performed - Low battery power - I Data Error Precautions • Your digital camera is manufactured using precision digital components. In areas subject to strong vibration 15 INTRODUCTION I Operating conditions • This...
.... In areas subject to high humidity or dust - Removing the battery or memory card, or setting the camera onto the USB cradle while the camera is being performed - Low battery power - I Data Error Precautions • Your digital camera is manufactured using precision digital components. In areas subject to strong vibration 15 INTRODUCTION I Operating conditions • This...
Owners Manual
Page 16
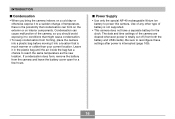
...and time settings of temperature, there is the possibility that is not supported. • This camera does not have a separate battery for a few hours. Be sure to power this camera. Leave it in the plastic bag until the air inside the bag has a chance to ...camera indoors on interior components. Condensation can form on the exterior or on a cold day or otherwise expose it into a location that condensation can cause malfunction of battery is much warmer or colder than your current location. If condensation does form, remove the battery from both the battery and USB cradle...
...and time settings of temperature, there is the possibility that is not supported. • This camera does not have a separate battery for a few hours. Be sure to power this camera. Leave it in the plastic bag until the air inside the bag has a chance to ...camera indoors on interior components. Condensation can form on the exterior or on a cold day or otherwise expose it into a location that condensation can cause malfunction of battery is much warmer or colder than your current location. If condensation does form, remove the battery from both the battery and USB cradle...
Owners Manual
Page 18
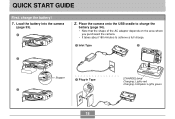
QUICK START GUIDE QUICK START GUIDE First, charge the battery! 1. Load the battery into the camera (page 33). 1 2. Place the camera onto the USB cradle to charge the battery (page 34). • Note that the shape of the AC adaptor depends on the area where you purchased the camera. • It takes about 180 minutes to achieve a full charge. 1 Inlet Type 2 2 Stopper 1 Plug-in Type [CHARGE] lamp Charging: Lights red Charging Complete: Lights green 3 18
QUICK START GUIDE QUICK START GUIDE First, charge the battery! 1. Load the battery into the camera (page 33). 1 2. Place the camera onto the USB cradle to charge the battery (page 34). • Note that the shape of the AC adaptor depends on the area where you purchased the camera. • It takes about 180 minutes to achieve a full charge. 1 Inlet Type 2 2 Stopper 1 Plug-in Type [CHARGE] lamp Charging: Lights red Charging Complete: Lights green 3 18
Owners Manual
Page 25
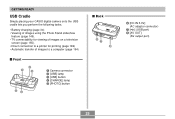
GETTING READY USB Cradle Simply placing your CASIO digital camera onto the USB cradle lets you perform the following tasks. • Battery charging (page 34) • Viewing of images using the Photo Stand slideshow feature (page 149). • TV... a television screen (page 155). • Direct connection to a printer for printing (page 189) • Automatic transfer of images to a computer (page 194) I Front 2 13 54 1 Camera connector 2 [USB] lamp 3 [USB] button 4 [CHARGE] lamp 5 [PHOTO] button I Back 67 8 6 [DC IN 5.3V] (AC adaptor connector) 7 [ ] (USB port) 8 [AV OUT] (AV output port)...
GETTING READY USB Cradle Simply placing your CASIO digital camera onto the USB cradle lets you perform the following tasks. • Battery charging (page 34) • Viewing of images using the Photo Stand slideshow feature (page 149). • TV... a television screen (page 155). • Direct connection to a printer for printing (page 189) • Automatic transfer of images to a computer (page 194) I Front 2 13 54 1 Camera connector 2 [USB] lamp 3 [USB] button 4 [CHARGE] lamp 5 [PHOTO] button I Back 67 8 6 [DC IN 5.3V] (AC adaptor connector) 7 [ ] (USB port) 8 [AV OUT] (AV output port)...

Owners Manual
Page 34
... the first time after purchasing it in the direction indicated by the arrow. Use of any other type of the USB cradle, and then plug it . You need to power this camera. To charge the battery 1. GETTING READY 3. Connect the bundled AC adaptor to the [DC IN 5.3V] connector of battery is... not fully charged when you use the camera for the first time. The battery is not supported. Swing the battery cover closed, and then slide it in to a household power outlet. • Note...
... the first time after purchasing it in the direction indicated by the arrow. Use of any other type of the USB cradle, and then plug it . You need to power this camera. To charge the battery 1. GETTING READY 3. Connect the bundled AC adaptor to the [DC IN 5.3V] connector of battery is... not fully charged when you use the camera for the first time. The battery is not supported. Swing the battery cover closed, and then slide it in to a household power outlet. • Note...

Owners Manual
Page 35
... area. • Never use the AC adaptor with a voltage converter. Set the camera onto the USB cradle. • Do not place the camera onto the USB cradle while it is turned on. • The [CHARGE] lamp on the USB cradle should turn green. [CHARGE] lamp • It takes about 180 minutes to 240V... of the other ones that comes with the camera, or purchase a commercially available AC power cord that is designed for operation with any power supply in the range of the power cord plug varies according to country or geographic area. AC Adaptor USB Cradle [DC IN 5.3V] NOTE • The...
... area. • Never use the AC adaptor with a voltage converter. Set the camera onto the USB cradle. • Do not place the camera onto the USB cradle while it is turned on. • The [CHARGE] lamp on the USB cradle should turn green. [CHARGE] lamp • It takes about 180 minutes to 240V... of the other ones that comes with the camera, or purchase a commercially available AC power cord that is designed for operation with any power supply in the range of the power cord plug varies according to country or geographic area. AC Adaptor USB Cradle [DC IN 5.3V] NOTE • The...

Owners Manual
Page 36
... use any other charging device. • Use only the bundled AC adaptor. If this camera. • Make sure that can be caused by any of the following: a problem with the USB cradle, a problem with the camera, or a problem with this happens, simply wait until the battery reaches normal temperature. An...AD-C40, AD-C620 and AD-C630 AC adaptors with the battery or how it is complete, remove the camera from the USB cradle and see if it means that comes with the camera or the optionally available charger (BC-30L) to the allowable charging temperature range. • If the [CHARGE...
... use any other charging device. • Use only the bundled AC adaptor. If this camera. • Make sure that can be caused by any of the following: a problem with the USB cradle, a problem with the camera, or a problem with this happens, simply wait until the battery reaches normal temperature. An...AD-C40, AD-C620 and AD-C630 AC adaptors with the battery or how it is complete, remove the camera from the USB cradle and see if it means that comes with the camera or the optionally available charger (BC-30L) to the allowable charging temperature range. • If the [CHARGE...

Owners Manual
Page 37
... with how the battery is connected securely to the power outlet and USB cradle. • If the same symptoms occur again when you place the camera on the USB cradle after taking the above steps, contact a CASIO authorized service center. They do not guarantee that the AC adaptor's power ...Apporoximate Battery Life 325 shots (160 minutes) 740 shots (190 minutes) 410 minutes 170 minutes 410 minutes 37 Remove the battery from the camera and check the battery contacts for dirt. Low temperatures and continued use reduce battery life. GETTING READY I Battery Life Guidelines The battery life ...
... with how the battery is connected securely to the power outlet and USB cradle. • If the same symptoms occur again when you place the camera on the USB cradle after taking the above steps, contact a CASIO authorized service center. They do not guarantee that the AC adaptor's power ...Apporoximate Battery Life 325 shots (160 minutes) 740 shots (190 minutes) 410 minutes 170 minutes 410 minutes 37 Remove the battery from the camera and check the battery contacts for dirt. Low temperatures and continued use reduce battery life. GETTING READY I Battery Life Guidelines The battery life ...

Owners Manual
Page 40
NOTE • The term "battery" in this camera. - Never use any other than this manual refers to the CASIO NP-40 Rechargeable Lithium Ion Battery. • Use only the USB cradle (CA-26) that can conduct electricity (necklaces, pencil lead, etc.) - Never use or leave the battery under direct sunlight, in an... time. Never place the battery in fresh water or salt water. - Never carry or store the battery together with items that comes with the camera or the optionally available charger (BC-30L) to intense heat. - Never try to take the battery apart, modify it to charge the special ...
NOTE • The term "battery" in this camera. - Never use any other than this manual refers to the CASIO NP-40 Rechargeable Lithium Ion Battery. • Use only the USB cradle (CA-26) that can conduct electricity (necklaces, pencil lead, etc.) - Never use or leave the battery under direct sunlight, in an... time. Never place the battery in fresh water or salt water. - Never carry or store the battery together with items that comes with the camera or the optionally available charger (BC-30L) to intense heat. - Never try to take the battery apart, modify it to charge the special ...

Owners Manual
Page 41
... and the instructions that come with the optional charger before using , charging, or storing a battery, immediately remove it from the camera or charger, and keep it off with thinner, benzene, alcohol, or other battery abnormality • If the battery does not ...charging to 95°F). Battery discoloration - Battery deformation - Prolonged contact with the camera or the specified optional charger to malfunction. 41 Charging outside this CASIO digital camera only. • Use only the USB cradle that the battery has reached the end of its service life. Fluid leaking -...
... and the instructions that come with the optional charger before using , charging, or storing a battery, immediately remove it from the camera or charger, and keep it off with thinner, benzene, alcohol, or other battery abnormality • If the battery does not ...charging to 95°F). Battery discoloration - Battery deformation - Prolonged contact with the camera or the specified optional charger to malfunction. 41 Charging outside this CASIO digital camera only. • Use only the USB cradle that the battery has reached the end of its service life. Fluid leaking -...

Owners Manual
Page 42
...lead to severe bending, twisting, or pulling. G USING THE BATTERY • See page 34 of fire or electric shock. I USB Cradle and AC Adaptor Precautions Caution! • Never use . • Store the battery in a cool, dry place (20°C (... charger for information about charging procedures and charging times. • When transporting a battery, keep it away from the camera when you do not place heavy objects on the AC adaptor. A battery left in its case. GETTING READY G...shock. • Never touch the AC adaptor while your dealer or nearest CASIO authorized service center.
...lead to severe bending, twisting, or pulling. G USING THE BATTERY • See page 34 of fire or electric shock. I USB Cradle and AC Adaptor Precautions Caution! • Never use . • Store the battery in a cool, dry place (20°C (... charger for information about charging procedures and charging times. • When transporting a battery, keep it away from the camera when you do not place heavy objects on the AC adaptor. A battery left in its case. GETTING READY G...shock. • Never touch the AC adaptor while your dealer or nearest CASIO authorized service center.

Owners Manual
Page 43
... not place a vase or any other container filled with water. To enter this mode at startup: REC PLAY Press this button to turn on the camera: Power button or [ ] (REC) [ ] (PLAY) Power button Green operation lamp [ ] (PLAY) [ ] (REC) 43 This is normal and does not indicate ...malfunction. • Unplug the AC power cord from the USB cradle before connecting or disconnecting the AC adaptor. • Charging, USB data communication, and using it will turn on the camera Press the power button, [ ] (REC) or [ ] (PLAY). Water creates the risk ...
... not place a vase or any other container filled with water. To enter this mode at startup: REC PLAY Press this button to turn on the camera: Power button or [ ] (REC) [ ] (PLAY) Power button Green operation lamp [ ] (PLAY) [ ] (REC) 43 This is normal and does not indicate ...malfunction. • Unplug the AC power cord from the USB cradle before connecting or disconnecting the AC adaptor. • Charging, USB data communication, and using it will turn on the camera Press the power button, [ ] (REC) or [ ] (PLAY). Water creates the risk ...

Owners Manual
Page 46
While a movie is connected to a computer or some other device through the USB cradle - Power button [ ][ ] 46 During Past Movie standby Using the On-screen Menus Pressing [MENU] displays menus on whether you are disabled in a REC mode or ...). • If you can use to enter the PLAY mode instead, press [ ] (PLAY). While playing back a voice recording file - During Short Movie standby - When the camera is being recorded - While a slideshow is in a REC mode. 1. The menu that appears depends on the monitor screen that you want to perform various operations...
While a movie is connected to a computer or some other device through the USB cradle - Power button [ ][ ] 46 During Past Movie standby Using the On-screen Menus Pressing [MENU] displays menus on whether you are disabled in a REC mode or ...). • If you can use to enter the PLAY mode instead, press [ ] (PLAY). While playing back a voice recording file - During Short Movie standby - When the camera is being recorded - While a slideshow is in a REC mode. 1. The menu that appears depends on the monitor screen that you want to perform various operations...
Owners Manual
Page 49
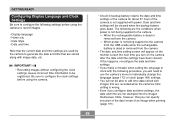
...date and time settings. • If you make a mistake when setting the language or clock with the following procedure, you will need to use the camera's menu to individually change the language (page 173) or clock (page 169) settings. • You will not be able to edit time data stored... the date and time settings have been cleared. When the rechargeable battery is not being supplied to the camera from the USB cradle while the rechargeable battery is dead or removed from the camera - Note, however, that are stored along with image data, etc. The following are not stamped into the ...
...date and time settings. • If you make a mistake when setting the language or clock with the following procedure, you will need to use the camera's menu to individually change the language (page 173) or clock (page 169) settings. • You will not be able to edit time data stored... the date and time settings have been cleared. When the rechargeable battery is not being supplied to the camera from the USB cradle while the rechargeable battery is dead or removed from the camera - Note, however, that are stored along with image data, etc. The following are not stamped into the ...
Owners Manual
Page 58
...digital noise (graininess) to appear in file memory and even lead to the memory card. • Fluorescent lighting actually flickers at a frequency that cannot be lost, it directly at the subject's eyes. I Recording Precautions • Never open the battery cover or place the camera onto the USB cradle... while the green operation lamp is selected for the ISO sensitivity setting (page 125), the camera increases sensitivity and uses a faster shutter speed. This can also corrupt images ...
...digital noise (graininess) to appear in file memory and even lead to the memory card. • Fluorescent lighting actually flickers at a frequency that cannot be lost, it directly at the subject's eyes. I Recording Precautions • Never open the battery cover or place the camera onto the USB cradle... while the green operation lamp is selected for the ISO sensitivity setting (page 125), the camera increases sensitivity and uses a faster shutter speed. This can also corrupt images ...
Owners Manual
Page 149
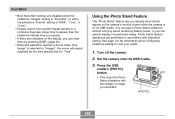
...operations are indicators on its USB cradle. Set the camera onto the USB cradle. 3. Press the USB cradle's [PHOTO] button. • This starts the Photo Stand slideshow with slideshow setting. Turn off the camera. 2. PLAYBACK • Note ...that effect settings are disabled when the slideshow "Images" setting is "Favorites", or when the slideshow "Interval" setting is "MAX", "1 sec", or "2 sec". • Images copied from another digital camera...
...operations are indicators on its USB cradle. Set the camera onto the USB cradle. 3. Press the USB cradle's [PHOTO] button. • This starts the Photo Stand slideshow with slideshow setting. Turn off the camera. 2. PLAYBACK • Note ...that effect settings are disabled when the slideshow "Images" setting is "Favorites", or when the slideshow "Interval" setting is "MAX", "1 sec", or "2 sec". • Images copied from another digital camera...

Owners Manual
Page 155
... images on the TV and select its video input mode. 5. Connect one end of the AV cable that comes with the camera to the [AV OUT] port of the USB cradle, and the other end to the video input terminal of the TV. • Connect the yellow plug of the AV cable... to the TV's audio input (white) terminal. Turn off the camera. 3. Set the camera onto the USB cradle. 4. AV cable TV Video input terminal [AV OUT] (AV output port) 2. Turn on a TV screen. Now when you perform an image display...
... images on the TV and select its video input mode. 5. Connect one end of the AV cable that comes with the camera to the [AV OUT] port of the USB cradle, and the other end to the video input terminal of the TV. • Connect the yellow plug of the AV cable... to the TV's audio input (white) terminal. Turn off the camera. 3. Set the camera onto the USB cradle. 4. AV cable TV Video input terminal [AV OUT] (AV output port) 2. Turn on a TV screen. Now when you perform an image display...

