Owners Manual
Page 5
... Outline Sharpness 127 Specifying Color Saturation 127 Specifying Contrast 128 Resetting the Camera 128 Using the Shortcut Menu (EX Menu 129 130 PLAYBACK Basic Playback Operation 130 Playing an Audio Snapshot 131 Zooming the Display Image 132 Resizing an Image 133 Cropping an Image 134 ...Adding Audio to a Snapshot 152 To re-record audio 153 Playing Back a Voice Recording File 154 Displaying Camera Images on a TV Screen 155 Selecting the Video Output System 156 158 DELETING FILES Deleting a Single File 158 Deleting All Files 159 160 FILE MANAGEMENT Folders...
... Outline Sharpness 127 Specifying Color Saturation 127 Specifying Contrast 128 Resetting the Camera 128 Using the Shortcut Menu (EX Menu 129 130 PLAYBACK Basic Playback Operation 130 Playing an Audio Snapshot 131 Zooming the Display Image 132 Resizing an Image 133 Cropping an Image 134 ...Adding Audio to a Snapshot 152 To re-record audio 153 Playing Back a Voice Recording File 154 Displaying Camera Images on a TV Screen 155 Selecting the Video Output System 156 158 DELETING FILES Deleting a Single File 158 Deleting All Files 159 160 FILE MANAGEMENT Folders...
Owners Manual
Page 12
.... 12 Software can be upgraded to your computer and create Video CDs. INTRODUCTION • PRINT Image Matching III Compatible (page 192) Images include PRINT Image Matching III data (mode setting and other camera setup information). It also comes with Photohands, and application that... Data Storage (page 208) DCF (Design rule for Camera File system) data storage protocol provides image compatibility between the digital camera and printers. • Bundled with Photo Loader and Photohands (pages 216, 219, 229) Your camera comes bundled with Photo Loader, the popular application that ...
.... 12 Software can be upgraded to your computer and create Video CDs. INTRODUCTION • PRINT Image Matching III Compatible (page 192) Images include PRINT Image Matching III data (mode setting and other camera setup information). It also comes with Photohands, and application that... Data Storage (page 208) DCF (Design rule for Camera File system) data storage protocol provides image compatibility between the digital camera and printers. • Bundled with Photo Loader and Photohands (pages 216, 219, 229) Your camera comes bundled with Photo Loader, the popular application that ...

Owners Manual
Page 155
... recorded images on the TV screen instead of the TV, and the white plug to the video input (yellow) terminal of the camera's monitor screen. 155 Connect one end of the AV cable that comes with the camera to the [AV OUT] port of the USB cradle, and the other end to the... the TV. • Connect the yellow plug of the AV cable to the TV's audio input (white) terminal. AV cable TV Video input terminal [AV OUT] (AV output port) 2. To display camera images on the TV and select its video input mode. 5. Turn on a TV, you perform an image display operation on the...
... recorded images on the TV screen instead of the TV, and the white plug to the video input (yellow) terminal of the camera's monitor screen. 155 Connect one end of the AV cable that comes with the camera to the [AV OUT] port of the USB cradle, and the other end to the... the TV. • Connect the yellow plug of the AV cable to the TV's audio input (white) terminal. AV cable TV Video input terminal [AV OUT] (AV output port) 2. To display camera images on the TV and select its video input mode. 5. Turn on a TV, you perform an image display operation on the...
Owners Manual
Page 156
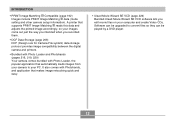
Select the "Set Up" tab, select "Video Out", and then press [̈]. 3. Perform volume level adjustment using TV controls. • After using an optionally available AV cable (EMC2A) to connect the camera's USB cradle connector directly to the AUDIO IN terminal of a TV, you can select either ... Japan, and other areas that use the NTSC system Europe and other areas that the audio output is monaural. • The camera's monitor screen will go blank during video output. • Pressing the USB cradle's [PHOTO] button will activate the Photo Stand feature (page 149) and display images ...
Select the "Set Up" tab, select "Video Out", and then press [̈]. 3. Perform volume level adjustment using TV controls. • After using an optionally available AV cable (EMC2A) to connect the camera's USB cradle connector directly to the AUDIO IN terminal of a TV, you can select either ... Japan, and other areas that use the NTSC system Europe and other areas that the audio output is monaural. • The camera's monitor screen will go blank during video output. • Pressing the USB cradle's [PHOTO] button will activate the Photo Stand feature (page 149) and display images ...

Owners Manual
Page 157
Images will not display properly if you use a TV (monitor) that is designed for a different video input system. 157 B PLAYBACK IMPORTANT! • Images will not display properly if you select the wrong video output system. • This camera supports the NTSC and PAL video input systems only.
Images will not display properly if you use a TV (monitor) that is designed for a different video input system. 157 B PLAYBACK IMPORTANT! • Images will not display properly if you select the wrong video output system. • This camera supports the NTSC and PAL video input systems only.

Owners Manual
Page 167
..."Set Up" tab, select "Sounds", and then press [̈]. 3. Press [MENU]. 2. IMPORTANT! • The volume setting you make here also affects the video output volume level (page 155). Select the "Set Up" tab, select "Sounds", and then press [̈]. 3. Use [̆] and [̄] to select ..." Play". 4. To set the confirmation tone volume level 1. IMPORTANT! • The volume setting you make here does not affect the video output volume level (page 155). 167 Use [̆] and [̄] to select " Operation". 4. OTHER SETTINGS To set the audio volume level for ...
..."Set Up" tab, select "Sounds", and then press [̈]. 3. Press [MENU]. 2. IMPORTANT! • The volume setting you make here also affects the video output volume level (page 155). Select the "Set Up" tab, select "Sounds", and then press [̈]. 3. Use [̆] and [̄] to select ..." Play". 4. To set the confirmation tone volume level 1. IMPORTANT! • The volume setting you make here does not affect the video output volume level (page 155). 167 Use [̆] and [̄] to select " Operation". 4. OTHER SETTINGS To set the audio volume level for ...

Owners Manual
Page 221
...an SD memory card that was recorded with the camera. 3. In the "Video acceleration" area click [Advanced]. 3. USING THE CAMERA WITH A COMPUTER Playing a Movie In order to play a movie recorded with this camera on a PC that can connect to the Internet 1. In the "Legacy video renderer" area, clear the "Use YUV Flipping..." check box. 221 If your PC does not have MPEG-4 codec installed, it will cause the movie file recorded with the camera to start playing the movie as soon as -is not ...
...an SD memory card that was recorded with the camera. 3. In the "Video acceleration" area click [Advanced]. 3. USING THE CAMERA WITH A COMPUTER Playing a Movie In order to play a movie recorded with this camera on a PC that can connect to the Internet 1. In the "Legacy video renderer" area, clear the "Use YUV Flipping..." check box. 221 If your PC does not have MPEG-4 codec installed, it will cause the movie file recorded with the camera to start playing the movie as soon as -is not ...

Owners Manual
Page 223
USING THE CAMERA WITH A COMPUTER G Viewing the Contents of Windows 2000 or 98SE, you need to know when installing the application. 1. Click the "Read me " file contains information ... me" file for "Windows Media Player 9" before installing it. When using an SD memory card that is , without changing its basic settings. - In the "Legacy video renderer" area, clear the "Use YUV Flipping" check box. 223 On the dialog box that appear on your computer screen. Click the "Install" button for...
USING THE CAMERA WITH A COMPUTER G Viewing the Contents of Windows 2000 or 98SE, you need to know when installing the application. 1. Click the "Read me " file contains information ... me" file for "Windows Media Player 9" before installing it. When using an SD memory card that is , without changing its basic settings. - In the "Legacy video renderer" area, clear the "Use YUV Flipping" check box. 223 On the dialog box that appear on your computer screen. Click the "Install" button for...

Owners Manual
Page 232
... / Spot +2 / +1 / 0 / -1 / -2 +2 / +1 / 0 / -1 / -2 +2 / +1 / 0 / -1 / -2 +2 / +1 / 0 / -1 / -2 Auto / Off G Set Up Tab Menu Screen Sounds Startup File No. World Time Adjust Date Style Language Sleep Auto Power Off REC / PLAY USB Video Out Format Reset Bright / Normal Startup / Half Shutter /Shutter / Operation / Operation / Play On (Selectable image) / Off Continue / Reset Home / World Home Time setup (city, DST...
... / Spot +2 / +1 / 0 / -1 / -2 +2 / +1 / 0 / -1 / -2 +2 / +1 / 0 / -1 / -2 +2 / +1 / 0 / -1 / -2 Auto / Off G Set Up Tab Menu Screen Sounds Startup File No. World Time Adjust Date Style Language Sleep Auto Power Off REC / PLAY USB Video Out Format Reset Bright / Normal Startup / Half Shutter /Shutter / Operation / Operation / Play On (Selectable image) / Off Continue / Reset Home / World Home Time setup (city, DST...

