Owners Manual
Page 2
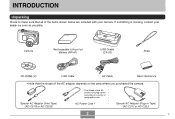
If something is missing, contact your camera. Special AC Adaptor (Inlet Type) (AD-C51G or AD-C52G) * The shape of the AC power cord plug varies according to make sure that the ... are included with your dealer as soon as possible. AC Power Cord * Special AC Adaptor (Plug-in Type) (AD-C51J or AD-C52J) 2 B Camera Rechargeable Lithium Ion Battery (NP-40) USB Cradle (CA-26) Strap CD-ROMs (2) USB Cable AV Cable Basic Reference • Note that all of the AC adaptor depends...
If something is missing, contact your camera. Special AC Adaptor (Inlet Type) (AD-C51G or AD-C52G) * The shape of the AC power cord plug varies according to make sure that the ... are included with your dealer as soon as possible. AC Power Cord * Special AC Adaptor (Plug-in Type) (AD-C51J or AD-C52J) 2 B Camera Rechargeable Lithium Ion Battery (NP-40) USB Cradle (CA-26) Strap CD-ROMs (2) USB Cable AV Cable Basic Reference • Note that all of the AC adaptor depends...
Owners Manual
Page 3
... Contents of the Monitor Screen 30 Attaching the Strap 32 Power Requirements 33 Loading the Rechargeable Battery 33 To charge the battery 34 To replace the battery 39 Power Supply Precautions 40 Turning the Camera On and Off 43 Configuring Power Saving Settings 45 Using the On-screen Menus 46 Configuring... To configure display language and clock settings 50 52 BASIC IMAGE RECORDING Recording an Image 52 Specifying the Recording Mode 52 Aiming the Camera 53 Recording an Image 54 Using the Optical Viewfinder 60 Using Zoom 61 Optical Zoom 61 Digital Zoom 62 3
... Contents of the Monitor Screen 30 Attaching the Strap 32 Power Requirements 33 Loading the Rechargeable Battery 33 To charge the battery 34 To replace the battery 39 Power Supply Precautions 40 Turning the Camera On and Off 43 Configuring Power Saving Settings 45 Using the On-screen Menus 46 Configuring... To configure display language and clock settings 50 52 BASIC IMAGE RECORDING Recording an Image 52 Specifying the Recording Mode 52 Aiming the Camera 53 Recording an Image 54 Using the Optical Viewfinder 60 Using Zoom 61 Optical Zoom 61 Digital Zoom 62 3

Owners Manual
Page 8
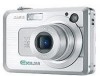
shall not be trademarks or service marks of the EX-Z750. • CASIO COMPUTER CO., LTD. Be sure to back up all copyrights and ...any third party due to CASIO COMPUTER CO., LTD. 8 assumes no responsibility for any damages or losses suffered by you or any damage or loss caused by the screens and configuration of the actual camera. • The SD logo... names used herein may arise through the use of this manual. • CASIO COMPUTER CO., LTD. Except as a result of malfunction, repairs, or battery replacement. assumes no responsibility for any loss or claims by third parties which...
shall not be trademarks or service marks of the EX-Z750. • CASIO COMPUTER CO., LTD. Be sure to back up all copyrights and ...any third party due to CASIO COMPUTER CO., LTD. 8 assumes no responsibility for any damages or losses suffered by you or any damage or loss caused by the screens and configuration of the actual camera. • The SD logo... names used herein may arise through the use of this manual. • CASIO COMPUTER CO., LTD. Except as a result of malfunction, repairs, or battery replacement. assumes no responsibility for any loss or claims by third parties which...

Owners Manual
Page 9
...2.5-inch TFT color LCD monitor screen • 8.3MB flash memory Images can be recorded without using a memory card. • Long battery life A low-power design combines with a large-capacity battery to provide more recording and playback between charges. • Bundled with a USB Cradle The bundled USB cradle can be used to... charge the camera's battery (page 34), to view images on a TV screen (page 155), and to transfer images to third parties of such files over the ...
...2.5-inch TFT color LCD monitor screen • 8.3MB flash memory Images can be recorded without using a memory card. • Long battery life A low-power design combines with a large-capacity battery to provide more recording and playback between charges. • Bundled with a USB Cradle The bundled USB cradle can be used to... charge the camera's battery (page 34), to view images on a TV screen (page 155), and to transfer images to third parties of such files over the ...

Owners Manual
Page 13
... no more smoke coming out of this manual to "camera" refer to the CASIO EX-Z750 Digital Camera. • Never try to the subject's eyes. After making sure there is especially true with young children. Never use the AC adaptor to a CASIO authorized service center. • Never look at the sun.... • Never use any other bright light through the camera's viewfinder. Next, remove the camera's battery and/or unplug the AC adaptor power cord from water and other liquids, and never let it get into the camera, immediately turn it is too close to observe the following ...
... no more smoke coming out of this manual to "camera" refer to the CASIO EX-Z750 Digital Camera. • Never try to the subject's eyes. After making sure there is especially true with young children. Never use the AC adaptor to a CASIO authorized service center. • Never look at the sun.... • Never use any other bright light through the camera's viewfinder. Next, remove the camera's battery and/or unplug the AC adaptor power cord from water and other liquids, and never let it get into the camera, immediately turn it is too close to observe the following ...
Owners Manual
Page 14
...any other image data already stored in its use the camera inside of test images and check the results to ensure that the camera is configured correctly and operating properly. 14 INTRODUCTION •... I Test for proper operation before using the camera to rough treatment, immediately turn it off. Before using the camera! Next, remove the camera's battery and/or unplug the AC adaptor power cord... of this camera can also corrupt other area where its memory to personal computer memory. • Never open the battery cover, disconnect the AC adaptor from the camera, or unplug...
...any other image data already stored in its use the camera inside of test images and check the results to ensure that the camera is configured correctly and operating properly. 14 INTRODUCTION •... I Test for proper operation before using the camera to rough treatment, immediately turn it off. Before using the camera! Next, remove the camera's battery and/or unplug the AC adaptor power cord... of this camera can also corrupt other area where its memory to personal computer memory. • Never open the battery cover, disconnect the AC adaptor from the camera, or unplug...
Owners Manual
Page 15
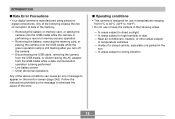
... by the message to direct sunlight - I Data Error Precautions • Your digital camera is manufactured using precision digital components. In areas subject to eliminate the cause of the error. Low battery power - Removing the battery or memory card, or setting the camera onto the USB cradle while the camera is being performed - INTRODUCTION I Operating conditions • This...
... by the message to direct sunlight - I Data Error Precautions • Your digital camera is manufactured using precision digital components. In areas subject to eliminate the cause of the error. Low battery power - Removing the battery or memory card, or setting the camera onto the USB cradle while the camera is being performed - INTRODUCTION I Operating conditions • This...
Owners Manual
Page 16
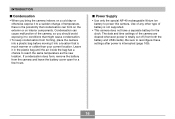
...change of temperature, there is the possibility that is totally cut off (from the camera and leave the battery cover open for the clock. If condensation does form, remove the battery from both the battery and USB cradle). I Condensation • When you should avoid exposing it to ...reconfigure these settings after power is not supported. • This camera does not have a separate battery for a few hours. Leave it into a location that condensation can cause malfunction of the camera, so you bring the camera indoors on interior components. Use of any other type of the...
...change of temperature, there is the possibility that is totally cut off (from the camera and leave the battery cover open for the clock. If condensation does form, remove the battery from both the battery and USB cradle). I Condensation • When you should avoid exposing it to ...reconfigure these settings after power is not supported. • This camera does not have a separate battery for a few hours. Leave it into a location that condensation can cause malfunction of the camera, so you bring the camera indoors on interior components. Use of any other type of the...
Owners Manual
Page 18
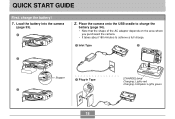
Load the battery into the camera (page 33). 1 2. Place the camera onto the USB cradle to charge the battery (page 34). • Note that the shape of the AC adaptor depends on the area where you purchased the camera. • It takes about 180 minutes to achieve a full charge. 1 Inlet Type 2 2 Stopper 1 Plug-in Type [CHARGE] lamp Charging: Lights red Charging Complete: Lights green 3 18 QUICK START GUIDE QUICK START GUIDE First, charge the battery! 1.
Load the battery into the camera (page 33). 1 2. Place the camera onto the USB cradle to charge the battery (page 34). • Note that the shape of the AC adaptor depends on the area where you purchased the camera. • It takes about 180 minutes to achieve a full charge. 1 Inlet Type 2 2 Stopper 1 Plug-in Type [CHARGE] lamp Charging: Lights red Charging Complete: Lights green 3 18 QUICK START GUIDE QUICK START GUIDE First, charge the battery! 1.
Owners Manual
Page 22
I Button Operations Button operations are indicated by double quotation marks (" "). I Terminology The following table defines the terminology used in this manual: "camera" "file memory" "battery" "charger" Means this: The CASIO EX-Z750 Digital Camera The location where the camera is always enclosed by the button name inside of brackets ([ ]). GETTING READY GETTING READY This section contains information about things...
I Button Operations Button operations are indicated by double quotation marks (" "). I Terminology The following table defines the terminology used in this manual: "camera" "file memory" "battery" "charger" Means this: The CASIO EX-Z750 Digital Camera The location where the camera is always enclosed by the button name inside of brackets ([ ]). GETTING READY GETTING READY This section contains information about things...
Owners Manual
Page 24
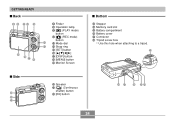
GETTING READY I Back 9 0 AB C I HG F 9 Finder 0 Operation lamp A [ ] (PLAY mode) button B [ ] (REC mode) button D C Mode dial E D Strap ring E [SET] button F G [DISP] button H [MENU] button I Monitor Screen I Side J K L J Speaker K [ ] (Continuous shutter) button L [EX] button R Q P ON 24 M I Bottom M Stopper N Memory card slot O Battery compartment P Battery cover Q Connector R Tripod screw hole * Use this hole when attaching to a tripod.
GETTING READY I Back 9 0 AB C I HG F 9 Finder 0 Operation lamp A [ ] (PLAY mode) button B [ ] (REC mode) button D C Mode dial E D Strap ring E [SET] button F G [DISP] button H [MENU] button I Monitor Screen I Side J K L J Speaker K [ ] (Continuous shutter) button L [EX] button R Q P ON 24 M I Bottom M Stopper N Memory card slot O Battery compartment P Battery cover Q Connector R Tripod screw hole * Use this hole when attaching to a tripod.
Owners Manual
Page 25
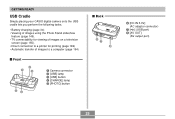
GETTING READY USB Cradle Simply placing your CASIO digital camera onto the USB cradle lets you perform the following tasks. • Battery charging (page 34) • Viewing of images using the Photo Stand slideshow feature (page 149). • TV connectability for viewing of images on a television screen (...
GETTING READY USB Cradle Simply placing your CASIO digital camera onto the USB cradle lets you perform the following tasks. • Battery charging (page 34) • Viewing of images using the Photo Stand slideshow feature (page 149). • TV connectability for viewing of images on a television screen (...

Owners Manual
Page 27
...I Aperture value (pages 28, 56, 87) J ISO sensitivity (page 125) K Zoom indicator (page 62) • Left side indicates optical zoom. • Right side indicates digital zoom. Flash mode, Focus mode, White balance, Selftimer, Metering. - EX menu screen (page 129) image size, white balance, AF area. NOTE • ...1200 pixels 640 × 480 pixels • Movies: Recording time (page 105) A EV value (page 83) B Date and time (page 169) C Battery capacity (page 39) D Histogram (page 117) E Focus frame (page 55) • Focusing complete: Green • Focusing failed: Red NOTE • ...
...I Aperture value (pages 28, 56, 87) J ISO sensitivity (page 125) K Zoom indicator (page 62) • Left side indicates optical zoom. • Right side indicates digital zoom. Flash mode, Focus mode, White balance, Selftimer, Metering. - EX menu screen (page 129) image size, white balance, AF area. NOTE • ...1200 pixels 640 × 480 pixels • Movies: Recording time (page 105) A EV value (page 83) B Date and time (page 169) C Battery capacity (page 39) D Histogram (page 117) E Focus frame (page 55) • Focusing complete: Green • Focusing failed: Red NOTE • ...

Owners Manual
Page 29
... 125) Flash Off 9 Date and time Red-eye reduction (page 169) C REC modes (page 52) 0 Metering mode indicator (page 126) Snapshot BEST SHOT Manual Exposure D Battery capacity (page 39) E Histogram (page 117) F EV value (page 83) 29
... 125) Flash Off 9 Date and time Red-eye reduction (page 169) C REC modes (page 52) 0 Metering mode indicator (page 126) Snapshot BEST SHOT Manual Exposure D Battery capacity (page 39) E Histogram (page 117) F EV value (page 83) 29

Owners Manual
Page 33
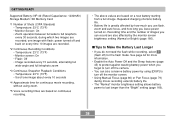
While pulling the stopper in the direction indicated by the arrow, and then swing it open. 2. Arrow marks NP-40 Stopper • Push the bottom of the battery, and make sure that the stopper securely locks the battery in the illustration, align the arrow mark on the battery with the arrow mark on the camera and slide the battery into the camera. Slide the battery cover in the direction indicated by the arrow in place. 33 GETTING READY Power Requirements Your camera is powered by a rechargeable lithium ion battery (NP-40). Loading the Rechargeable Battery 1.
While pulling the stopper in the direction indicated by the arrow, and then swing it open. 2. Arrow marks NP-40 Stopper • Push the bottom of the battery, and make sure that the stopper securely locks the battery in the illustration, align the arrow mark on the battery with the arrow mark on the camera and slide the battery into the camera. Slide the battery cover in the direction indicated by the arrow in place. 33 GETTING READY Power Requirements Your camera is powered by a rechargeable lithium ion battery (NP-40). Loading the Rechargeable Battery 1.

Owners Manual
Page 34
... and then plug it in the direction indicated by the arrow. Swing the battery cover closed, and then slide it . You need to power this camera. To charge the battery 1. GETTING READY 3. The battery is not supported. IMPORTANT! • Use only the special NP-40 rechargeable... lithium ion battery to charge the battery before using the camera for the first time after purchasing it in to ...
... and then plug it in the direction indicated by the arrow. Swing the battery cover closed, and then slide it . You need to power this camera. To charge the battery 1. GETTING READY 3. The battery is not supported. IMPORTANT! • Use only the special NP-40 rechargeable... lithium ion battery to charge the battery before using the camera for the first time after purchasing it in to ...

Owners Manual
Page 35
...the shape of the power cord plug varies according to use the AC adaptor with a voltage converter. Set the camera onto the USB cradle. • Do not place the camera onto the USB cradle while it is up to you plan to country or geographic area. Actual charging time ...AC adaptor in your area, replace the AC power cord with a voltage converter. 2. It is turned on. • The [CHARGE] lamp on current battery capacity and charging conditions. 35 Note, however, that in a geographic area where the power receptacle shape is different from 100V AC to achieve a full charge...
...the shape of the power cord plug varies according to use the AC adaptor with a voltage converter. Set the camera onto the USB cradle. • Do not place the camera onto the USB cradle while it is up to you plan to country or geographic area. Actual charging time ...AC adaptor in your area, replace the AC power cord with a voltage converter. 2. It is turned on. • The [CHARGE] lamp on current battery capacity and charging conditions. 35 Note, however, that in a geographic area where the power receptacle shape is different from 100V AC to achieve a full charge...

Owners Manual
Page 36
...only the USB cradle (CA-26) that comes with this happens, simply wait until the battery reaches normal temperature. Never use optionally available AD-C40, AD-C620 and AD-C630 AC adaptors with the camera or the optionally available charger (BC-30L) to become warm) or when it means that... the camera connector of AC adaptor. An error can be performed while the camera is on the USB cradle are: battery charging, Photo Stand, image output to the allowable charging temperature range. • If the [CHARGE] ...
...only the USB cradle (CA-26) that comes with this happens, simply wait until the battery reaches normal temperature. Never use optionally available AD-C40, AD-C620 and AD-C630 AC adaptors with the camera or the optionally available charger (BC-30L) to become warm) or when it means that... the camera connector of AC adaptor. An error can be performed while the camera is on the USB cradle are: battery charging, Photo Stand, image output to the allowable charging temperature range. • If the [CHARGE] ...

Owners Manual
Page 37
... a CASIO authorized service center. Perform the following steps. 1. They do not guarantee that the AC adaptor's power cord is loaded. Low temperatures and continued use reduce battery life. If the contacts are dirty, wipe them clean with how the battery is connected securely to battery failure. Remove the battery from the camera and check the battery contacts...
... a CASIO authorized service center. Perform the following steps. 1. They do not guarantee that the AC adaptor's power cord is loaded. Low temperatures and continued use reduce battery life. If the contacts are dirty, wipe them clean with how the battery is connected securely to battery failure. Remove the battery from the camera and check the battery contacts...
Owners Manual
Page 38
I Tips to Make the Battery Last Longer • If you do not need the flash while recording, select (flash off) for continuous movie recording, without using [DISP] to turn off the camera. • You can record are recorded, one image about every 10 seconds *4 ...two images are also affected by the monitor screen brightness setting (Normal or Bright) (page 166). Repeated charging shortens battery life. • Battery life is greatly affected by using zoom. *5 Voice recording times are based on continuous recording. • The above values are recorded. *2 Continuous Recording ...
I Tips to Make the Battery Last Longer • If you do not need the flash while recording, select (flash off) for continuous movie recording, without using [DISP] to turn off the camera. • You can record are recorded, one image about every 10 seconds *4 ...two images are also affected by the monitor screen brightness setting (Normal or Bright) (page 166). Repeated charging shortens battery life. • Battery life is greatly affected by using zoom. *5 Voice recording times are based on continuous recording. • The above values are recorded. *2 Continuous Recording ...


