Owners Manual
Page 2
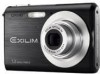
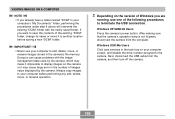
Strap CD-ROM USB Cable AV Cable 2 Basic Reference INTRODUCTION INTRODUCTION Unpacking Check to country or geographic area. Camera Rechargeable Lithium Ion Battery (NP-20) Lithium Ion Battery Charger (BC-11L) AC Power Cord * * The shape of the AC power cord plug varies according to make sure that all of the items shown below are included with your dealer as soon as possible. If something is missing, contact your camera.
Strap CD-ROM USB Cable AV Cable 2 Basic Reference INTRODUCTION INTRODUCTION Unpacking Check to country or geographic area. Camera Rechargeable Lithium Ion Battery (NP-20) Lithium Ion Battery Charger (BC-11L) AC Power Cord * * The shape of the AC power cord plug varies according to make sure that all of the items shown below are included with your dealer as soon as possible. If something is missing, contact your camera.
Owners Manual
Page 14
...). I Test for proper operation before using the camera! Before using precision digital components. Low battery power - INTRODUCTION I Data Error Precautions • Your digital camera is manufactured using the camera to ensure that the camera is configured correctly and operating properly. Other abnormal ... the results to record important images, make sure you turn off the camera - Removing the battery or memory card while the camera is being performed - Disconnecting the USB cable while a data communication operation is performing a record or memory access operation -...
...). I Test for proper operation before using the camera! Before using precision digital components. Low battery power - INTRODUCTION I Data Error Precautions • Your digital camera is manufactured using the camera to ensure that the camera is configured correctly and operating properly. Other abnormal ... the results to record important images, make sure you turn off the camera - Removing the battery or memory card while the camera is being performed - Disconnecting the USB cable while a data communication operation is performing a record or memory access operation -...
Owners Manual
Page 148
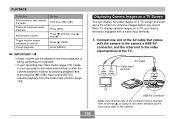
... You can display recorded images on a TV screen and even use [̆] and [̄]. Connect one end of the AV cable that is marked with the camera to the camera's USB/AV connector, and the other end to resume playback from the index mark position (page 108). IMPORTANT! • Audio volume... TV screen to the index mark before you need a television equipped with a video input terminal. 1. Yellow White (Video) (Audio) AV cable Video input terminal 148 TV USB/AV connector Make sure that the side of the connector that comes with an arrow (̆) is paused. • If your recording has...
... You can display recorded images on a TV screen and even use [̆] and [̄]. Connect one end of the AV cable that is marked with the camera to the camera's USB/AV connector, and the other end to resume playback from the index mark position (page 108). IMPORTANT! • Audio volume... TV screen to the index mark before you need a television equipped with a video input terminal. 1. Yellow White (Video) (Audio) AV cable Video input terminal 148 TV USB/AV connector Make sure that the side of the connector that comes with an arrow (̆) is paused. • If your recording has...
Owners Manual
Page 184
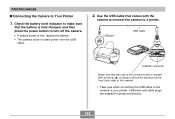
... comes with an arrow (̆) is low, replace the battery. • The camera does not draw power over the USB cable. 2. USB port USB USB cable USB/AV connector Make sure that the side of the camera. • Take care when connecting the USB cable to turn off the camera. • If battery power is facing in the same direction as the...
... comes with an arrow (̆) is low, replace the battery. • The camera does not draw power over the USB cable. 2. USB port USB USB cable USB/AV connector Make sure that the side of the camera. • Take care when connecting the USB cable to turn off the camera. • If battery power is facing in the same direction as the...
Owners Manual
Page 186
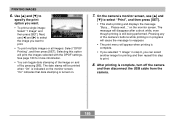
...The message will appear when printing is complete. • If you selected "1 Image" in step 6, you can toggle date stamping of the camera's buttons while printing is in progress will cause the message to reappear. • The print menu will disappear after a short while, even though... To print multiple images or all images: Select "DPOF Printing", and then press [SET]. After printing is indicated on and off the camera and then disconnect the USB cable from the camera. 186 PRINTING IMAGES 6. Use [̆] and [̄] to specify the print option you want . • To print a single ...
...The message will appear when printing is complete. • If you selected "1 Image" in step 6, you can toggle date stamping of the camera's buttons while printing is in progress will cause the message to reappear. • The print menu will disappear after a short while, even though... To print multiple images or all images: Select "DPOF Printing", and then press [SET]. After printing is indicated on and off the camera and then disconnect the USB cable from the camera. 186 PRINTING IMAGES 6. Use [̆] and [̄] to specify the print option you want . • To print a single ...
Owners Manual
Page 187
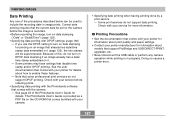
...date printing. Check with your service before the image is provided as a PDF file on an image that comes bundled with your camera. • Specifying date printing when having printing done by a print service - Some print services do not support DPOF printing. Check... has a date/ time stamp embedded on the camera before ordering prints. • Specifying date printing with the Photohands software that support PictBridge and USB DIRECT-PRINT, upgrades, etc. • Never disconnect the USB cable or perform any camera operation while printing is in image prints. See ...
...date printing. Check with your service before the image is provided as a PDF file on an image that comes bundled with your camera. • Specifying date printing when having printing done by a print service - Some print services do not support DPOF printing. Check... has a date/ time stamp embedded on the camera before ordering prints. • Specifying date printing with the Photohands software that support PictBridge and USB DIRECT-PRINT, upgrades, etc. • Never disconnect the USB cable or perform any camera operation while printing is in image prints. See ...
Owners Manual
Page 192
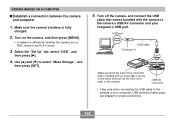
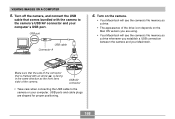
..." tab, select "USB", and then press [̈]. 4. USB port USB cable Connector A Make sure that the side of the camera. Use [̆] and [̄] to the camera or your computer's USB port. USB/AV connector • Take care when connecting the USB cable to select "Mass Storage", and then press [SET]. 5. Turn off the camera, and connect the USB cable that is facing...
..." tab, select "USB", and then press [̈]. 4. USB port USB cable Connector A Make sure that the side of the camera. Use [̆] and [̄] to the camera or your computer's USB port. USB/AV connector • Take care when connecting the USB cable to select "Mass Storage", and then press [SET]. 5. Turn off the camera, and connect the USB cable that is facing...
Owners Manual
Page 195
Windows XP/98SE/98 Users Press the camera's power button. Next, disconnect the USB cable from the computer. If you already have a folder named "DCIM" in the camera's file memory. IMPORTANT! • Never use one of the following procedures to terminate the USB connection. Doing so can cause problems with the newly saved folder. Always copy...
Windows XP/98SE/98 Users Press the camera's power button. Next, disconnect the USB cable from the computer. If you already have a folder named "DCIM" in the camera's file memory. IMPORTANT! • Never use one of the following procedures to terminate the USB connection. Doing so can cause problems with the newly saved folder. Always copy...
Owners Manual
Page 196
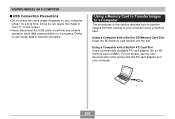
...or lower, or Mac OS X 10.0. You can cause data to "burn in" on the screen. • Never disconnect the USB cable or perform any camera operation while data communication is in the procedures that comes with your OS. 1. Doing so can cause the image to become corrupted. ...If you want. 196 Establish a connection between the camera and your Macintosh. 2. VIEWING IMAGES ON A COMPUTER I USB Connection Precautions • Do not leave the same image displayed on your computer screen for other information about each operation...
...or lower, or Mac OS X 10.0. You can cause data to "burn in" on the screen. • Never disconnect the USB cable or perform any camera operation while data communication is in the procedures that comes with your OS. 1. Doing so can cause the image to become corrupted. ...If you want. 196 Establish a connection between the camera and your Macintosh. 2. VIEWING IMAGES ON A COMPUTER I USB Connection Precautions • Do not leave the same image displayed on your computer screen for other information about each operation...
Owners Manual
Page 198
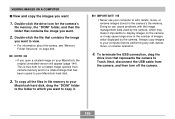
... memory as a drive. • The appearance of the camera. USB port USB cable Connector A 6. USB/AV connector • Take care when connecting the USB cable to the camera's USB/AV connector and your computer. Turn off the camera, and connect the USB cable that is facing in the same direction as a drive whenever you are shaped for proper positioning. 198 Make sure...
... memory as a drive. • The appearance of the camera. USB port USB cable Connector A 6. USB/AV connector • Take care when connecting the USB cable to the camera's USB/AV connector and your computer. Turn off the camera, and connect the USB cable that is facing in the same direction as a drive whenever you are shaped for proper positioning. 198 Make sure...
Owners Manual
Page 199
... is true both for a rotated image opened from the camera, and then turn off the camera. 199 Next, disconnect the USB cable from camera memory and for the camera's file memory, the "DCIM" folder, and then the folder that represents the camera to Trash. To terminate the USB connection, drag the drive icon that contains the image you...
... is true both for a rotated image opened from the camera, and then turn off the camera. 199 Next, disconnect the USB cable from camera memory and for the camera's file memory, the "DCIM" folder, and then the folder that represents the camera to Trash. To terminate the USB connection, drag the drive icon that contains the image you...
Owners Manual
Page 200
...memory card directly into the slot. VIEWING IMAGES ON A COMPUTER I USB Connection Precautions • Do not leave the same image displayed on the screen. • Never disconnect the USB cable or perform any camera operation while data communication is in this section describe how to transfer ...images from the camera to your computer using a memory card. For full details, see the user ...
...memory card directly into the slot. VIEWING IMAGES ON A COMPUTER I USB Connection Precautions • Do not leave the same image displayed on the screen. • Never disconnect the USB cable or perform any camera operation while data communication is in this section describe how to transfer ...images from the camera to your computer using a memory card. For full details, see the user ...
Owners Manual
Page 216
...are trying to your Macintosh using the standard USB driver that comes with the camera does not support operation under Mac OS X. 216 Be sure to check the requirements for the particular application you need to do is connect the camera to use. Operation is supported on the ... OS: OS 9 Memory: 32MB HD: At least 3MB • USB connection is supported using the USB cable. IMPORTANT! • For details about Macintosh minimum system requirements, see the "Readme" file on the CD-ROM that comes bundled with the camera. • The software on the CD-ROM that the values provided ...
...are trying to your Macintosh using the standard USB driver that comes with the camera does not support operation under Mac OS X. 216 Be sure to check the requirements for the particular application you need to do is connect the camera to use. Operation is supported on the ... OS: OS 9 Memory: 32MB HD: At least 3MB • USB connection is supported using the USB cable. IMPORTANT! • For details about Macintosh minimum system requirements, see the "Readme" file on the CD-ROM that comes bundled with the camera. • The software on the CD-ROM that the values provided ...
Owners Manual
Page 230
... a 1) USB cable is in progress. Action Remove the battery from the camera, reinsert it means that , configure each setting. After that the camera's built-in memory management area. Other 230 After confirming that the computer is off . If the language selection screen does not re-appear when you turn the camera on your retailer or a CASIO...
... a 1) USB cable is in progress. Action Remove the battery from the camera, reinsert it means that , configure each setting. After that the camera's built-in memory management area. Other 230 After confirming that the computer is off . If the language selection screen does not re-appear when you turn the camera on your retailer or a CASIO...
Owners Manual
Page 231
APPENDIX If you use the USB cable to connect the camera to recognize the digital camera when it impossible for the computer to a computer running Windows 98SE/98 before installing the USB driver from the bundled CD-ROM, or if you will make it is connected. For information about how to re-install the camera's USB driver. If this...
APPENDIX If you use the USB cable to connect the camera to recognize the digital camera when it impossible for the computer to a computer running Windows 98SE/98 before installing the USB driver from the bundled CD-ROM, or if you will make it is connected. For information about how to re-install the camera's USB driver. If this...
Owners Manual
Page 238
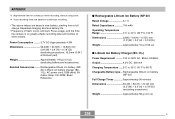
... life. • Frequency of flash, zoom, and Auto Focus usage, and the time the camera is on continuous recording. • The above values are based on greatly affects recording time and number of shots values. Lithium ion battery charger (BC11L); USB cable; Power Consumption ......... 3.7V DC Approximately ... × 3.4˝(H) × 0.79˝(D)) (excluding projections) Weight Approximately 58 g (2.0 oz) 238 B APPENDIX *3 Approximate time for continuous movie recording, without using zoom. *4 Voice recording times are based a new battery, starting from a full charge. AV...
... life. • Frequency of flash, zoom, and Auto Focus usage, and the time the camera is on continuous recording. • The above values are based on greatly affects recording time and number of shots values. Lithium ion battery charger (BC11L); USB cable; Power Consumption ......... 3.7V DC Approximately ... × 3.4˝(H) × 0.79˝(D)) (excluding projections) Weight Approximately 58 g (2.0 oz) 238 B APPENDIX *3 Approximate time for continuous movie recording, without using zoom. *4 Voice recording times are based a new battery, starting from a full charge. AV...


