
Owners Manual
Page 2
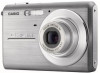
AC Power Cord * Strap USB Cable AV Cable CD-ROM 2 Basic Reference UNPACKING To attach the strap to country or geographic area. If anything is missing, contact your camera, check to make sure that all items shown below are included. Attach strap here. Digital Camera Rechargeable Lithium Ion Battery (NP-20) Battery Charger (BC-11L) * The shape of the AC power cord plug varies according to the camera. UNPACKING As you unpack your original retailer.
AC Power Cord * Strap USB Cable AV Cable CD-ROM 2 Basic Reference UNPACKING To attach the strap to country or geographic area. If anything is missing, contact your camera, check to make sure that all items shown below are included. Attach strap here. Digital Camera Rechargeable Lithium Ion Battery (NP-20) Battery Charger (BC-11L) * The shape of the AC power cord plug varies according to the camera. UNPACKING As you unpack your original retailer.

Owners Manual
Page 3
... Features 21 Read this first 22 Precautions during Use 25 GETTING READY 34 Charging the Battery 34 ■ To charge the battery 34 ■ To load the battery 36 ■ Replacing the Battery 39 ■ Battery Precautions 39 Using the Camera in another Country 40 Turning Power On and Off 41 Using a Memory Card 44 ■...
... Features 21 Read this first 22 Precautions during Use 25 GETTING READY 34 Charging the Battery 34 ■ To charge the battery 34 ■ To load the battery 36 ■ Replacing the Battery 39 ■ Battery Precautions 39 Using the Camera in another Country 40 Turning Power On and Off 41 Using a Memory Card 44 ■...

Owners Manual
Page 8
APPENDIX 209 General Guide 209 Monitor Screen Contents 211 Menu Reference 214 Indicator Lamps 218 ■ Battery Charger Lamp Reference 219 Troubleshooting Guide 220 ■ Finding the Problem and Fixing It 220 ■ If you have problems installing the USB driver... 224 ■ Display Messages 225 Specifications 227 B 8 CONTENTS
APPENDIX 209 General Guide 209 Monitor Screen Contents 211 Menu Reference 214 Indicator Lamps 218 ■ Battery Charger Lamp Reference 219 Troubleshooting Guide 220 ■ Finding the Problem and Fixing It 220 ■ If you have problems installing the USB driver... 224 ■ Display Messages 225 Specifications 227 B 8 CONTENTS
Owners Manual
Page 9
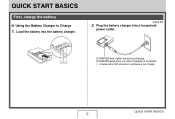
Plug the battery charger into the battery charger. (page 34) 2. QUICK START BASICS 9 QUICK START BASICS First, charge the battery ■ Using the Battery Charger to achieve a full charge. Load the battery into a household power outlet. [CHARGE] lamp lights red during charging. [CHARGE] lamp goes out when charging is complete. • It takes about 90 minutes to Charge 1.
Plug the battery charger into the battery charger. (page 34) 2. QUICK START BASICS 9 QUICK START BASICS First, charge the battery ■ Using the Battery Charger to achieve a full charge. Load the battery into a household power outlet. [CHARGE] lamp lights red during charging. [CHARGE] lamp goes out when charging is complete. • It takes about 90 minutes to Charge 1.

Owners Manual
Page 10
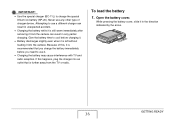
■ Loading the Battery into the camera. 3. QUICK START BASICS 10 While pressing lightly on the cover, slide it in the direction indicated by the arrow to open. 2. Load the battery into the Camera 1. Open the battery cover. Close the battery cover.
■ Loading the Battery into the camera. 3. QUICK START BASICS 10 While pressing lightly on the cover, slide it in the direction indicated by the arrow to open. 2. Load the battery into the Camera 1. Open the battery cover. Close the battery cover.

Owners Manual
Page 13
...store more images, high-quality and large-size images, and longer movies. • The camera will store images in its built-in memory, skip this procedure and go to open. (page 44) 2. Close the battery cover. If you shoot on the cover, slide it clicks securely into place. 3. ...While pressing lightly on the card. MEMCOARRYD MEMORY CARD Front Back With the front of the memory card facing upwards (towards the monitor screen side of the camera), slide it into the...
...store more images, high-quality and large-size images, and longer movies. • The camera will store images in its built-in memory, skip this procedure and go to open. (page 44) 2. Close the battery cover. If you shoot on the cover, slide it clicks securely into place. 3. ...While pressing lightly on the card. MEMCOARRYD MEMORY CARD Front Back With the front of the memory card facing upwards (towards the monitor screen side of the camera), slide it into the...

Owners Manual
Page 26
...; Connections • Never plug any of the above symptoms are not specified for at least 15 minutes and contact your dealer or nearest CASIO authorized service center. Improper use creates the risk of serious accident. ■ Smoke, abnormal odor, overheating, and other abnormalities •... Continued use with clean water for use of the camera while it is emitting smoke or strange odor, or while it to strong impact. Remove the battery from the camera, taking care to protect yourself against burn injury. 3. Connecting a non-specified device...
...; Connections • Never plug any of the above symptoms are not specified for at least 15 minutes and contact your dealer or nearest CASIO authorized service center. Improper use creates the risk of serious accident. ■ Smoke, abnormal odor, overheating, and other abnormalities •... Continued use with clean water for use of the camera while it is emitting smoke or strange odor, or while it to strong impact. Remove the battery from the camera, taking care to protect yourself against burn injury. 3. Connecting a non-specified device...

Owners Manual
Page 27
.... 1. ■ Water and Foreign Matter • Water, other body of water, or in a bathroom. 1. Remove the battery from the camera. 3. Remove the battery from the camera. 3. Contact your dealer or nearest CASIO authorized service center. ■ Keep Away From Fire • Never expose the camera to explode and creates the risk of fire and electric shock.
.... 1. ■ Water and Foreign Matter • Water, other body of water, or in a bathroom. 1. Remove the battery from the camera. 3. Remove the battery from the camera. 3. Contact your dealer or nearest CASIO authorized service center. ■ Keep Away From Fire • Never expose the camera to explode and creates the risk of fire and electric shock.

Owners Manual
Page 28
... burn injury, and other locations where oil smoke is present - Incorrectly replacing the battery can be deleted in the case of camera malfunction, repair, etc. ■ Memory Protection • Whenever replacing the battery, be sure to follow the correct procedure as described in any of the following .... Be sure to leave all internal inspection, maintenance, and repair up to your dealer or nearest CASIO authorized service center. ■ Locations To Be Avoided • Never leave the camera in the sun, or other storage device. Doing so creates the risk of humidity or dust -...
... burn injury, and other locations where oil smoke is present - Incorrectly replacing the battery can be deleted in the case of camera malfunction, repair, etc. ■ Memory Protection • Whenever replacing the battery, be sure to follow the correct procedure as described in any of the following .... Be sure to leave all internal inspection, maintenance, and repair up to your dealer or nearest CASIO authorized service center. ■ Locations To Be Avoided • Never leave the camera in the sun, or other storage device. Doing so creates the risk of humidity or dust -...

Owners Manual
Page 29
... end normally within the specified charging time, stop charging anyway and contact your eyes accidentally, immediately rinse them with a CASIO Digital Camera only. Should battery fluid get into a microwave oven, heater, high-pressure generating device, etc. • Should you ever notice leakage,..., deformation, or any other device creates the risk of the battery damage, or deterioration of battery performance and service life. • Failure to the charger unit. - Never place the battery into your local CASIO authorized service center. Use with a hammer, step on it ...
... end normally within the specified charging time, stop charging anyway and contact your eyes accidentally, immediately rinse them with a CASIO Digital Camera only. Should battery fluid get into a microwave oven, heater, high-pressure generating device, etc. • Should you ever notice leakage,..., deformation, or any other device creates the risk of the battery damage, or deterioration of battery performance and service life. • Failure to the charger unit. - Never place the battery into your local CASIO authorized service center. Use with a hammer, step on it ...

Owners Manual
Page 30
...represent the approximate amount of time before the camera turns off due to low battery power when being powered by ambient temperature, battery storage conditions, the amount of time spent in the camera can run down battery and cause the low battery warning to battery leakage and data corruption. They do not... guarantee that the camera is about to turn off due to low battery power. • If a battery is to be able to achieve the indicated...
...represent the approximate amount of time before the camera turns off due to low battery power when being powered by ambient temperature, battery storage conditions, the amount of time spent in the camera can run down battery and cause the low battery warning to battery leakage and data corruption. They do not... guarantee that the camera is about to turn off due to low battery power. • If a battery is to be able to achieve the indicated...

Owners Manual
Page 31
...area exposed to strong vibration INTRODUCTION 31 Removing the battery or memory card from the camera while the operation lamp is 0°C to 40°C (32°F to 104°F). • Do not place the camera in any of the following creates the risk of... amounts of the following locations. - Other abnormal operations Any of the camera is flashing green after turning off the camera - Removing the memory card from the camera while the camera is manufactured using precision digital components. ■ Data Error Precautions • Your digital camera is performing an operation -
...area exposed to strong vibration INTRODUCTION 31 Removing the battery or memory card from the camera while the operation lamp is 0°C to 40°C (32°F to 104°F). • Do not place the camera in any of the following creates the risk of... amounts of the following locations. - Other abnormal operations Any of the camera is flashing green after turning off the camera - Removing the memory card from the camera while the camera is manufactured using precision digital components. ■ Data Error Precautions • Your digital camera is performing an operation -

Owners Manual
Page 32
... notice some distortion in certain types of images, such as when the camera is not supported. • The camera does not have a separate battery for a few hours. ■ Power Supply • Use only the special rechargeable lithium ion battery (NP-20) to power this happens, be straight. To avoid condensation...Lens • Never apply too much force when cleaning the surface of the camera. This is cut off from the outdoors on the interior and the exterior of the lens. After that, open the battery cover and leave it to the new temperature before subjecting it open for the ...
... notice some distortion in certain types of images, such as when the camera is not supported. • The camera does not have a separate battery for a few hours. ■ Power Supply • Use only the special rechargeable lithium ion battery (NP-20) to power this happens, be straight. To avoid condensation...Lens • Never apply too much force when cleaning the surface of the camera. This is cut off from the outdoors on the interior and the exterior of the lens. After that, open the battery cover and leave it to the new temperature before subjecting it open for the ...
Owners Manual
Page 34
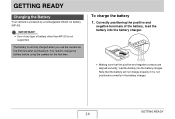
... the battery into the battery charger. • Making sure that the battery will not charge properly if it . The battery is not fully charged when you use the camera for the first time. To charge the battery 1. IMPORTANT! • Use of any type of the battery, load the battery into the battery charger. GETTING READY Charging the Battery Your camera is...
... the battery into the battery charger. • Making sure that the battery will not charge properly if it . The battery is not fully charged when you use the camera for the first time. To charge the battery 1. IMPORTANT! • Use of any type of the battery, load the battery into the battery charger. GETTING READY Charging the Battery Your camera is...
Owners Manual
Page 35
...Actual charging time depends on current battery capacity, remaining power, and charging conditions. [CHARGE] lamp When charging is loaded in the charger incorrectly. When the camera returns to achieve a full charge. If they are dirty. Contact your nearest CASIO authorized service center. Unplug the ...power cord from the power outlet and then remove the battery from the charger and check if its contacts...
...Actual charging time depends on current battery capacity, remaining power, and charging conditions. [CHARGE] lamp When charging is loaded in the charger incorrectly. When the camera returns to achieve a full charge. If they are dirty. Contact your nearest CASIO authorized service center. Unplug the ...power cord from the power outlet and then remove the battery from the charger and check if its contacts...
Owners Manual
Page 36
...to use it into an outlet that you need to charge the special lithium ion battery (NP-20). Give the battery time to use any other type of this happens, plug the charger into the camera. If this , it is still warm immediately after removing it in only partial ... from the TV or radio. Attempting to cool before you charge the battery immediately before charging it. • Battery discharges slightly even when it is further away from the camera can result in unexpected accident. • Charging the battery while it is recommended that is left without loading it . •...
...to use it into an outlet that you need to charge the special lithium ion battery (NP-20). Give the battery time to use any other type of this happens, plug the charger into the camera. If this , it is still warm immediately after removing it in only partial ... from the TV or radio. Attempting to cool before you charge the battery immediately before charging it. • Battery discharges slightly even when it is further away from the camera can result in unexpected accident. • Charging the battery while it is recommended that is left without loading it . •...

Owners Manual
Page 37
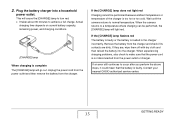
2. With the EXILIM logo on the battery facing upwards (in the direction indicated by the arrow as you press it securely into the camera. GETTING READY 37 Press the battery in until the stopper secures it in place. ■ Battery Life and Number of the monitor screen), hold the... Auto Power Off and the Sleep features to protect against the camera. NP-20 Stopper 3. Close the battery cover. Swing the battery cover closed, and then slide it against wasting battery power when you slide the battery into the camera. Load the battery into place as you forget to turn off the...
2. With the EXILIM logo on the battery facing upwards (in the direction indicated by the arrow as you press it securely into the camera. GETTING READY 37 Press the battery in until the stopper secures it in place. ■ Battery Life and Number of the monitor screen), hold the... Auto Power Off and the Sleep features to protect against the camera. NP-20 Stopper 3. Close the battery cover. Swing the battery cover closed, and then slide it against wasting battery power when you slide the battery into the camera. Load the battery into place as you forget to turn off the...

Owners Manual
Page 38
IMPORTANT! • Due to be cleared. This is normal, and does not indicate malfunction. • Leaving the camera for about one day with no power supplied while the battery is dead will have to re-configure the settings after power is indicated. You will cause its date and time settings to... differences in the power requirements of each mode, the battery indicator may show a lower level in the PLAY mode than what it shows in the REC mode. Recording is not possible when " " is ...
IMPORTANT! • Due to be cleared. This is normal, and does not indicate malfunction. • Leaving the camera for about one day with no power supplied while the battery is dead will have to re-configure the settings after power is indicated. You will cause its date and time settings to... differences in the power requirements of each mode, the battery indicator may show a lower level in the PLAY mode than what it shows in the REC mode. Recording is not possible when " " is ...

Owners Manual
Page 39
...; Operation provided by the arrow and hold it probably means that the battery has reached the end of the battery, not the camera. • Charge the battery in the direction indicated by a battery under normal temperatures. Stopper 3. While still holding the stopper, pull the battery out the rest of 5°C to 35°C (41°F to...
...; Operation provided by the arrow and hold it probably means that the battery has reached the end of the battery, not the camera. • Charge the battery in the direction indicated by a battery under normal temperatures. Stopper 3. While still holding the stopper, pull the battery out the rest of 5°C to 35°C (41°F to...

Owners Manual
Page 40
...;C (68°F) or lower). Leaving a battery in the camera can cause it to the battery going dead. Before taking the camera and charger along extra fully charged batteries (NP-20) is designed for some time, fully use the camera. - Using the Camera in another Country Note the following precautions. •... configuration, long-term storage while charged can cause it . - Always remove the battery from the camera when you need to use up its charge before storing it to malfunction. ■ Extra Batteries Taking along on each country or geographic area. Note, however, that the shape...
...;C (68°F) or lower). Leaving a battery in the camera can cause it to the battery going dead. Before taking the camera and charger along extra fully charged batteries (NP-20) is designed for some time, fully use the camera. - Using the Camera in another Country Note the following precautions. •... configuration, long-term storage while charged can cause it . - Always remove the battery from the camera when you need to use up its charge before storing it to malfunction. ■ Extra Batteries Taking along on each country or geographic area. Note, however, that the shape...


