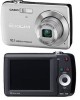
User Guide
Page 3
...YouTube Uploader for your final image, shoot a test shot to ensure that the camera is due to the characteristics of the liquid crystal panel, and does not indicate malfunction. Except for CASIO. • CASIO COMPUTER CO., LTD. LCD Panel The liquid crystal panel of the monitor screen uses...in part or its entirety, is forbidden under copyright laws. • CASIO COMPUTER CO., LTD. Read this first! • The contents of this manual and the bundled Basic Reference are subject to change without the permission of CASIO COMPUTER CO., LTD. shall not be held liable for any other ...
...YouTube Uploader for your final image, shoot a test shot to ensure that the camera is due to the characteristics of the liquid crystal panel, and does not indicate malfunction. Except for CASIO. • CASIO COMPUTER CO., LTD. LCD Panel The liquid crystal panel of the monitor screen uses...in part or its entirety, is forbidden under copyright laws. • CASIO COMPUTER CO., LTD. Read this first! • The contents of this manual and the bundled Basic Reference are subject to change without the permission of CASIO COMPUTER CO., LTD. shall not be held liable for any other ...
User Guide
Page 18
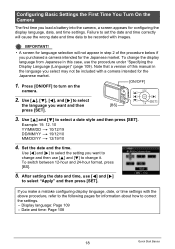
...the display language, date, and time settings. Set the date and the time. Example: 19. 12. 10 YY/MM/DD * 10/12/19 DD/MM/YY * 19/12/10 MM/DD/YY * 12/19/10 4. To change it. IMPORTANT! • A screen for language selection will cause the wrong date and ... 1. Use [8], [2], [4], and [6] to select [SET ] the language you load a battery into the camera, a screen appears for information about how to set the date and time correctly will not appear in step 2 of this manual in this case, use the procedure under "Specifying the Display Language (Language)" (page 109). To...
...the display language, date, and time settings. Set the date and the time. Example: 19. 12. 10 YY/MM/DD * 10/12/19 DD/MM/YY * 19/12/10 MM/DD/YY * 12/19/10 4. To change it. IMPORTANT! • A screen for language selection will cause the wrong date and ... 1. Use [8], [2], [4], and [6] to select [SET ] the language you load a battery into the camera, a screen appears for information about how to set the date and time correctly will not appear in step 2 of this manual in this case, use the procedure under "Specifying the Display Language (Language)" (page 109). To...
User Guide
Page 23
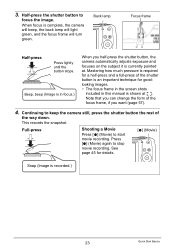
Half-press the shutter button to start movie recording. Beep, beep (Image is in this manual is currently pointed at ß. Note that you can change the form of the way down. This records the snapshot. 3. Continuing to stop movie recording. ... pressure is required for a half-press and a full-press of the shutter button is an important technique for details. [0] (Movie) Snap (Image is complete, the camera will beep, the back lamp will light green, and the focus frame will turn green. When focus is recorded.) 23 Quick Start Basics
Half-press the shutter button to start movie recording. Beep, beep (Image is in this manual is currently pointed at ß. Note that you can change the form of the way down. This records the snapshot. 3. Continuing to stop movie recording. ... pressure is required for a half-press and a full-press of the shutter button is an important technique for details. [0] (Movie) Snap (Image is complete, the camera will beep, the back lamp will light green, and the focus frame will turn green. When focus is recorded.) 23 Quick Start Basics
User Guide
Page 28
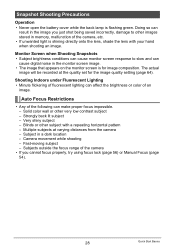
...focus lock (page 56) or Manual Focus (page 54). 28 Quick Start Basics Shooting Indoors under Fluorescent Lighting • Minute flickering of the camera, etc. • If unwanted light is flashing green. Camera movement while shooting - Subjects ... - Blinds or other very low contrast subject - The actual image will be recorded at varying distances from the camera - Solid color wall or other subject with your hand when shooting an image. Fast-moving subject - Subject in...lens with a repeating horizontal pattern - Doing so can cause digital noise in a dark location -
...focus lock (page 56) or Manual Focus (page 54). 28 Quick Start Basics Shooting Indoors under Fluorescent Lighting • Minute flickering of the camera, etc. • If unwanted light is flashing green. Camera movement while shooting - Subjects ... - Blinds or other very low contrast subject - The actual image will be recorded at varying distances from the camera - Solid color wall or other subject with your hand when shooting an image. Fast-moving subject - Subject in...lens with a repeating horizontal pattern - Doing so can cause digital noise in a dark location -

User Guide
Page 38
... setting that matches your shooting conditions (Daylight, Overcast, etc.) 38 Snapshot Tutorial Daylight Fluorescent « Tungsten · Manual WB Configures the camera to adjust white balance automatically For shooting outdoors on a clear day For shooting outdoors on a clear day in the shade...under daylight fluorescent lighting For shooting under light bulb lighting For configuring the camera manually to suit a particular light source. 1Select "· Manual WB". 2Under the lighting conditions you turn off the camera. • When "‡ Auto WB" is retained even if you...
... setting that matches your shooting conditions (Daylight, Overcast, etc.) 38 Snapshot Tutorial Daylight Fluorescent « Tungsten · Manual WB Configures the camera to adjust white balance automatically For shooting outdoors on a clear day For shooting outdoors on a clear day in the shade...under daylight fluorescent lighting For shooting under light bulb lighting For configuring the camera manually to suit a particular light source. 1Select "· Manual WB". 2Under the lighting conditions you turn off the camera. • When "‡ Auto WB" is retained even if you...
User Guide
Page 39
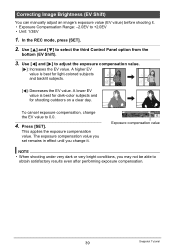
... backlit subjects. [4]: Decreases the EV value. Use [8] and [2] to adjust the exposure compensation value. [6]: Increases the EV value. Correcting Image Brightness (EV Shift) You can manually adjust an image's exposure value (EV value) before shooting it . To cancel exposure compensation, change it . • Exposure Compensation Range: -2.0EV to 0.0. 4. The exposure compensation...
... backlit subjects. [4]: Decreases the EV value. Use [8] and [2] to adjust the exposure compensation value. [6]: Increases the EV value. Correcting Image Brightness (EV Shift) You can manually adjust an image's exposure value (EV value) before shooting it . To cancel exposure compensation, change it . • Exposure Compensation Range: -2.0EV to 0.0. 4. The exposure compensation...
User Guide
Page 43
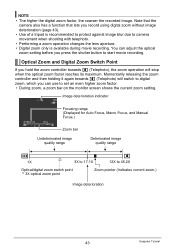
..., and Manual Focus.) Zoom bar Undeteriorated image quality range Deteriorated image quality range 1X 3X to 17.1X 12X to set an even higher zoom factor. • During zoom, a zoom bar on the monitor screen shows the current zoom setting. Optical Zoom and Digital Zoom Switch... a tripod is available during movie recording. Note that the camera also has a function that lets you press the shutter button to camera movement when shooting with telephoto. • Performing a zoom operation changes the lens aperture. • Digital zoom only is recommended to protect against image blur due to...
..., and Manual Focus.) Zoom bar Undeteriorated image quality range Deteriorated image quality range 1X 3X to 17.1X 12X to set an even higher zoom factor. • During zoom, a zoom bar on the monitor screen shows the current zoom setting. Optical Zoom and Digital Zoom Switch... a tripod is available during movie recording. Note that the camera also has a function that lets you press the shutter button to camera movement when shooting with telephoto. • Performing a zoom operation changes the lens aperture. • Digital zoom only is recommended to protect against image blur due to...
User Guide
Page 53
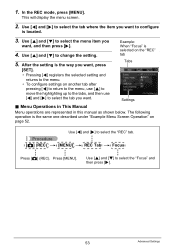
..." tab 5. The following operation is selected on page 52. Use [8] and [2] to select the "Focus" and then press [6]. 53 Advanced Settings Menu Operations in This Manual Menu operations are represented in this manual as shown below. In the REC mode, press [MENU]. Use [8] and [2] to select the menu item you want .
..." tab 5. The following operation is selected on page 52. Use [8] and [2] to select the "Focus" and then press [6]. 53 Advanced Settings Menu Operations in This Manual Menu operations are represented in this manual as shown below. In the REC mode, press [MENU]. Use [8] and [2] to select the menu item you want .
User Guide
Page 54
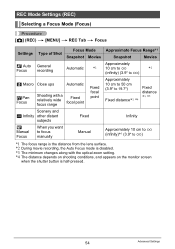
...* Focus Focus Mode Approximate Focus Range*1 Settings Type of Shot Snapshot Movies Snapshot Movies Q Auto General Focus recording Approximately Automatic *2 10 cm to 9 *2 (infinity) (3.9" to 9) ´ Macro Close ups Automatic E Pan Focus Shooting with a relatively wide focus range... to 19.7") Fixed distance*3, *4 Fixed distance *3, *5 Scenery and ) Infinity other distant subjects Fixed Infinity W Manual Focus When you want to focus manually Manual Approximately 10 cm to 9 (infinity)*3 (3.9" to 9) *1 The focus range is the distance from the lens surface. *2...
...* Focus Focus Mode Approximate Focus Range*1 Settings Type of Shot Snapshot Movies Snapshot Movies Q Auto General Focus recording Approximately Automatic *2 10 cm to 9 *2 (infinity) (3.9" to 9) ´ Macro Close ups Automatic E Pan Focus Shooting with a relatively wide focus range... to 19.7") Fixed distance*3, *4 Fixed distance *3, *5 Scenery and ) Infinity other distant subjects Fixed Infinity W Manual Focus When you want to focus manually Manual Approximately 10 cm to 9 (infinity)*3 (3.9" to 9) *1 The focus range is the distance from the lens surface. *2...
User Guide
Page 55
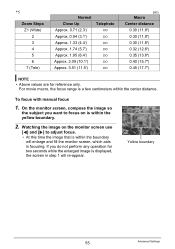
To focus with manual focus 1. If you want to adjust focus. • At this time the image that is within the boundary will re-appear. Yellow boundary 55 Advanced ... any operation for reference only. *5 Zoom Steps Z1 (Wide) 2 3 4 5 6 7 (Tele) Normal Close Up Approx. 0.71 (2.3') Approx. 0.94 (3.1') Approx. 1.33 (4.4') Approx. 1.74 (5.7') Approx. 1.95 (6.4') Approx. 3.09 (10.1') Approx. 3.51 (11.5') Telephoto 9 9 9 9 9 9 9 (m) Macro Center distance 0.30 (11.8") 0.30 (11.8") 0.30 (11.8") 0.32 (12.6") 0.35 (13.8") 0.40 (15.7") 0.45 (17.7") NOTE • Above values...
To focus with manual focus 1. If you want to adjust focus. • At this time the image that is within the boundary will re-appear. Yellow boundary 55 Advanced ... any operation for reference only. *5 Zoom Steps Z1 (Wide) 2 3 4 5 6 7 (Tele) Normal Close Up Approx. 0.71 (2.3') Approx. 0.94 (3.1') Approx. 1.33 (4.4') Approx. 1.74 (5.7') Approx. 1.95 (6.4') Approx. 3.09 (10.1') Approx. 3.51 (11.5') Telephoto 9 9 9 9 9 9 9 (m) Macro Center distance 0.30 (11.8") 0.30 (11.8") 0.30 (11.8") 0.32 (12.6") 0.35 (13.8") 0.40 (15.7") 0.45 (17.7") NOTE • Above values...
User Guide
Page 56
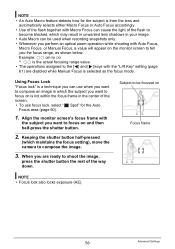
...Macro can be focused on and then half-press the shutter button. 2. Keeping the shutter button half-pressed (which maintains the focus setting), move the camera to shoot the image, press the shutter button the rest of the way down. When you want to focus on Focus frame NOTE • Focus... can cause the light of the flash to become blocked, which may result in unwanted lens shadows in which the subject you are disabled while Manual Focus is selected as shown below. Example: oo cm to 9 * oo is the actual focusing range value. • The operations assigned to the [4] and [6] ...
...Macro can be focused on and then half-press the shutter button. 2. Keeping the shutter button half-pressed (which maintains the focus setting), move the camera to shoot the image, press the shutter button the rest of the way down. When you want to focus on Focus frame NOTE • Focus... can cause the light of the flash to become blocked, which may result in unwanted lens shadows in which the subject you are disabled while Manual Focus is selected as shown below. Example: oo cm to 9 * oo is the actual focusing range value. • The operations assigned to the [4] and [6] ...

User Guide
Page 63
... Balance ISO AF Area Metering CS Self-timer Flash Intensity Digital Zoom MF Position Zoom Position* Disabled (Initial Default Setting) Snapshot (Auto) Auto AF (Auto Focus) Auto Auto Spot Multi Off Off 0 On Position before manual focus was selected. Full wide Enabled Setting at power off... * Optical zoom setting only. • If you turn the camera power off the camera. Configuring Power On Default Settings (Memory) Procedure [r] (REC) * [MENU] * REC...
... Balance ISO AF Area Metering CS Self-timer Flash Intensity Digital Zoom MF Position Zoom Position* Disabled (Initial Default Setting) Snapshot (Auto) Auto AF (Auto Focus) Auto Auto Spot Multi Off Off 0 On Position before manual focus was selected. Full wide Enabled Setting at power off... * Optical zoom setting only. • If you turn the camera power off the camera. Configuring Power On Default Settings (Memory) Procedure [r] (REC) * [MENU] * REC...
User Guide
Page 84
...In addition to images, you also can transfer screen shot images from your computer to the camera (Photo Transport*) (page 92). • You can perform the operations described below while the camera is connected to a computer automatically over a wireless LAN for Windows and the Macintosh. &#... users should refer to "Using the Camera with a Macintosh" on page 95. 84 Using the Camera with a Computer Things you need to perform when using the camera with your computer to camera memory Playback and edit movies • Save images and view them manually (USB connection) (pages 86, 95...
...In addition to images, you also can transfer screen shot images from your computer to the camera (Photo Transport*) (page 92). • You can perform the operations described below while the camera is connected to a computer automatically over a wireless LAN for Windows and the Macintosh. &#... users should refer to "Using the Camera with a Macintosh" on page 95. 84 Using the Camera with a Computer Things you need to perform when using the camera with your computer to camera memory Playback and edit movies • Save images and view them manually (USB connection) (pages 86, 95...
User Guide
Page 85
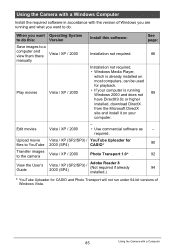
... commercial software as - required. Upload movie Vista / XP (SP2/SP3) / YouTube Uploader for files to YouTube 2000 (SP4) CASIO* 90 Transfer images to the camera Vista / XP / 2000 Photo Transport 1.0* 92 View the User's Guide Vista / XP (SP2/SP3) / 2000 (SP4) Adobe...CASIO and Photo Transport will not run under 64-bit versions of Windows you are running and what you want to do this: Version Install this software: See page: Save images to do . When you want Operating System to a computer and view them there Vista / XP / 2000 Installation not required. 86 manually...
... commercial software as - required. Upload movie Vista / XP (SP2/SP3) / YouTube Uploader for files to YouTube 2000 (SP4) CASIO* 90 Transfer images to the camera Vista / XP / 2000 Photo Transport 1.0* 92 View the User's Guide Vista / XP (SP2/SP3) / 2000 (SP4) Adobe...CASIO and Photo Transport will not run under 64-bit versions of Windows you are running and what you want to do this: Version Install this software: See page: Save images to do . When you want Operating System to a computer and view them there Vista / XP / 2000 Installation not required. 86 manually...

User Guide
Page 86
...for Bundled Software Computer system requirements are different for details. Viewing and Storing Images on the camera and press [MENU]. 2. See the "Read me" file that comes with a Computer To connect the camera to your computer in order to select "Mass Storage", and then press [SET]. 86 ...Using the Camera with each application for each of this manual. . On the "Set Up" tab, select "USB" and then press [6]. 3. Use...
...for Bundled Software Computer system requirements are different for details. Viewing and Storing Images on the camera and press [MENU]. 2. See the "Read me" file that comes with a Computer To connect the camera to your computer in order to select "Mass Storage", and then press [SET]. 86 ...Using the Camera with each application for each of this manual. . On the "Set Up" tab, select "USB" and then press [6]. 3. Use...
User Guide
Page 94
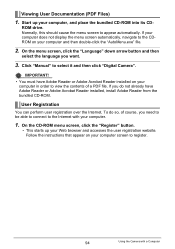
... the menu screen to select it and then click "Digital Camera". Click "Manual" to appear automatically. If you do so, of a PDF file. To do not already have Adobe Reader or Adobe Acrobat Reader installed on your computer screen to register. 94 Using the Camera with your computer and then double-click the "AutoMenu...
... the menu screen to select it and then click "Digital Camera". Click "Manual" to appear automatically. If you do so, of a PDF file. To do not already have Adobe Reader or Adobe Acrobat Reader installed on your computer screen to register. 94 Using the Camera with your computer and then double-click the "AutoMenu...

User Guide
Page 95
... Version Install this software: See page: Save images to your OS 9 Macintosh and view Installation not required. 95 them there manually OS X Save images to your OS 9 Macintosh automatically/ Manage images OS X Use commercially available software. 98 Use iPhoto, which... comes bundled with your computer and save files 1. Using the Camera with a Macintosh Install the required software in accordance with Mac OS 9, X (10.1, 10.2, 10.3, 10.4, 10.5) only. Play movies You can playback with QuickTime, OS 9 / OS X which comes bundled with...
... Version Install this software: See page: Save images to your OS 9 Macintosh and view Installation not required. 95 them there manually OS X Save images to your OS 9 Macintosh automatically/ Manage images OS X Use commercially available software. 98 Use iPhoto, which... comes bundled with your computer and save files 1. Using the Camera with a Macintosh Install the required software in accordance with Mac OS 9, X (10.1, 10.2, 10.3, 10.4, 10.5) only. Play movies You can playback with QuickTime, OS 9 / OS X which comes bundled with...
User Guide
Page 99
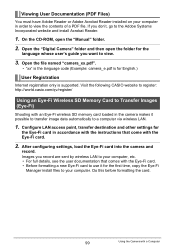
... the Eye-Fi Manager install files to the Adobe Systems Incorporated website and install Acrobat Reader. 1. Visit the following CASIO website to register: http://world.casio.com/qv/register/ Using an Eye-Fi Wireless SD Memory Card to Transfer Images (Eye-Fi) Shooting with an ... a computer via wireless LAN. 1. Images you don't, go to your computer. Open the "Digital Camera" folder and then open the "Manual" folder. 2. Do this before formatting the card. 99 Using the Camera with a Computer Configure LAN access point, transfer destination and other settings for English.) User Registration ...
... the Eye-Fi Manager install files to the Adobe Systems Incorporated website and install Acrobat Reader. 1. Visit the following CASIO website to register: http://world.casio.com/qv/register/ Using an Eye-Fi Wireless SD Memory Card to Transfer Images (Eye-Fi) Shooting with an ... a computer via wireless LAN. 1. Images you don't, go to your computer. Open the "Digital Camera" folder and then open the "Manual" folder. 2. Do this before formatting the card. 99 Using the Camera with a Computer Configure LAN access point, transfer destination and other settings for English.) User Registration ...
User Guide
Page 104
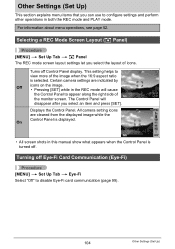
... screen layout settings let you select an item and press [SET]. This setting helps to appear along the right side of the monitor screen. All camera setting icons are indicated by Off icons on the image. • Pressing [SET] while in the REC mode will disappear after you select the layout... off Eye-Fi Card Communication (Eye-Fi) Procedure [MENU] * Set Up Tab * Eye-Fi Select "Off" to configure settings and perform other operations in this manual show what appears when the Control Panel is displayed. The Control Panel will cause the Control Panel to view more of icons.
... screen layout settings let you select an item and press [SET]. This setting helps to appear along the right side of the monitor screen. All camera setting icons are indicated by Off icons on the image. • Pressing [SET] while in the REC mode will disappear after you select the layout... off Eye-Fi Card Communication (Eye-Fi) Procedure [MENU] * Set Up Tab * Eye-Fi Select "Off" to configure settings and perform other operations in this manual show what appears when the Control Panel is displayed. The Control Panel will cause the Control Panel to view more of icons.
User Guide
Page 118
...of time before using , charging, or storing a battery, immediately remove it from the camera or charger unit and keep it off with clean tap water. Leaving a low or dead battery in this manual represent the approximate amount of the precautions and proper handling instructions, and make sure that ... flame. • Do not use or leave the battery under normal temperature (23°C (73°F)). Doing so can damage your local CASIO authorized service center. Actual battery life is greatly affected by the special battery under direct sunlight, in an automobile parked in the sun, or...
...of time before using , charging, or storing a battery, immediately remove it from the camera or charger unit and keep it off with clean tap water. Leaving a low or dead battery in this manual represent the approximate amount of the precautions and proper handling instructions, and make sure that ... flame. • Do not use or leave the battery under normal temperature (23°C (73°F)). Doing so can damage your local CASIO authorized service center. Actual battery life is greatly affected by the special battery under direct sunlight, in an automobile parked in the sun, or...

