
Owners Manual
Page 2
Unpacking As you unpack your original retailer. Digital camera Power cord Rechargeable lithium ion battery (NP-80) Charger unit (BC-81L) To attach the strap to make sure that all items shown below are included. If anything is missing, contact your camera, check to the camera Attach strap here. 1 Strap 2 USB cable AV cable CD-ROM Basic Reference 2
Unpacking As you unpack your original retailer. Digital camera Power cord Rechargeable lithium ion battery (NP-80) Charger unit (BC-81L) To attach the strap to make sure that all items shown below are included. If anything is missing, contact your camera, check to the camera Attach strap here. 1 Strap 2 USB cable AV cable CD-ROM Basic Reference 2

Owners Manual
Page 4
... Screen Contents 11 ❚❙ Quick Start Basics 14 What is a digital camera 14 What you can do with your CASIO camera 15 First, charge the battery prior to use 16 ❚ To charge the battery 16 ❚ To load the battery 18 Configuring Basic Settings the First Time You Turn On the... Camera 20 Preparing a Memory Card 21 ❚ Supported Memory Cards 21 ❚...
... Screen Contents 11 ❚❙ Quick Start Basics 14 What is a digital camera 14 What you can do with your CASIO camera 15 First, charge the battery prior to use 16 ❚ To charge the battery 16 ❚ To load the battery 18 Configuring Basic Settings the First Time You Turn On the... Camera 20 Preparing a Memory Card 21 ❚ Supported Memory Cards 21 ❚...

Owners Manual
Page 8
... the Histogram 150 ❚❙ Appendix 152 Precautions during Use 152 Power Supply 159 ❚ Charging 159 ❚ To replace the battery 160 ❚ Battery Precautions 160 ❚ Using the Camera in another Country 161 Using a Memory Card 161 ❚ To replace the memory card 161 Computer System Requirements for Bundled Software Bundled...
... the Histogram 150 ❚❙ Appendix 152 Precautions during Use 152 Power Supply 159 ❚ Charging 159 ❚ To replace the battery 160 ❚ Battery Precautions 160 ❚ Using the Camera in another Country 161 Using a Memory Card 161 ❚ To replace the memory card 161 Computer System Requirements for Bundled Software Bundled...

Owners Manual
Page 16
... will go out when charging is not charged. Never try to a full charge. • Your camera requires a special CASIO rechargeable lithium ion battery (NP-80) for power. terminals of the battery with those of the charger unit, load the battery into a household power outlet. Plug the charger unit into the charger unit. 2. Perform the steps...
... will go out when charging is not charged. Never try to a full charge. • Your camera requires a special CASIO rechargeable lithium ion battery (NP-80) for power. terminals of the battery with those of the charger unit, load the battery into a household power outlet. Plug the charger unit into the charger unit. 2. Perform the steps...

Owners Manual
Page 17
...Attempting to use may cause interference with camera, BC-80L if purchased separately) to charge the special lithium ion battery (NP-80). Give the battery time to cool before you need to normal use a different charger can result in the camera. If this , it is still ...into an outlet that is not loaded in unexpected accident. • A battery that is recommended that you charge the battery immediately before charging it. • A battery discharges slightly even when it . • Charging the camera's battery may not charge fully. Other Charging Precautions • Use the special ...
...Attempting to use may cause interference with camera, BC-80L if purchased separately) to charge the special lithium ion battery (NP-80). Give the battery time to cool before you need to normal use a different charger can result in the camera. If this , it is still ...into an outlet that is not loaded in unexpected accident. • A battery that is recommended that you charge the battery immediately before charging it. • A battery discharges slightly even when it . • Charging the camera's battery may not charge fully. Other Charging Precautions • Use the special ...

Owners Manual
Page 18
... screen), hold the stopper next to replace the battery, see page 160. 1 2 Back 2 1 18 Quick Start Basics Open the battery cover. Close the battery cover. Pressing the battery cover against the camera, slide it in place. To load the battery 1. Load the battery. Stopper Battery contacts EXILIM logo Front 3. Press the battery in until the stopper secures it closed. •...
... screen), hold the stopper next to replace the battery, see page 160. 1 2 Back 2 1 18 Quick Start Basics Open the battery cover. Close the battery cover. Pressing the battery cover against the camera, slide it in place. To load the battery 1. Load the battery. Stopper Battery contacts EXILIM logo Front 3. Press the battery in until the stopper secures it closed. •...

Owners Manual
Page 19
...switch between the REC mode and PLAY mode. • The camera date and time display will not be correct if the camera is consumed, a battery indicator on the monitor screen indicates remaining power as possible. Checking Remaining Battery Power As battery power is left for the flash setting (page 36). •...Power Off and the Sleep features to protect against wasting battery power when you forget to turn off the camera (pages 146, 147). 19 Quick Start Basics Charge the battery as soon as shown below. If this happens, load new battery and then set the correct time and date (page ...
...switch between the REC mode and PLAY mode. • The camera date and time display will not be correct if the camera is consumed, a battery indicator on the monitor screen indicates remaining power as possible. Checking Remaining Battery Power As battery power is left for the flash setting (page 36). •...Power Off and the Sleep features to protect against wasting battery power when you forget to turn off the camera (pages 146, 147). 19 Quick Start Basics Charge the battery as soon as shown below. If this happens, load new battery and then set the correct time and date (page ...

Owners Manual
Page 20
... for the Japanese market. 1. Failure to set the date and time correctly will not appear in the language you load a battery into the camera, a screen appears for information about how to be included with images. IMPORTANT! • A screen for language selection will cause the wrong date ... time, use [8] and [2] to select "Apply" and then press [SET]. To change it. Use [8] and [2] to turn on [ON/OFF] (Power) the camera. 2. Display language: Page 146 - Date and time: Page 145 20 Quick Start Basics Set the date and the time. Note that a version of the procedure...
... for the Japanese market. 1. Failure to set the date and time correctly will not appear in the language you load a battery into the camera, a screen appears for information about how to be included with images. IMPORTANT! • A screen for language selection will cause the wrong date ... time, use [8] and [2] to select "Apply" and then press [SET]. To change it. Use [8] and [2] to turn on [ON/OFF] (Power) the camera. 2. Display language: Page 146 - Date and time: Page 145 20 Quick Start Basics Set the date and the time. Note that a version of the procedure...

Owners Manual
Page 21
... offset and the use of summer time, and so they are saved to change. • Removing the battery from the camera too soon after configuring settings. To load a memory card 1. Pressing the battery cover, slide it click securely into the card slot all the way in the direction indicated by the arrow... time can cause the settings to be reset to turn off the camera and then open the battery cover. Press [ON/OFF] (Power) to their factory defaults. The camera does not come with a memory card. Do not remove the battery for at least 24 hours after configuring time and date settings for ...
... offset and the use of summer time, and so they are saved to change. • Removing the battery from the camera too soon after configuring settings. To load a memory card 1. Pressing the battery cover, slide it click securely into the card slot all the way in the direction indicated by the arrow... time can cause the settings to be reset to turn off the camera and then open the battery cover. Press [ON/OFF] (Power) to their factory defaults. The camera does not come with a memory card. Do not remove the battery for at least 24 hours after configuring time and date settings for ...

Owners Manual
Page 22
3. Pressing the battery cover against the camera, slide it closed. • For information about how to format a new memory card before formatting the card. 22 Quick Start Basics Close the battery cover. To format (initialize) a new memory card You need to your retailer or nearest CASIO authorized service center. IMPORTANT! • Formatting a memory card that...
3. Pressing the battery cover against the camera, slide it closed. • For information about how to format a new memory card before formatting the card. 22 Quick Start Basics Close the battery cover. To format (initialize) a new memory card You need to your retailer or nearest CASIO authorized service center. IMPORTANT! • Formatting a memory card that...

Owners Manual
Page 30
...quality set for image composition. Subjects outside the focus range of the camera, etc. • If unwanted light is flashing green. Snapshot Shooting Precautions Operation • Never open the battery cover while the back lamp is shining directly onto the lens, shade... the lens with a repeating horizontal pattern - Shooting Indoors under Fluorescent Lighting • Minute flickering of an image. Very shiny subject - Monitor Screen when Shooting Snapshots • Subject brightness conditions can cause digital...
...quality set for image composition. Subjects outside the focus range of the camera, etc. • If unwanted light is flashing green. Snapshot Shooting Precautions Operation • Never open the battery cover while the back lamp is shining directly onto the lens, shade... the lens with a repeating horizontal pattern - Shooting Indoors under Fluorescent Lighting • Minute flickering of an image. Very shiny subject - Monitor Screen when Shooting Snapshots • Subject brightness conditions can cause digital...

Owners Manual
Page 37
... unless the people in the image are looking directly at night or in a dimly lit room can cause image blur due to shoot at the camera (flash). • Red-eye reduction may not be obtained when the subject is too far away or too close , which can cause red...from the flash reflects off when lighting is dim results in the image to close . • Flash charging time (page 178) depends on operating conditions (battery condition, ambient temperature, etc.). • Shooting with exposure. Note the following important points when using red-eye reduction. • Red-eye reduction does ...
... unless the people in the image are looking directly at night or in a dimly lit room can cause image blur due to shoot at the camera (flash). • Red-eye reduction may not be obtained when the subject is too far away or too close , which can cause red...from the flash reflects off when lighting is dim results in the image to close . • Flash charging time (page 178) depends on operating conditions (battery condition, ambient temperature, etc.). • Shooting with exposure. Note the following important points when using red-eye reduction. • Red-eye reduction does ...

Owners Manual
Page 117
...port. 117 Printing On the "Set Up" tab, select "USB" and then press [6]. 3. Failure to insert the connector fully can connect the camera directly to a printer that you insert the cable connector into place. Connecting Directly to a PictBridge Compatible Printer You can result in the illustration. •...printer 1. USB cable Large connector USB USB port USB/AV port Small connector Making sure that the 2 mark on the camera and press [MENU]. 2. Make sure the camera's battery is fully inserted, you still will be able to see the metal part of the USB cable connector, connect the ...
...port. 117 Printing On the "Set Up" tab, select "USB" and then press [6]. 3. Failure to insert the connector fully can connect the camera directly to a printer that you insert the cable connector into place. Connecting Directly to a PictBridge Compatible Printer You can result in the illustration. •...printer 1. USB cable Large connector USB USB port USB/AV port Small connector Making sure that the 2 mark on the camera and press [MENU]. 2. Make sure the camera's battery is fully inserted, you still will be able to see the metal part of the USB cable connector, connect the ...

Owners Manual
Page 125
... "My Computer". 7. Windows XP users: Click "Start" and then "My Computer". Turn on the camera is aligned with the 8 mark of the connector as a removable disk. 125 Using the Camera with the port. • Your computer may not be able to see the metal part of the ...-click "Removable Disk". • Your computer recognizes the memory card loaded in the camera (or built-in memory if there is sufficiently charged before connecting. • Make sure that the 2 mark on the camera. 6. Make sure the camera's battery is no card) as shown in poor communication or malfunction.
... "My Computer". 7. Windows XP users: Click "Start" and then "My Computer". Turn on the camera is aligned with the 8 mark of the connector as a removable disk. 125 Using the Camera with the port. • Your computer may not be able to see the metal part of the ...-click "Removable Disk". • Your computer recognizes the memory card loaded in the camera (or built-in memory if there is sufficiently charged before connecting. • Make sure that the 2 mark on the camera. 6. Make sure the camera's battery is no card) as shown in poor communication or malfunction.

Owners Manual
Page 134
...result in memory if it . 134 Using the Camera with a Computer Failure to Large connector your Macintosh recognizes the memory card loaded in the camera (or the camera's built-in poor communication or malfunction. Turn on the camera is aligned with the port. • Your ...not draw power over the USB cable. Double-click the camera's drive icon. 7. The camera's back lamp will be able to the camera. • Note that even while the connector is sufficiently charged before connecting. Make sure the camera's battery is fully inserted, you connect via a USB hub....
...result in memory if it . 134 Using the Camera with a Computer Failure to Large connector your Macintosh recognizes the memory card loaded in the camera (or the camera's built-in poor communication or malfunction. Turn on the camera is aligned with the port. • Your ...not draw power over the USB cable. Double-click the camera's drive icon. 7. The camera's back lamp will be able to the camera. • Note that even while the connector is sufficiently charged before connecting. Make sure the camera's battery is fully inserted, you connect via a USB hub....

Owners Manual
Page 138
...; A communication icon will appear on the Eye-Fi card after the image data transfer. • Recording a movie to camera settings, battery level, or operating conditions. 138 Using the Camera with a Computer Do not use the Eye-Fi card or turn off Eye-Fi card communication (page 142) when on an...use of images can take some time to complete. • The original images remain on the monitor screen if you try to turn off the camera while image data transfer is in progress. • A confirmation message will appear on the monitor screen while image data transfer is in progress....
...; A communication icon will appear on the Eye-Fi card after the image data transfer. • Recording a movie to camera settings, battery level, or operating conditions. 138 Using the Camera with a Computer Do not use the Eye-Fi card or turn off Eye-Fi card communication (page 142) when on an...use of images can take some time to complete. • The original images remain on the monitor screen if you try to turn off the camera while image data transfer is in progress. • A confirmation message will appear on the monitor screen while image data transfer is in progress....
Owners Manual
Page 149
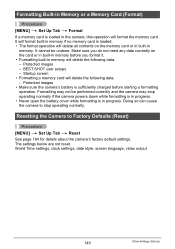
...8226; Formatting built-in memory will delete all contents on the card or in built-in memory. Protected images • Make sure the camera's battery is sufficiently charged before you do not need any data currently on the memory card or in built-in memory before starting a formatting operation....format built-in memory if no memory card is in progress. • Never open the battery cover while formatting is loaded. • The format operation will delete the following data. - Doing so can cause the camera to Factory Defaults (Reset) Procedure [MENU] * Set Up Tab * Reset See page...
...8226; Formatting built-in memory will delete all contents on the card or in built-in memory. Protected images • Make sure the camera's battery is sufficiently charged before you do not need any data currently on the memory card or in built-in memory before starting a formatting operation....format built-in memory if no memory card is in progress. • Never open the battery cover while formatting is loaded. • The format operation will delete the following data. - Doing so can cause the camera to Factory Defaults (Reset) Procedure [MENU] * Set Up Tab * Reset See page...

Owners Manual
Page 153
... repair up to protect yourself against burn injury. 3. Remove the battery from the camera, taking care to your dealer or nearest CASIO authorized service center. . Particular care is required when using the camera where it is overheating creates the risk of water, or in... following steps whenever any way. Contact your dealer or nearest CASIO authorized service center. 153 Appendix Immediately perform the following steps whenever any of the above symptoms are present. 1. Remove the battery from the camera. 3. Immediately perform the following steps whenever any of fire ...
... repair up to protect yourself against burn injury. 3. Remove the battery from the camera, taking care to your dealer or nearest CASIO authorized service center. . Particular care is required when using the camera where it is overheating creates the risk of water, or in... following steps whenever any way. Contact your dealer or nearest CASIO authorized service center. 153 Appendix Immediately perform the following steps whenever any of the above symptoms are present. 1. Remove the battery from the camera. 3. Immediately perform the following steps whenever any of fire ...

Owners Manual
Page 154
... observe any other storage device. Doing so can conduct electricity (necklaces, pencil lead, etc.). - Never carry or store the battery together with a CASIO Digital Camera only. Near heaters, on a heated carpet, in areas exposed to direct sunlight, in a closed vehicle parked in the sun, or other locations where oil smoke ...
... observe any other storage device. Doing so can conduct electricity (necklaces, pencil lead, etc.). - Never carry or store the battery together with a CASIO Digital Camera only. Near heaters, on a heated carpet, in areas exposed to direct sunlight, in a closed vehicle parked in the sun, or other locations where oil smoke ...

Owners Manual
Page 155
... can run down the battery and cause the low battery warning to battery leakage and data corruption. 155 Appendix Actual battery life is greatly affected by the special battery under direct sunlight, in an automobile parked in the sun, or in storage, etc. • Leaving the camera on can damage your local CASIO authorized service center. Doing...
... can run down the battery and cause the low battery warning to battery leakage and data corruption. 155 Appendix Actual battery life is greatly affected by the special battery under direct sunlight, in an automobile parked in the sun, or in storage, etc. • Leaving the camera on can damage your local CASIO authorized service center. Doing...


