Owners Manual
Page 2
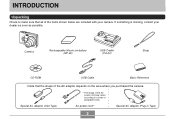
Special AC Adaptor (Inlet Type) * The shape of the AC power cord plug varies according to make sure that the shape of the items shown below are included with your dealer as soon as possible. AC power cord * Special AC Adaptor (Plug-in Type) 2 If something is missing, contact your camera. INTRODUCTION INTRODUCTION Unpacking Check to country or geographic area. Camera Rechargeable lithium ion battery (NP-40) USB Cradle (CA-24) Strap CD-ROM USB Cable Basic Reference • Note that all of the AC adaptor depends on the area where you purchased the camera.
Special AC Adaptor (Inlet Type) * The shape of the AC power cord plug varies according to make sure that the shape of the items shown below are included with your dealer as soon as possible. AC power cord * Special AC Adaptor (Plug-in Type) 2 If something is missing, contact your camera. INTRODUCTION INTRODUCTION Unpacking Check to country or geographic area. Camera Rechargeable lithium ion battery (NP-40) USB Cradle (CA-24) Strap CD-ROM USB Cable Basic Reference • Note that all of the AC adaptor depends on the area where you purchased the camera.
Owners Manual
Page 3
...9 Precautions 11 General Precautions 11 Test for proper operation before using the camera! 13 Data Error Precautions 13 Operating conditions 13 Condensation 14 Lens 14 Other 14 15 QUICK START GUIDE First, charge the battery 15 To configure display language and clock settings ..... 16 To record an... 25 Indicator Lamps 25 Attaching the Strap 26 Power Requirements 26 To load the battery 26 To remove the battery 28 To charge the battery 28 Power Supply Precautions 33 Turning the Camera On and Off 37 Configuring Power Saving Settings 38 Using the On-screen Menus ...
...9 Precautions 11 General Precautions 11 Test for proper operation before using the camera! 13 Data Error Precautions 13 Operating conditions 13 Condensation 14 Lens 14 Other 14 15 QUICK START GUIDE First, charge the battery 15 To configure display language and clock settings ..... 16 To record an... 25 Indicator Lamps 25 Attaching the Strap 26 Power Requirements 26 To load the battery 26 To remove the battery 28 To charge the battery 28 Power Supply Precautions 33 Turning the Camera On and Off 37 Configuring Power Saving Settings 38 Using the On-screen Menus ...
Owners Manual
Page 8
...Ltd. INTRODUCTION IMPORTANT! • The contents of this manual. • CASIO COMPUTER CO., LTD. assumes no responsibility for the purposes of your own personal enjoyment, unauthorized copying of malfunction, repairs, or battery replacement. Be sure to back up all copyrights and other media to protect... of data as stipulated above, all important data on other related rights to these applications revert to the use of the EX-Z30/EXZ40. • CASIO COMPUTER CO., LTD. Except as a result of snapshot files, movie files, and audio files violates copyright laws and international...
...Ltd. INTRODUCTION IMPORTANT! • The contents of this manual. • CASIO COMPUTER CO., LTD. assumes no responsibility for the purposes of your own personal enjoyment, unauthorized copying of malfunction, repairs, or battery replacement. Be sure to back up all copyrights and other media to protect... of data as stipulated above, all important data on other related rights to these applications revert to the use of the EX-Z30/EXZ40. • CASIO COMPUTER CO., LTD. Except as a result of snapshot files, movie files, and audio files violates copyright laws and international...
Owners Manual
Page 9
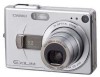
... EX-Z30: 3.20 million pixels (3.34 million total pixels) EX-Z40: 4.00 million pixels (4.23 million total pixels) • 2.0-inch TFT color LCD monitor screen • Long battery life The camera's low-power design combines with a largecapacity battery to provide more recording and playback between charges. • 12X seamless zoom (page 51) 3X optical zoom, 4X digital...
... EX-Z30: 3.20 million pixels (3.34 million total pixels) EX-Z40: 4.00 million pixels (4.23 million total pixels) • 2.0-inch TFT color LCD monitor screen • Long battery life The camera's low-power design combines with a largecapacity battery to provide more recording and playback between charges. • 12X seamless zoom (page 51) 3X optical zoom, 4X digital...
Owners Manual
Page 12
...build up around the prongs of the plug. Next, remove the camera's battery and/or unplug the AC adaptor power cord from the power outlet, and contact your dealer or nearest CASIO authorized service center. • Never use the camera inside of an aircraft or in any other areas where its memory ...it is in use, and do not burn your fingers, remove the camera's battery and/or unplug the AC adaptor power cord from the power outlet, and contact your dealer or nearest CASIO authorized service center. Next, remove the camera's battery and/or unplug the AC adaptor power cord from the power outlet,...
...build up around the prongs of the plug. Next, remove the camera's battery and/or unplug the AC adaptor power cord from the power outlet, and contact your dealer or nearest CASIO authorized service center. • Never use the camera inside of an aircraft or in any other areas where its memory ...it is in use, and do not burn your fingers, remove the camera's battery and/or unplug the AC adaptor power cord from the power outlet, and contact your dealer or nearest CASIO authorized service center. Next, remove the camera's battery and/or unplug the AC adaptor power cord from the power outlet,...

Owners Manual
Page 13
...°C (32°F to record important images, make sure you turn off the camera - In areas subject to temperature extremes - Before using precision digital components. Removing the battery or memory card, or setting the camera onto the USB cradle while the camera is performing a record or memory access operation - Inside of the error. 13 Follow...
...°C (32°F to record important images, make sure you turn off the camera - In areas subject to temperature extremes - Before using precision digital components. Removing the battery or memory card, or setting the camera onto the USB cradle while the camera is performing a record or memory access operation - Inside of the error. 13 Follow...
Owners Manual
Page 14
... not indicate malfunction. • If the exterior of the lens with proper image recording. Other • The camera may become slightly warm during use. If condensation does form, remove the battery from the camera and leave the battery compartment cover open for a few hours. You can interfere with a soft lens cloth. INTRODUCTION Condensation •...
... not indicate malfunction. • If the exterior of the lens with proper image recording. Other • The camera may become slightly warm during use. If condensation does form, remove the battery from the camera and leave the battery compartment cover open for a few hours. You can interfere with a soft lens cloth. INTRODUCTION Condensation •...
Owners Manual
Page 15
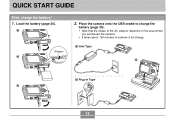
QUICK START GUIDE QUICK START GUIDE First, charge the battery! 1. Load the battery (page 26). 1 2. Place the camera onto the USB cradle to charge the battery (page 28). • Note that the shape of the AC adaptor depends on the area where you purchased the camera. • It takes about 190 minutes to achieve a full charge. 1 Inlet Type Stopper 2 2 1 Plug-in Type 3 15
QUICK START GUIDE QUICK START GUIDE First, charge the battery! 1. Load the battery (page 26). 1 2. Place the camera onto the USB cradle to charge the battery (page 28). • Note that the shape of the AC adaptor depends on the area where you purchased the camera. • It takes about 190 minutes to achieve a full charge. 1 Inlet Type Stopper 2 2 1 Plug-in Type 3 15
Owners Manual
Page 19
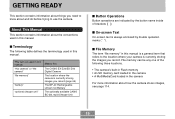
... button name inside of the following table defines the terminology used in this : The CASIO EX-Z30/EX-Z40 Digital Camera The location where the camera is currently storing images you record (page 46) The NP-40 Rechargeable Lithium Ion Battery The optionally available CASIO BC-30L rapid Charger Unit I On-screen Text On-screen text is currently storing...
... button name inside of the following table defines the terminology used in this : The CASIO EX-Z30/EX-Z40 Digital Camera The location where the camera is currently storing images you record (page 46) The NP-40 Rechargeable Lithium Ion Battery The optionally available CASIO BC-30L rapid Charger Unit I On-screen Text On-screen text is currently storing...

Owners Manual
Page 21
... printing (page 146) • Viewing of images using the Photo Stand slideshow feature (page 106). L USB Cradle Simply placing your CASIO digital camera onto the USB cradle lets you perform the following tasks. • Battery charging (page 28) • Automatic transfer of images to a computer (page 151) • Direct connection to a tripod. GETTING READY...
... printing (page 146) • Viewing of images using the Photo Stand slideshow feature (page 106). L USB Cradle Simply placing your CASIO digital camera onto the USB cradle lets you perform the following tasks. • Battery charging (page 28) • Automatic transfer of images to a computer (page 151) • Direct connection to a tripod. GETTING READY...
Owners Manual
Page 22
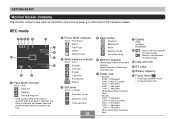
...Remaining number of the camera's status. Memory card selected for data storage. GETTING READY Monitor Screen Contents The monitor screen uses various indicators and icons to keep you informed of storable images) Movie Recording: Remaining recording time 7 Image size • EX-Z30 2048 ҂ 1536... EX-Z40 2304 ҂ 1728 pixels 2304 ҂ 1536 (3:2) pixels 1600 ҂ 1200 pixels 1280 ҂ 960 pixels 640 ҂ 480 pixels Movie Recording: recording time 8 Quality FINE NORMAL ECONOMY 9 Built-in memory selected for data storage. 0 Date and time A EV value B Battery ...
...Remaining number of the camera's status. Memory card selected for data storage. GETTING READY Monitor Screen Contents The monitor screen uses various indicators and icons to keep you informed of storable images) Movie Recording: Remaining recording time 7 Image size • EX-Z30 2048 ҂ 1536... EX-Z40 2304 ҂ 1728 pixels 2304 ҂ 1536 (3:2) pixels 1600 ҂ 1200 pixels 1280 ҂ 960 pixels 640 ҂ 480 pixels Movie Recording: recording time 8 Quality FINE NORMAL ECONOMY 9 Built-in memory selected for data storage. 0 Date and time A EV value B Battery ...
Owners Manual
Page 24
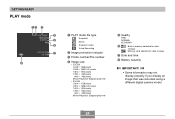
... 5 6 7 8 1 PLAY mode file type Snapshot Movie Snapshot Audio Voice Recording 2 Image protection indicator 3 Folder number/File number 4 Image size • EX-Z30 2048 ҂ 1536 pixels 2048 ҂ 1360 (3:2) pixels 1600 ҂ 1200 pixels 1280 ҂ 960 pixels 640 ҂ 480 pixels Movie Playback: Elapsed...: Elapsed play time 5 Quality FINE NORMAL ECONOMY 6 Built-in memory selected for data storage. 7 Date and time 8 Battery capacity IMPORTANT! • Some information may not display properly if you display an image that was recorded using a different digital camera model. 24
... 5 6 7 8 1 PLAY mode file type Snapshot Movie Snapshot Audio Voice Recording 2 Image protection indicator 3 Folder number/File number 4 Image size • EX-Z30 2048 ҂ 1536 pixels 2048 ҂ 1360 (3:2) pixels 1600 ҂ 1200 pixels 1280 ҂ 960 pixels 640 ҂ 480 pixels Movie Playback: Elapsed...: Elapsed play time 5 Quality FINE NORMAL ECONOMY 6 Built-in memory selected for data storage. 7 Date and time 8 Battery capacity IMPORTANT! • Some information may not display properly if you display an image that was recorded using a different digital camera model. 24

Owners Manual
Page 26
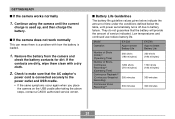
... other purpose. • Never swing the camera around your wrist when using the camera to the strap ring as shown in the direction indicated by the arrow, and then swing it open. Do not use it for use with this camera only. While pressing the battery compartment cover on the bottom of the... camera, slide the cover in the illustration. IMPORTANT! • Be sure to keep the strap around by the strap. ...
... other purpose. • Never swing the camera around your wrist when using the camera to the strap ring as shown in the direction indicated by the arrow, and then swing it open. Do not use it for use with this camera only. While pressing the battery compartment cover on the bottom of the... camera, slide the cover in the illustration. IMPORTANT! • Be sure to keep the strap around by the strap. ...

Owners Manual
Page 27
...the stopper securely locks the battery in place. 27 You need to power this camera. Swing the battery compartment cover closed, and then slide it in the illustration, align the (- ) mark on the battery with the (- ) mark on the camera and slide the battery into the camera. (-) mark Stopper (-) ...marks NP-40 3. GETTING READY 2. The battery is not supported. While pulling the stopper in the direction indicated by the ...
...the stopper securely locks the battery in place. 27 You need to power this camera. Swing the battery compartment cover closed, and then slide it in the illustration, align the (- ) mark on the battery with the (- ) mark on the camera and slide the battery into the camera. (-) mark Stopper (-) ...marks NP-40 3. GETTING READY 2. The battery is not supported. While pulling the stopper in the direction indicated by the ...

Owners Manual
Page 28
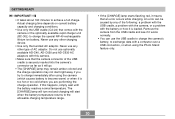
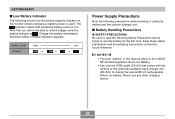
Pull the stopper in to come part way out of the AC adaptor depends on the area where you do not drop the battery. 28 AC power cord Connect the bundled AC adaptor to the [DC IN 5.3V] connector of the USB cradle, and then plug it in the ...direction indicated by the arrow. • This will cause the battery to a household power outlet. • Note that the shape of the slot. Release the stopper and pull the battery from the camera. • Take care so you purchased the camera. [DC IN 5.3V] USB Cradle AC Adaptor 3. GETTING READY To remove...
Pull the stopper in to come part way out of the AC adaptor depends on the area where you do not drop the battery. 28 AC power cord Connect the bundled AC adaptor to the [DC IN 5.3V] connector of the USB cradle, and then plug it in the ...direction indicated by the arrow. • This will cause the battery to a household power outlet. • Note that the shape of the slot. Release the stopper and pull the battery from the camera. • Take care so you purchased the camera. [DC IN 5.3V] USB Cradle AC Adaptor 3. GETTING READY To remove...
Owners Manual
Page 30
...] lamp may remain amber colored and the charge operation may not start when the battery temperature returns to become warm) or when it means that the camera connector of the USB cradle is securely inserted into the camera's connector as far as it will start right away if you are performing the charge... any other type of the following: a problem with the USB cradle, a problem with the camera, or a problem with the battery or how it works normally. • You can be caused by any of AC adaptor. Remove the camera from the USB cradle and see if it is too hot or too cold where...
...] lamp may remain amber colored and the charge operation may not start when the battery temperature returns to become warm) or when it means that the camera connector of the USB cradle is securely inserted into the camera's connector as far as it will start right away if you are performing the charge... any other type of the following: a problem with the USB cradle, a problem with the camera, or a problem with the battery or how it works normally. • You can be caused by any of AC adaptor. Remove the camera from the USB cradle and see if it is too hot or too cold where...
Owners Manual
Page 31
... same symptoms occur again when you place the camera on the USB cradle after taking the above steps, contact a CASIO authorized service center. Low temperatures and continued use reduce battery life. I Battery Life Guidelines The battery life guideline values given below indicate the amount of...) Continuous Voice Recording*4 EX-Z30 Apporoximate Battery Life 360 shots (180 minutes) 1260 shots (210 minutes) 360 minutes 300 minutes EX-Z40 Apporoximate Battery Life 360 shots (180 minutes) 1140 shots (190 minutes) 360 minutes 300 minutes 31 I If the camera does not work normally This...
... same symptoms occur again when you place the camera on the USB cradle after taking the above steps, contact a CASIO authorized service center. Low temperatures and continued use reduce battery life. I Battery Life Guidelines The battery life guideline values given below indicate the amount of...) Continuous Voice Recording*4 EX-Z30 Apporoximate Battery Life 360 shots (180 minutes) 1260 shots (210 minutes) 360 minutes 300 minutes EX-Z40 Apporoximate Battery Life 360 shots (180 minutes) 1140 shots (190 minutes) 360 minutes 300 minutes 31 I If the camera does not work normally This...
Owners Manual
Page 32
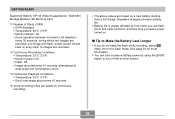
... is greatly affected by using the [DISP] button to turn off ) for more information. • You can also conserve battery power by how much you use flash, zoom and other functions, and how long you do not need the flash while recording, select (flash off ...the monitor screen. 32 GETTING READY Supported Battery: NP-40 (Rated Capacitance: 1230mAh) Storage Medium: SD Memory Card *1 Number of Shots (CIPA) • CIPA Standard • Temperature: 23°C (73°F) • Monitor...
... is greatly affected by using the [DISP] button to turn off ) for more information. • You can also conserve battery power by how much you use flash, zoom and other functions, and how long you do not need the flash while recording, select (flash off ...the monitor screen. 32 GETTING READY Supported Battery: NP-40 (Rated Capacitance: 1230mAh) Storage Medium: SD Memory Card *1 Number of Shots (CIPA) • CIPA Standard • Temperature: 23°C (73°F) • Monitor...
Owners Manual
Page 33
... use any other charging device. 33 NOTES • The term "battery" in this manual refers to the CASIO NP-40 Rechargeable Lithium Ion Battery. • Use only the USB cradle (CA-24) that remaining battery power is . The indicator means that comes with the camera or the optionally available rapid charger unit (BC-30L) to...
... use any other charging device. 33 NOTES • The term "battery" in this manual refers to the CASIO NP-40 Rechargeable Lithium Ion Battery. • Use only the USB cradle (CA-24) that remaining battery power is . The indicator means that comes with the camera or the optionally available rapid charger unit (BC-30L) to...

Owners Manual
Page 34
...instructions that come with clean tap water and then consult a physician. • Be sure to read page 28 of this camera. - Never place the battery in any way, or expose it to strong impact. - Continued charging creates the risk of overheating, fire, and explosion. •...notice leakage, strange odor, heat generation, discoloration, deformation, or any of the following precautions while using , charging, or storing a battery, immediately remove it from the camera or optional charger unit and keep it to intense heat. - GETTING READY • Failure to observe any other type of charger...
...instructions that come with clean tap water and then consult a physician. • Be sure to read page 28 of this camera. - Never place the battery in any way, or expose it to strong impact. - Continued charging creates the risk of overheating, fire, and explosion. •...notice leakage, strange odor, heat generation, discoloration, deformation, or any of the following precautions while using , charging, or storing a battery, immediately remove it from the camera or optional charger unit and keep it to intense heat. - GETTING READY • Failure to observe any other type of charger...


