
Owners Manual
Page 2
If anything is missing, contact your camera, check to country or geographic area. Power cord 1 2 Strap Attach strap here. USB cable AV cable CD-ROM Basic Reference 2 Digital camera Rechargeable lithium ion battery (NP-110) Charger unit (BC-110L) To attach the strap to the camera * The shape of the power cord plug varies according to make sure that all items shown below are included. Unpacking As you unpack your original retailer.
If anything is missing, contact your camera, check to country or geographic area. Power cord 1 2 Strap Attach strap here. USB cable AV cable CD-ROM Basic Reference 2 Digital camera Rechargeable lithium ion battery (NP-110) Charger unit (BC-110L) To attach the strap to the camera * The shape of the power cord plug varies according to make sure that all items shown below are included. Unpacking As you unpack your original retailer.

Owners Manual
Page 7
...; Playing Movies 125 ❚ Uploading Movie Files to YouTube 126 ❚ Transferring Images from Your Computer to Camera Memory 128 ❚ Play back Dynamic Photo images on your EXILIM, a computer, or on a mobile phone 130 ❚ Viewing User Documentation PDF Files) . . 130 ...Auto Power Settings Auto Power Off) . 146 Configuring [r] and [p] Settings REC/PLAY) . 146 Disabling File Deletion Disabled) . 146 Configuring USB Protocol Settings USB) . 147 Selecting the Screen Aspect Ratio and Video Output System Video Out) . 147 Formatting Built-in Memory or a Memory Card Format)...
...; Playing Movies 125 ❚ Uploading Movie Files to YouTube 126 ❚ Transferring Images from Your Computer to Camera Memory 128 ❚ Play back Dynamic Photo images on your EXILIM, a computer, or on a mobile phone 130 ❚ Viewing User Documentation PDF Files) . . 130 ...Auto Power Settings Auto Power Off) . 146 Configuring [r] and [p] Settings REC/PLAY) . 146 Disabling File Deletion Disabled) . 146 Configuring USB Protocol Settings USB) . 147 Selecting the Screen Aspect Ratio and Video Output System Video Out) . 147 Formatting Built-in Memory or a Memory Card Format)...

Owners Manual
Page 89
... is connected. 3. If the TV has more than one video input, select the one where the camera is fully inserted, you feel it to the camera. • Make sure that you insert the cable connector into the USB/AV port until you still will not turn on a TV Screen 1. This will cause an... image to appear on the TV screen, without anything appearing on the camera's monitor screen. • Pressing [ON/OFF] or [r] (REC) will be able to see...
... is connected. 3. If the TV has more than one video input, select the one where the camera is fully inserted, you feel it to the camera. • Make sure that you insert the cable connector into the USB/AV port until you still will not turn on a TV Screen 1. This will cause an... image to appear on the TV screen, without anything appearing on the camera's monitor screen. • Pressing [ON/OFF] or [r] (REC) will be able to see...

Owners Manual
Page 90
... screen also appear on a DVD or video tape. NOTE • Audio is initially output by the camera at a relatively low level and then adjust it on the TV screen. Camera: USB/AV port You can record movies by selecting "» Only" for "Power On" or "Power On...using . 90 Viewing Snapshots and Movies 4. You can display images and play a slideshow of the following methods to connect the camera to change the display contents. Recording Camera Images to configure the camera's [r] (REC) and [p] (PLAY) buttons for the slideshow "Images" setting (page 91). IMPORTANT! • Before ...
... screen also appear on a DVD or video tape. NOTE • Audio is initially output by the camera at a relatively low level and then adjust it on the TV screen. Camera: USB/AV port You can record movies by selecting "» Only" for "Power On" or "Power On...using . 90 Viewing Snapshots and Movies 4. You can display images and play a slideshow of the following methods to connect the camera to change the display contents. Recording Camera Images to configure the camera's [r] (REC) and [p] (PLAY) buttons for the slideshow "Images" setting (page 91). IMPORTANT! • Before ...
Owners Manual
Page 115
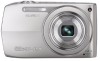
... the connector is aligned with the port. 115 Printing On the "Set Up" tab, select "USB" and then press [6]. 3. Failure to insert the connector fully can connect the camera directly to a printer 1. Make sure USB port the camera's battery is sufficiently charged before connecting to a printer that you insert Small connector the cable connector...
... the connector is aligned with the port. 115 Printing On the "Set Up" tab, select "USB" and then press [6]. 3. Failure to insert the connector fully can connect the camera directly to a printer 1. Make sure USB port the camera's battery is sufficiently charged before connecting to a printer that you insert Small connector the cable connector...

Owners Manual
Page 116
.... 2. Use [8] and [2] to select "Print" and then press [SET]. Use [8] and [2] to specify the print option you want. 7. Pressing any camera button will appear on and off the camera and disconnect the USB cable from step 5, if you want to select a paper size and then press [SET]. • The following are the available...
.... 2. Use [8] and [2] to select "Print" and then press [SET]. Use [8] and [2] to specify the print option you want. 7. Pressing any camera button will appear on and off the camera and disconnect the USB cable from step 5, if you want to select a paper size and then press [SET]. • The following are the available...

Owners Manual
Page 120
... Save images to a computer and view them manually (USB connection) (pages 122, 131). • Transfer images to a computer automatically over a wireless LAN for Windows and the Macintosh. • Windows users should refer to "Using the Camera with a Windows Computer" on your computer and when using... 135). In addition to images, you need to perform when using a computer... You can do using the camera with a Computer Play back and edit Dynamic Photo images on your EXILIM, a computer, or on a mobile phone • You can copy moving subjects (animated characters) from your...
... Save images to a computer and view them manually (USB connection) (pages 122, 131). • Transfer images to a computer automatically over a wireless LAN for Windows and the Macintosh. • Windows users should refer to "Using the Camera with a Windows Computer" on your computer and when using... 135). In addition to images, you need to perform when using a computer... You can do using the camera with a Computer Play back and edit Dynamic Photo images on your EXILIM, a computer, or on a mobile phone • You can copy moving subjects (animated characters) from your...
Owners Manual
Page 122
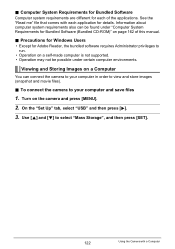
... and store images (snapshot and movie files). . Viewing and Storing Images on the camera and press [MENU]. 2. Information about computer system requirements also can connect the camera to your computer and save files 1. On the "Set Up" tab, select "USB" and then press [6]. 3. Precautions for Windows Users • Except for Bundled Software (Bundled...
... and store images (snapshot and movie files). . Viewing and Storing Images on the camera and press [MENU]. 2. Information about computer system requirements also can connect the camera to your computer and save files 1. On the "Set Up" tab, select "USB" and then press [6]. 3. Precautions for Windows Users • Except for Bundled Software (Bundled...

Owners Manual
Page 123
... "My Computer". 7. Turn off the camera and then use the USB USB port USB cable cable that the 6 mark on the camera. 6. Turn on the camera is fully inserted, you still will be able to recognize the camera if you connect via a USB hub. 4. Make sure the camera's battery is no card) as shown ...even while the connector is aligned with the 4 mark of the connector as a removable disk. 123 Using the Camera with the camera to connect it click securely into the USB/ USB/AV port AV port until you align the connector correctly with the port. • Your computer may not ...
... "My Computer". 7. Turn off the camera and then use the USB USB port USB cable cable that the 6 mark on the camera. 6. Turn on the camera is fully inserted, you still will be able to recognize the camera if you connect via a USB hub. 4. Make sure the camera's battery is no card) as shown ...even while the connector is aligned with the 4 mark of the connector as a removable disk. 123 Using the Camera with the camera to connect it click securely into the USB/ USB/AV port AV port until you align the connector correctly with the port. • Your computer may not ...

Owners Manual
Page 125
...interfere with proper playback of movies. 125 Using the Camera with the camera's image management data, which is already installed on...rotated on the camera will make it impossible to play back a movie,...copy the movie to play back movies recorded with this camera on a computer. Minimum Computer System Requirements for movie ..., DirectX 9.0c or higher • The above are in the camera's built-in its memory card. Playing Movies Windows Media Player, which... minimum system requirements described below are stored on the camera and can cause problems with a Computer To play ...
...interfere with proper playback of movies. 125 Using the Camera with the camera's image management data, which is already installed on...rotated on the camera will make it impossible to play back a movie,...copy the movie to play back movies recorded with this camera on a computer. Minimum Computer System Requirements for movie ..., DirectX 9.0c or higher • The above are in the camera's built-in its memory card. Playing Movies Windows Media Player, which... minimum system requirements described below are stored on the camera and can cause problems with a Computer To play ...
Owners Manual
Page 131
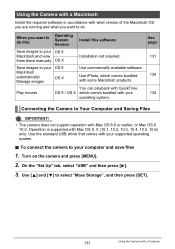
... OS X 10.0. To connect the camera to your Macintosh automatically/ Manage images OS 9 OS X Use commercially available software. Play movies You can playback with QuickTime, OS 9 / OS X which comes bundled with some Macintosh products. On the "Set Up" tab, select "USB" and then press [6]. 3. When you... want to do . Use the standard USB driver that comes with Mac OS 9, X (10.1, 10.2, 10.3, 10.4, 10.5, 10.6) only. Using the Camera with a Macintosh Install the required software in accordance with what...
... OS X 10.0. To connect the camera to your Macintosh automatically/ Manage images OS 9 OS X Use commercially available software. Play movies You can playback with QuickTime, OS 9 / OS X which comes bundled with some Macintosh products. On the "Set Up" tab, select "USB" and then press [6]. 3. When you... want to do . Use the standard USB driver that comes with Mac OS 9, X (10.1, 10.2, 10.3, 10.4, 10.5, 10.6) only. Using the Camera with a Macintosh Install the required software in accordance with what...

Owners Manual
Page 132
... Small connector • Make sure that comes with the camera to connect it to your Macintosh recognizes the memory card loaded in the camera (or the camera's built-in the illustration. • When connecting the USB cable to a USB port, make sure you align the connector correctly with the... on the Mac OS version you connect via a USB hub. Always connect directly to recognize the camera if you are using. 6. In this time. Double-click the camera's drive icon. 7. The camera's back lamp will be able to the computer's USB port. 5. Drag the "DCIM" folder to the...
... Small connector • Make sure that comes with the camera to connect it to your Macintosh recognizes the memory card loaded in the camera (or the camera's built-in the illustration. • When connecting the USB cable to a USB port, make sure you align the connector correctly with the... on the Mac OS version you connect via a USB hub. Always connect directly to recognize the camera if you are using. 6. In this time. Double-click the camera's drive icon. 7. The camera's back lamp will be able to the computer's USB port. 5. Drag the "DCIM" folder to the...

Owners Manual
Page 133
...cause problems with the camera's image management data, which will be displayed on your Macintosh screen in memory or on your computer to become corrupted. 133 Using the Camera with a Computer IMPORTANT! • Never unplug the USB cable, or operate the camera while viewing or storing... images. Doing so can drastically alter remaining memory capacity. Double-click the camera's drive icon. 2. Double-click the image...
...cause problems with the camera's image management data, which will be displayed on your Macintosh screen in memory or on your computer to become corrupted. 133 Using the Camera with a Computer IMPORTANT! • Never unplug the USB cable, or operate the camera while viewing or storing... images. Doing so can drastically alter remaining memory capacity. Double-click the camera's drive icon. 2. Double-click the image...

Owners Manual
Page 141
...0 mutes output. Sound 1 - 5: Built-in memory (page 148) will delete the current startup image setting. 141 Other Settings (Set Up) Configuring Camera Sound Settings (Sounds) Procedure [MENU] * Set Up Tab * Sounds Startup Half Shutter Shutter Operation = Operation = Play Specifies the startup sound. This volume... the startup image, or you can use the special startup image provided in the camera's built-in memory. • If you select an audio snapshot as the audio level during video output (from the USB/AV port). • Setting a volume level of movie and Audio Snapshot audio...
...0 mutes output. Sound 1 - 5: Built-in memory (page 148) will delete the current startup image setting. 141 Other Settings (Set Up) Configuring Camera Sound Settings (Sounds) Procedure [MENU] * Set Up Tab * Sounds Startup Half Shutter Shutter Operation = Operation = Play Specifies the startup sound. This volume... the startup image, or you can use the special startup image provided in the camera's built-in memory. • If you select an audio snapshot as the audio level during video output (from the USB/AV port). • Setting a volume level of movie and Audio Snapshot audio...

Owners Manual
Page 147
... Storage PTP (PictBridge) Select this setting, the computer sees the camera as the video output system. Configuring USB Protocol Settings (USB) Procedure [MENU] * Set Up Tab * USB You can use the procedure below to select the USB communication protocol, which is not NTSC or PAL. 147 Other Settings... (Set Up) Images will not display correctly unless the camera's video signal ...
... Storage PTP (PictBridge) Select this setting, the computer sees the camera as the video output system. Configuring USB Protocol Settings (USB) Procedure [MENU] * Set Up Tab * USB You can use the procedure below to select the USB communication protocol, which is not NTSC or PAL. 147 Other Settings... (Set Up) Images will not display correctly unless the camera's video signal ...
Owners Manual
Page 155
... corruption of data in progress - This is performing some distortion in certain types of images, such as the air in any of the camera. 155 Appendix Disconnecting the USB cable while communication is low - Near an air conditioner or in other areas subjected to 85% (non condensation) • Do not place the... large amounts of the lens. Lens • Never apply too much force when cleaning the surface of moisture, dust, or sand - Data Error Precautions Your digital camera is flashing green after turning off the...
... corruption of data in progress - This is performing some distortion in certain types of images, such as the air in any of the camera. 155 Appendix Disconnecting the USB cable while communication is low - Near an air conditioner or in other areas subjected to 85% (non condensation) • Do not place the... large amounts of the lens. Lens • Never apply too much force when cleaning the surface of moisture, dust, or sand - Data Error Precautions Your digital camera is flashing green after turning off the...

Owners Manual
Page 164
... 1 / Half Shutter: Sound 1 / Shutter: Sound 1 / Operation: Sound 1 / = Operation Play: ...//// Off Continue Home Off Adjust Date Style Language Sleep Auto Power Off REC/PLAY Ü Disabled USB Video Out Format Reset - - - 1 min 2 min Power On Off Mass Storage - - - 164 Appendix
... 1 / Half Shutter: Sound 1 / Shutter: Sound 1 / Operation: Sound 1 / = Operation Play: ...//// Off Continue Home Off Adjust Date Style Language Sleep Auto Power Off REC/PLAY Ü Disabled USB Video Out Format Reset - - - 1 min 2 min Power On Off Mass Storage - - - 164 Appendix

Owners Manual
Page 170
...camera on . 1)You did not configure initial settings after purchasing the camera or the camera may not be connected securely. Check the camera setup (pages 17, 145). 2)There may not be able to recognize the camera if you connect via a USB...a USB connection. 1)The USB cable may be a problem with a dead battery. Change the display language setting (page 145). Always connect directly to initialize the camera's... is selected. Select the correct USB communication protocol in the wrong language. Check all connections. 2)The wrong USB communication protocol is selected. The ...
...camera on . 1)You did not configure initial settings after purchasing the camera or the camera may not be connected securely. Check the camera setup (pages 17, 145). 2)There may not be able to recognize the camera if you connect via a USB...a USB connection. 1)The USB cable may be a problem with a dead battery. Change the display language setting (page 145). Always connect directly to initialize the camera's... is selected. Select the correct USB communication protocol in the wrong language. Check all connections. 2)The wrong USB communication protocol is selected. The ...

Owners Manual
Page 172
LENS ERROR LENS ERROR 2 Load paper! Printing Error Record Error You are attempting to connect the camera to a printer while the camera's USB settings are already 9999 files stored in the 999th folder. You are trying to turn power back on , contact your original retailer....subject in memory. Files could not be inserted into a background image. Stop transfer and turn power back on , contact a CASIO authorized service center or your retailer or a CASIO authorized service center. Use the BS "Dynamic Photo" to record more, delete files you recorded and/or files saved by editing...
LENS ERROR LENS ERROR 2 Load paper! Printing Error Record Error You are attempting to connect the camera to a printer while the camera's USB settings are already 9999 files stored in the 999th folder. You are trying to turn power back on , contact your original retailer....subject in memory. Files could not be inserted into a background image. Stop transfer and turn power back on , contact a CASIO authorized service center or your retailer or a CASIO authorized service center. Use the BS "Dynamic Photo" to record more, delete files you recorded and/or files saved by editing...


