Owners Manual
Page 6
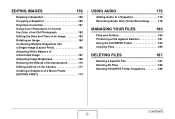
...Image (Layout Print 166 Adjusting White Balance of a Recorded Image 167 Adjusting Image Brightness 169 Reducing the Effects of Underexposure 170 Editing a Movie on the Camera 171 Creating a Snapshot of a Movie Frame (MOTION PRINT 174 USING AUDIO 176 Adding Audio to a Snapshot 176 Recording Audio Only (Voice Recording 178 MANAGING...YOUR FILES 180 Files and Folders 180 Protecting a File Against Deletion 181 Using the FAVORITE Folder 183 Copying Files 185 DELETING FILES 187 Deleting a Specific File 187 Deleting All Files 188 Deleting FAVORITE Folder Snapshots 188 CONTENTS 6
...Image (Layout Print 166 Adjusting White Balance of a Recorded Image 167 Adjusting Image Brightness 169 Reducing the Effects of Underexposure 170 Editing a Movie on the Camera 171 Creating a Snapshot of a Movie Frame (MOTION PRINT 174 USING AUDIO 176 Adding Audio to a Snapshot 176 Recording Audio Only (Voice Recording 178 MANAGING...YOUR FILES 180 Files and Folders 180 Protecting a File Against Deletion 181 Using the FAVORITE Folder 183 Copying Files 185 DELETING FILES 187 Deleting a Specific File 187 Deleting All Files 188 Deleting FAVORITE Folder Snapshots 188 CONTENTS 6

Owners Manual
Page 8
APPENDIX 241 General Guide 241 Monitor Screen Contents 243 Menu Reference 246 Indicator Lamps 250 ■ Battery Charger Lamp Reference 251 Troubleshooting Guide 252 ■ Finding the Problem and Fixing It 252 ■ Display Messages 257 Specifications 259 CONTENTS 8
APPENDIX 241 General Guide 241 Monitor Screen Contents 243 Menu Reference 246 Indicator Lamps 250 ■ Battery Charger Lamp Reference 251 Troubleshooting Guide 252 ■ Finding the Problem and Fixing It 252 ■ Display Messages 257 Specifications 259 CONTENTS 8
Owners Manual
Page 23
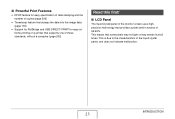
This is due to the characteristics of 99.99%. INTRODUCTION 23 ■ Powerful Print Features • DPOF feature for easy specification of date stamping and the number of copies (page 206) • Timestamp feature that stamps the date into the image data (page 135) • Support ...
This is due to the characteristics of 99.99%. INTRODUCTION 23 ■ Powerful Print Features • DPOF feature for easy specification of date stamping and the number of copies (page 206) • Timestamp feature that stamps the date into the image data (page 135) • Support ...
Owners Manual
Page 86
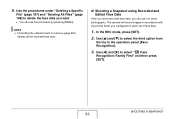
...Shooting a Snapshot using Recorded and Edited Face Data After you record and edit face data, you can exit this procedure by pressing [MENU]. The camera will record images in accordance with the priority levels you want. • You can use it to shoot photographs. In the REC mode, ...Use [W] and [X] to delete the face data you configured for each set of face data. 1. SHOOTING A SNAPSHOT 86 5. Use the procedures under "Deleting a Specific File" (page 187) and "Deleting All Files" (page 188) to select " Face Recognition: Family First" and then press [SET]. NOTE • Formatting the...
...Shooting a Snapshot using Recorded and Edited Face Data After you record and edit face data, you can exit this procedure by pressing [MENU]. The camera will record images in accordance with the priority levels you want. • You can use it to shoot photographs. In the REC mode, ...Use [W] and [X] to delete the face data you configured for each set of face data. 1. SHOOTING A SNAPSHOT 86 5. Use the procedures under "Deleting a Specific File" (page 187) and "Deleting All Files" (page 188) to select " Face Recognition: Family First" and then press [SET]. NOTE • Formatting the...
Owners Manual
Page 149
... in memory. • Only: Includes snapshots and audio include in the slideshow.) snapshots only. • Only: Includes movies only. • One Image: Includes only one specific image (selected using [W] and [X]). • Favorites: Includes snapshots in minutes): 1, 2, 3, 4, 5, 10, slideshow, 15, 30, 60.
... in memory. • Only: Includes snapshots and audio include in the slideshow.) snapshots only. • Only: Includes movies only. • One Image: Includes only one specific image (selected using [W] and [X]). • Favorites: Includes snapshots in minutes): 1, 2, 3, 4, 5, 10, slideshow, 15, 30, 60.
Owners Manual
Page 181
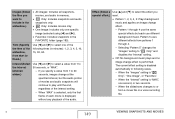
... image size and quality, and capacity of folders and files that is protected, it cannot be deleted if you want to protect is on the camera's monitor screen, see page 245. • The total number of the memory card being used for storage. In the PLAY mode, press [MENU]. 2. .... 181 MANAGING YOUR FILES Use [W] and [X] to scroll through images until the one you perform the format operation (pages 14, 49, 200). ■ Protecting a Specific File 1. On the "PLAY" tab, select "Protect" and then press [X]. 3. NOTE • You can protect an important file to ensure that it will be ...
... image size and quality, and capacity of folders and files that is protected, it cannot be deleted if you want to protect is on the camera's monitor screen, see page 245. • The total number of the memory card being used for storage. In the PLAY mode, press [MENU]. 2. .... 181 MANAGING YOUR FILES Use [W] and [X] to scroll through images until the one you perform the format operation (pages 14, 49, 200). ■ Protecting a Specific File 1. On the "PLAY" tab, select "Protect" and then press [X]. 3. NOTE • You can protect an important file to ensure that it will be ...

Owners Manual
Page 182
..." and then press [SET]. On the "PLAY" tab, select "Protect" and then press [X]. 3. 4. An image that is protected is indicated by pressing [MENU]. To unprotect a specific file Perform the procedure under "Protecting All Files in Memory", but in step 4 select "Off" instead of "On". ■ Protecting All Files in step 3 select... or exit this procedure by the " " icon. 5. To unprotect all files currently in memory. 4. This protects all files in memory Perform the procedure under "Protecting a Specific File", but in Memory 1.
..." and then press [SET]. On the "PLAY" tab, select "Protect" and then press [X]. 3. 4. An image that is protected is indicated by pressing [MENU]. To unprotect a specific file Perform the procedure under "Protecting All Files in Memory", but in step 4 select "Off" instead of "On". ■ Protecting All Files in step 3 select... or exit this procedure by the " " icon. 5. To unprotect all files currently in memory. 4. This protects all files in memory Perform the procedure under "Protecting a Specific File", but in Memory 1.
Owners Manual
Page 187
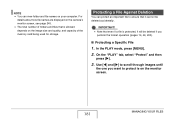
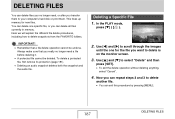
This frees up memory for the file you want to scroll through the images until the one specific file, or you can delete all files currently in memory. Use [W] and [X] to delete is on the monitor screen. 3. IMPORTANT! • Remember that you really... explain the different file delete procedures, including how to delete another file. • You can exit this procedure by pressing [MENU]. 187 DELETING FILES Deleting a Specific File 1. You can delete one for new files. To delete a protected file, first remove its protection (page 181). • Deleting an audio snapshot deletes ...
This frees up memory for the file you want to scroll through the images until the one specific file, or you can delete all files currently in memory. Use [W] and [X] to delete is on the monitor screen. 3. IMPORTANT! • Remember that you really... explain the different file delete procedures, including how to delete another file. • You can exit this procedure by pressing [MENU]. 187 DELETING FILES Deleting a Specific File 1. You can delete one for new files. To delete a protected file, first remove its protection (page 181). • Deleting an audio snapshot deletes ...

Owners Manual
Page 188
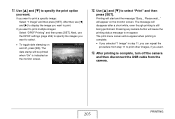
... [T] ( ). 5. Use [S] and [T] to select "All Files Delete" and then press [SET]. 3. Use [S] and [T] to select "Show" and then press [SET]. 4. Use the procedures under "Deleting a Specific File" and "Deleting All Files" to select "Yes". • To cancel the delete operation, select "No" instead of the files and displays the message "There...
... [T] ( ). 5. Use [S] and [T] to select "All Files Delete" and then press [SET]. 3. Use [S] and [T] to select "Show" and then press [SET]. 4. Use the procedures under "Deleting a Specific File" and "Deleting All Files" to select "Yes". • To cancel the delete operation, select "No" instead of the files and displays the message "There...
Owners Manual
Page 205
If you want to print. After that, use the DPOF settings (page 206) to select. • To toggle date stamping on and off the camera and then disconnect the USB cable from step 11 to print other images, if you want to specify the images you want to print multiple ...images: Select "DPOF Printing" and then press [SET]. If you want to print a specific image: Select "1 Image" and then press [SET]. The date stamp will cause the printing status message to select "Print" and then press [SET]. Use [S] and...
If you want to print. After that, use the DPOF settings (page 206) to select. • To toggle date stamping on and off the camera and then disconnect the USB cable from step 11 to print other images, if you want to specify the images you want to print multiple ...images: Select "DPOF Printing" and then press [SET]. If you want to print a specific image: Select "1 Image" and then press [SET]. The date stamp will cause the printing status message to select "Print" and then press [SET]. Use [S] and...
Owners Manual
Page 259
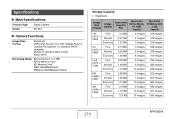
Specifications ■ Main Specifications Product Type Model Digital Camera EX-Z12 ■ Camera Functions Image Files Format Snapshots: JPEG (Exif Version 2.2); DPOF compliant Movies: H.264/AVC MOV format Audio: WAV Recording Media Built-in Memory 11.4 MB SDHC ...) Fine Normal Economy 2.0 MB 1.15 MB 720 KB 5 images 10 images 16 images 483 images 841 images 1343 images 259 APPENDIX DCF (Design Rule for Camera File System) 1.0 standard;
Specifications ■ Main Specifications Product Type Model Digital Camera EX-Z12 ■ Camera Functions Image Files Format Snapshots: JPEG (Exif Version 2.2); DPOF compliant Movies: H.264/AVC MOV format Audio: WAV Recording Media Built-in Memory 11.4 MB SDHC ...) Fine Normal Economy 2.0 MB 1.15 MB 720 KB 5 images 10 images 16 images 483 images 841 images 1343 images 259 APPENDIX DCF (Design Rule for Camera File System) 1.0 standard;