

User Guide
Page 1
E Digital Camera User's Guide K1140PCM1DMX Thank you for purchasing this CASIO product. • Before using it, be sure to read the precautions contained in this User's Guide. • Keep the User's Guide in a safe place for future reference. • For the most up-to-date information about this product, visit the official EXILIM Website at http://www.exilim.com/ 1
E Digital Camera User's Guide K1140PCM1DMX Thank you for purchasing this CASIO product. • Before using it, be sure to read the precautions contained in this User's Guide. • Keep the User's Guide in a safe place for future reference. • For the most up-to-date information about this product, visit the official EXILIM Website at http://www.exilim.com/ 1
User Guide
Page 2
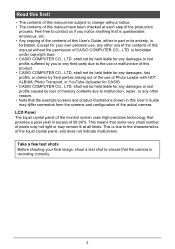
Digital camera Rechargeable lithium ion battery (NP-40) Charger unit (BC-31L) To attach the strap to make sure that all items shown below are included. If anything is missing, contact your camera, check to the camera Attach strap here. Power cord Strap USB cable AV cable CD-ROM Basic Reference 2 Unpacking As you unpack your original retailer.
Digital camera Rechargeable lithium ion battery (NP-40) Charger unit (BC-31L) To attach the strap to make sure that all items shown below are included. If anything is missing, contact your camera, check to the camera Attach strap here. Power cord Strap USB cable AV cable CD-ROM Basic Reference 2 Unpacking As you unpack your original retailer.
User Guide
Page 3
...loss of memory contents due to malfunction, repair, or any other use or malfunction of this product. • CASIO COMPUTER CO., LTD. This is forbidden under copyright laws. • CASIO COMPUTER CO., LTD. is due to the characteristics of the liquid crystal panel, and does not indicate malfunction. ...precision technology that some very small number of pixels may not light or may differ somewhat from the screens and configuration of the actual camera. Feel free to contact us if you or any damages, lost profits suffered by third parties arising out of the use of Photo...
...loss of memory contents due to malfunction, repair, or any other use or malfunction of this product. • CASIO COMPUTER CO., LTD. This is forbidden under copyright laws. • CASIO COMPUTER CO., LTD. is due to the characteristics of the liquid crystal panel, and does not indicate malfunction. ...precision technology that some very small number of pixels may not light or may differ somewhat from the screens and configuration of the actual camera. Feel free to contact us if you or any damages, lost profits suffered by third parties arising out of the use of Photo...
User Guide
Page 4
...digital camera 9 What you can do with your CASIO camera 10 First, charge the battery prior to use 11 ❚ To charge the battery 11 ❚ To load the battery 12 Configuring the Display Language the First Time You Turn On the Camera... 14 ❚ To format (initialize) a new memory card 15 To shoot a snapshot 16 Holding the Camera Correctly 18 Viewing Snapshots 19 Deleting Images 20 ❚ To delete a single file 20 ❚ To delete... 41 Changing the Control Panel Date/Time Style 42 Shooting with Zoom 42 ❚ Optical Zoom and Digital Zoom Switch Point 43 B 4 Contents
...digital camera 9 What you can do with your CASIO camera 10 First, charge the battery prior to use 11 ❚ To charge the battery 11 ❚ To load the battery 12 Configuring the Display Language the First Time You Turn On the Camera... 14 ❚ To format (initialize) a new memory card 15 To shoot a snapshot 16 Holding the Camera Correctly 18 Viewing Snapshots 19 Deleting Images 20 ❚ To delete a single file 20 ❚ To delete... 41 Changing the Control Panel Date/Time Style 42 Shooting with Zoom 42 ❚ Optical Zoom and Digital Zoom Switch Point 43 B 4 Contents
User Guide
Page 5
...❚ Using Auto Shutter Auto Shutter) . . . 66 ❚ Shooting with Face Recognition Face Recognition) . . . 66 ❚ Reducing the Effects of Camera and Subject Movement . . . . (Anti Shake) . . . 67 ❚ Specifying the Auto Focus Area AF Area) . . . 68 ❚ Using.... . . 70 ❚ Shooting with Quick Shutter Quick Shutter) . . . 70 ❚ Displaying the On-screen Grid Grid) . . . 71 ❚ Turning Digital Zoom On or Off Digital Zoom) . . . 71 ❚ Turning on Image Review Review) . . . 71 ❚ Using Icon Help Icon Help) . . . 71 ❚ Configuring Power On...
...❚ Using Auto Shutter Auto Shutter) . . . 66 ❚ Shooting with Face Recognition Face Recognition) . . . 66 ❚ Reducing the Effects of Camera and Subject Movement . . . . (Anti Shake) . . . 67 ❚ Specifying the Auto Focus Area AF Area) . . . 68 ❚ Using.... . . 70 ❚ Shooting with Quick Shutter Quick Shutter) . . . 70 ❚ Displaying the On-screen Grid Grid) . . . 71 ❚ Turning Digital Zoom On or Off Digital Zoom) . . . 71 ❚ Turning on Image Review Review) . . . 71 ❚ Using Icon Help Icon Help) . . . 71 ❚ Configuring Power On...
User Guide
Page 6
...; Turning On Flash Assist Flash Assist) . . . 79 ❚❙ Viewing Snapshots and Movies 80 Viewing Snapshots 80 Viewing a Movie 80 Zooming an On-screen Image 81 Displaying 12 Images on the Same Screen 81 Displaying Images in the Calendar Screen 82 Viewing Snapshots and Movies on... a TV Screen 82 ❚❙ Other Playback Functions (PLAY) 85 Playing a Slideshow on the Camera Slideshow) . . 85 ❚ Saving Music from Your Computer to Camera Memory 86 Laying Out Snapshots with Layout Print Layout Print) . . 88 Creating a Snapshot of Movie Frames MOTION ...
...; Turning On Flash Assist Flash Assist) . . . 79 ❚❙ Viewing Snapshots and Movies 80 Viewing Snapshots 80 Viewing a Movie 80 Zooming an On-screen Image 81 Displaying 12 Images on the Same Screen 81 Displaying Images in the Calendar Screen 82 Viewing Snapshots and Movies on... a TV Screen 82 ❚❙ Other Playback Functions (PLAY) 85 Playing a Slideshow on the Camera Slideshow) . . 85 ❚ Saving Music from Your Computer to Camera Memory 86 Laying Out Snapshots with Layout Print Layout Print) . . 88 Creating a Snapshot of Movie Frames MOTION ...
User Guide
Page 7
...REC Mode Screen Layout R Panel) . 126 Selecting a PLAY Mode Screen Layout P Display) . 127 Adjusting Monitor Screen Brightness Screen) . 127 Configuring Camera Sound Settings Sounds) . 128 Configuring a Startup Image Startup) . 128 Specifying the File Name Serial Number Generation Rule . . . . . (File ...No.) . 129 Configuring World Time Settings World Time) . 130 Time Stamping Snapshots Timestamp) . 131 Setting the Camera's Clock Adjust) . 132 Specifying the Date Style Date Style) . 132 Specifying the Display Language Language) . 133 Configuring Sleep State Settings Sleep...
...REC Mode Screen Layout R Panel) . 126 Selecting a PLAY Mode Screen Layout P Display) . 127 Adjusting Monitor Screen Brightness Screen) . 127 Configuring Camera Sound Settings Sounds) . 128 Configuring a Startup Image Startup) . 128 Specifying the File Name Serial Number Generation Rule . . . . . (File ...No.) . 129 Configuring World Time Settings World Time) . 130 Time Stamping Snapshots Timestamp) . 131 Setting the Camera's Clock Adjust) . 132 Specifying the Date Style Date Style) . 132 Specifying the Display Language Language) . 133 Configuring Sleep State Settings Sleep...
User Guide
Page 8
❚ Battery Precautions 149 ❚ Using the Camera in another Country 149 Using a Memory Card 150 ❚ To replace the memory card 150 Computer System Requirements for Bundled Software 152 General Guide 153 Monitor Screen Contents 154 Reset Initial Default Settings 156 When things don't go right 159 ❚ Troubleshooting 159 ❚ Display Messages 163 Number of Snapshots and Movie Recording Time 165 Specifications 167 8 Contents
❚ Battery Precautions 149 ❚ Using the Camera in another Country 149 Using a Memory Card 150 ❚ To replace the memory card 150 Computer System Requirements for Bundled Software 152 General Guide 153 Monitor Screen Contents 154 Reset Initial Default Settings 156 When things don't go right 159 ❚ Troubleshooting 159 ❚ Display Messages 163 Number of Snapshots and Movie Recording Time 165 Specifications 167 8 Contents
User Guide
Page 9
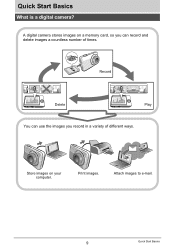
Attach images to e-mail. 9 Quick Start Basics Print images. Record Delete Play You can record and delete images a countless number of different ways. Store images on a memory card, so you can use the images you record in a variety of times. Quick Start Basics What is a digital camera? A digital camera stores images on your computer.
Attach images to e-mail. 9 Quick Start Basics Print images. Record Delete Play You can record and delete images a countless number of different ways. Store images on a memory card, so you can use the images you record in a variety of times. Quick Start Basics What is a digital camera? A digital camera stores images on your computer.

User Guide
Page 10
...subject is packed with your CASIO camera Your CASIO camera is smiling, etc. BEST SHOT Simply select the sample scene you want and the camera sets up automatically. Then all you need do with a powerful selection of features and functions to make recording of digital images easier, including the ...following three main functions. See page 50 for more information. See page 32 for more information. See page 28 for more information. 10 Quick Start Basics Auto Shutter The camera releases the shutter automatically ...
...subject is packed with your CASIO camera Your CASIO camera is smiling, etc. BEST SHOT Simply select the sample scene you want and the camera sets up automatically. Then all you need do with a powerful selection of features and functions to make recording of digital images easier, including the ...following three main functions. See page 50 for more information. See page 32 for more information. See page 28 for more information. 10 Quick Start Basics Auto Shutter The camera releases the shutter automatically ...
User Guide
Page 11
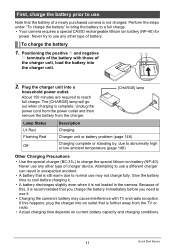
...the special charger (BC-31L) to charge the special lithium ion battery (NP-40). Never use a different charger can result in the camera. terminals of the battery with TV and radio reception. Because of the charger unit, load the battery into a household power outlet. To... and negative - Plug the charger unit into the charger unit. 2. About 150 minutes are required to a full charge. • Your camera requires a special CASIO rechargeable lithium ion battery (NP-40) for power. If this happens, plug the charger into an outlet that you charge the battery immediately...
...the special charger (BC-31L) to charge the special lithium ion battery (NP-40). Never use a different charger can result in the camera. terminals of the battery with TV and radio reception. Because of the charger unit, load the battery into a household power outlet. To... and negative - Plug the charger unit into the charger unit. 2. About 150 minutes are required to a full charge. • Your camera requires a special CASIO rechargeable lithium ion battery (NP-40) for power. If this happens, plug the charger into an outlet that you charge the battery immediately...
User Guide
Page 12
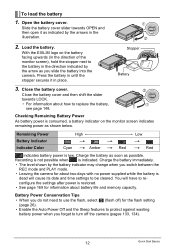
...by the arrow as indicated by the battery indicator may change when you switch between the REC mode and PLAY mode. • Leaving the camera for about battery life and memory capacity. Checking Remaining Battery Power As battery power is consumed, a battery indicator on the battery facing upwards... hold the stopper next to the battery in until the stopper secures it as you slide the battery into the camera. Recording is not possible when is low. With the EXILIM logo on the monitor screen indicates remaining power as possible. To load the battery 1. Open the battery cover. 1...
...by the arrow as indicated by the battery indicator may change when you switch between the REC mode and PLAY mode. • Leaving the camera for about battery life and memory capacity. Checking Remaining Battery Power As battery power is consumed, a battery indicator on the battery facing upwards... hold the stopper next to the battery in until the stopper secures it as you slide the battery into the camera. Recording is not possible when is low. With the EXILIM logo on the monitor screen indicates remaining power as possible. To load the battery 1. Open the battery cover. 1...
User Guide
Page 13
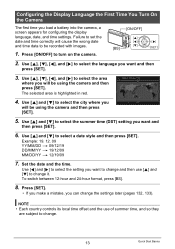
... [8] and [2] to select the summer time (DST) setting you want and then press [SET]. 6. Configuring the Display Language the First Time You Turn On the Camera The first time you can change the settings later (pages 132, 133). Use [8], [2], [4], and [6] to change. 13 Quick Start Basics Use [8] and [2] .... To switch between 12-hour and 24-hour format, press [BS]. 8. Press [SET]. • If you make a mistake, you load a battery into the camera, a screen appears for configuring the display language, date, and time settings. Example: 19. 12. 09 YY/MM/DD * 09/12/19 DD/MM/YY *...
... [8] and [2] to select the summer time (DST) setting you want and then press [SET]. 6. Configuring the Display Language the First Time You Turn On the Camera The first time you can change the settings later (pages 132, 133). Use [8], [2], [4], and [6] to change. 13 Quick Start Basics Use [8] and [2] .... To switch between 12-hour and 24-hour format, press [BS]. 8. Press [SET]. • If you make a mistake, you load a battery into the camera, a screen appears for configuring the display language, date, and time settings. Example: 19. 12. 09 YY/MM/DD * 09/12/19 DD/MM/YY *...

User Guide
Page 14
...of memory card. Press [ON/OFF] to turn off the camera and 1 then open it click securely into the card slot, immediately turn off the camera, remove the battery, and contact your retailer or nearest CASIO authorized service center. 14 Quick Start Basics Front Back Front 3.... Images recorded while a memory card is loaded, images are saved to the memory card. Supported Memory Cards - Load a memory card. Preparing a Memory Card Though the camera has built-in memory....
...of memory card. Press [ON/OFF] to turn off the camera and 1 then open it click securely into the card slot, immediately turn off the camera, remove the battery, and contact your retailer or nearest CASIO authorized service center. 14 Quick Start Basics Front Back Front 3.... Images recorded while a memory card is loaded, images are saved to the memory card. Supported Memory Cards - Load a memory card. Preparing a Memory Card Though the camera has built-in memory....
User Guide
Page 15
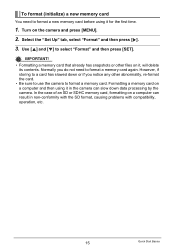
..., will delete its contents. Turn on it for the first time. 1. However, if storing to a card has slowed down data processing by the camera. To format (initialize) a new memory card You need to select "Format" and then press [SET]. Normally you notice any other files on the...]. 2. Formatting a memory card on a computer can slow down or if you do not need to format a new memory card before using it in the camera can result in non-conformity with the SD format, causing problems with compatibility, operation, etc. 15 Quick Start Basics Use [8] and [2] to format a memory...
..., will delete its contents. Turn on it for the first time. 1. However, if storing to a card has slowed down data processing by the camera. To format (initialize) a new memory card You need to select "Format" and then press [SET]. Normally you notice any other files on the...]. 2. Formatting a memory card on a computer can slow down or if you do not need to format a new memory card before using it in the camera can result in non-conformity with the SD format, causing problems with compatibility, operation, etc. 15 Quick Start Basics Use [8] and [2] to format a memory...

User Guide
Page 16
Zoom controller z Telephoto w Wide Angle 3. Half-press the shutter button to turn green. When focus is currently pointed at the subject. If it is complete, the camera will beep, the back lamp will light green, and the focus frame will turn on the display. B 16 Quick Start Basics To shoot... stops. Make sure R is an important technique for a half-press and a full-press of the shutter button is on the camera. You can zoom the image, if you half-press the shutter button, the camera automatically adjusts exposure and focuses on the subject it isn't, see page 50.
Zoom controller z Telephoto w Wide Angle 3. Half-press the shutter button to turn green. When focus is currently pointed at the subject. If it is complete, the camera will beep, the back lamp will light green, and the focus frame will turn on the display. B 16 Quick Start Basics To shoot... stops. Make sure R is an important technique for a half-press and a full-press of the shutter button is on the camera. You can zoom the image, if you half-press the shutter button, the camera automatically adjusts exposure and focuses on the subject it isn't, see page 50.
User Guide
Page 17
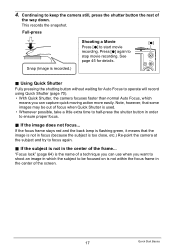
Press [0] again to keep the camera still, press the shutter button the rest of the way down. If the image does not focus... ...however, that the image is not in the center of focus when Quick Shutter is too close, etc.) Re-point the camera at the subject and try to half-press the shutter button in the center of a technique you can use when you can... page 45 for Auto Focus to operate will record using Quick Shutter (page 70). • With Quick Shutter, the camera focuses faster than normal Auto Focus, which means you want to shoot an image in which the subject to be out of the...
Press [0] again to keep the camera still, press the shutter button the rest of the way down. If the image does not focus... ...however, that the image is not in the center of focus when Quick Shutter is too close, etc.) Re-point the camera at the subject and try to half-press the shutter button in the center of a technique you can use when you can... page 45 for Auto Focus to operate will record using Quick Shutter (page 70). • With Quick Shutter, the camera focuses faster than normal Auto Focus, which means you want to shoot an image in which the subject to be out of the...
User Guide
Page 18
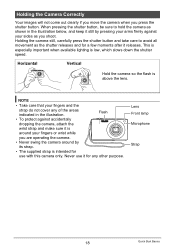
... shutter button. Lens Front lamp Microphone Strap 18 Quick Start Basics Horizontal Vertical Hold the camera so the flash is low, which slows down the shutter speed. Never use with this camera only. This is especially important when available lighting is above the lens. NOTE •...areas indicated in the illustration below, and keep it releases. Holding the Camera Correctly Your images will not come out clearly if you move the camera when you are operating the camera. • Never swing the camera around by its strap. • The supplied strap is intended for use...
... shutter button. Lens Front lamp Microphone Strap 18 Quick Start Basics Horizontal Vertical Hold the camera so the flash is low, which slows down the shutter speed. Never use with this camera only. This is especially important when available lighting is above the lens. NOTE •...areas indicated in the illustration below, and keep it releases. Holding the Camera Correctly Your images will not come out clearly if you move the camera when you are operating the camera. • Never swing the camera around by its strap. • The supplied strap is intended for use...
User Guide
Page 19
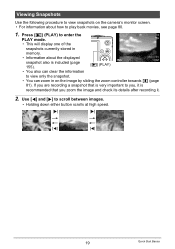
...PLAY) to enter the PLAY mode. • This will display one of the snapshots currently stored in on the image by sliding the zoom controller towards z (page 81). If you are recording a snapshot that you , it . 2. Viewing Snapshots Use the following procedure to view snapshots ...on the camera's monitor screen. • For information about the displayed snapshot also is recommended that is very important to you zoom the image and check its details after recording it is included (page 155). [p] (PLAY) ...
...PLAY) to enter the PLAY mode. • This will display one of the snapshots currently stored in on the image by sliding the zoom controller towards z (page 81). If you are recording a snapshot that you , it . 2. Viewing Snapshots Use the following procedure to view snapshots ...on the camera's monitor screen. • For information about the displayed snapshot also is recommended that is very important to you zoom the image and check its details after recording it is included (page 155). [p] (PLAY) ...
User Guide
Page 21
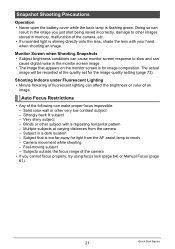
... shade the lens with a repeating horizontal pattern - Camera movement while shooting - Blinds or other very low contrast subject - Subjects outside the focus range ...of the camera, etc. • If unwanted light is for light from the camera - Multiple subjects at the quality set for the image quality setting ... from the AF assist lamp to reach - Very shiny subject - Subject in memory, malfunction of the camera • If you just shot being saved incorrectly, damage to slow and can cause monitor screen response...
... shade the lens with a repeating horizontal pattern - Camera movement while shooting - Blinds or other very low contrast subject - Subjects outside the focus range ...of the camera, etc. • If unwanted light is for light from the camera - Multiple subjects at the quality set for the image quality setting ... from the AF assist lamp to reach - Very shiny subject - Subject in memory, malfunction of the camera • If you just shot being saved incorrectly, damage to slow and can cause monitor screen response...


