
Owners Manual
Page 2
... Cord * Special AC Adaptor (Plug-in Type) (AD-C52J) 2 If something is missing, contact your camera. INTRODUCTION INTRODUCTION Unpacking Check to country or geographic area. Camera Rechargeable Lithium Ion Battery (NP-20) USB Cradle (CA-30) Strap CD-ROMs (2) USB Cable AV Cable Basic Reference • Note that all of the AC power cord plug...
... Cord * Special AC Adaptor (Plug-in Type) (AD-C52J) 2 If something is missing, contact your camera. INTRODUCTION INTRODUCTION Unpacking Check to country or geographic area. Camera Rechargeable Lithium Ion Battery (NP-20) USB Cradle (CA-30) Strap CD-ROMs (2) USB Cable AV Cable Basic Reference • Note that all of the AC power cord plug...
Owners Manual
Page 3
...an image 20 To view a recorded image 21 To delete an image 21 22 GETTING READY About This Manual 22 General Guide 23 Camera 23 USB Cradle 25 Monitor Screen Contents 26 REC Mode 26 PLAY Mode 28 Changing the Contents of the Monitor Screen 30 Attaching the Strap 31 Power...47 To configure display language and clock settings 48 50 BASIC IMAGE RECORDING Recording an Image 50 Aiming the Camera 50 Recording an Image 51 Using Zoom 56 Optical Zoom 56 Digital Zoom 58 Using the Flash 60 Flash Unit Status 62 Changing the Flash Intensity Setting 63 Using Flash ...
...an image 20 To view a recorded image 21 To delete an image 21 22 GETTING READY About This Manual 22 General Guide 23 Camera 23 USB Cradle 25 Monitor Screen Contents 26 REC Mode 26 PLAY Mode 28 Changing the Contents of the Monitor Screen 30 Attaching the Strap 31 Power...47 To configure display language and clock settings 48 50 BASIC IMAGE RECORDING Recording an Image 50 Aiming the Camera 50 Recording an Image 51 Using Zoom 56 Optical Zoom 56 Digital Zoom 58 Using the Flash 60 Flash Unit Status 62 Changing the Flash Intensity Setting 63 Using Flash ...
Owners Manual
Page 9
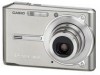
...; 2.2-inch TFT color LCD monitor screen • 8.3MB built-in memory Images can be recorded without using a memory card. • Bundled with a USB Cradle The bundled USB cradle can be used to charge the camera's battery (page 33), to view images on a TV screen (page 146), and to transfer images to third parties ... light (page 53) Improves auto focus accuracy when shooting under dim lighting. • 12X zoom (page 56) 3X optical zoom, 4X digital zoom 9 B I LCD Panel The LCD panel is on the cradle (page 140). • REC mode or PLAY mode power up (page 41) Press [ ] (REC) or [ ] (PLAY) ...
...; 2.2-inch TFT color LCD monitor screen • 8.3MB built-in memory Images can be recorded without using a memory card. • Bundled with a USB Cradle The bundled USB cradle can be used to charge the camera's battery (page 33), to view images on a TV screen (page 146), and to transfer images to third parties ... light (page 53) Improves auto focus accuracy when shooting under dim lighting. • 12X zoom (page 56) 3X optical zoom, 4X digital zoom 9 B I LCD Panel The LCD panel is on the cradle (page 140). • REC mode or PLAY mode power up (page 41) Press [ ] (REC) or [ ] (PLAY) ...
Owners Manual
Page 15
... subject to high humidity or dust - Removing the battery or memory card, or setting the camera onto the USB cradle while the camera is still flashing green after you turn off the camera - Inside of the error. Follow the instructions provided by the message...sunlight - Removing the battery, removing the memory card, or placing the camera onto the USB cradle while the operation lamp is performing a record or memory access operation - I Data Error Precautions • Your digital camera is manufactured using precision digital components. Any of the following areas. -
... subject to high humidity or dust - Removing the battery or memory card, or setting the camera onto the USB cradle while the camera is still flashing green after you turn off the camera - Inside of the error. Follow the instructions provided by the message...sunlight - Removing the battery, removing the memory card, or placing the camera onto the USB cradle while the operation lamp is performing a record or memory access operation - I Data Error Precautions • Your digital camera is manufactured using precision digital components. Any of the following areas. -
Owners Manual
Page 16
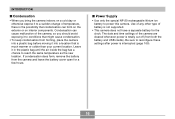
... on interior components. Use of any other type of battery is totally cut off (from both the battery and USB cradle). Be sure to power this camera. The date and time settings of temperature, there is the possibility that is interrupted (page 160). 16 Condensation can form on the .... I Condensation • When you should avoid exposing it to conditions that might cause condensation. • To keep condensation from forming, place the camera into a plastic bag before moving it in the plastic bag until the air inside the bag has a chance to reach the same temperature as the...
... on interior components. Use of any other type of battery is totally cut off (from both the battery and USB cradle). Be sure to power this camera. The date and time settings of temperature, there is the possibility that is interrupted (page 160). 16 Condensation can form on the .... I Condensation • When you should avoid exposing it to conditions that might cause condensation. • To keep condensation from forming, place the camera into a plastic bag before moving it in the plastic bag until the air inside the bag has a chance to reach the same temperature as the...
Owners Manual
Page 18
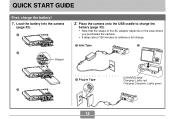
Place the camera onto the USB cradle to charge the battery (page 33). • Note that the shape of the AC adaptor depends on the area where you purchased the camera. • It takes about 120 minutes to achieve a full charge. 1 Inlet Type 2 2 Stopper 1 Plug-in Type [CHARGE] lamp Charging: Lights red Charging Complete: Lights green 3 18 Load the battery into the camera (page 32). 1 2. QUICK START GUIDE QUICK START GUIDE First, charge the battery! 1.
Place the camera onto the USB cradle to charge the battery (page 33). • Note that the shape of the AC adaptor depends on the area where you purchased the camera. • It takes about 120 minutes to achieve a full charge. 1 Inlet Type 2 2 Stopper 1 Plug-in Type [CHARGE] lamp Charging: Lights red Charging Complete: Lights green 3 18 Load the battery into the camera (page 32). 1 2. QUICK START GUIDE QUICK START GUIDE First, charge the battery! 1.
Owners Manual
Page 25
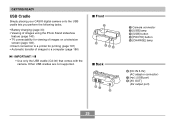
GETTING READY USB Cradle Simply placing your CASIO digital camera onto the USB cradle lets you perform the following tasks. • Battery charging (page 33) • Viewing of images using the Photo Stand slideshow feature (page 140). •...). • Direct connection to a printer for printing (page 181) • Automatic transfer of images to a computer (page 186) IMPORTANT! • Use only the USB cradle (CA-30) that comes with the camera. I Front 1 5 432 I Back 67 8 1 Camera connector 2 [USB] lamp 3 [USB] button 4 [PHOTO] button 5 [CHARGE] lamp 6 [DC IN 5.3V] (AC adaptor connector...
GETTING READY USB Cradle Simply placing your CASIO digital camera onto the USB cradle lets you perform the following tasks. • Battery charging (page 33) • Viewing of images using the Photo Stand slideshow feature (page 140). •...). • Direct connection to a printer for printing (page 181) • Automatic transfer of images to a computer (page 186) IMPORTANT! • Use only the USB cradle (CA-30) that comes with the camera. I Front 1 5 432 I Back 67 8 1 Camera connector 2 [USB] lamp 3 [USB] button 4 [PHOTO] button 5 [CHARGE] lamp 6 [DC IN 5.3V] (AC adaptor connector...

Owners Manual
Page 33
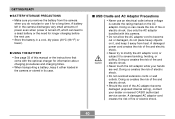
... shape of battery is not fully charged when you purchased the camera. [DC IN 5.3V] USB Cradle AC Adaptor AC power cord 33 GETTING READY 3. You need to power this camera. Connect the bundled AC adaptor to the [DC IN 5.3V] connector of the USB cradle, and then plug it . The battery is not supported. ...To charge the battery 1. Use of any other type of the AC adaptor depends on the area where you use the camera for the first time. IMPORTANT! • Use only the ...
... shape of battery is not fully charged when you purchased the camera. [DC IN 5.3V] USB Cradle AC Adaptor AC power cord 33 GETTING READY 3. You need to power this camera. Connect the bundled AC adaptor to the [DC IN 5.3V] connector of the USB cradle, and then plug it . The battery is not supported. ...To charge the battery 1. Use of any other type of the AC adaptor depends on the area where you use the camera for the first time. IMPORTANT! • Use only the ...

Owners Manual
Page 34
... the power receptacle shape is different from 100V AC to 240V AC. With the camera positioned with the monitor screen facing forward as shown in the illustration, place it onto the USB cradle. • Do not place the camera onto the USB cradle while it is turned on. [CHARGE] lamp [DC IN 5.3V] •... charging has started. If you to country or geographic area. AC Adaptor USB Cradle NOTE • The AC adaptor is designed for operation with any power supply in the range of 100V to 240V AC. Turn off the camera. 3. GETTING READY NOTE • The bundled AC adaptor is designed for...
... the power receptacle shape is different from 100V AC to 240V AC. With the camera positioned with the monitor screen facing forward as shown in the illustration, place it onto the USB cradle. • Do not place the camera onto the USB cradle while it is turned on. [CHARGE] lamp [DC IN 5.3V] •... charging has started. If you to country or geographic area. AC Adaptor USB Cradle NOTE • The AC adaptor is designed for operation with any power supply in the range of 100V to 240V AC. Turn off the camera. 3. GETTING READY NOTE • The bundled AC adaptor is designed for...

Owners Manual
Page 35
... as far as it will start right away if you try to charge immediately after using the camera (which causes battery to a TV, and USB data communication. 35 Remove the camera from the USB cradle. After charging is complete, remove the camera from the USB cradle and see if it works normally. • The only operations that the...
... as far as it will start right away if you try to charge immediately after using the camera (which causes battery to a TV, and USB data communication. 35 Remove the camera from the USB cradle. After charging is complete, remove the camera from the USB cradle and see if it works normally. • The only operations that the...

Owners Manual
Page 36
Note that you will not be able to the power outlet and USB cradle. • If the same symptoms occur again when you place the camera on the monitor screen changes as battery power is used. This is low. If the contacts are dirty, wipe them clean with ...how the battery is loaded. I If the camera does not work normally This can mean there is a problem with a dry cloth. 2. Perform the following shows how the battery capacity indicator on the USB cradle after taking the above steps, contact a CASIO authorized service center. Charge the battery immediately whenever either ...
Note that you will not be able to the power outlet and USB cradle. • If the same symptoms occur again when you place the camera on the monitor screen changes as battery power is used. This is low. If the contacts are dirty, wipe them clean with ...how the battery is loaded. I If the camera does not work normally This can mean there is a problem with a dry cloth. 2. Perform the following shows how the battery capacity indicator on the USB cradle after taking the above steps, contact a CASIO authorized service center. Charge the battery immediately whenever either ...

Owners Manual
Page 38
...you load it into fire, or otherwise expose it to strong impact. - Never place the battery in a microwave oven, throw it into the camera or attach it to intense heat. - Never use or leave the battery near open flame. - Do not immerse the battery in any other ... any way, or expose it to the optional charger. - I Battery Handling Precautions G SAFETY PRECAUTIONS Be sure to the CASIO NP-20 Rechargeable Lithium Ion Battery. • Use only the USB cradle (CA-30) that comes with items that can conduct electricity (necklaces, pencil lead, etc.) - Never use any other ...
...you load it into fire, or otherwise expose it to strong impact. - Never place the battery in a microwave oven, throw it into the camera or attach it to intense heat. - Never use or leave the battery near open flame. - Do not immerse the battery in any other ... any way, or expose it to the optional charger. - I Battery Handling Precautions G SAFETY PRECAUTIONS Be sure to the CASIO NP-20 Rechargeable Lithium Ion Battery. • Use only the USB cradle (CA-30) that comes with items that can conduct electricity (necklaces, pencil lead, etc.) - Never use any other ...

Owners Manual
Page 39
... volatile agents or chemically treated rags. Should battery fluid get onto clothing or your skin, immediately rinse it away from the camera or charger, and keep it off with the camera or the specified optional charger to malfunction. 39 Prolonged contact with thinner, benzene, alcohol, or other battery abnormality • If the... passed, stop charging. Charge the battery in cold environments shortens the operating time you ever notice any other type of charger for use with this CASIO digital camera only. • Use only the USB cradle that comes with clean tap water.
... volatile agents or chemically treated rags. Should battery fluid get onto clothing or your skin, immediately rinse it away from the camera or charger, and keep it off with the camera or the specified optional charger to malfunction. 39 Prolonged contact with thinner, benzene, alcohol, or other battery abnormality • If the... passed, stop charging. Charge the battery in cold environments shortens the operating time you ever notice any other type of charger for use with this CASIO digital camera only. • Use only the USB cradle that comes with clean tap water.
Owners Manual
Page 40
... of fire and electric shock. • Never touch the AC adaptor while your dealer or nearest CASIO authorized service center. G USING THE BATTERY • See page 33 of power even when power...extension cords or wall outlets. A damaged power cord creates the risk of fire or electric shock. 40 I USB Cradle and AC Adaptor Precautions Caution! • Never use . • Store the battery in its case. GETTING ...8226; Never try to modify the AC adaptor cord, or subject it away from the camera when you remove the battery from heat. Use only the AC adaptor bundled with this ...
... of fire and electric shock. • Never touch the AC adaptor while your dealer or nearest CASIO authorized service center. G USING THE BATTERY • See page 33 of power even when power...extension cords or wall outlets. A damaged power cord creates the risk of fire or electric shock. 40 I USB Cradle and AC Adaptor Precautions Caution! • Never use . • Store the battery in its case. GETTING ...8226; Never try to modify the AC adaptor cord, or subject it away from the camera when you remove the battery from heat. Use only the AC adaptor bundled with this ...

Owners Manual
Page 41
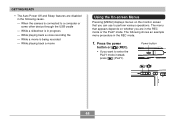
...; Make sure you are not using the Photo Stand feature can cause the AC adaptor to turn on the camera Press the power button, [ ] (REC) or [ ] (PLAY). Turning the Camera On and Off I To turn on the camera: Power button or [ ] (REC) [ ] (PLAY) Power button Operation lamp [ ] (PLAY) [ ... malfunction. • Unplug the AC power cord from the power outlet whenever you always remove the camera from the USB cradle before connecting or disconnecting the AC adaptor. • Charging, USB data communication, and using it on. The operation lamp will light green momentarily, and then power ...
...; Make sure you are not using the Photo Stand feature can cause the AC adaptor to turn on the camera Press the power button, [ ] (REC) or [ ] (PLAY). Turning the Camera On and Off I To turn on the camera: Power button or [ ] (REC) [ ] (PLAY) Power button Operation lamp [ ] (PLAY) [ ... malfunction. • Unplug the AC power cord from the power outlet whenever you always remove the camera from the USB cradle before connecting or disconnecting the AC adaptor. • Charging, USB data communication, and using it on. The operation lamp will light green momentarily, and then power ...
Owners Manual
Page 44
While a slideshow is being recorded - When the camera is connected to enter the PLAY mode instead, press [ ] (PLAY). While playing back a voice recording file - The menu that appears depends on the monitor screen ... While playing back a movie Using the On-screen Menus Pressing [MENU] displays menus on whether you want to a computer or some other device through the USB cradle -
While a slideshow is being recorded - When the camera is connected to enter the PLAY mode instead, press [ ] (PLAY). While playing back a voice recording file - The menu that appears depends on the monitor screen ... While playing back a movie Using the On-screen Menus Pressing [MENU] displays menus on whether you want to a computer or some other device through the USB cradle -

Owners Manual
Page 47
...battery goes dead. When power is not being supplied to the camera. - The following are the conditions when power is not being supplied to the camera from the USB cradle while the rechargeable battery is dead or removed from the camera - Note, however, that are not stamped into the images ...themselves. When the rechargeable battery is dead or removed from the camera • The date and time ...
...battery goes dead. When power is not being supplied to the camera. - The following are the conditions when power is not being supplied to the camera from the USB cradle while the rechargeable battery is dead or removed from the camera - Note, however, that are not stamped into the images ...themselves. When the rechargeable battery is dead or removed from the camera • The date and time ...

Owners Manual
Page 54
... and [̄] to select the "REC" tab. 3. When using the camera indoors under such lighting, you may experience some digital noise (graininess) to appear in images of the camera. • Never remove the memory card while an image is recommended that cannot be lost, it can also corrupt ...54 I Recording Precautions • Never open the battery cover or place the camera onto the USB cradle while the operation lamp is selected for the ISO sensitivity setting (page 117), the camera automatically adjusts its sensitivity in file memory and even lead to select the setting ...
... and [̄] to select the "REC" tab. 3. When using the camera indoors under such lighting, you may experience some digital noise (graininess) to appear in images of the camera. • Never remove the memory card while an image is recommended that cannot be lost, it can also corrupt ...54 I Recording Precautions • Never open the battery cover or place the camera onto the USB cradle while the operation lamp is selected for the ISO sensitivity setting (page 117), the camera automatically adjusts its sensitivity in file memory and even lead to select the setting ...

Owners Manual
Page 140
...sec". • Images copied from another digital camera or a computer may take longer time to suit your needs. 1. Photo Stand feature operations are indicators on the display, you can specify display of a particular image. See page 138 for "Time". Press the USB cradle's [PHOTO] button. • This... starts the Photo Stand slideshow with slideshow setting. Turn off the camera. 2. Using the Photo Stand Feature The "Photo Stand" feature lets you can ...
...sec". • Images copied from another digital camera or a computer may take longer time to suit your needs. 1. Photo Stand feature operations are indicators on the display, you can specify display of a particular image. See page 138 for "Time". Press the USB cradle's [PHOTO] button. • This... starts the Photo Stand slideshow with slideshow setting. Turn off the camera. 2. Using the Photo Stand Feature The "Photo Stand" feature lets you can ...
Owners Manual
Page 146
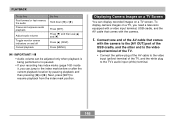
... your recording has index marks (page 108) inside it, you need a television equipped with a video input terminal, USB cradle, and the AV cable that comes with the camera to the [AV OUT] port of the USB cradle, and the other end to the video input terminal of the TV. • Connect the yellow plug of... the AV cable to the index mark before or after the current playback location by pausing playback and then pressing [̇] or [̈]. To display camera images on a TV...
... your recording has index marks (page 108) inside it, you need a television equipped with a video input terminal, USB cradle, and the AV cable that comes with the camera to the [AV OUT] port of the USB cradle, and the other end to the video input terminal of the TV. • Connect the yellow plug of... the AV cable to the index mark before or after the current playback location by pausing playback and then pressing [̇] or [̈]. To display camera images on a TV...

