
Owners Manual
Page 2
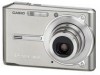
... according to make sure that the shape of the AC adaptor depends on the area where you purchased the camera. Camera Rechargeable Lithium Ion Battery (NP-20) USB Cradle (CA-30) Strap CD-ROMs (2) USB Cable AV Cable Basic Reference • Note that all of the items shown below are included with your dealer as soon...
... according to make sure that the shape of the AC adaptor depends on the area where you purchased the camera. Camera Rechargeable Lithium Ion Battery (NP-20) USB Cradle (CA-30) Strap CD-ROMs (2) USB Cable AV Cable Basic Reference • Note that all of the items shown below are included with your dealer as soon...
Owners Manual
Page 15
Disconnecting the USB cable, removing the camera from the USB cradle, or disconnecting the AC adaptor from 0°C to 40°C (32°F to 104°F). • Do not use or keep the camera in the following creates the risk of corruption of data in the sun - In ...subject to strong vibration 15 In areas subject to temperature extremes - Removing the battery or memory card, or setting the camera onto the USB cradle while the camera is manufactured using precision digital components. In areas subject to eliminate the cause of the error. Follow the instructions provided by...
Disconnecting the USB cable, removing the camera from the USB cradle, or disconnecting the AC adaptor from 0°C to 40°C (32°F to 104°F). • Do not use or keep the camera in the following creates the risk of corruption of data in the sun - In ...subject to strong vibration 15 In areas subject to temperature extremes - Removing the battery or memory card, or setting the camera onto the USB cradle while the camera is manufactured using precision digital components. In areas subject to eliminate the cause of the error. Follow the instructions provided by...
Owners Manual
Page 146
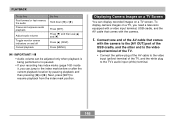
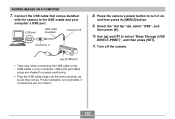
Connect one end of the AV cable that comes with the camera to the [AV OUT] port of the USB cradle, and the other end to the video input terminal of the TV. • Connect the yellow plug of the AV cable to the video input (yellow) terminal of the TV, and the white... is paused. • If your recording has index marks (page 108) inside it, you need a television equipped with a video input terminal, USB cradle, and the AV cable that comes with the camera. 1. Press [SET]. Next, press [SET] to resume playback from the index mark position. Press [̄] and then use [̆] and ...
Connect one end of the AV cable that comes with the camera to the [AV OUT] port of the USB cradle, and the other end to the video input terminal of the TV. • Connect the yellow plug of the AV cable to the video input (yellow) terminal of the TV, and the white... is paused. • If your recording has index marks (page 108) inside it, you need a television equipped with a video input terminal, USB cradle, and the AV cable that comes with the camera. 1. Press [SET]. Next, press [SET] to resume playback from the index mark position. Press [̄] and then use [̆] and ...
Owners Manual
Page 147
... using TV controls. 147 IMPORTANT! • Make sure that the audio output is monaural. • The camera's monitor screen will go blank during video output. • Pressing the USB cradle's [PHOTO] button will activate the Photo Stand feature (page 140) and display images on the TV screen... • For video output, the audio volume level is initially set to turn on the camera, and then perform the required operation for the camera's power on/off the camera. 3. Press [ ] to maximum. PLAYBACK AV cable TV Video input terminal [AV OUT] (AV output port) 2. Turn off functions (page...
... using TV controls. 147 IMPORTANT! • Make sure that the audio output is monaural. • The camera's monitor screen will go blank during video output. • Pressing the USB cradle's [PHOTO] button will activate the Photo Stand feature (page 140) and display images on the TV screen... • For video output, the audio volume level is initially set to turn on the camera, and then perform the required operation for the camera's power on/off the camera. 3. Press [ ] to maximum. PLAYBACK AV cable TV Video input terminal [AV OUT] (AV output port) 2. Turn off functions (page...
Owners Manual
Page 181
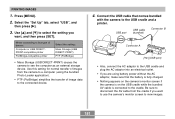
... printer PictBridge-compatible printer Select this type of image data to the cradle. USB port USB cable (bundled) Connector B Connector A [ ](USB port) • Also, connect the AC adaptor to the USB cradle and a printer. Be sure to disconnect the AV cable from the camera to a computer (using battery power without the AC adaptor, make sure that comes...
... printer PictBridge-compatible printer Select this type of image data to the cradle. USB port USB cable (bundled) Connector B Connector A [ ](USB port) • Also, connect the AC adaptor to the USB cradle and a printer. Be sure to disconnect the AV cable from the camera to a computer (using battery power without the AC adaptor, make sure that comes...

Owners Manual
Page 184
... for details. Check with your printer for details about models that support PictBridge and USB DIRECT-PRINT, upgrades, etc. • Never disconnect the USB cable, or perform any camera or USB cradle operation while printing is recorded. • Specifying date printing with your service ...user documentation that comes with DPOF settings (page 178) - The Photohands User's Guide is provided as a PDF file on the camera before ordering prints. • Specifying date printing with the Photohands software that comes with your printer manufacturer for more information. Note ...
... for details. Check with your printer for details about models that support PictBridge and USB DIRECT-PRINT, upgrades, etc. • Never disconnect the USB cable, or perform any camera or USB cradle operation while printing is recorded. • Specifying date printing with your service ...user documentation that comes with DPOF settings (page 178) - The Photohands User's Guide is provided as a PDF file on the camera before ordering prints. • Specifying date printing with the Photohands software that comes with your printer manufacturer for more information. Note ...
Owners Manual
Page 190
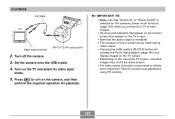
...;] to turn it on, and then press its [MENU] button. 9. Press the camera's power button to select "Mass Storage (USB DIRECT-PRINT)", and then press [SET]. 11. Turn off the camera. [ ](USB port) • Take care when connecting the USB cable to the USB cradle and your computer. VIEWING IMAGES ON A COMPUTER 7. Select the "Set Up" tab...
...;] to turn it on, and then press its [MENU] button. 9. Press the camera's power button to select "Mass Storage (USB DIRECT-PRINT)", and then press [SET]. 11. Turn off the camera. [ ](USB port) • Take care when connecting the USB cable to the USB cradle and your computer. VIEWING IMAGES ON A COMPUTER 7. Select the "Set Up" tab...
Owners Manual
Page 194
... to "burn in" on the screen. • Never disconnect the USB cable, or perform any camera or USB cradle operation while data communication is not lit, remove the camera from the USB cradle. Windows 2000/Me Users • Click card services in progress. You can find details about USB connections, etc. Depending on your Macintosh. 2. Doing so can...
... to "burn in" on the screen. • Never disconnect the USB cable, or perform any camera or USB cradle operation while data communication is not lit, remove the camera from the USB cradle. Windows 2000/Me Users • Click card services in progress. You can find details about USB connections, etc. Depending on your Macintosh. 2. Doing so can...
Owners Manual
Page 196
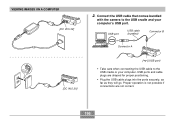
Connect the USB cable that comes bundled with the camera to the USB cradle or your computer's USB port. Proper operation is not possible if connections are shaped for proper positioning. • Plug the USB cable plugs into the ports securely, as far as they will go. USB ports and cable plugs are not correct. 196 VIEWING IMAGES ON A COMPUTER [DC IN 5.3V] 2. USB port USB cable (bundled) Connector B [DC IN 5.3V] Connector A [ ](USB port) • Take care when connecting the USB cable to the USB cradle and your computer.
Connect the USB cable that comes bundled with the camera to the USB cradle or your computer's USB port. Proper operation is not possible if connections are shaped for proper positioning. • Plug the USB cable plugs into the ports securely, as far as they will go. USB ports and cable plugs are not correct. 196 VIEWING IMAGES ON A COMPUTER [DC IN 5.3V] 2. USB port USB cable (bundled) Connector B [DC IN 5.3V] Connector A [ ](USB port) • Take care when connecting the USB cable to the USB cradle and your computer.
Owners Manual
Page 199
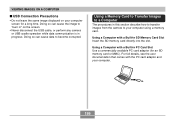
... cause the image to "burn in SD Memory Card Slot Insert the SD memory card directly into the slot. VIEWING IMAGES ON A COMPUTER I USB Connection Precautions • Do not leave the same image displayed on the screen. • Never disconnect the USB cable, or perform any camera or USB cradle operation while data communication is in progress...
... cause the image to "burn in SD Memory Card Slot Insert the SD memory card directly into the slot. VIEWING IMAGES ON A COMPUTER I USB Connection Precautions • Do not leave the same image displayed on the screen. • Never disconnect the USB cable, or perform any camera or USB cradle operation while data communication is in progress...
Owners Manual
Page 220
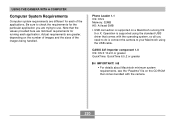
... sizes of the applications. Actual requirements are trying to your Macintosh using the standard USB driver that comes with the camera. 220 Photo Loader 1.1 OS: OS 9 Memory: 32MB HD: At least 3MB • USB connection is supported using the USB cable. CASIO AVI Importer component 1.0 OS: OS X 10.2.8 or greater QuickTime: QuickTime 6.5.2 or greater IMPORTANT! •...
... sizes of the applications. Actual requirements are trying to your Macintosh using the standard USB driver that comes with the camera. 220 Photo Loader 1.1 OS: OS 9 Memory: 32MB HD: At least 3MB • USB connection is supported using the USB cable. CASIO AVI Importer component 1.0 OS: OS X 10.2.8 or greater QuickTime: QuickTime 6.5.2 or greater IMPORTANT! •...
Owners Manual
Page 235
... that the computer is in progress. USB communication is not accessing camera memory, disconnect the USB cable. 1) Check the connection between the camera and USB cradle. 2) Check all connections. 3) Install the USB driver on your computer (page 186). 4) Press the [USB] button on the USB cradle. 2) USB cable is not connected securely. 3) USB driver is not installed. 4) Camera is off . Action Remove the...
... that the computer is in progress. USB communication is not accessing camera memory, disconnect the USB cable. 1) Check the connection between the camera and USB cradle. 2) Check all connections. 3) Install the USB driver on your computer (page 186). 4) Press the [USB] button on the USB cradle. 2) USB cable is not connected securely. 3) USB driver is not installed. 4) Camera is off . Action Remove the...
Owners Manual
Page 236
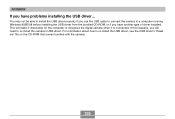
... type of driver installed. If this happens, you use the USB cable to connect the camera to re-install the USB driver, see the USB driver's "Read me" file on the CD-ROM that comes bundled with the camera. 236 This will need to recognize the digital camera when it impossible for the computer to re-install the...
... type of driver installed. If this happens, you use the USB cable to connect the camera to re-install the USB driver, see the USB driver's "Read me" file on the CD-ROM that comes bundled with the camera. 236 This will need to recognize the digital camera when it impossible for the computer to re-install the...
Owners Manual
Page 243
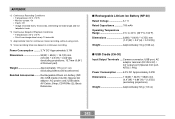
...USB port; USB cable; AV Cable; Basic Reference I Rechargeable Lithium Ion Battery (NP-20) Rated Voltage 3.7 V Rated Capacitance 700 mAh Operating Temperature Range 0°C to 40°C (32°F to 104°F) Dimensions 33(W) × 50(H) × 4.7(D) mm (1.3˝(W) × 2.0˝(H) × 0.19˝(D)) Weight Approximately 16 g (0.56 oz) I USB...excluding projections) Weight Approximately 52 g (1.8 oz) 243 AC power cord; CD-ROMs (2); Camera connector; Rechargeable lithium ion battery (NP20); APPENDIX *2 Continuous Recording Conditions • Temperature: 23...
...USB port; USB cable; AV Cable; Basic Reference I Rechargeable Lithium Ion Battery (NP-20) Rated Voltage 3.7 V Rated Capacitance 700 mAh Operating Temperature Range 0°C to 40°C (32°F to 104°F) Dimensions 33(W) × 50(H) × 4.7(D) mm (1.3˝(W) × 2.0˝(H) × 0.19˝(D)) Weight Approximately 16 g (0.56 oz) I USB...excluding projections) Weight Approximately 52 g (1.8 oz) 243 AC power cord; CD-ROMs (2); Camera connector; Rechargeable lithium ion battery (NP20); APPENDIX *2 Continuous Recording Conditions • Temperature: 23...


