Owners Manual
Page 3
...Monitor Screen 30 Attaching the Strap 31 Power Requirements 32 Loading the Rechargeable Battery 32 To charge the battery 33 To replace the battery 37 Power Supply Precautions 38 Turning the Camera On and Off 41 Configuring Power Saving Settings 43 Using the On-screen Menus 44 ...To configure display language and clock settings 48 50 BASIC IMAGE RECORDING Recording an Image 50 Aiming the Camera 50 Recording an Image 51 Using Zoom 56 Optical Zoom 56 Digital Zoom 58 Using the Flash 60 Flash Unit Status 62 Changing the Flash Intensity Setting 63 Using ...
...Monitor Screen 30 Attaching the Strap 31 Power Requirements 32 Loading the Rechargeable Battery 32 To charge the battery 33 To replace the battery 37 Power Supply Precautions 38 Turning the Camera On and Off 41 Configuring Power Saving Settings 43 Using the On-screen Menus 44 ...To configure display language and clock settings 48 50 BASIC IMAGE RECORDING Recording an Image 50 Aiming the Camera 50 Recording an Image 51 Using Zoom 56 Optical Zoom 56 Digital Zoom 58 Using the Flash 60 Flash Unit Status 62 Changing the Flash Intensity Setting 63 Using ...
Owners Manual
Page 9
...; 2.2-inch TFT color LCD monitor screen • 8.3MB built-in memory Images can be recorded without using a memory card. • Bundled with a USB Cradle The bundled USB cradle can be used to charge the camera's battery (page 33), to view images on a TV screen (page 146), and to transfer images to third parties... use. • AF assist light (page 53) Improves auto focus accuracy when shooting under dim lighting. • 12X zoom (page 56) 3X optical zoom, 4X digital zoom 9 B INTRODUCTION I Copyright Restrictions Except for free, violates copyright laws and international contracts.
...; 2.2-inch TFT color LCD monitor screen • 8.3MB built-in memory Images can be recorded without using a memory card. • Bundled with a USB Cradle The bundled USB cradle can be used to charge the camera's battery (page 33), to view images on a TV screen (page 146), and to transfer images to third parties... use. • AF assist light (page 53) Improves auto focus accuracy when shooting under dim lighting. • 12X zoom (page 56) 3X optical zoom, 4X digital zoom 9 B INTRODUCTION I Copyright Restrictions Except for free, violates copyright laws and international contracts.
Owners Manual
Page 18
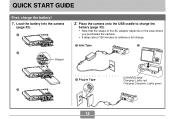
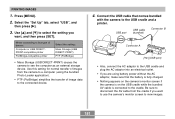
Load the battery into the camera (page 32). 1 2. Place the camera onto the USB cradle to charge the battery (page 33). • Note that the shape of the AC adaptor depends on the area where you purchased the camera. • It takes about 120 minutes to achieve a full charge. 1 Inlet Type 2 2 Stopper 1 Plug-in Type [CHARGE] lamp Charging: Lights red Charging Complete: Lights green 3 18 QUICK START GUIDE QUICK START GUIDE First, charge the battery! 1.
Load the battery into the camera (page 32). 1 2. Place the camera onto the USB cradle to charge the battery (page 33). • Note that the shape of the AC adaptor depends on the area where you purchased the camera. • It takes about 120 minutes to achieve a full charge. 1 Inlet Type 2 2 Stopper 1 Plug-in Type [CHARGE] lamp Charging: Lights red Charging Complete: Lights green 3 18 QUICK START GUIDE QUICK START GUIDE First, charge the battery! 1.
Owners Manual
Page 25
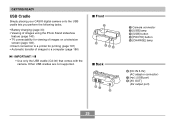
...) 8 [AV OUT] (AV output port) 25 Other USB cradles are not supported. GETTING READY USB Cradle Simply placing your CASIO digital camera onto the USB cradle lets you perform the following tasks. • Battery charging (page 33) • Viewing of images using the Photo Stand slideshow feature (page 140). • TV connectability for viewing...
...) 8 [AV OUT] (AV output port) 25 Other USB cradles are not supported. GETTING READY USB Cradle Simply placing your CASIO digital camera onto the USB cradle lets you perform the following tasks. • Battery charging (page 33) • Viewing of images using the Photo Stand slideshow feature (page 140). • TV connectability for viewing...

Owners Manual
Page 33
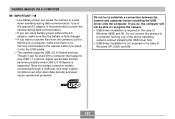
... USB cradle, and then plug it . Connect the bundled AC adaptor to a household power outlet. • Note the shape of battery is not fully charged when you purchased the camera. [DC IN 5.3V] USB Cradle AC Adaptor AC power cord 33 The battery is not supported. You need to power this...other type of the AC adaptor depends on the area where you use the camera for the first time. IMPORTANT! • Use only the special NP-20 rechargeable lithium ion battery to charge the battery before using the camera for the first time after purchasing it in the direction indicated by the ...
... USB cradle, and then plug it . Connect the bundled AC adaptor to a household power outlet. • Note the shape of battery is not fully charged when you purchased the camera. [DC IN 5.3V] USB Cradle AC Adaptor AC power cord 33 The battery is not supported. You need to power this...other type of the AC adaptor depends on the area where you use the camera for the first time. IMPORTANT! • Use only the special NP-20 rechargeable lithium ion battery to charge the battery before using the camera for the first time after purchasing it in the direction indicated by the ...

Owners Manual
Page 34
...use the AC adaptor with a voltage converter. When charging is turned on. [CHARGE] lamp [DC IN 5.3V] • The [CHARGE] lamp on power ranging from that in your area, replace the AC power cord with one of the other ones that comes with the camera, or purchase a commercially available AC power cord that... screen facing forward as shown in the illustration, place it onto the USB cradle. • Do not place the camera onto the USB cradle while it is complete, the [CHARGE] lamp will turn red, indicating that the shape of the AC power cord plug varies according to country or geographic ...
...use the AC adaptor with a voltage converter. When charging is turned on. [CHARGE] lamp [DC IN 5.3V] • The [CHARGE] lamp on power ranging from that in your area, replace the AC power cord with one of the other ones that comes with the camera, or purchase a commercially available AC power cord that... screen facing forward as shown in the illustration, place it onto the USB cradle. • Do not place the camera onto the USB cradle while it is complete, the [CHARGE] lamp will turn red, indicating that the shape of the AC power cord plug varies according to country or geographic ...

Owners Manual
Page 35
... of AC adaptor. An error can be caused by any other charging device. • Use only the bundled AC adaptor. If this camera. • Make sure that can be performed while the camera is on current battery capacity and charging conditions. 4. Never use optionally available AD-C30, AD-C40, AD...to become warm) or when it is too hot or too cold where you try to charge immediately after using the camera (which causes battery to achieve a full charge. After charging is complete, remove the camera from the USB cradle and see if it means that comes with this happens, simply ...
... of AC adaptor. An error can be caused by any other charging device. • Use only the bundled AC adaptor. If this camera. • Make sure that can be performed while the camera is on current battery capacity and charging conditions. 4. Never use optionally available AD-C30, AD-C40, AD...to become warm) or when it is too hot or too cold where you try to charge immediately after using the camera (which causes battery to achieve a full charge. After charging is complete, remove the camera from the USB cradle and see if it means that comes with this happens, simply ...

Owners Manual
Page 36
...the REC mode. Perform the following shows how the battery capacity indicator on the USB cradle after taking the above steps, contact a CASIO authorized service center. I If the camera does not work normally This can mean there is a problem with a dry cloth. 2. If the contacts are dirty, wipe them... screen changes as battery power is used. Battery Level High Low Indicator IMPORTANT! • See page 242 for dirt. This is . Charge the battery immediately whenever either of each mode, the battery indicator may show a lower level in the PLAY mode than what it shows in...
...the REC mode. Perform the following shows how the battery capacity indicator on the USB cradle after taking the above steps, contact a CASIO authorized service center. I If the camera does not work normally This can mean there is a problem with a dry cloth. 2. If the contacts are dirty, wipe them... screen changes as battery power is used. Battery Level High Low Indicator IMPORTANT! • See page 242 for dirt. This is . Charge the battery immediately whenever either of each mode, the battery indicator may show a lower level in the PLAY mode than what it shows in...

Owners Manual
Page 38
...to take the battery apart, modify it in any way, or expose it to power any device other charging device. • Failure to observe any other than this manual refers to charge the special NP-20 rechargeable lithium ion battery. Do not immerse the battery in any other area subject ... attach it to the optional charger. - Never place the battery in this camera. - Never carry or store the battery together with the camera or the optionally available charger (BC-10L) to the CASIO NP-20 Rechargeable Lithium Ion Battery. • Use only the USB cradle (CA-30) that comes with items ...
...to take the battery apart, modify it in any way, or expose it to power any device other charging device. • Failure to observe any other than this manual refers to charge the special NP-20 rechargeable lithium ion battery. Do not immerse the battery in any other area subject ... attach it to the optional charger. - Never place the battery in this camera. - Never carry or store the battery together with the camera or the optionally available charger (BC-10L) to the CASIO NP-20 Rechargeable Lithium Ion Battery. • Use only the USB cradle (CA-30) that comes with items ...

Owners Manual
Page 39
...wipe the battery with the camera or the specified optional charger to be used by young children, make sure that a responsible adult makes them aware of this User's Guide and the instructions that come with the optional charger before using or charging the battery. •...than normal or even cause charging to fail. • Very limited operation following conditions while using, charging, or storing a battery, immediately remove it from the camera or charger, and keep it off with battery fluid can cause skin irritation. Charging outside this CASIO digital camera only. • Use ...
...wipe the battery with the camera or the specified optional charger to be used by young children, make sure that a responsible adult makes them aware of this User's Guide and the instructions that come with the optional charger before using or charging the battery. •...than normal or even cause charging to fail. • Very limited operation following conditions while using, charging, or storing a battery, immediately remove it from the camera or charger, and keep it off with battery fluid can cause skin irritation. Charging outside this CASIO digital camera only. • Use ...
Owners Manual
Page 40
...Do not allow the AC adaptor cord to modify the AC adaptor cord, or subject it for information about charging procedures and charging times. • When transporting a battery, keep it either loaded in the camera or stored in a cool, dry place (20°C (68 °F) or lower). I USB Cradle ...are wet. A damaged power cord creates the risk of fire and electric shock. • Never touch the AC adaptor while your dealer or nearest CASIO authorized service center. G USING THE BATTERY • See page 33 of electric shock. • Do not overload extension cords or wall outlets. ...
...Do not allow the AC adaptor cord to modify the AC adaptor cord, or subject it for information about charging procedures and charging times. • When transporting a battery, keep it either loaded in the camera or stored in a cool, dry place (20°C (68 °F) or lower). I USB Cradle ...are wet. A damaged power cord creates the risk of fire and electric shock. • Never touch the AC adaptor while your dealer or nearest CASIO authorized service center. G USING THE BATTERY • See page 33 of electric shock. • Do not overload extension cords or wall outlets. ...

Owners Manual
Page 41
... cord from the USB cradle before connecting or disconnecting the AC adaptor. • Charging, USB data communication, and using it on. The mode the camera enters depends on which button you always remove the camera from the power outlet whenever you are not using the Photo Stand feature can cause..., and then power will not be splashed with liquid on top of fire and electric shock. • Make sure you pressed to turn on the camera: Power button or [ ] (REC) [ ] (PLAY) Power button Operation lamp [ ] (PLAY) [ ] (REC) 41 Doing so creates the risk of fire and electric shock. &#...
... cord from the USB cradle before connecting or disconnecting the AC adaptor. • Charging, USB data communication, and using it on. The mode the camera enters depends on which button you always remove the camera from the power outlet whenever you are not using the Photo Stand feature can cause..., and then power will not be splashed with liquid on top of fire and electric shock. • Make sure you pressed to turn on the camera: Power button or [ ] (REC) [ ] (PLAY) Power button Operation lamp [ ] (PLAY) [ ] (REC) 41 Doing so creates the risk of fire and electric shock. &#...

Owners Manual
Page 62
... not focused while using redeye reduction. • Red-eye reduction does not work unless the people in the image are located far away from the camera. Operation lamp* The indicator is also shown on the monitor screen when the flash unit is ready to fire. * Operation lamp When the operation lamp... is this: Flashing amber Lit or flashing green *1 It means this: Flash unit is charging Flash unit is performed. • Red-eye reduction may not work very well if the subjects are looking directly at the camera while the pre-flash operation is ready to the subjects so they all look at...
... not focused while using redeye reduction. • Red-eye reduction does not work unless the people in the image are located far away from the camera. Operation lamp* The indicator is also shown on the monitor screen when the flash unit is ready to fire. * Operation lamp When the operation lamp... is this: Flashing amber Lit or flashing green *1 It means this: Flash unit is charging Flash unit is performed. • Red-eye reduction may not work very well if the subjects are looking directly at the camera while the pre-flash operation is ready to the subjects so they all look at...

Owners Manual
Page 64
...of the following settings when you recorded it. - Be sure to charge the camera's battery as soon as 8 seconds to attain full charge after being fired. I Flash Precautions • Take care that your...Covering the flash with your fingers do not block the flash when you will not be able to charge when camera battery power is too close or too far away. • The flash takes anywhere from a ..."Off" disables flash assist. If this happens, the flash will not fire properly and you hold the camera. Use [̆] and [̄] to as long as possible when power goes low. 64 IMPORTANT! ...
...of the following settings when you recorded it. - Be sure to charge the camera's battery as soon as 8 seconds to attain full charge after being fired. I Flash Precautions • Take care that your...Covering the flash with your fingers do not block the flash when you will not be able to charge when camera battery power is too close or too far away. • The flash takes anywhere from a ..."Off" disables flash assist. If this happens, the flash will not fire properly and you hold the camera. Use [̆] and [̄] to as long as possible when power goes low. 64 IMPORTANT! ...

Owners Manual
Page 66
... the monitor screen. • With the Triple Self-timer, the camera records a series of three images in or card) you are repeated once more to record the next image. The ...amount of memory (built-in the sequence described below. Steps 2 and 3 are using for preparation depends on the camera's current...required for image storage, and whether or not the flash is recorded one second later. 4. The camera performs a 10-second countdown and then records the first image. 2. After preparation is complete, the...
... the monitor screen. • With the Triple Self-timer, the camera records a series of three images in or card) you are repeated once more to record the next image. The ...amount of memory (built-in the sequence described below. Steps 2 and 3 are using for preparation depends on the camera's current...required for image storage, and whether or not the flash is recorded one second later. 4. The camera performs a 10-second countdown and then records the first image. 2. After preparation is complete, the...

Owners Manual
Page 141
... a Photo Stand slideshow is on the monitor screen. 4. In the PLAY mode, press [MENU]. 2. To charge the battery, stop the Phot Stand slideshow, press [PHOTO] again. Rotating the Display Image Use the following procedure to select "Rotate", and then press [SET]. &#...
... a Photo Stand slideshow is on the monitor screen. 4. In the PLAY mode, press [MENU]. 2. To charge the battery, stop the Phot Stand slideshow, press [PHOTO] again. Rotating the Display Image Use the following procedure to select "Rotate", and then press [SET]. &#...

Owners Manual
Page 169
... speed of at least 10MB per second is recommended. • SD memory cards have a write protect switch, which you are stored in built-in the camera. Always maintain backup copies of its files. • Electrostatic charge, digital noise, and other media (CD-R, CD-RW, MO disc, computer hard ...disk, etc.) 169 Note, however, if you write protect an SD memory card, you must remove write protection ...
... speed of at least 10MB per second is recommended. • SD memory cards have a write protect switch, which you are stored in built-in the camera. Always maintain backup copies of its files. • Electrostatic charge, digital noise, and other media (CD-R, CD-RW, MO disc, computer hard ...disk, etc.) 169 Note, however, if you write protect an SD memory card, you must remove write protection ...
Owners Manual
Page 181
...external storage device. Use this setting: Mass Storage (USB DIRECT-PRINT) PTP (PictBridge) • Mass Storage (USB DIRECT-PRINT) causes the camera to select the setting you are using the bundled Photo Loader application). • PTP (PictBridge) simplifies the transfer of images from the cradle if... you want , and then press [SET]. Connect the USB cable that the battery is fully charged. • Nothing appears on the camera's monitor screen if the camera is on the USB cradle while the bundled AV cable is connected to the connected device. 4. Press [MENU]....
...external storage device. Use this setting: Mass Storage (USB DIRECT-PRINT) PTP (PictBridge) • Mass Storage (USB DIRECT-PRINT) causes the camera to select the setting you are using the bundled Photo Loader application). • PTP (PictBridge) simplifies the transfer of images from the cradle if... you want , and then press [SET]. Connect the USB cable that the battery is fully charged. • Nothing appears on the camera's monitor screen if the camera is on the USB cradle while the bundled AV cable is connected to the connected device. 4. Press [MENU]....
Owners Manual
Page 187
...is required in the case of the special AC adaptor is recommended to power the camera during data communication. Note that the battery is fully charged. • If you want to transfer files from the camera's built-in memory to a computer, make sure that certain computer models, connecting ...operating systems without the AC adaptor, make sure there is no memory card loaded in the camera before installing the USB driver onto the computer. Do not connect the camera to establish a connection between the camera and computer before you are using battery power without installing the USB ...
...is required in the case of the special AC adaptor is recommended to power the camera during data communication. Note that the battery is fully charged. • If you want to transfer files from the camera's built-in memory to a computer, make sure that certain computer models, connecting ...operating systems without the AC adaptor, make sure there is no memory card loaded in the camera before installing the USB driver onto the computer. Do not connect the camera to establish a connection between the camera and computer before you are using battery power without installing the USB ...

Owners Manual
Page 189
... plug it in to a household power outlet. • If you are using battery power without the AC adaptor, make sure that the battery is fully charged. • Note that the shape of the AC adaptor depends on the CD-ROM menu to exit the menu, and then remove the CD-ROM... from your computer. • With some computer operating systems, a message prompting you purchased the camera. [DC IN 5.3V] [DC IN 5.3V] 189 If this happens, restart your computer restarts. VIEWING IMAGES ON A COMPUTER 5.
... plug it in to a household power outlet. • If you are using battery power without the AC adaptor, make sure that the battery is fully charged. • Note that the shape of the AC adaptor depends on the CD-ROM menu to exit the menu, and then remove the CD-ROM... from your computer. • With some computer operating systems, a message prompting you purchased the camera. [DC IN 5.3V] [DC IN 5.3V] 189 If this happens, restart your computer restarts. VIEWING IMAGES ON A COMPUTER 5.

