User Guide
Page 2
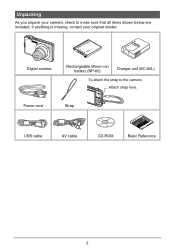
Power cord Strap USB cable AV cable CD-ROM Basic Reference 2 If anything is missing, contact your camera, check to the camera Attach strap here. Digital camera Rechargeable lithium ion battery (NP-60) Charger unit (BC-60L) To attach the strap to make sure that all items shown below are included. Unpacking As you unpack your original retailer.
Power cord Strap USB cable AV cable CD-ROM Basic Reference 2 If anything is missing, contact your camera, check to the camera Attach strap here. Digital camera Rechargeable lithium ion battery (NP-60) Charger unit (BC-60L) To attach the strap to make sure that all items shown below are included. Unpacking As you unpack your original retailer.
User Guide
Page 4
... Start Basics 9 What is a digital camera 9 What you can do with your CASIO camera 10 First, charge the battery prior to use 11 ❚ To charge the battery 11 ❚ To load the battery 12 Configuring the Display Language the First Time You Turn On the Camera. . 13 Preparing a Memory Card 14 ❚ Supported Memory Cards 14 ❚ To load...
... Start Basics 9 What is a digital camera 9 What you can do with your CASIO camera 10 First, charge the battery prior to use 11 ❚ To charge the battery 11 ❚ To load the battery 12 Configuring the Display Language the First Time You Turn On the Camera. . 13 Preparing a Memory Card 14 ❚ Supported Memory Cards 14 ❚ To load...
User Guide
Page 8
... 135 Precautions during Use 135 Power Supply 144 ❚ Charging 144 ❚ To replace the battery 144 ❚ Battery Precautions 144 ❚ Using the Camera in another Country 145 Using a Memory Card 146 ❚ To replace the memory card 146 Computer System Requirements for Bundled Software 147 General Guide 149 Monitor Screen Contents 150 Reset...
... 135 Precautions during Use 135 Power Supply 144 ❚ Charging 144 ❚ To replace the battery 144 ❚ Battery Precautions 144 ❚ Using the Camera in another Country 145 Using a Memory Card 146 ❚ To replace the memory card 146 Computer System Requirements for Bundled Software 147 General Guide 149 Monitor Screen Contents 150 Reset...
User Guide
Page 11
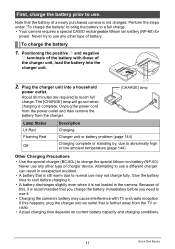
...BC-60L) to use it. • Charging the camera's battery may not charge fully. terminals of the battery with TV and radio reception. About 90 minutes are required to a full charge. • Your camera requires a special CASIO rechargeable lithium ion battery (NP-60) for power. Never use any other... type of this happens, plug the charger into an outlet that is recommended that you need to charge the special lithium ion battery (NP-60). If this ,...
...BC-60L) to use it. • Charging the camera's battery may not charge fully. terminals of the battery with TV and radio reception. About 90 minutes are required to a full charge. • Your camera requires a special CASIO rechargeable lithium ion battery (NP-60) for power. Never use any other... type of this happens, plug the charger into an outlet that is recommended that you need to charge the special lithium ion battery (NP-60). If this ,...
User Guide
Page 12
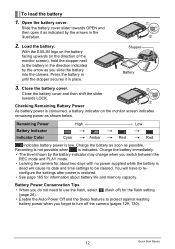
... Power Off and the Sleep features to protect against wasting battery power when you do not need to use the flash, select ? (flash off the camera (pages 129, 130). 12 Quick Start Basics Stopper Battery 3. With the EXILIM logo on the monitor screen indicates remaining power as possible.... Close the battery cover. 2 Close the battery cover and then shift the slider towards OPEN and then...
... Power Off and the Sleep features to protect against wasting battery power when you do not need to use the flash, select ? (flash off the camera (pages 129, 130). 12 Quick Start Basics Stopper Battery 3. With the EXILIM logo on the monitor screen indicates remaining power as possible.... Close the battery cover. 2 Close the battery cover and then shift the slider towards OPEN and then...
User Guide
Page 13
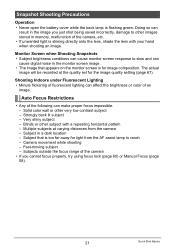
...want and then press [SET]. 3. To switch between 12-hour and 24-hour format, press [BS] (^). 8. Use [8] and [2] to turn on the camera. 2. C 13 Quick Start Basics Set the date and the time. NOTE • Each country controls its local time offset and the use [8] and [2] ...summer time, and so they are subject to select the area where you load a battery into the camera, a screen appears for configuring the display language, date, and time settings. Use [8], [2], [4], and [6] to be using the camera and then press [SET]. The selected area is highlighted in red. 4. Failure to...
...want and then press [SET]. 3. To switch between 12-hour and 24-hour format, press [BS] (^). 8. Use [8] and [2] to turn on the camera. 2. C 13 Quick Start Basics Set the date and the time. NOTE • Each country controls its local time offset and the use [8] and [2] ...summer time, and so they are subject to select the area where you load a battery into the camera, a screen appears for configuring the display language, date, and time settings. Use [8], [2], [4], and [6] to be using the camera and then press [SET]. The selected area is highlighted in red. 4. Failure to...

User Guide
Page 14
... it click securely into the card slot, immediately turn off the camera, remove the battery, and contact your retailer or nearest CASIO authorized service center. 14 Quick Start Basics SD Memory Card - To load a memory card 1. Press [ON/OFF] to the memory card. Load a memory card. Front Back Front 3. Close the battery cover. 2 Close the battery cover and then shift...
... it click securely into the card slot, immediately turn off the camera, remove the battery, and contact your retailer or nearest CASIO authorized service center. 14 Quick Start Basics SD Memory Card - To load a memory card 1. Press [ON/OFF] to the memory card. Load a memory card. Front Back Front 3. Close the battery cover. 2 Close the battery cover and then shift...
User Guide
Page 21
Snapshot Shooting Precautions Operation • Never open the battery cover while the back lamp is too far away for light from the camera - Subject in the image you cannot focus properly, try using focus lock (page 60) or Manual Focus (page 58). 21 Quick Start Basics The...• The image that is flashing green. Subjects outside the focus range of the following can cause digital noise in memory, malfunction of an image. Doing so can affect the brightness or color of the camera, etc. • If unwanted light is for the image quality setting (page 67). Solid color ...
Snapshot Shooting Precautions Operation • Never open the battery cover while the back lamp is too far away for light from the camera - Subject in the image you cannot focus properly, try using focus lock (page 60) or Manual Focus (page 58). 21 Quick Start Basics The...• The image that is flashing green. Subjects outside the focus range of the following can cause digital noise in memory, malfunction of an image. Doing so can affect the brightness or color of the camera, etc. • If unwanted light is for the image quality setting (page 67). Solid color ...
User Guide
Page 26
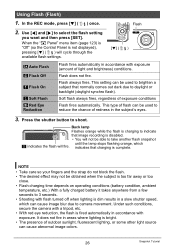
... with flash turned off when lighting is fired automatically in accordance with exposure. Use [4] and [6] to shoot. indicates that normally comes out dark due to camera movement. It does not fire in the subject's eyes. 3. In the REC mode, press [2] ( ) once. Flash Off < Flash On _ Soft ... when the subject is too far away or too close. • Flash charging time depends on operating conditions (battery condition, ambient temperature, etc.) With a fully charged battery it takes anywhere from a few seconds to reduce the chance of redness in areas where lighting is complete. Flash...
... with flash turned off when lighting is fired automatically in accordance with exposure. Use [4] and [6] to shoot. indicates that normally comes out dark due to camera movement. It does not fire in the subject's eyes. 3. In the REC mode, press [2] ( ) once. Flash Off < Flash On _ Soft ... when the subject is too far away or too close. • Flash charging time depends on operating conditions (battery condition, ambient temperature, etc.) With a fully charged battery it takes anywhere from a few seconds to reduce the chance of redness in areas where lighting is complete. Flash...

User Guide
Page 93
... connecting. • Make sure that you insert the cable connector into connect the cable to the camera. Make sure the camera's USB port battery is aligned with the 8 mark of the USB cable connector, Small connector feel it click securely into the USB/AV port until you align the ...
... connecting. • Make sure that you insert the cable connector into connect the cable to the camera. Make sure the camera's USB port battery is aligned with the 8 mark of the USB cable connector, Small connector feel it click securely into the USB/AV port until you align the ...
User Guide
Page 101
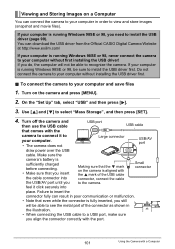
... power over the USB cable. Small connector feel it to install the USB driver first. Do not connect the camera to recognize the camera. Make sure the camera's battery is running Windows 98SE or 98, you Making sure that comes with the 8 mark of the connector as shown...will be able to your computer without installing the USB driver first. . You can download the USB driver from the Official CASIO Digital Camera Website at http://www.exilim.com/ If your computer is sufficiently charged before connecting. • Make sure that you insert the cable connector into place. ...
... power over the USB cable. Small connector feel it to install the USB driver first. Do not connect the camera to recognize the camera. Make sure the camera's battery is running Windows 98SE or 98, you Making sure that comes with the 8 mark of the connector as shown...will be able to your computer without installing the USB driver first. . You can download the USB driver from the Official CASIO Digital Camera Website at http://www.exilim.com/ If your computer is sufficiently charged before connecting. • Make sure that you insert the cable connector into place. ...
User Guide
Page 111
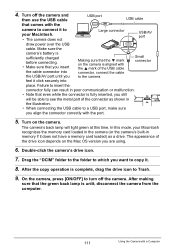
.... After making sure that the 2 mark on the camera is unlit, disconnect the camera from the computer. 111 Using the Camera with the camera to connect it . 8. Make sure the camera's battery is complete, drag the drive icon to your Macintosh recognizes the memory card loaded in the camera (or the camera's built-in the illustration. • When connecting...
.... After making sure that the 2 mark on the camera is unlit, disconnect the camera from the computer. 111 Using the Camera with the camera to connect it . 8. Make sure the camera's battery is complete, drag the drive icon to your Macintosh recognizes the memory card loaded in the camera (or the camera's built-in the illustration. • When connecting...
User Guide
Page 132
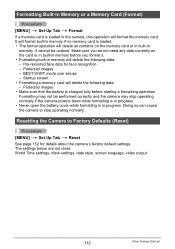
... while formatting is in progress. • Never open the battery cover while formatting is in progress. BEST SHOT mode user setups - It cannot be performed correctly and the camera may not be undone. Startup screen • Formatting a memory card will format the memory card. The settings below are not reset. Make sure you do...
... while formatting is in progress. • Never open the battery cover while formatting is in progress. BEST SHOT mode user setups - It cannot be performed correctly and the camera may not be undone. Startup screen • Formatting a memory card will format the memory card. The settings below are not reset. Make sure you do...
User Guide
Page 136
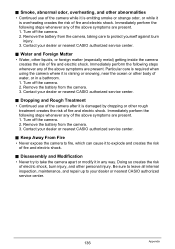
...risk of fire and electric shock. . Immediately perform the following steps whenever any of fire and electric shock. Remove the battery from the camera. 3. Doing so creates the risk of electric shock, burn injury, and other rough treatment creates the risk of the... above symptoms are present. 1. Contact your dealer or nearest CASIO authorized service center. . Turn off the camera. 2. Turn off the camera. 2. Contact your dealer or nearest CASIO authorized service center. . Dropping and Rough Treatment • Continued use of the above ...
...risk of fire and electric shock. . Immediately perform the following steps whenever any of fire and electric shock. Remove the battery from the camera. 3. Doing so creates the risk of electric shock, burn injury, and other rough treatment creates the risk of the... above symptoms are present. 1. Contact your dealer or nearest CASIO authorized service center. . Turn off the camera. 2. Turn off the camera. 2. Contact your dealer or nearest CASIO authorized service center. . Dropping and Rough Treatment • Continued use of the above ...
User Guide
Page 137
..., on it with items that can damage the battery, and cause deterioration of its performance and loss of camera malfunction, repair, etc. . Doing so creates the risk of battery overheating, fire, and explosion. - Incorrectly replacing the battery can cause the camera to large amounts of locations. Use with a CASIO Digital Camera only. Never use with any other locations...
..., on it with items that can damage the battery, and cause deterioration of its performance and loss of camera malfunction, repair, etc. . Doing so creates the risk of battery overheating, fire, and explosion. - Incorrectly replacing the battery can cause the camera to large amounts of locations. Use with a CASIO Digital Camera only. Never use with any other locations...

User Guide
Page 138
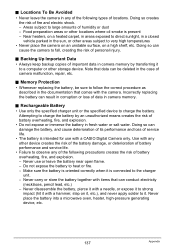
... CASIO authorized service center. • Should you ever notice leakage, strange odor, heat generation, discoloration, deformation, or any other abnormal condition while using, charging, or storing a battery, immediately remove it from the camera or charger unit and keep it away from a battery... approximate amount of time before using or charging the battery. • If a battery is greatly affected by ambient temperature, battery storage conditions, the amount of time spent in the camera can cause skin irritation. . Should battery fluid get onto clothing or your skin, immediately rinse...
... CASIO authorized service center. • Should you ever notice leakage, strange odor, heat generation, discoloration, deformation, or any other abnormal condition while using, charging, or storing a battery, immediately remove it from the camera or charger unit and keep it away from a battery... approximate amount of time before using or charging the battery. • If a battery is greatly affected by ambient temperature, battery storage conditions, the amount of time spent in the camera can cause skin irritation. . Should battery fluid get onto clothing or your skin, immediately rinse...
User Guide
Page 139
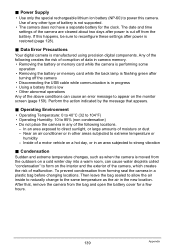
...communication is in progress • Using a battery that appears. . Data Error Precautions Your digital camera is restored (page 128). . Perform the action indicated by the message that is flashing green after power is manufactured using precision digital components. In an area exposed to appear on...- Condensation Sudden and extreme temperature changes, such as the air in camera memory. • Removing the battery or memory card while the camera is performing some operation • Removing the battery or memory card while the back lamp is low • Other abnormal operations Any ...
...communication is in progress • Using a battery that appears. . Data Error Precautions Your digital camera is restored (page 128). . Perform the action indicated by the message that is flashing green after power is manufactured using precision digital components. In an area exposed to appear on...- Condensation Sudden and extreme temperature changes, such as the air in camera memory. • Removing the battery or memory card while the camera is performing some operation • Removing the battery or memory card while the back lamp is low • Other abnormal operations Any ...
User Guide
Page 140
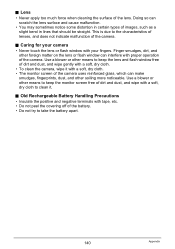
...etc. • Do not peel the covering off of the camera. Old Rechargeable Battery Handling Precautions • Insulate the positive and negative terminals with proper operation of the battery. • Do not try to clean it with your camera • Never touch the lens or flash window with a ...soft, dry cloth. • The monitor screen of the camera uses reinforced glass, which can make smudges, fingerprints,...
...etc. • Do not peel the covering off of the camera. Old Rechargeable Battery Handling Precautions • Insulate the positive and negative terminals with proper operation of the battery. • Do not try to clean it with your camera • Never touch the lens or flash window with a ...soft, dry cloth. • The monitor screen of the camera uses reinforced glass, which can make smudges, fingerprints,...
User Guide
Page 144
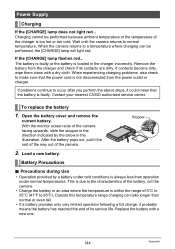
...very limited operation following a full charge, it the rest of the way out of the camera. With the monitor screen side of the battery, not the camera. • Charge the battery in an area where the temperature is too hot or too cold. This is due to... a temperature where charging can take longer than operation under cold conditions is loaded in the illustration. When experiencing charging problems, also check to 95°F). Contact your nearest CASIO...
...very limited operation following a full charge, it the rest of the way out of the camera. With the monitor screen side of the battery, not the camera. • Charge the battery in an area where the temperature is too hot or too cold. This is due to... a temperature where charging can take longer than operation under cold conditions is loaded in the illustration. When experiencing charging problems, also check to 95°F). Contact your nearest CASIO...

User Guide
Page 145
... during Use • The bundled charger is charged can discharge and go dead, which will require some time, fully use the camera. • Store batteries in another Country . Extra Batteries • Taking along on a trip in the range of 100V to malfunction. . Note, however, that the shape of...some time to charge when you need to use up its charge before storing it. • Always remove the battery from the camera when you do not plan to use a battery for operation with travel agent about the power supply requirements in your destination(s). • Do not connect the ...
... during Use • The bundled charger is charged can discharge and go dead, which will require some time, fully use the camera. • Store batteries in another Country . Extra Batteries • Taking along on a trip in the range of 100V to malfunction. . Note, however, that the shape of...some time to charge when you need to use up its charge before storing it. • Always remove the battery from the camera when you do not plan to use a battery for operation with travel agent about the power supply requirements in your destination(s). • Do not connect the ...


