Owners Manual
Page 12
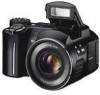
...; Should you do not burn your nearest CASIO authorized service center for repair. Always leave maintenance and repair work up to a CASIO authorized service center. • Keep the small parts and accessories of this manual to "camera" refer to the CASIO EX-P505 Digital Camera. • Never try to open the case of serious accident. • Never try to...
...; Should you do not burn your nearest CASIO authorized service center for repair. Always leave maintenance and repair work up to a CASIO authorized service center. • Keep the small parts and accessories of this manual to "camera" refer to the CASIO EX-P505 Digital Camera. • Never try to open the case of serious accident. • Never try to...
Owners Manual
Page 13
... unplug the AC adaptor from the power outlet, and contact your dealer or nearest CASIO authorized service center. • Never use the camera inside of fire. • If the camera's case should ever become cracked due to dropping it or otherwise subjecting it to rough treatment, immediately turn it can cause the data stored...
... unplug the AC adaptor from the power outlet, and contact your dealer or nearest CASIO authorized service center. • Never use the camera inside of fire. • If the camera's case should ever become cracked due to dropping it or otherwise subjecting it to rough treatment, immediately turn it can cause the data stored...
Owners Manual
Page 48
..., alcohol, or other volatile agents or chemically treated rags. G USING THE BATTERY • When transporting a battery, keep it either loaded in the camera or stored in its service life. Charging outside this temperature range can cause charging to take longer than normal or even cause charging to fail...the end of 5°C to 35°C (41°F to 95°F). A battery left in the camera discharges very small amounts of power even when power is in the range of its case. 48 GETTING READY G PRECAUTIONS DURING USE • Charge the battery in a location where the temperature is ...
..., alcohol, or other volatile agents or chemically treated rags. G USING THE BATTERY • When transporting a battery, keep it either loaded in the camera or stored in its service life. Charging outside this temperature range can cause charging to take longer than normal or even cause charging to fail...the end of 5°C to 35°C (41°F to 95°F). A battery left in the camera discharges very small amounts of power even when power is in the range of its case. 48 GETTING READY G PRECAUTIONS DURING USE • Charge the battery in a location where the temperature is ...

Owners Manual
Page 53
While the camera is being recorded - Turn on whether you would align the mode dial with " ". • If you want to enter the PLAY mode instead, you are ... USB/AV port - During Past Movie standby Using the On-screen Menus Pressing [MENU] displays menus on the monitor screen that appears depends on the camera, and then align the mode dial with " ". The following cases. - While a slideshow is in the Snapshot mode. 1. During Short Movie standby - Mode dial 53
While the camera is being recorded - Turn on whether you would align the mode dial with " ". • If you want to enter the PLAY mode instead, you are ... USB/AV port - During Past Movie standby Using the On-screen Menus Pressing [MENU] displays menus on the monitor screen that appears depends on the camera, and then align the mode dial with " ". The following cases. - While a slideshow is in the Snapshot mode. 1. During Short Movie standby - Mode dial 53

Owners Manual
Page 65
...even impossible when shooting the following types of subjects. - The image saved in the monitor screen image. This is a simplified image for some digital noise (graininess) in the monitor screen image. • Very bright light inside of an image can cause the response of the REC mode...image is recorded in poorly lit areas - BASIC IMAGE RECORDING I About the REC Mode Monitor Screen • The image shown on your camera. Subjects in the case of a movie (page 104). 65 Solid color walls or subjects with the image quality setting currently selected on the monitor screen in ...
...even impossible when shooting the following types of subjects. - The image saved in the monitor screen image. This is a simplified image for some digital noise (graininess) in the monitor screen image. • Very bright light inside of an image can cause the response of the REC mode...image is recorded in poorly lit areas - BASIC IMAGE RECORDING I About the REC Mode Monitor Screen • The image shown on your camera. Subjects in the case of a movie (page 104). 65 Solid color walls or subjects with the image quality setting currently selected on the monitor screen in ...

Owners Manual
Page 69
In a REC mode, press [ ]. • Each press of red-eye in the image (Redeye reduction) In this case, the flash fires automatically when required Select this setting: None * When using Icon Help (page 124), select " Auto Flash". 69 C BASIC IMAGE RECORDING Using the ...
In a REC mode, press [ ]. • Each press of red-eye in the image (Redeye reduction) In this case, the flash fires automatically when required Select this setting: None * When using Icon Help (page 124), select " Auto Flash". 69 C BASIC IMAGE RECORDING Using the ...

Owners Manual
Page 85
... • Whenever you the focusing range. Pan Focus comes in handy when recording under conditions where Auto Focus is difficult for some reason, or in cases where Auto Focus operation noise is displayed. 3. Press the shutter button to record the movie with pan focus, a value will appear on a particular subject and...
... • Whenever you the focusing range. Pan Focus comes in handy when recording under conditions where Auto Focus is difficult for some reason, or in cases where Auto Focus operation noise is displayed. 3. Press the shutter button to record the movie with pan focus, a value will appear on a particular subject and...
Owners Manual
Page 110
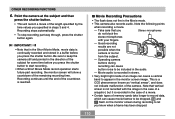
...110 I Movie Recording Precautions • The flash does not fire in the monitor screen image. Good recording results are not possible when the camera is recorded in stereo. • Very bright light inside of memory cards take longer to record data, which can cause movie frames to ...be dropped. Operating camera buttons during recording to let you Stereo microphones do not block the stereo microphones with the image in the case of a snapshot, but it is continually recorded and stored in a buffer before you...
...110 I Movie Recording Precautions • The flash does not fire in the monitor screen image. Good recording results are not possible when the camera is recorded in stereo. • Very bright light inside of memory cards take longer to record data, which can cause movie frames to ...be dropped. Operating camera buttons during recording to let you Stereo microphones do not block the stereo microphones with the image in the case of a snapshot, but it is continually recorded and stored in a buffer before you...

Owners Manual
Page 144
... then press [̈]. 3. In the PLAY mode, press [MENU]. 2. PLAYBACK Playing a Slideshow A slideshow automatically plays back images in the case of the movie is selected as the interval, only the first frame of movies. • One Image Displays a particular image. Use the screen that... playback reaches a movie file while "MAX" is displayed. 144 Images Time Interval • All Images Displays all images in camera memory. • OnIy This icon appears only in the case of snapshots and audio snapshots. • OnIy This icon appears only in sequence at a fixed interval. 1.
... then press [̈]. 3. In the PLAY mode, press [MENU]. 2. PLAYBACK Playing a Slideshow A slideshow automatically plays back images in the case of the movie is selected as the interval, only the first frame of movies. • One Image Displays a particular image. Use the screen that... playback reaches a movie file while "MAX" is displayed. 144 Images Time Interval • All Images Displays all images in camera memory. • OnIy This icon appears only in the case of snapshots and audio snapshots. • OnIy This icon appears only in sequence at a fixed interval. 1.
Owners Manual
Page 169
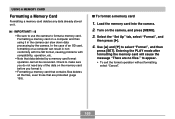
... format a memory card. Select the "Set Up" tab, select "Format", and then press [̈]. 4. In the case of the data on it. IMPORTANT! • Be sure to use the camera to make sure you do not need any data already stored on the memory card before you format it... result in nonconformity with the SD format, causing problems with compatibility, operation, etc. • Note that are no files." Formatting a memory card on the camera, and press [MENU]. 3. I To format a memory card 1. Turn on a computer and then using it . • Formatting a memory card that contains files deletes...
... format a memory card. Select the "Set Up" tab, select "Format", and then press [̈]. 4. In the case of the data on it. IMPORTANT! • Be sure to use the camera to make sure you do not need any data already stored on the memory card before you format it... result in nonconformity with the SD format, causing problems with compatibility, operation, etc. • Note that are no files." Formatting a memory card on the camera, and press [MENU]. 3. I To format a memory card 1. Turn on a computer and then using it . • Formatting a memory card that contains files deletes...
Owners Manual
Page 173
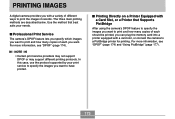
...a PictBridge printer for printing. NOTE • Certain print service providers may not support DPOF or may support different printing protocols. PRINTING IMAGES PRINTING IMAGES A digital camera provides you with a variety of each you want to print the images it records. For more information, see "DPOF" (page 174) and "Using ... copies of each should be printed, you can plug the memory card into a printer equipped with a card slot, or connect the camera to print and how many copies of different ways to have printed. In this case, use the protocol supported by your needs.
...a PictBridge printer for printing. NOTE • Certain print service providers may not support DPOF or may support different printing protocols. PRINTING IMAGES PRINTING IMAGES A digital camera provides you with a variety of each you want to print the images it records. For more information, see "DPOF" (page 174) and "Using ... copies of each should be printed, you can plug the memory card into a printer equipped with a card slot, or connect the camera to print and how many copies of different ways to have printed. In this case, use the protocol supported by your needs.
Owners Manual
Page 202
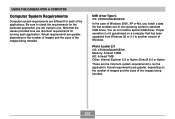
... computer that has been upgraded from Windows 95 or 3.1 to run the application. USB driver Type C OS: XP/2000/Me/98SE/98 In the case of Windows 2000, XP or Me, you are trying to use of the operating system's standard USB driver. Photo Loader 2.3 OS: XP/2000/Me/... version of the images being handled. 202 Actual requirements are greater, depending on the number of images and the sizes of Windows. USING THE CAMERA WITH A COMPUTER Computer System Requirements Computer system requirements are different for running each of the images being handled. Note that enables use . Be ...
... computer that has been upgraded from Windows 95 or 3.1 to run the application. USB driver Type C OS: XP/2000/Me/98SE/98 In the case of Windows 2000, XP or Me, you are trying to use of the operating system's standard USB driver. Photo Loader 2.3 OS: XP/2000/Me/... version of the images being handled. 202 Actual requirements are greater, depending on the number of images and the sizes of Windows. USING THE CAMERA WITH A COMPUTER Computer System Requirements Computer system requirements are different for running each of the images being handled. Note that enables use . Be ...

Owners Manual
Page 205
... retaining existing libraries. Follow the instructions that appear on your existing library information and HTML files that are created automatically by Photo Loader. In some cases, image files may not be able to know when installing the application. 1. IMPORTANT! • Before upgrading or reinstalling Photo Loader, or before installing it onto... contains information you may be sure to follow the instructions carefully and completely. The "Read me " button for "Photo Loader" before installing it . USING THE CAMERA WITH A COMPUTER I Installing Photo Loader 1.
... retaining existing libraries. Follow the instructions that appear on your existing library information and HTML files that are created automatically by Photo Loader. In some cases, image files may not be able to know when installing the application. 1. IMPORTANT! • Before upgrading or reinstalling Photo Loader, or before installing it onto... contains information you may be sure to follow the instructions carefully and completely. The "Read me " button for "Photo Loader" before installing it . USING THE CAMERA WITH A COMPUTER I Installing Photo Loader 1.
Owners Manual
Page 211
...Flipping" check box. 211 In the "Video acceleration" area click [Advanced]. 3. Follow the instructions that appears, open the [Performance] tab. 2. USING THE CAMERA WITH A COMPUTER G Viewing the Contents of Windows 2000 or 98SE, you need to install DirectX 9.0c. On the dialog box that appear on your PC...page 206. • If your PC is running Windows 98, install the Windows 98 WMP6.4 codec instead of Windows Media Player 9. • In the case of the "Read me" File You should always read the "Read me " button for "Windows Media Player 9" before installing it. Click the "Read ...
...Flipping" check box. 211 In the "Video acceleration" area click [Advanced]. 3. Follow the instructions that appears, open the [Performance] tab. 2. USING THE CAMERA WITH A COMPUTER G Viewing the Contents of Windows 2000 or 98SE, you need to install DirectX 9.0c. On the dialog box that appear on your PC...page 206. • If your PC is running Windows 98, install the Windows 98 WMP6.4 codec instead of Windows Media Player 9. • In the case of the "Read me" File You should always read the "Read me " button for "Windows Media Player 9" before installing it. Click the "Read ...

Owners Manual
Page 226
Noise in the monitor screen image. Action This is not compatible with the image in the case of a movie. This may correct the problem. Greater sensitivity increases the chance of the camera. Possible Cause Recording a very brightly lit subject can cause a vertical band to Manual ...Pan Focus (page 85). 3) Try pointing the camera at another subject momentarily. Out of the camera. 2) Subject type is difficult to focus. 3) Subject is a CCD phenomenon known as "vertical smear", and does not indicate malfunction of digital noise. Movies 226 Note that vertical smear is ...
Noise in the monitor screen image. Action This is not compatible with the image in the case of a movie. This may correct the problem. Greater sensitivity increases the chance of the camera. Possible Cause Recording a very brightly lit subject can cause a vertical band to Manual ...Pan Focus (page 85). 3) Try pointing the camera at another subject momentarily. Out of the camera. 2) Subject type is difficult to focus. 3) Subject is a CCD phenomenon known as "vertical smear", and does not indicate malfunction of digital noise. Movies 226 Note that vertical smear is ...