Owners Manual
Page 2
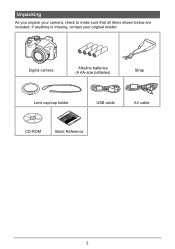
If anything is missing, contact your camera, check to make sure that all items shown below are included. Unpacking As you unpack your original retailer. Digital camera Alkaline batteries (4 AA-size batteries) Strap Lens cap/cap holder USB cable AV cable CD-ROM Basic Reference 2
If anything is missing, contact your camera, check to make sure that all items shown below are included. Unpacking As you unpack your original retailer. Digital camera Alkaline batteries (4 AA-size batteries) Strap Lens cap/cap holder USB cable AV cable CD-ROM Basic Reference 2

Owners Manual
Page 4
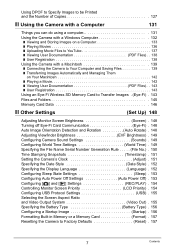
...9 Monitor Screen Contents 11 ❚❙ Quick Start Basics 14 What is a digital camera 14 What you can do with your CASIO camera 15 Attaching the Lens Cap and Strap 16 To load the batteries 16 ❚ Specifying the Battery Type 19 Configuring Basic Settings the First Time You Turn On the... Camera 20 Preparing a Memory Card 21 ❚ Supported Memory Cards 21 ❚ To ...
...9 Monitor Screen Contents 11 ❚❙ Quick Start Basics 14 What is a digital camera 14 What you can do with your CASIO camera 15 Attaching the Lens Cap and Strap 16 To load the batteries 16 ❚ Specifying the Battery Type 19 Configuring Basic Settings the First Time You Turn On the... Camera 20 Preparing a Memory Card 21 ❚ Supported Memory Cards 21 ❚ To ...
Owners Manual
Page 7
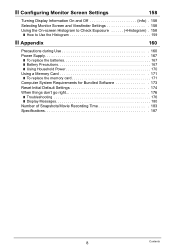
...) . 149 Specifying the File Name Serial Number Generation Rule . . . . . (File No.) . 150 Time Stamping Snapshots Timestamp) . 151 Setting the Camera's Clock Adjust) . 151 Specifying the Date Style Date Style) . 152 Specifying the Display Language Language) . 152 Configuring Sleep State Settings Sleep) . 153 Configuring... Protocol Settings USB) . 155 Selecting the Screen Aspect Ratio and Video Output System Video Out) . 155 Specifying the Battery Type Battery Type) . 156 Configuring a Startup Image Startup) . 156 Formatting Built-in Memory or a Memory Card Format) . 157 Resetting the...
...) . 149 Specifying the File Name Serial Number Generation Rule . . . . . (File No.) . 150 Time Stamping Snapshots Timestamp) . 151 Setting the Camera's Clock Adjust) . 151 Specifying the Date Style Date Style) . 152 Specifying the Display Language Language) . 152 Configuring Sleep State Settings Sleep) . 153 Configuring... Protocol Settings USB) . 155 Selecting the Screen Aspect Ratio and Video Output System Video Out) . 155 Specifying the Battery Type Battery Type) . 156 Configuring a Startup Image Startup) . 156 Formatting Built-in Memory or a Memory Card Format) . 157 Resetting the...
Owners Manual
Page 8
... Histogram) . 158 ❚ How to Use the Histogram 159 ❚❙ Appendix 160 Precautions during Use 160 Power Supply 167 ❚ To replace the batteries 167 ❚ Battery Precautions 167 ❚ Using Household Power 170 Using a Memory Card 171 ❚ To replace the memory card 171 Computer System Requirements for Bundled Software...
... Histogram) . 158 ❚ How to Use the Histogram 159 ❚❙ Appendix 160 Precautions during Use 160 Power Supply 167 ❚ To replace the batteries 167 ❚ Battery Precautions 167 ❚ Using Household Power 170 Using a Memory Card 171 ❚ To replace the memory card 171 Computer System Requirements for Bundled Software...
Owners Manual
Page 16
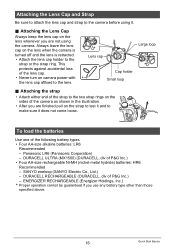
...are not using it does not come loose. To load the batteries Use one of P&G Inc.) - Always leave the lens cap on the sides of the camera as shown in the illustration. • After you use any battery type other than those specified above. 16 Quick Start Basics ...This protects against accidental loss of P&G Inc.) • Four AA-size rechargeable Ni-MH (nickel-metal hydride) batteries: HR6 Recommended - DURACELL ULTRA...
...are not using it does not come loose. To load the batteries Use one of P&G Inc.) - Always leave the lens cap on the sides of the camera as shown in the illustration. • After you use any battery type other than those specified above. 16 Quick Start Basics ...This protects against accidental loss of P&G Inc.) • Four AA-size rechargeable Ni-MH (nickel-metal hydride) batteries: HR6 Recommended - DURACELL ULTRA...
Owners Manual
Page 17
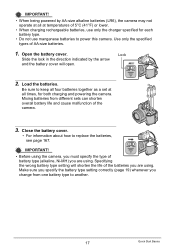
... a set at temperatures of 5°C (41°F) or lower. • When charging rechargeable batteries, use manganese batteries to replace the batteries, see page 167. Close the battery cover. • For information about how to power this camera. Make sure you specify the battery type setting correctly (page 19) whenever you are using . IMPORTANT! • When being...
... a set at temperatures of 5°C (41°F) or lower. • When charging rechargeable batteries, use manganese batteries to replace the batteries, see page 167. Close the battery cover. • For information about how to power this camera. Make sure you specify the battery type setting correctly (page 19) whenever you are using . IMPORTANT! • When being...
Owners Manual
Page 18
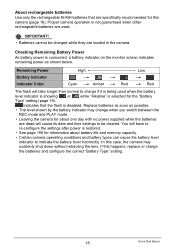
.... • Leaving the camera for about battery life and memory capacity. • Certain camera operating conditions and battery types can cause the battery level indicator to be charged while they are used when the battery level indicator is showing or while "Alkaline" is selected for this camera (page 16). Remaining Power Battery Indicator Indicator Color High * * Cyan * Amber * Red...
.... • Leaving the camera for about battery life and memory capacity. • Certain camera operating conditions and battery types can cause the battery level indicator to be charged while they are used when the battery level indicator is showing or while "Alkaline" is selected for this camera (page 16). Remaining Power Battery Indicator Indicator Color High * * Cyan * Amber * Red...
Owners Manual
Page 19
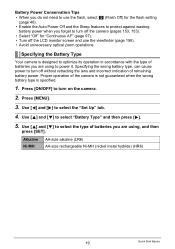
... and the Sleep features to protect against wasting battery power when you are using to turn on the camera. 2. Press [ON/OFF] to turn off without retracting the lens and incorrect indication of remaining battery power. Battery Power Conservation Tips • When you do not...operations. Press [MENU]. 3. Use [8] and [2] to select the "Set Up" tab. 4. Use [4] and [6] to select "Battery Type" and then press [6]. 5. Specifying the Battery Type Your camera is specified. 1. Alkaline AA-size alkaline (LR6) Ni-MH AA-size rechargeable Ni-MH (nickel metal hydride) (HR6) 19 Quick...
... and the Sleep features to protect against wasting battery power when you are using to turn on the camera. 2. Press [ON/OFF] to turn off without retracting the lens and incorrect indication of remaining battery power. Battery Power Conservation Tips • When you do not...operations. Press [MENU]. 3. Use [8] and [2] to select the "Set Up" tab. 4. Use [4] and [6] to select "Battery Type" and then press [6]. 5. Specifying the Battery Type Your camera is specified. 1. Alkaline AA-size alkaline (LR6) Ni-MH AA-size rechargeable Ni-MH (nickel metal hydride) (HR6) 19 Quick...
Owners Manual
Page 20
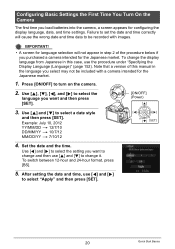
..., press [BS]. 5. Failure to be included with images. Example: July 10, 2012 YY/MM/DD * 12/7/10 DD/MM/YY * 10/7/12 MM/DD/YY * 7/10/12 4. Configuring Basic Settings the First Time You Turn On the Camera The first time you load batteries into the camera, a screen appears for the Japanese market. 1. IMPORTANT! • A screen for...
..., press [BS]. 5. Failure to be included with images. Example: July 10, 2012 YY/MM/DD * 12/7/10 DD/MM/YY * 10/7/12 MM/DD/YY * 7/10/12 4. Configuring Basic Settings the First Time You Turn On the Camera The first time you load batteries into the camera, a screen appears for the Japanese market. 1. IMPORTANT! • A screen for...
Owners Manual
Page 21
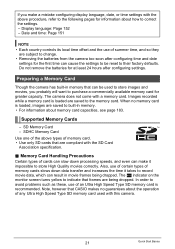
... to avoid problems such as these, use of an Ultra High Speed Type SD memory card is recommended. The camera does not come with the above types of memory card. • Use only SD cards that CASIO makes no memory card is loaded are being dropped. Also,...commercially available memory card for greater capacity. Images recorded while a memory card is loaded, images are subject to change. • Removing the batteries from the camera too soon after configuring settings. In order to their factory defaults. Display language: Page 152 - Supported Memory Cards - The Y indicator ...
... to avoid problems such as these, use of an Ultra High Speed Type SD memory card is recommended. The camera does not come with the above types of memory card. • Use only SD cards that CASIO makes no memory card is loaded are being dropped. Also,...commercially available memory card for greater capacity. Images recorded while a memory card is loaded, images are subject to change. • Removing the batteries from the camera too soon after configuring settings. In order to their factory defaults. Display language: Page 152 - Supported Memory Cards - The Y indicator ...
Owners Manual
Page 22
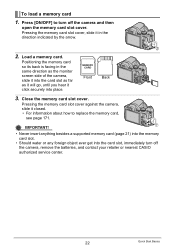
Close the memory card slot cover. Pressing the memory card slot cover against the camera, slide it click securely into the card slot, immediately turn off the camera, remove the batteries, and contact your retailer or nearest CASIO authorized service center. 22 Quick Start Basics Front Back 1 2 3. Positioning the memory card so its back is...
Close the memory card slot cover. Pressing the memory card slot cover against the camera, slide it click securely into the card slot, immediately turn off the camera, remove the batteries, and contact your retailer or nearest CASIO authorized service center. 22 Quick Start Basics Front Back 1 2 3. Positioning the memory card so its back is...
Owners Manual
Page 31
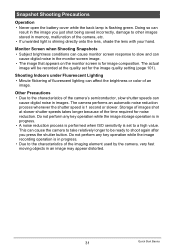
... under Fluorescent Lighting • Minute flickering of fluorescent lighting can cause digital noise in memory, malfunction of the camera, etc. • If unwanted light is flashing green. Doing so can cause digital noise in the monitor screen image. • The image that appears...can cause the camera to take relatively longer to the characteristics of the camera's semiconductor, slow shutter speeds can affect the brightness or color of images shot at the quality set to a high value. Snapshot Shooting Precautions Operation • Never open the battery cover while the...
... under Fluorescent Lighting • Minute flickering of fluorescent lighting can cause digital noise in memory, malfunction of the camera, etc. • If unwanted light is flashing green. Doing so can cause digital noise in the monitor screen image. • The image that appears...can cause the camera to take relatively longer to the characteristics of the camera's semiconductor, slow shutter speeds can affect the brightness or color of images shot at the quality set to a high value. Snapshot Shooting Precautions Operation • Never open the battery cover while the...
Owners Manual
Page 47
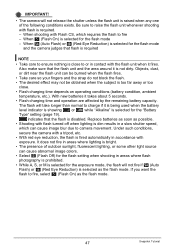
...Reduction) is selected for the flash setting when shooting in a slow shutter speed, which requires the flash to raise the flash unit whenever shooting with exposure. With new batteries it is being used when the battery level indicator is showing or while "Alkaline" is selected as the flash... mode. 47 Snapshot Tutorial When < (Flash On) is disabled. If you want the flash to camera movement. Replace batteries as soon as possible. • Shooting with the flash unit when it is raised when any one of outdoor sunlight, fluorescent lighting...
...Reduction) is selected for the flash setting when shooting in a slow shutter speed, which requires the flash to raise the flash unit whenever shooting with exposure. With new batteries it is being used when the battery level indicator is showing or while "Alkaline" is selected as the flash... mode. 47 Snapshot Tutorial When < (Flash On) is disabled. If you want the flash to camera movement. Replace batteries as soon as possible. • Shooting with the flash unit when it is raised when any one of outdoor sunlight, fluorescent lighting...
Owners Manual
Page 88
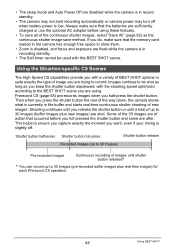
... you capture exactly the moment you press the shutter button the rest of the way down, the camera stores what is currently in record standby. • The camera may not start recording automatically or camera power may turn off . If you do, make sure that occurred before using . Then when ...of the 30 images are of action that the batteries are sufficiently charged or use the optional AC adaptor before you are trying to 30 images (pre-recorded buffer images plus new images) are shot. Using the Situation-specific CS Scenes The High Speed CS capabilities provide you with a variety of ...
... you capture exactly the moment you press the shutter button the rest of the way down, the camera stores what is currently in record standby. • The camera may not start recording automatically or camera power may turn off . If you do, make sure that occurred before using . Then when ...of the 30 images are of action that the batteries are sufficiently charged or use the optional AC adaptor before you are trying to 30 images (pre-recorded buffer images plus new images) are shot. Using the Situation-specific CS Scenes The High Speed CS capabilities provide you with a variety of ...
Owners Manual
Page 125
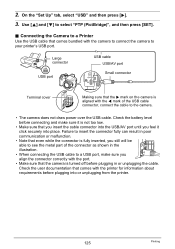
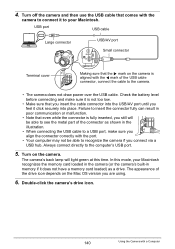
... then press [6]. 3. Large connector USB USB port USB cable USB/AV port Small connector Terminal cover Making sure that the 6 mark on the camera is not too low. • Make sure that comes bundled with the 4 mark of the connector as shown in or unplugging the cable. ...printer for information about requirements before connecting and make sure you feel it is aligned with the camera to connect the camera to the camera. • The camera does not draw power over the USB cable. Check the battery level before plugging into place. 2. Use [8] and [2] to a USB port, make sure...
... then press [6]. 3. Large connector USB USB port USB cable USB/AV port Small connector Terminal cover Making sure that the 6 mark on the camera is not too low. • Make sure that comes bundled with the 4 mark of the connector as shown in or unplugging the cable. ...printer for information about requirements before connecting and make sure you feel it is aligned with the camera to connect the camera to the camera. • The camera does not draw power over the USB cable. Check the battery level before plugging into place. 2. Use [8] and [2] to a USB port, make sure...
Owners Manual
Page 133
... cable Large connector USB/AV port Small connector Terminal cover Making sure that you feel it to run. • Operation on the camera and press [MENU]. 2. Precautions for Windows Users • Except for Adobe Reader, the bundled software requires Administrator privileges to your computer. Check... the battery level before connecting and make sure it is not too low. • Make sure that the 6 mark on a Computer You can result...
... cable Large connector USB/AV port Small connector Terminal cover Making sure that you feel it to run. • Operation on the camera and press [MENU]. 2. Precautions for Windows Users • Except for Adobe Reader, the bundled software requires Administrator privileges to your computer. Check... the battery level before connecting and make sure it is not too low. • Make sure that the 6 mark on a Computer You can result...
Owners Manual
Page 140
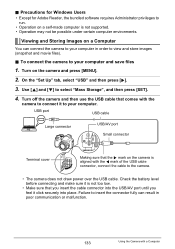
... memory card loaded) as shown in memory if it is fully inserted, you still will be able to recognize the camera if you are using. 6. Check the battery level before connecting and make sure you feel it click securely into the USB/AV port until you align the connector ...correctly with a Computer Always connect directly to the camera. • The camera does not draw power over the USB cable. In this time. The camera's back lamp ...
... memory card loaded) as shown in memory if it is fully inserted, you still will be able to recognize the camera if you are using. 6. Check the battery level before connecting and make sure you feel it click securely into the USB/AV port until you align the connector ...correctly with a Computer Always connect directly to the camera. • The camera does not draw power over the USB cable. In this time. The camera's back lamp ...
Owners Manual
Page 144
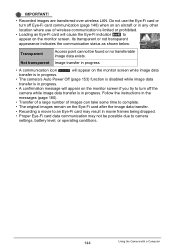
... LAN. Transparent Not transparent Access point cannot be possible due to camera settings, battery level, or operating conditions. 144 Using the Camera with a Computer Do not use the Eye-Fi card or turn off the camera while image data transfer is limited or prohibited. • Loading ... data transfer. • Recording a movie to appear on the monitor screen while image data transfer is in progress. • The camera's Auto Power Off (page 153) function is disabled while image data transfer is in progress. Its transparent or not transparent appearance indicates ...
... LAN. Transparent Not transparent Access point cannot be possible due to camera settings, battery level, or operating conditions. 144 Using the Camera with a Computer Do not use the Eye-Fi card or turn off the camera while image data transfer is limited or prohibited. • Loading ... data transfer. • Recording a movie to appear on the monitor screen while image data transfer is in progress. • The camera's Auto Power Off (page 153) function is disabled while image data transfer is in progress. Its transparent or not transparent appearance indicates ...
Owners Manual
Page 156
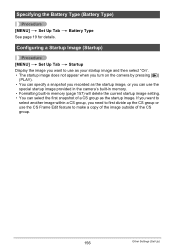
Specifying the Battery Type (Battery Type) Procedure [MENU] * Set Up Tab * Battery Type See page 19 for details. If you want to use as your startup image and then select "On". • The startup image does not appear when you turn on the camera by pressing [p] (PLAY). • You can specify a snapshot you ... group, you can use the CS Frame Edit feature to first divide up the CS group or use the special startup image provided in the camera's built-in memory. • Formatting built-in memory (page 157) will delete the current startup image setting. • You can select the first ...
Specifying the Battery Type (Battery Type) Procedure [MENU] * Set Up Tab * Battery Type See page 19 for details. If you want to use as your startup image and then select "On". • The startup image does not appear when you turn on the camera by pressing [p] (PLAY). • You can specify a snapshot you ... group, you can use the CS Frame Edit feature to first divide up the CS group or use the special startup image provided in the camera's built-in memory. • Formatting built-in memory (page 157) will delete the current startup image setting. • You can select the first ...
Owners Manual
Page 157
... - Startup screen • Formatting a memory card will format the memory card. Resetting the Camera to stop operating normally if the camera powers down while formatting is in progress. • Never open the battery cover while formatting is loaded. • The format operation will delete all contents on the ...Make sure you do not need any data currently on the memory card or in built-in the camera, this operation will delete the following data. - Protected images • Check the battery level before you format it is loaded in memory. It cannot be performed correctly and the...
... - Startup screen • Formatting a memory card will format the memory card. Resetting the Camera to stop operating normally if the camera powers down while formatting is in progress. • Never open the battery cover while formatting is loaded. • The format operation will delete all contents on the ...Make sure you do not need any data currently on the memory card or in built-in the camera, this operation will delete the following data. - Protected images • Check the battery level before you format it is loaded in memory. It cannot be performed correctly and the...


