
Owners Manual
Page 2
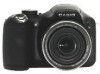
Unpacking As you unpack your original retailer. If anything is missing, contact your camera, check to make sure that all items shown below are included. Digital camera Alkaline batteries (4 AA-size batteries) Strap Lens cap/cap holder USB cable AV cable CD-ROM Basic Reference 2
Unpacking As you unpack your original retailer. If anything is missing, contact your camera, check to make sure that all items shown below are included. Digital camera Alkaline batteries (4 AA-size batteries) Strap Lens cap/cap holder USB cable AV cable CD-ROM Basic Reference 2

Owners Manual
Page 4
... first 3 ❚❙ Quick Start Basics 9 What is a digital camera 9 What you can do with your CASIO camera 10 Attaching the Lens Cap and Strap 11 To load the batteries 12 ❚ Specifying the Battery Type 15 Configuring the Display Language the First Time You Turn On the Camera. . 15 Preparing a Memory Card 17 ❚ Supported Memory...
... first 3 ❚❙ Quick Start Basics 9 What is a digital camera 9 What you can do with your CASIO camera 10 Attaching the Lens Cap and Strap 11 To load the batteries 12 ❚ Specifying the Battery Type 15 Configuring the Display Language the First Time You Turn On the Camera. . 15 Preparing a Memory Card 17 ❚ Supported Memory...

Owners Manual
Page 7
...124 ❚❙ Other Settings (Set Up) 126 Adjusting Monitor Screen Brightness Screen) . 126 Adjusting Viewfinder Brightness EVF Brightness) . 126 Configuring Camera Sound Settings Sounds) . 127 Specifying the File Name Serial Number Generation Rule . . . . . (File No.) . 127 Configuring World ...Ratio and Video Output System (Video Out) . 133 Specifying the Battery Type Battery Type) . 134 Configuring a Startup Image Startup) . 134 Formatting Built-in Memory or a Memory Card Format) . 135 Resetting the Camera to Factory Defaults Reset) . 135 ❚❙ Configuring Monitor ...
...124 ❚❙ Other Settings (Set Up) 126 Adjusting Monitor Screen Brightness Screen) . 126 Adjusting Viewfinder Brightness EVF Brightness) . 126 Configuring Camera Sound Settings Sounds) . 127 Specifying the File Name Serial Number Generation Rule . . . . . (File No.) . 127 Configuring World ...Ratio and Video Output System (Video Out) . 133 Specifying the Battery Type Battery Type) . 134 Configuring a Startup Image Startup) . 134 Formatting Built-in Memory or a Memory Card Format) . 135 Resetting the Camera to Factory Defaults Reset) . 135 ❚❙ Configuring Monitor ...
Owners Manual
Page 12
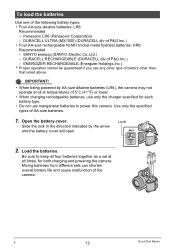
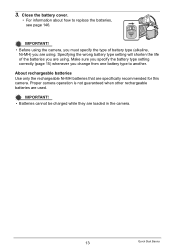
... the charger specified for both charging and powering the camera. Open the battery cover. To load the batteries Use one of the camera. Panasonic LR6 (Panasonic Corporation) - IMPORTANT! • When being powered by the arrow and the battery cover will open. 2. Mixing batteries from different sets can shorten overall battery life and cause malfunction of the following...
... the charger specified for both charging and powering the camera. Open the battery cover. To load the batteries Use one of the camera. Panasonic LR6 (Panasonic Corporation) - IMPORTANT! • When being powered by the arrow and the battery cover will open. 2. Mixing batteries from different sets can shorten overall battery life and cause malfunction of the following...
Owners Manual
Page 13
... they are using . Specifying the wrong battery type setting will shorten the life of battery type (alkaline, Ni-MH) you change from one battery type to replace the batteries, see page 146. About rechargeable batteries Use only the rechargeable Ni-MH batteries that are specifically recommended for this camera. 3. Close the battery cover. • For information about how...
... they are using . Specifying the wrong battery type setting will shorten the life of battery type (alkaline, Ni-MH) you change from one battery type to replace the batteries, see page 146. About rechargeable batteries Use only the rechargeable Ni-MH batteries that are specifically recommended for this camera. 3. Close the battery cover. • For information about how...

Owners Manual
Page 14
...Battery Indicator Indicator Color High * * Cyan * Amber * Red Low * * Red The flash will take longer than normal to charge if it is being used when the battery level indicator is showing or while "Alkaline" is disabled. indicates that the flash is selected for the "Battery Type" setting (page 15). Battery...the camera for about battery life and memory capacity. • Certain camera operating conditions and battery can cause the battery level indicator to indicate the battery level incorrectly. If this case, the camera may change when you forget to turn off the camera (...
...Battery Indicator Indicator Color High * * Cyan * Amber * Red Low * * Red The flash will take longer than normal to charge if it is being used when the battery level indicator is showing or while "Alkaline" is disabled. indicates that the flash is selected for the "Battery Type" setting (page 15). Battery...the camera for about battery life and memory capacity. • Certain camera operating conditions and battery can cause the battery level indicator to indicate the battery level incorrectly. If this case, the camera may change when you forget to turn off the camera (...

Owners Manual
Page 15
..." tab. 4. Failure to set the date and time correctly will cause the wrong date and time data to power it. Specifying the Battery Type Your camera is specified. 1. Alkaline Ni-MH AA-size alkaline (LR6) AA-size rechargeable Ni-MH (nickel metal hydride) (HR6) Configuring the ...the lens and incorrect indication of the camera is not guaranteed when the wrong battery type is designed to turn on the camera. [ON/OFF] (Power) =8? =4? =6? =2? [SET] 15 Quick Start Basics Press [ON/OFF] to turn on the camera. 2. Proper operation of remaining battery power. Press [ON/OFF] to ...
..." tab. 4. Failure to set the date and time correctly will cause the wrong date and time data to power it. Specifying the Battery Type Your camera is specified. 1. Alkaline Ni-MH AA-size alkaline (LR6) AA-size rechargeable Ni-MH (nickel metal hydride) (HR6) Configuring the ...the lens and incorrect indication of the camera is not guaranteed when the wrong battery type is designed to turn on the camera. [ON/OFF] (Power) =8? =4? =6? =2? [SET] 15 Quick Start Basics Press [ON/OFF] to turn on the camera. 2. Proper operation of remaining battery power. Press [ON/OFF] to ...

Owners Manual
Page 18
...it into the card slot, immediately turn off the camera, remove the batteries, and contact your retailer or nearest CASIO authorized service center. However, if storing to a card has slowed down data processing by the camera. In the case of the camera, slide it , will go, until you do not..., etc. To format (initialize) a new memory card You need to select "Format" and then press [SET]. Formatting a memory card on the camera and press [MENU]. 2. B 18 Quick Start Basics Front Back 3. Close the memory card slot cover. Normally you hear it click securely into the...
...it into the card slot, immediately turn off the camera, remove the batteries, and contact your retailer or nearest CASIO authorized service center. However, if storing to a card has slowed down data processing by the camera. In the case of the camera, slide it , will go, until you do not..., etc. To format (initialize) a new memory card You need to select "Format" and then press [SET]. Formatting a memory card on the camera and press [MENU]. 2. B 18 Quick Start Basics Front Back 3. Close the memory card slot cover. Normally you hear it click securely into the...

Owners Manual
Page 26
...green. Snapshot Shooting Precautions Operation • Never open the battery cover while the back lamp is for image composition. Multiple subjects at the quality set for light from the camera - Doing so can make proper focus impossible. - Camera movement while shooting - The actual image will be recorded at...; If you just shot being saved incorrectly, damage to reach - Very shiny subject - Subjects outside the focus range of the camera, etc. • If unwanted light is shining directly onto the lens, shade the lens with a repeating horizontal pattern - Auto Focus ...
...green. Snapshot Shooting Precautions Operation • Never open the battery cover while the back lamp is for image composition. Multiple subjects at the quality set for light from the camera - Doing so can make proper focus impossible. - Camera movement while shooting - The actual image will be recorded at...; If you just shot being saved incorrectly, damage to reach - Very shiny subject - Subjects outside the focus range of the camera, etc. • If unwanted light is shining directly onto the lens, shade the lens with a repeating horizontal pattern - Auto Focus ...

Owners Manual
Page 36
...soon as possible. • Shooting with the flash unit when it is being used when the battery level indicator is showing or while "Alkaline" is disabled. It does not fire in a slow shutter speed, which requires the flash to raise the flash unit whenever shooting with Flash CS, which can...be obtained when the subject is bright. • The presence of the following conditions exists. Be sure to fire - Under such conditions, secure the camera with a tripod, etc. • With red eye reduction, the flash is fired automatically in contact with flash turned off when lighting is dim ...
...soon as possible. • Shooting with the flash unit when it is being used when the battery level indicator is showing or while "Alkaline" is disabled. It does not fire in a slow shutter speed, which requires the flash to raise the flash unit whenever shooting with Flash CS, which can...be obtained when the subject is bright. • The presence of the following conditions exists. Be sure to fire - Under such conditions, secure the camera with a tripod, etc. • With red eye reduction, the flash is fired automatically in contact with flash turned off when lighting is dim ...

Owners Manual
Page 75
...when shooting with this BEST SHOT scene: t (Single Shot), × (High-speed CS), ª (Flash CS). • The sleep mode and Auto Power Off are fixed while the camera is in record standby. • The camera may not start recording automatically or camera power may not record correctly if the subject is little difference... its background are pre-recorded, press the shutter button the rest of the way down . Also, Move Out CS may turn off when battery power is sufficiently charged or use the optional AC adaptor before using these features. • To save method. Be sure to put the...
...when shooting with this BEST SHOT scene: t (Single Shot), × (High-speed CS), ª (Flash CS). • The sleep mode and Auto Power Off are fixed while the camera is in record standby. • The camera may not start recording automatically or camera power may not record correctly if the subject is little difference... its background are pre-recorded, press the shutter button the rest of the way down . Also, Move Out CS may turn off when battery power is sufficiently charged or use the optional AC adaptor before using these features. • To save method. Be sure to put the...

Owners Manual
Page 106
...When connecting the USB cable to select "PTP (PictBridge)", and then press [SET]. . Failure to insert the connector fully can connect the camera directly to the camera. • The camera does not draw power over the USB cable. Use [8] and [2] to a USB port, make sure it click securely into the USB/AV...'s USB port. Large connector USB USB port USB cable USB/AV port Small connector Making sure that the 6 mark on the camera and press [MENU]. 2. Check the battery level before connecting and make sure you feel it is not too low. • Make sure that you insert the cable connector...
...When connecting the USB cable to select "PTP (PictBridge)", and then press [SET]. . Failure to insert the connector fully can connect the camera directly to the camera. • The camera does not draw power over the USB cable. Use [8] and [2] to a USB port, make sure it click securely into the USB/AV...'s USB port. Large connector USB USB port USB cable USB/AV port Small connector Making sure that the 6 mark on the camera and press [MENU]. 2. Check the battery level before connecting and make sure you feel it is not too low. • Make sure that you insert the cable connector...

Owners Manual
Page 114
...click "Removable Disk". 3Drag the "DCIM" folder to your Windows desktop to your Windows desktop to the camera. • The camera does not draw power over the USB cable. Check the battery level before connecting and make sure you insert the cable connector into place. Windows Vista 1Select "Open folder ...to view files". 2Drag the "DCIM" folder to your computer. Turn on the camera is not too low. • Make sure that...
...click "Removable Disk". 3Drag the "DCIM" folder to your Windows desktop to your Windows desktop to the camera. • The camera does not draw power over the USB cable. Check the battery level before connecting and make sure you insert the cable connector into place. Windows Vista 1Select "Open folder ...to view files". 2Drag the "DCIM" folder to your computer. Turn on the camera is not too low. • Make sure that...

Owners Manual
Page 120
Check the battery level before connecting and make sure you feel it . 120 Using the Camera with the 4 mark of the connector as a drive. Turn on the camera is fully inserted, you still will light green at this mode, your Macintosh. Turn off the camera and then use the USB cable that you insert the... on the Mac OS version you want to copy it click securely into the USB/AV port until you align the connector correctly with the camera to connect it to a USB port, make sure it does not have a memory card loaded) as shown in the illustration. • When connecting the USB...
Check the battery level before connecting and make sure you feel it . 120 Using the Camera with the 4 mark of the connector as a drive. Turn on the camera is fully inserted, you still will light green at this mode, your Macintosh. Turn off the camera and then use the USB cable that you insert the... on the Mac OS version you want to copy it click securely into the USB/AV port until you align the connector correctly with the camera to connect it to a USB port, make sure it does not have a memory card loaded) as shown in the illustration. • When connecting the USB...

Owners Manual
Page 134
... the image you can use as your startup image and then select "On". • The startup image does not appear when you turn on the camera by pressing [p] (PLAY). • You can specify a snapshot you recorded as the startup image. If you want to make a copy of the image outside of... group, you need to first divide up the CS group or use the frame select feature to use the special startup image provided in the camera's built-in memory. • Formatting built-in memory (page 135) will delete the current startup image setting. • You can select the first snapshot of...
... the image you can use as your startup image and then select "On". • The startup image does not appear when you turn on the camera by pressing [p] (PLAY). • You can specify a snapshot you recorded as the startup image. If you want to make a copy of the image outside of... group, you need to first divide up the CS group or use the frame select feature to use the special startup image provided in the camera's built-in memory. • Formatting built-in memory (page 135) will delete the current startup image setting. • You can select the first snapshot of...

Owners Manual
Page 135
...) Procedure [MENU] * Set Up Tab * Reset See page 159 for details about the camera's factory default settings. 135 Other Settings (Set Up) Protected images - Protected images • Check the battery level before you format it is not too low. It will format built-in memory if no... format the memory card. It cannot be performed correctly and the camera may not be undone. Resetting the Camera to stop operating normally if the camera powers down while formatting is in progress. • Never open the battery cover while formatting is in memory will delete the following data. ...
...) Procedure [MENU] * Set Up Tab * Reset See page 159 for details about the camera's factory default settings. 135 Other Settings (Set Up) Protected images - Protected images • Check the battery level before you format it is not too low. It will format built-in memory if no... format the memory card. It cannot be performed correctly and the camera may not be undone. Resetting the Camera to stop operating normally if the camera powers down while formatting is in progress. • Never open the battery cover while formatting is in memory will delete the following data. ...

Owners Manual
Page 140
... is required when using the camera where it is overheating creates the risk of fire and electric shock. Keep Away From Fire • Never expose the camera to your dealer or nearest CASIO authorized service center. . Remove the batteries from the camera, taking care to explode and... creates the risk of fire and electric shock. Remove the batteries from the camera. 3. Be sure to leave all internal inspection...
... is required when using the camera where it is overheating creates the risk of fire and electric shock. Keep Away From Fire • Never expose the camera to your dealer or nearest CASIO authorized service center. . Remove the batteries from the camera, taking care to explode and... creates the risk of fire and electric shock. Remove the batteries from the camera. 3. Be sure to leave all internal inspection...

Owners Manual
Page 141
... other areas subject to very high temperatures • Never place the camera on an unstable surface, on a high shelf, etc. Backing Up Important Data • Always keep backup copies of camera malfunction, repair, etc. . Do not expose batteries to become shorted. - Never mix new batteries with the camera. Do not charge non-rechargeable batteries. - Note that are facing...
... other areas subject to very high temperatures • Never place the camera on an unstable surface, on a high shelf, etc. Backing Up Important Data • Always keep backup copies of camera malfunction, repair, etc. . Do not expose batteries to become shorted. - Never mix new batteries with the camera. Do not charge non-rechargeable batteries. - Note that are facing...

Owners Manual
Page 142
... to high temperatures. • Battery fluid can damage your eyes, take batteries apart, modify them in a microwave oven, throw them into your eyes with battery fluid can conduct electricity (necklaces, pencil lead, etc.). - Battery discoloration - Never try to take the following conditions while using batteries creates the risk of sight. . Should battery fluid get into the camera. - See...
... to high temperatures. • Battery fluid can damage your eyes, take batteries apart, modify them in a microwave oven, throw them into your eyes with battery fluid can conduct electricity (necklaces, pencil lead, etc.). - Battery discoloration - Never try to take the following conditions while using batteries creates the risk of sight. . Should battery fluid get into the camera. - See...

Owners Manual
Page 143
...; Disconnecting the USB cable while communication is greatly affected by the message that the life of weak batteries can cause an error message to achieve operation for the life noted. Data Error Precautions Your digital camera is recommended. . In an area exposed to appear. Near an air conditioner or in the User's Guide...
...; Disconnecting the USB cable while communication is greatly affected by the message that the life of weak batteries can cause an error message to achieve operation for the life noted. Data Error Precautions Your digital camera is recommended. . In an area exposed to appear. Near an air conditioner or in the User's Guide...


