
Owners Manual
Page 1
E Digital Camera User's Guide K1160PCM2DMX Thank you for purchasing this CASIO product. • Before using it, be sure to read the precautions contained in this User's Guide. • Keep the User's Guide in a safe place for future reference. • For the most up-to-date information about this product, visit the official EXILIM Website at http://www.exilim.com/
E Digital Camera User's Guide K1160PCM2DMX Thank you for purchasing this CASIO product. • Before using it, be sure to read the precautions contained in this User's Guide. • Keep the User's Guide in a safe place for future reference. • For the most up-to-date information about this product, visit the official EXILIM Website at http://www.exilim.com/

Owners Manual
Page 3
.... 3 LCD Panel The liquid crystal panel used for any damages, lost profits suffered by you notice anything that the camera is forbidden under copyright laws. • CASIO COMPUTER CO., LTD. shall not be held liable for CASIO. • CASIO COMPUTER CO., LTD. Take test shots Before... shooting your own personal use, any other use of YouTube Uploader for any damages ...
.... 3 LCD Panel The liquid crystal panel used for any damages, lost profits suffered by you notice anything that the camera is forbidden under copyright laws. • CASIO COMPUTER CO., LTD. shall not be held liable for CASIO. • CASIO COMPUTER CO., LTD. Take test shots Before... shooting your own personal use, any other use of YouTube Uploader for any damages ...

Owners Manual
Page 4
...Start Basics 9 What is a digital camera 9 What you can do with your CASIO camera 10 Attaching the Lens Cap and Strap 11 To load the batteries 12 ❚ Specifying the Battery Type 15 Configuring the Display Language the First Time You Turn On the Camera. . 15 Preparing a Memory... ❚ Auto Focus Restrictions 26 ❚❙ Snapshot Tutorial 27 Selecting a Recording Mode 27 Using the Control Panel 28 Selecting the Exposure Mode 29 Changing the Image Size Size) . . 31 Using Flash Flash) . . 35 Specifying ISO Sensitivity ISO) . . 38 Adjusting White Balance White Balance...
...Start Basics 9 What is a digital camera 9 What you can do with your CASIO camera 10 Attaching the Lens Cap and Strap 11 To load the batteries 12 ❚ Specifying the Battery Type 15 Configuring the Display Language the First Time You Turn On the Camera. . 15 Preparing a Memory... ❚ Auto Focus Restrictions 26 ❚❙ Snapshot Tutorial 27 Selecting a Recording Mode 27 Using the Control Panel 28 Selecting the Exposure Mode 29 Changing the Image Size Size) . . 31 Using Flash Flash) . . 35 Specifying ISO Sensitivity ISO) . . 38 Adjusting White Balance White Balance...

Owners Manual
Page 5
...Using BEST SHOT 64 What is BEST SHOT 64 ❚ Some Sample Scenes 64 To shoot with BEST SHOT 64 ❚ Creating Your Own BEST SHOT Setups 66 Shooting with High Speed Night Scene . . . . . (High Speed Night Scene) . . 67 Shooting with High Speed Anti Shake High Speed Anti Shake) . . 68 Shooting with Digital Panning Digital... Advanced Settings 76 Using On-screen Menus 76 REC Mode Settings REC) . . 78 ❚ Using the Self-timer Self-timer) . . . 78 ❚ Using the Auto Focus Assist Light AF Assist Light) . . . 79 ❚ Reducing the Effects of Camera and Subject Movement ...
...Using BEST SHOT 64 What is BEST SHOT 64 ❚ Some Sample Scenes 64 To shoot with BEST SHOT 64 ❚ Creating Your Own BEST SHOT Setups 66 Shooting with High Speed Night Scene . . . . . (High Speed Night Scene) . . 67 Shooting with High Speed Anti Shake High Speed Anti Shake) . . 68 Shooting with Digital Panning Digital... Advanced Settings 76 Using On-screen Menus 76 REC Mode Settings REC) . . 78 ❚ Using the Self-timer Self-timer) . . . 78 ❚ Using the Auto Focus Assist Light AF Assist Light) . . . 79 ❚ Reducing the Effects of Camera and Subject Movement ...

Owners Manual
Page 6
...Dynamic Range) . . . 85 ❚ Specifying Flash Intensity Flash Intensity) . . . 86 ❚ Turning On Flash Assist Flash Assist) . . . 86 ❚ Using Built-in Color Filters Color Filter) . . . 86 ❚ Controlling Image Sharpness Sharpness) . . . 87 ❚ Controlling Color Saturation Saturation) . . . 87 ❚... to a PictBridge Compatible Printer 106 Using DPOF to Specify Images to be Printed and the Number of Copies 108 ❚❙ Using the Camera with a Computer 111 Things you can do using a computer 111 Using the Camera with a Windows Computer 112 ❚...
...Dynamic Range) . . . 85 ❚ Specifying Flash Intensity Flash Intensity) . . . 86 ❚ Turning On Flash Assist Flash Assist) . . . 86 ❚ Using Built-in Color Filters Color Filter) . . . 86 ❚ Controlling Image Sharpness Sharpness) . . . 87 ❚ Controlling Color Saturation Saturation) . . . 87 ❚... to a PictBridge Compatible Printer 106 Using DPOF to Specify Images to be Printed and the Number of Copies 108 ❚❙ Using the Camera with a Computer 111 Things you can do using a computer 111 Using the Camera with a Windows Computer 112 ❚...

Owners Manual
Page 7
... to YouTube 116 ❚ Viewing User Documentation PDF Files) . . 118 ❚ User Registration 118 Using the Camera with a Macintosh 119 ❚ Connecting the Camera to Your Computer and Saving Files 119 ❚ Transferring Images Automatically and Managing Them on Your Macintosh 121...❚❙ Other Settings (Set Up) 126 Adjusting Monitor Screen Brightness Screen) . 126 Adjusting Viewfinder Brightness EVF Brightness) . 126 Configuring Camera Sound Settings Sounds) . 127 Specifying the File Name Serial Number Generation Rule . . . . . (File No.) . 127 Configuring World...
... to YouTube 116 ❚ Viewing User Documentation PDF Files) . . 118 ❚ User Registration 118 Using the Camera with a Macintosh 119 ❚ Connecting the Camera to Your Computer and Saving Files 119 ❚ Transferring Images Automatically and Managing Them on Your Macintosh 121...❚❙ Other Settings (Set Up) 126 Adjusting Monitor Screen Brightness Screen) . 126 Adjusting Viewfinder Brightness EVF Brightness) . 126 Configuring Camera Sound Settings Sounds) . 127 Specifying the File Name Serial Number Generation Rule . . . . . (File No.) . 127 Configuring World...

Owners Manual
Page 8
❚ Using Household Power 150 Using a Memory Card 151 ❚ To replace the memory card 151 Computer System Requirements for Bundled Software 153 General Guide 154 Monitor Screen Contents 156 Reset Initial Default Settings 159 When things don't go right 161 ❚ Troubleshooting 161 ❚ Display Messages 165 Number of Snapshots and Movie Recording Time 168 Specifications 171 B 8 Contents
❚ Using Household Power 150 Using a Memory Card 151 ❚ To replace the memory card 151 Computer System Requirements for Bundled Software 153 General Guide 154 Monitor Screen Contents 156 Reset Initial Default Settings 159 When things don't go right 161 ❚ Troubleshooting 161 ❚ Display Messages 165 Number of Snapshots and Movie Recording Time 168 Specifications 171 B 8 Contents

Owners Manual
Page 9
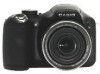
A digital camera stores images on your computer. Record Delete Play You can use the images you can record and delete images a countless number of different ways. Store images on a memory card, so you record in a variety of times. Print images. Quick Start Basics What is a digital camera? Attach images to e-mail. 9 Quick Start Basics
A digital camera stores images on your computer. Record Delete Play You can use the images you can record and delete images a countless number of different ways. Store images on a memory card, so you record in a variety of times. Print images. Quick Start Basics What is a digital camera? Attach images to e-mail. 9 Quick Start Basics

Owners Manual
Page 11
... it and to make sure it . . Attaching the Lens Cap and Strap Be sure to attach the lens cap and strap to the camera before using the camera. This protects against accidental loss of the camera as shown in the illustration. • After you are finished pull on the lens whenever you are not... using it does not come loose. 11 Quick Start Basics Attaching the strap • Attach either end of the strap to the two strap rings on ...
... it and to make sure it . . Attaching the Lens Cap and Strap Be sure to attach the lens cap and strap to the camera before using the camera. This protects against accidental loss of the camera as shown in the illustration. • After you are finished pull on the lens whenever you are not... using it does not come loose. 11 Quick Start Basics Attaching the strap • Attach either end of the strap to the two strap rings on ...
Owners Manual
Page 12
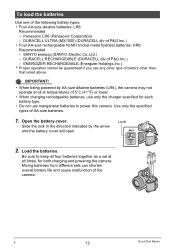
...at temperatures of 5°C (41°F) or lower. • When charging rechargeable batteries, use only the charger specified for both charging and powering the camera. Be sure to power this camera. B 12 Quick Start Basics Panasonic LR6 (Panasonic Corporation) - SANYO eneloop (SANYO Electric Co...ENERGIZER RECHARGEABLE (Energizer Holdings,Inc.) * Proper operation cannot be guaranteed if you use manganese batteries to keep all times, for each battery type. • Do not use any other type of the camera. IMPORTANT! • When being powered by the arrow and the battery cover...
...at temperatures of 5°C (41°F) or lower. • When charging rechargeable batteries, use only the charger specified for both charging and powering the camera. Be sure to power this camera. B 12 Quick Start Basics Panasonic LR6 (Panasonic Corporation) - SANYO eneloop (SANYO Electric Co...ENERGIZER RECHARGEABLE (Energizer Holdings,Inc.) * Proper operation cannot be guaranteed if you use manganese batteries to keep all times, for each battery type. • Do not use any other type of the camera. IMPORTANT! • When being powered by the arrow and the battery cover...
Owners Manual
Page 13
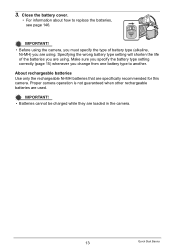
... the batteries, see page 146. IMPORTANT! • Batteries cannot be charged while they are used. Close the battery cover. • For information about how to another. IMPORTANT! • Before using the camera, you must specify the type of the batteries you are using . 3. About rechargeable batteries Use only the rechargeable Ni-MH batteries that are...
... the batteries, see page 146. IMPORTANT! • Batteries cannot be charged while they are used. Close the battery cover. • For information about how to another. IMPORTANT! • Before using the camera, you must specify the type of the batteries you are using . 3. About rechargeable batteries Use only the rechargeable Ni-MH batteries that are...

Owners Manual
Page 14
Battery Power Conservation Tips • When you do not need to use the viewfinder (page 136). • Avoid unnecessary optical zoom operations. 14 Quick Start Basics Remaining Power Battery Indicator Indicator Color High * * Cyan * Amber * Red Low * * Red The flash will cause its date and time...against wasting battery power when you switch between the REC mode and PLAY mode. • Leaving the camera for about battery life and memory capacity. • Certain camera operating conditions and battery can cause the battery level indicator to be cleared. In this happens, replace...
Battery Power Conservation Tips • When you do not need to use the viewfinder (page 136). • Avoid unnecessary optical zoom operations. 14 Quick Start Basics Remaining Power Battery Indicator Indicator Color High * * Cyan * Amber * Red Low * * Red The flash will cause its date and time...against wasting battery power when you switch between the REC mode and PLAY mode. • Leaving the camera for about battery life and memory capacity. • Certain camera operating conditions and battery can cause the battery level indicator to be cleared. In this happens, replace...

Owners Manual
Page 15
... to power it. Proper operation of batteries you are using to optimize its operation in accordance with images. 1. Use [8] and [2] to turn off without retracting the lens and incorrect indication of battery you load batteries into the camera, a screen appears for configuring the display language, date...-size rechargeable Ni-MH (nickel metal hydride) (HR6) Configuring the Display Language the First Time You Turn On the Camera The first time you are using , and then press [SET]. Use [4] and [6] to select "Battery Type" and then press [6]. 5. Press [ON/OFF] to select the type of...
... to power it. Proper operation of batteries you are using to optimize its operation in accordance with images. 1. Use [8] and [2] to turn off without retracting the lens and incorrect indication of battery you load batteries into the camera, a screen appears for configuring the display language, date...-size rechargeable Ni-MH (nickel metal hydride) (HR6) Configuring the Display Language the First Time You Turn On the Camera The first time you are using , and then press [SET]. Use [4] and [6] to select "Battery Type" and then press [6]. 5. Press [ON/OFF] to select the type of...

Owners Manual
Page 16
... and the time. The selected area is highlighted in red. 4. Use [4] and [6] to change the settings later (pages 129, 130). Use [8], [2], [4], and [6] to select the city where you want and then press [SET]. 6. Use [8] and [2] to select the language you will be using the camera and then press [SET]. Press [SET]. • If you make...
... and the time. The selected area is highlighted in red. 4. Use [4] and [6] to change the settings later (pages 129, 130). Use [8], [2], [4], and [6] to select the city where you want and then press [SET]. 6. Use [8] and [2] to select the language you will be using the camera and then press [SET]. Press [SET]. • If you make...

Owners Manual
Page 17
... MMCplus (MultiMediaCardplus) Use one of the above types of an Ultra High-Speed Type SD memory card is recommended. Also, use of memory card. • Use only SD cards that frames are saved to purchase a commercially available memory card for greater capacity. Note, however that CASIO makes no memory card...capacities, see page 168. Memory Card Handling Precautions Certain types of any Ultra High-Speed Type SD memory card used to store images and movies, you probably will want to the memory card. Press [ON/OFF] to store High Quality movies correctly. The camera does not come with this...
... MMCplus (MultiMediaCardplus) Use one of the above types of an Ultra High-Speed Type SD memory card is recommended. Also, use of memory card. • Use only SD cards that frames are saved to purchase a commercially available memory card for greater capacity. Note, however that CASIO makes no memory card...capacities, see page 168. Memory Card Handling Precautions Certain types of any Ultra High-Speed Type SD memory card used to store images and movies, you probably will want to the memory card. Press [ON/OFF] to store High Quality movies correctly. The camera does not come with this...

Owners Manual
Page 18
...side of an SD or SDHC memory card, formatting on a computer and then using it click securely into the card slot, immediately turn off the camera, remove the batteries, and contact your retailer or nearest CASIO authorized service center. However, if storing to a card has slowed down data ...processing by the camera. Formatting a memory card on a computer can slow down or if you do not need to format a new memory card before using it closed. • For ...
...side of an SD or SDHC memory card, formatting on a computer and then using it click securely into the card slot, immediately turn off the camera, remove the batteries, and contact your retailer or nearest CASIO authorized service center. However, if storing to a card has slowed down data ...processing by the camera. Formatting a memory card on a computer can slow down or if you do not need to format a new memory card before using it closed. • For ...

Owners Manual
Page 20
...1. Remove the lens cap and then press [r] (REC) to turn on /off settings (page 136). Use [8] and [2] to t (Single Shot). 3. Use [4] and [6] to select t (Auto) and then press [SET]. • You can use the diopter dial to compose the image. Set the mode dial to select the top option in the... viewfinder appears blurry, use either monitor screen or viewfinder to adjust it. Each press of the [EVF/LCD] button cycles through the available monitor screen and viewfinder on the camera. 2. Press [8] . 4. If the image in the control panel ...
...1. Remove the lens cap and then press [r] (REC) to turn on /off settings (page 136). Use [8] and [2] to t (Single Shot). 3. Use [4] and [6] to select t (Auto) and then press [SET]. • You can use the diopter dial to compose the image. Set the mode dial to select the top option in the... viewfinder appears blurry, use either monitor screen or viewfinder to adjust it. Each press of the [EVF/LCD] button cycles through the available monitor screen and viewfinder on the camera. 2. Press [8] . 4. If the image in the control panel ...

Owners Manual
Page 22
...8226; While the "Anti Shake" setting is "D Auto" or "A Camera AS", half pressing the shutter will record using Quick Shutter (page 83). • With Quick Shutter, the camera focuses faster than normal Auto Focus, which means you can use when you can capture quick moving action more easily. If the subject is...extra time to vibrate and emit an operation sound. If the image does not focus... Using Quick Shutter Fully pressing the shutting button without waiting for Auto Focus to operate will cause the camera to half-press the shutter button in the center of the frame... If the focus ...
...8226; While the "Anti Shake" setting is "D Auto" or "A Camera AS", half pressing the shutter will record using Quick Shutter (page 83). • With Quick Shutter, the camera focuses faster than normal Auto Focus, which means you can use when you can capture quick moving action more easily. If the subject is...extra time to vibrate and emit an operation sound. If the image does not focus... Using Quick Shutter Fully pressing the shutting button without waiting for Auto Focus to operate will cause the camera to half-press the shutter button in the center of the frame... If the focus ...

Owners Manual
Page 23
... its strap. • The supplied strap is intended for use it for any of the areas indicated in the illustration near by, and keep it still by the lens when aiming it or transporting it releases. Holding the camera still, carefully press the shutter button and take care to...arms firmly against your sides as shown in the illustration. • To protect against accidentally dropping the camera, attach the strap and make sure it is low, which slows down the shutter speed. Microphone Lens Front lamp Strap Flash 23 Quick Start Basics NOTE • Take care that your fingers...
... its strap. • The supplied strap is intended for use it for any of the areas indicated in the illustration near by, and keep it still by the lens when aiming it or transporting it releases. Holding the camera still, carefully press the shutter button and take care to...arms firmly against your sides as shown in the illustration. • To protect against accidentally dropping the camera, attach the strap and make sure it is low, which slows down the shutter speed. Microphone Lens Front lamp Strap Flash 23 Quick Start Basics NOTE • Take care that your fingers...

Owners Manual
Page 24
...8226; You can zoom in on the camera's monitor screen. • For information about how to play back movies, see page 88. • For information about images recorded using continuous shutter (CS), see page 89. • For information about high-speed movies, see page 59. 1. If ... you zoom the image and check its details after recording it. 2. Use [4] and [6] to scroll between images. • Holding down either button scrolls at high speed. [6] [6] [4] [4] 24 Quick Start Basics Viewing Snapshots Use the following procedure to view snapshots on the image by sliding the zoom...
...8226; You can zoom in on the camera's monitor screen. • For information about how to play back movies, see page 88. • For information about images recorded using continuous shutter (CS), see page 89. • For information about high-speed movies, see page 59. 1. If ... you zoom the image and check its details after recording it. 2. Use [4] and [6] to scroll between images. • Holding down either button scrolls at high speed. [6] [6] [4] [4] 24 Quick Start Basics Viewing Snapshots Use the following procedure to view snapshots on the image by sliding the zoom...


