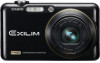

Owners Manual
Page 3
... camera is recording correctly. 3 This means that the example screens and product illustrations shown in this User's Guide may remain lit at each step of the production process. Read this first! • The contents of this manual are subject to change without the permission of CASIO COMPUTER... contents of the monitor screen uses high-precision technology that is forbidden under copyright laws. • CASIO COMPUTER CO., LTD. Feel free to the characteristics of the actual camera. shall not be held liable for any damages or lost profits caused by you notice anything that ...
... camera is recording correctly. 3 This means that the example screens and product illustrations shown in this User's Guide may remain lit at each step of the production process. Read this first! • The contents of this manual are subject to change without the permission of CASIO COMPUTER... contents of the monitor screen uses high-precision technology that is forbidden under copyright laws. • CASIO COMPUTER CO., LTD. Feel free to the characteristics of the actual camera. shall not be held liable for any damages or lost profits caused by you notice anything that ...

Owners Manual
Page 19
Failure to set the date and time correctly will not appear in this manual in the language you select may not be recorded with a camera intended for configuring the display language, date, and time settings. To change the display language from Japanese in step 2 of this case, use the ...procedure under "Specifying the Display Language (Language)" (page 156). Set the date and the time. Use [4] and [6] to select the setting you purchased a camera intended for the Japanese market. Press [ON/OFF] to select a date style and then press [SET]. Use [8] and [2] to turn on the...
Failure to set the date and time correctly will not appear in this manual in the language you select may not be recorded with a camera intended for configuring the display language, date, and time settings. To change the display language from Japanese in step 2 of this case, use the ...procedure under "Specifying the Display Language (Language)" (page 156). Set the date and the time. Use [4] and [6] to select the setting you purchased a camera intended for the Japanese market. Press [ON/OFF] to select a date style and then press [SET]. Use [8] and [2] to turn on the...

Owners Manual
Page 31
... shooting - Blinds or other very low contrast subject - Subject that is too far away for light from the camera - Solid color wall or other subject with a repeating horizontal pattern - Subject in a dark location - Subjects outside the focus range of the following can make proper ... - Multiple subjects at varying distances from the AF assist light to reach - Fast-moving subject - Very shiny subject - Auto Focus Restrictions • Any of the camera • If you cannot focus properly, try using focus lock (page 90) or Manual Focus (page 88). 31 Quick Start Basics
... shooting - Blinds or other very low contrast subject - Subject that is too far away for light from the camera - Solid color wall or other subject with a repeating horizontal pattern - Subject in a dark location - Subjects outside the focus range of the following can make proper ... - Multiple subjects at varying distances from the AF assist light to reach - Fast-moving subject - Very shiny subject - Auto Focus Restrictions • Any of the camera • If you cannot focus properly, try using focus lock (page 90) or Manual Focus (page 88). 31 Quick Start Basics

Owners Manual
Page 33
Selecting the Exposure Mode Your camera has a variety of built-in the control panel (Exposure mode). 3. b BEST SHOT Simply select one of a collection of different exposure modes. exposed. • If you want and then press [SET]. Use [4] and [6] to select the setting you are using manual focus (page 89), ...on the monitor screen will turn orange when you normally should use [4] and [6] to select the top option in sample scenes and the camera sets up automatically for easy image recording. t Auto Use this mode, you select the aperture and other settings are shooting. 1. In...
Selecting the Exposure Mode Your camera has a variety of built-in the control panel (Exposure mode). 3. b BEST SHOT Simply select one of a collection of different exposure modes. exposed. • If you want and then press [SET]. Use [4] and [6] to select the setting you are using manual focus (page 89), ...on the monitor screen will turn orange when you normally should use [4] and [6] to select the top option in sample scenes and the camera sets up automatically for easy image recording. t Auto Use this mode, you select the aperture and other settings are shooting. 1. In...

Owners Manual
Page 34
... the shutter speed setting, and then use [4] and [6] to change it . • The ISO sensitivity, shutter speed and aperture value Shutter speed on "A Camera AS", if you like. • In the S mode, ISO sensitivity (page 39) always operates according to its "AUTO" setting. If you want when ...to change it. 4 Use [8] and [2] to select the shutter speed setting, and then use [4] and [6] to change it . • If you are using manual focus (page 89), use [4] and [6] to achieve the brightness you half- The ISO sensitivity setting cannot be able to focus the image. press the shutter...
... the shutter speed setting, and then use [4] and [6] to change it . • The ISO sensitivity, shutter speed and aperture value Shutter speed on "A Camera AS", if you like. • In the S mode, ISO sensitivity (page 39) always operates according to its "AUTO" setting. If you want when ...to change it. 4 Use [8] and [2] to select the shutter speed setting, and then use [4] and [6] to change it . • If you are using manual focus (page 89), use [4] and [6] to achieve the brightness you half- The ISO sensitivity setting cannot be able to focus the image. press the shutter...

Owners Manual
Page 39
... this, it may take relatively longer for shooting in dimly lit areas.) Some coarseness (increased digital noise) • In the S (shutter speed priority) mode, ISO sensitivity always operates according to result in digital noise in images, the camera performs a noise filtering process. You will not be changed while in the S mode. •...movies, "AUTO" is used as the ISO sensitivity setting. • "S Image AS" (page 92) can be used when shooting a high speed movie in the M (manual exposure) mode. Specifying ISO Sensitivity (ISO) ISO sensitivity is in progress. 39 Snapshot Tutorial
... this, it may take relatively longer for shooting in dimly lit areas.) Some coarseness (increased digital noise) • In the S (shutter speed priority) mode, ISO sensitivity always operates according to result in digital noise in images, the camera performs a noise filtering process. You will not be changed while in the S mode. •...movies, "AUTO" is used as the ISO sensitivity setting. • "S Image AS" (page 92) can be used when shooting a high speed movie in the M (manual exposure) mode. Specifying ISO Sensitivity (ISO) ISO sensitivity is in progress. 39 Snapshot Tutorial

Owners Manual
Page 40
... etc. The white balance setting is cloudy, and the green cast that results when shooting under light bulb lighting For configuring the camera manually to suit a particular light source. 1Select "· Manual WB". 2Under the lighting conditions you plan to select the shooting condition you turn off the... or day white fluorescent lighting For shooting under daylight fluorescent lighting For shooting under fluorescent lighting. 1. Daylight Fluorescent « Tungsten · Manual WB Configures the camera to select the fourth control panel option from the top (White Balance). 3.
... etc. The white balance setting is cloudy, and the green cast that results when shooting under light bulb lighting For configuring the camera manually to suit a particular light source. 1Select "· Manual WB". 2Under the lighting conditions you plan to select the shooting condition you turn off the... or day white fluorescent lighting For shooting under daylight fluorescent lighting For shooting under fluorescent lighting. 1. Daylight Fluorescent « Tungsten · Manual WB Configures the camera to select the fourth control panel option from the top (White Balance). 3.

Owners Manual
Page 41
Certain subject colors and light source conditions can manually adjust an image's exposure value (EV value) before shooting it. • Exposure Compensation Range: -2.0 EV to +2.0 EV • Unit: 1/3EV 1. Exposure compensation value 4. The exposure ... exposure compensation value. Press [SET]. To cancel exposure compensation, change it to revert to determine the white point, which causes it or turn off the camera (which makes proper white balance adjustment impossible. Use [4] and [6] to select the fifth control panel option from the top (EV Shift). 3.
Certain subject colors and light source conditions can manually adjust an image's exposure value (EV value) before shooting it. • Exposure Compensation Range: -2.0 EV to +2.0 EV • Unit: 1/3EV 1. Exposure compensation value 4. The exposure ... exposure compensation value. Press [SET]. To cancel exposure compensation, change it to revert to determine the white point, which causes it or turn off the camera (which makes proper white balance adjustment impossible. Use [4] and [6] to select the fifth control panel option from the top (EV Shift). 3.

Owners Manual
Page 47
... recording. Image deterioration indicator Focusing range (Displayed for Auto Focus, Macro Focus, and Manual Focus.) * Products marketed in some geographic areas display inches and feet. Zoom bar 47 Snapshot Tutorial Optical Zoom/Digital Zoom Switch Point If you press [0] to "On" (page 96). • ... to set an even higher zoom factor. • If you record using digital zoom without image deterioration (page 48). • Use of a tripod is recommended to protect against image blur due to camera movement when shooting with telephoto. • Performing a zoom operation changes the ...
... recording. Image deterioration indicator Focusing range (Displayed for Auto Focus, Macro Focus, and Manual Focus.) * Products marketed in some geographic areas display inches and feet. Zoom bar 47 Snapshot Tutorial Optical Zoom/Digital Zoom Switch Point If you press [0] to "On" (page 96). • ... to set an even higher zoom factor. • If you record using digital zoom without image deterioration (page 48). • Use of a tripod is recommended to protect against image blur due to camera movement when shooting with telephoto. • Performing a zoom operation changes the ...
Owners Manual
Page 50
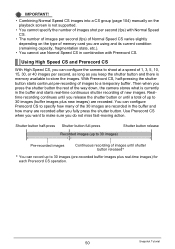
...keep the shutter button and there is memory available to make sure you press the shutter button the rest of the way down, the camera stores what is currently in combination with Prerecord CS. Using High Speed CS and Prerecord CS With High Speed CS, you can record...images) Pre-recorded images Continuous recording of images until shutter button released* * You can configure the camera to a temporary buffer. IMPORTANT! • Combining Normal Speed CS images into a CS group (page 104) manually on the playback screen is not supported. • You cannot specify the number of images shot ...
...keep the shutter button and there is memory available to make sure you press the shutter button the rest of the way down, the camera stores what is currently in combination with Prerecord CS. Using High Speed CS and Prerecord CS With High Speed CS, you can record...images) Pre-recorded images Continuous recording of images until shutter button released* * You can configure the camera to a temporary buffer. IMPORTANT! • Combining Normal Speed CS images into a CS group (page 104) manually on the playback screen is not supported. • You cannot specify the number of images shot ...

Owners Manual
Page 59
... zoom for Auto Focus or focus manually before you press [0] to become more pronounced when you press [0] to start recording. • The zoom bar is not displayed while movie recording is in progress. • The effects of this camera. • Only digital zoom is fixed at the position ... recording. • With HD movie and STD movie recording, the exposure mode is disabled during HD or STD movie recording. The exposure value that CASIO makes no guarantees about the operation of the currently exposure mode (Auto, A, S, M, BS) setting. • With high speed movie recording, ...
... zoom for Auto Focus or focus manually before you press [0] to become more pronounced when you press [0] to start recording. • The zoom bar is not displayed while movie recording is in progress. • The effects of this camera. • Only digital zoom is fixed at the position ... recording. • With HD movie and STD movie recording, the exposure mode is disabled during HD or STD movie recording. The exposure value that CASIO makes no guarantees about the operation of the currently exposure mode (Auto, A, S, M, BS) setting. • With high speed movie recording, ...

Owners Manual
Page 81
... continue until the end of the recording time is reached. • While the camera is in step 12 under "To setup the camera" on the monitor screen. 2. At this case, use of manual focus (page 88) to preset a fixed focus is in Move In CS recording standby, you configured in ...8226; "0 AUTO" flashes on the monitor screen turns green, press the shutter button the rest of the recording time is reached. • While the camera is recommended. 3. You then will go into recording standby and start saving images to enter the boundary on page 78. You then will adjust exposure...
... continue until the end of the recording time is reached. • While the camera is in step 12 under "To setup the camera" on the monitor screen. 2. At this case, use of manual focus (page 88) to preset a fixed focus is in Move In CS recording standby, you configured in ...8226; "0 AUTO" flashes on the monitor screen turns green, press the shutter button the rest of the recording time is reached. • While the camera is recommended. 3. You then will go into recording standby and start saving images to enter the boundary on page 78. You then will adjust exposure...

Owners Manual
Page 87
Example: When "Self-timer" is selected on page 86. Menu Operations in This Manual Menu operations are represented in this manual as the one described under "Example Menu Screen Operation" on the "REC" tab Tabs Items . Use [4] and [6] to select "Self-timer" and then press [6]. 87 ...
Example: When "Self-timer" is selected on page 86. Menu Operations in This Manual Menu operations are represented in this manual as the one described under "Example Menu Screen Operation" on the "REC" tab Tabs Items . Use [4] and [6] to select "Self-timer" and then press [6]. 87 ...

Owners Manual
Page 88
... distance *2 E Pan Focus Shooting with a relatively wide focus range Fixed focal point Fixed distance*2 ) Infinity Scenery and other distant subjects Fixed Infinity W Manual Focus When you want to focus manually Manual Approximately 3 cm to 9 (infinity)*2 (1.2" to 9) *1 The focus range is the distance from the lens surface. *2 The focus range depends on the current...
... distance *2 E Pan Focus Shooting with a relatively wide focus range Fixed focal point Fixed distance*2 ) Infinity Scenery and other distant subjects Fixed Infinity W Manual Focus When you want to focus manually Manual Approximately 3 cm to 9 (infinity)*2 (1.2" to 9) *1 The focus range is the distance from the lens surface. *2 The focus range depends on the current...

Owners Manual
Page 89
...two seconds while the enlarged image is within the boundary will re-appear. To focus with the "L/R Key" setting (page 97) are disabled while Manual Focus is selected as shown below. Note that is within the yellow boundary. 2. After recording is started, however, focus is fixed. • Whenever...the lens and automatically selects either Macro Focus or Auto Focus accordingly. • Use of the flash together with Auto Focus, Macro Focus, or Manual Focus, a value will appear on is displayed, the screen in step 1 will enlarge and fill the monitor screen, which may result in ...
...two seconds while the enlarged image is within the boundary will re-appear. To focus with the "L/R Key" setting (page 97) are disabled while Manual Focus is selected as shown below. Note that is within the yellow boundary. 2. After recording is started, however, focus is fixed. • Whenever...the lens and automatically selects either Macro Focus or Auto Focus accordingly. • Use of the flash together with Auto Focus, Macro Focus, or Manual Focus, a value will appear on is displayed, the screen in step 1 will enlarge and fill the monitor screen, which may result in ...

Owners Manual
Page 97
... will record the image using a high speed focus operation that is recorded. Recording is greater. Setting Q*´*) [4]/[6] key operation Selecting a Focus Mode (page 88) • W (Manual Focus) and E (Pan Focus) cannot be out of the four functions listed below to the [4] and [6] keys. NOTE • Quick Shutter is disabled when the...
... will record the image using a high speed focus operation that is recorded. Recording is greater. Setting Q*´*) [4]/[6] key operation Selecting a Focus Mode (page 88) • W (Manual Focus) and E (Pan Focus) cannot be out of the four functions listed below to the [4] and [6] keys. NOTE • Quick Shutter is disabled when the...

Owners Manual
Page 99
...CS Self-timer Flash Intensity High Speed CS Off 0 Digital Zoom MF Position Zoom Position* On Position before manual focus was selected. Enabled Setting at power off . Any setting whose memory is disabled will be remembered by the camera when it is turned off, and restored the next ...time the camera is turned off 99 Advanced Settings Configuring Power ...
...CS Self-timer Flash Intensity High Speed CS Off 0 Digital Zoom MF Position Zoom Position* On Position before manual focus was selected. Enabled Setting at power off . Any setting whose memory is disabled will be remembered by the camera when it is turned off, and restored the next ...time the camera is turned off 99 Advanced Settings Configuring Power ...

Owners Manual
Page 132
... only The procedures you can transfer screen shot images from your computer to a computer. Using the Camera with a Computer Things you need to perform when using the camera with a Computer Save images to a computer and view them manually (USB connection) (pages 134, 143). • Transfer images to a computer automatically over a wireless LAN for...
... only The procedures you can transfer screen shot images from your computer to a computer. Using the Camera with a Computer Things you need to perform when using the camera with a Computer Save images to a computer and view them manually (USB connection) (pages 134, 143). • Transfer images to a computer automatically over a wireless LAN for...

Owners Manual
Page 133
...: Save images to Operating System do . Upload movie files 7 / Vista / XP (SP2/ to YouTube SP3) / 2000 (SP4) YouTube Uploader for CASIO* 139 Transfer images to the camera 7 / Vista / XP / 2000 Photo Transport 1.0* 141 View the User's Guide Vista / XP (SP2/SP3) / 2000 (SP4) Adobe Reader 8...Transport will not run under 64-bit versions of Windows OS. 133 Using the Camera with the version of Windows you want to a computer and view 7 / Vista / XP / 2000 Installation not required. 134 them there manually Play movies 7 / Vista / XP / 2000 Installation not required. •...
...: Save images to Operating System do . Upload movie files 7 / Vista / XP (SP2/ to YouTube SP3) / 2000 (SP4) YouTube Uploader for CASIO* 139 Transfer images to the camera 7 / Vista / XP / 2000 Photo Transport 1.0* 141 View the User's Guide Vista / XP (SP2/SP3) / 2000 (SP4) Adobe Reader 8...Transport will not run under 64-bit versions of Windows OS. 133 Using the Camera with the version of Windows you want to a computer and view 7 / Vista / XP / 2000 Installation not required. 134 them there manually Play movies 7 / Vista / XP / 2000 Installation not required. •...

Owners Manual
Page 134
..., select "USB" and then press [6]. 3. Information about computer system requirements also can connect the camera to view and store images (snapshot and movie files). . Viewing and Storing Images on the camera and press [MENU]. 2. . To connect the camera to your computer in order to your computer and save files 1. Use [8] and [2] to run... for Windows Users • Except for Adobe Reader, the bundled software requires Administrator privileges to select "Mass Storage", and then press [SET]. 134 Using the Camera with each of this manual. .
..., select "USB" and then press [6]. 3. Information about computer system requirements also can connect the camera to view and store images (snapshot and movie files). . Viewing and Storing Images on the camera and press [MENU]. 2. . To connect the camera to your computer in order to your computer and save files 1. Use [8] and [2] to run... for Windows Users • Except for Adobe Reader, the bundled software requires Administrator privileges to select "Mass Storage", and then press [SET]. 134 Using the Camera with each of this manual. .

