User Guide
Page 1
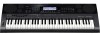
E USER'S GUIDE Please keep all information for future reference. CTK7000/WK7500E1B Safety Precautions Before trying to use the keyboard, be sure to read the separate "Safety Precautions".
E USER'S GUIDE Please keep all information for future reference. CTK7000/WK7500E1B Safety Precautions Before trying to use the keyboard, be sure to read the separate "Safety Precautions".

User Guide
Page 4
...One-touch Recording (EASY REC) ........ E-100 E-13 To turn on Digital Keyboard power E-13 Listening to Demo Tunes E-14 Selecting a Tone E-14 Layering and Splitting Tones E-15 Raising and Lowering Keyboard Tuning (Transpose E-18 Using Octave Shift E-18 Using the Metronome E-19 Using...Drawbar Organ Tones E-52 Music Presets E-54 Using Music Presets E-54 Creating a User Preset E-58 Editing a Chord Progression E-62 Saving Keyboard Setups to Registration Memory E-66 To save a setup to Audio Equipment or an Amplifier E-11 Outputting Input from registration memory .......... E-7 Saving...
...One-touch Recording (EASY REC) ........ E-100 E-13 To turn on Digital Keyboard power E-13 Listening to Demo Tunes E-14 Selecting a Tone E-14 Layering and Splitting Tones E-15 Raising and Lowering Keyboard Tuning (Transpose E-18 Using Octave Shift E-18 Using the Metronome E-19 Using...Drawbar Organ Tones E-52 Music Presets E-54 Using Music Presets E-54 Creating a User Preset E-58 Editing a Chord Progression E-62 Saving Keyboard Setups to Registration Memory E-66 To save a setup to Audio Equipment or an Amplifier E-11 Outputting Input from registration memory .......... E-7 Saving...

User Guide
Page 5
... Accompaniment Pattern and Rhythm Operations E-120 Recording and Playing Audio E-121 Audio Recording and Playback Functions.......... E-145 Storing and Loading Digital Keyboard Memory Data E-146 Using Rhythm (Auto Accompaniment) Data from another Model E-146 Importing Data from a Memory Card.......... E-130 Using...Using a Memory Card E-136 Loading and Removing a Memory Card E-137 Entering the Card Mode E-137 Formatting a Memory Card E-137 Saving Digital Keyboard Data to a Memory Card E-138 Loading Data from a Memory Card E-140 To delete a file from a memory card E-141 To rename a...
... Accompaniment Pattern and Rhythm Operations E-120 Recording and Playing Audio E-121 Audio Recording and Playback Functions.......... E-145 Storing and Loading Digital Keyboard Memory Data E-146 Using Rhythm (Auto Accompaniment) Data from another Model E-146 Importing Data from a Memory Card.......... E-130 Using...Using a Memory Card E-136 Loading and Removing a Memory Card E-137 Entering the Card Mode E-137 Formatting a Memory Card E-137 Saving Digital Keyboard Data to a Memory Card E-138 Loading Data from a Memory Card E-140 To delete a file from a memory card E-141 To rename a...

User Guide
Page 7
... T-6 AUDIO IN jack 12 T-7 DC 12V jack 9 T-8 MIC IN jack 12 T-9 LINE OUT R, L/MONO jacks 11 E-5 General Guide • In this manual, the term "Digital Keyboard" refers to the CTK-7000/WK-7500. • This manual uses the numbers and names below to refer to buttons and controllers. • The following...
... T-6 AUDIO IN jack 12 T-7 DC 12V jack 9 T-8 MIC IN jack 12 T-9 LINE OUT R, L/MONO jacks 11 E-5 General Guide • In this manual, the term "Digital Keyboard" refers to the CTK-7000/WK-7500. • This manual uses the numbers and names below to refer to buttons and controllers. • The following...

User Guide
Page 8
... or status is indicated by the R-14 (-, +) buttons or dial operations. There are sounded when you play something on the keyboard or when Auto Accompaniment is played. Currently Selected Item Indication The item that is affected by the location of the K next to...Group B. General Guide Reading the Display This section explains the contents of the Digital Keyboard's display screen. 1 2 45 6 3 1 Detailed information area This area displays a variety of information while the Digital Keyboard is being indicated. This indicates that the value to confirm proper operation when changing ...
... or status is indicated by the R-14 (-, +) buttons or dial operations. There are sounded when you play something on the keyboard or when Auto Accompaniment is played. Currently Selected Item Indication The item that is affected by the location of the K next to...Group B. General Guide Reading the Display This section explains the contents of the Digital Keyboard's display screen. 1 2 45 6 3 1 Detailed information area This area displays a variety of information while the Digital Keyboard is being indicated. This indicates that the value to confirm proper operation when changing ...

User Guide
Page 9
...you want to play back song data. In the rhythm mode, pressing the C-5 (SONG SEQUENCER) button will enter the card mode. - Turning off the Digital Keyboard or removing the memory card can use the R-17 (t, y) buttons to the rhythm mode. E-7 See "Using a Memory Card" (page E-136) for ...become corrupted. In the rhythm mode, pressing the C-9 (CARD) button will enter the song sequencer mode. - General Guide Menus You can cause the Digital Keyboard to fail to turn on the display. To display a menu, hold down . It also can use Auto Accompaniment. • Card mode (; Wait ...
...you want to play back song data. In the rhythm mode, pressing the C-5 (SONG SEQUENCER) button will enter the card mode. - Turning off the Digital Keyboard or removing the memory card can use the R-17 (t, y) buttons to the rhythm mode. E-7 See "Using a Memory Card" (page E-136) for ...become corrupted. In the rhythm mode, pressing the C-9 (CARD) button will enter the song sequencer mode. - General Guide Menus You can cause the Digital Keyboard to fail to turn on the display. To display a menu, hold down . It also can use Auto Accompaniment. • Card mode (; Wait ...

User Guide
Page 10
...default settings. User tone data (page E-44) - You can use to Its Factory Default Settings You can delete all data in keyboard memory and return all data and settings (or parameter settings only)" (page E-135). Auto Resume setting (page E-134) Returning the Digital...The following data and settings are returned to apply a predetermined default setup each time you can configure the Digital Keyboard so it on. This stored data is retained even when the Digital Keyboard is turned off .* However, the tone, rhythm, and other features that you turn off power. Registration setup...
...default settings. User tone data (page E-44) - You can use to Its Factory Default Settings You can delete all data in keyboard memory and return all data and settings (or parameter settings only)" (page E-135). Auto Resume setting (page E-134) Returning the Digital...The following data and settings are returned to apply a predetermined default setup each time you can configure the Digital Keyboard so it on. This stored data is retained even when the Digital Keyboard is turned off .* However, the tone, rhythm, and other features that you turn off power. Registration setup...
User Guide
Page 12
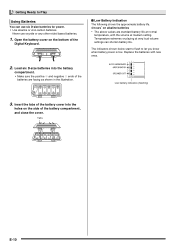
... into the holes on the side of the battery cover into the battery compartment. • Make sure the positive + and negative - ends of the Digital Keyboard. ■ Low Battery Indication The following shows the approximate battery life. 4 hours* on the bottom of the batteries are standard battery life at normal temperature...
... into the holes on the side of the battery cover into the battery compartment. • Make sure the positive + and negative - ends of the Digital Keyboard. ■ Low Battery Indication The following shows the approximate battery life. 4 hours* on the bottom of the batteries are standard battery life at normal temperature...

User Guide
Page 13
... sound. LINE OUT R jack output is right channel sound, while LINE OUT L/MONO jack output is up to you connect any device to the Digital Keyboard, be applied by pressing the pedal, see "Ped.Assign (Pedal Assign)" (page E-131). Connecting to adjust the volume level. INPUT 1 INPUT 2 Standard ... is connected. For information about the types of effects that require an adaptor plug, make sure you can be sure to either of the Digital Keyboard's T-9 (LINE OUT) jacks as AUX IN) to adjust the volume level. Use the L-2 (MAIN VOLUME) knob to the LINE OUT L/ MONO jack only outputs a...
... sound. LINE OUT R jack output is right channel sound, while LINE OUT L/MONO jack output is up to you connect any device to the Digital Keyboard, be applied by pressing the pedal, see "Ped.Assign (Pedal Assign)" (page E-131). Connecting to adjust the volume level. INPUT 1 INPUT 2 Standard ... is connected. For information about the types of effects that require an adaptor plug, make sure you can be sure to either of the Digital Keyboard's T-9 (LINE OUT) jacks as AUX IN) to adjust the volume level. Use the L-2 (MAIN VOLUME) knob to the LINE OUT L/ MONO jack only outputs a...

User Guide
Page 14
...cord to connect the external device to the Digital Keyboard's T-6 (AUDIO IN) jack. http://world.casio.com/ E-12 Input is output directly, and is independent of overall keyboard volume. • Before connecting a microphone, make sure that the Digital Keyboard and microphone are turned off. • Before ...or from a microphone. • Whenever connecting something to the Digital Keyboard, first use the Mixer to the Digital Keyboard for this product from the CASIO catalog available from your retailer, and from the CASIO website at the following URL. CD player, Portable audio player, etc...
...cord to connect the external device to the Digital Keyboard's T-6 (AUDIO IN) jack. http://world.casio.com/ E-12 Input is output directly, and is independent of overall keyboard volume. • Before connecting a microphone, make sure that the Digital Keyboard and microphone are turned off. • Before ...or from a microphone. • Whenever connecting something to the Digital Keyboard, first use the Mixer to the Digital Keyboard for this product from the CASIO catalog available from your retailer, and from the CASIO website at the following URL. CD player, Portable audio player, etc...

User Guide
Page 15
...Connections" (page E-11), connect headphones, amplifier, or other operation while it off automatically to apply a predetermined setup each time you turn it on Digital Keyboard power 1. Do not perform any other device. 3. For details, see "AutoResume (Auto Resume)" (page E-134) and "Default (Default Settings)" (page... four hours under AC adaptor power. • Auto Power Off is enabled while "on default settings). • To turn off the Digital Keyboard, press the L-1 (POWER) button again. • Under its default settings whenever you turn it is "on when the L-1 (POWER)...
...Connections" (page E-11), connect headphones, amplifier, or other operation while it off automatically to apply a predetermined setup each time you turn it on Digital Keyboard power 1. Do not perform any other device. 3. For details, see "AutoResume (Auto Resume)" (page E-134) and "Default (Default Settings)" (page... four hours under AC adaptor power. • Auto Power Off is enabled while "on default settings). • To turn off the Digital Keyboard, press the L-1 (POWER) button again. • Under its default settings whenever you turn it is "on when the L-1 (POWER)...

User Guide
Page 16
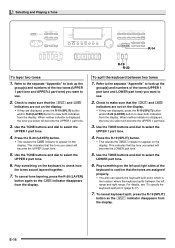
... down the L-14 (sREW) button until the one of the demo tune, while the L-14 (sREW) button performs fast backward play . • The Digital Keyboard has a total of the current song will re-enable Auto Power Off. Selecting a Tone The tones of this time. • Turning off . 2. See ... change the tone assigned to clear both indicators from the display. 3. Use the dial to scroll through R-11 ([K] USER TONES) to turn it off the keyboard after the end of the tone you release the L-14 (sREW) button. Holding down the L-4 ([A] POPS/ROCK/ DANCE) button, press the L-1 (POWER...
... down the L-14 (sREW) button until the one of the demo tune, while the L-14 (sREW) button performs fast backward play . • The Digital Keyboard has a total of the current song will re-enable Auto Power Off. Selecting a Tone The tones of this time. • Turning off . 2. See ... change the tone assigned to clear both indicators from the display. 3. Use the dial to scroll through R-11 ([K] USER TONES) to turn it off the keyboard after the end of the tone you release the L-14 (sREW) button. Holding down the L-4 ([A] POPS/ROCK/ DANCE) button, press the L-1 (POWER...
User Guide
Page 17
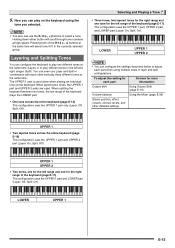
...the currently selected group. When layering two tones, the UPPER 1 part and UPPER 2 parts are used alone when playing an individual tone on the keyboard using the tone you selected. • You also can configure the settings described below to adjust each part when using multiple tones in the left... through tone numbers at the same time. The UPPER 1 part is used . UPPER 1 UPPER 2 • Two tones, one for the left range of the keyboard (page E-17) This configuration uses the UPPER 1 part and LOWER part (Layer: Off, Split: On). 5. Holding down either button will select tone 001 in ...
...the currently selected group. When layering two tones, the UPPER 1 part and UPPER 2 parts are used alone when playing an individual tone on the keyboard using the tone you selected. • You also can configure the settings described below to adjust each part when using multiple tones in the left... through tone numbers at the same time. The UPPER 1 part is used . UPPER 1 UPPER 2 • Two tones, one for the left range of the keyboard (page E-17) This configuration uses the UPPER 1 part and LOWER part (Layer: Off, Split: On). 5. Holding down either button will select tone 001 in ...
User Guide
Page 18
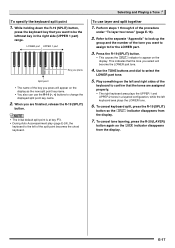
.... 4. Refer to the separate "Appendix" to use . 2. Use the TONE buttons and dial to select the UPPER 1 part tone. 4. To cancel keyboard split, press the R-19 (SPLIT) button so the @ indicator disappears from the display. When neither indicator is displayed, the tone you select will become... the UPPER 2 part tone. 5. This indicates that the @ and A indicators are not on the keyboard to clear both indicators from the display. Refer to the separate "Appendix" to look up the group(s) and numbers of the two tones (UPPER...
.... 4. Refer to the separate "Appendix" to use . 2. Use the TONE buttons and dial to select the UPPER 1 part tone. 4. To cancel keyboard split, press the R-19 (SPLIT) button so the @ indicator disappears from the display. When neither indicator is displayed, the tone you select will become... the UPPER 2 part tone. 5. This indicates that the @ and A indicators are not on the keyboard to clear both indicators from the display. Refer to the separate "Appendix" to look up the group(s) and numbers of the two tones (UPPER...
User Guide
Page 19
... (UPPER 1 part) range. Perform steps 1 through 6 of the tone you want to assign to be the leftmost key in a layered configuration, while the left keyboard area plays the LOWER tone. 6. Press the R-19 (SPLIT) button. • This causes the @ indicator to select the LOWER part tone. 5. To cancel ...finished, release the R-19 (SPLIT) button. • The initial default split point is at key F#3. • During Auto Accompaniment play (page E-24), the keyboard to the left and right sides of the key you select will appear on the display. Use the TONE buttons and dial to appear on...
... (UPPER 1 part) range. Perform steps 1 through 6 of the tone you want to assign to be the leftmost key in a layered configuration, while the left keyboard area plays the LOWER tone. 6. Press the R-19 (SPLIT) button. • This causes the @ indicator to select the LOWER part tone. 5. To cancel ...finished, release the R-19 (SPLIT) button. • The initial default split point is at key F#3. • During Auto Accompaniment play (page E-24), the keyboard to the left and right sides of the key you select will appear on the display. Use the TONE buttons and dial to appear on...

User Guide
Page 20
.... Hold down the R-20 (OCTAVE) button until the octave shift screen shown below . 2. Perform the same operation as in different octaves while the keyboard is applied to appear on the display, indicating that you can change the UPPER 2 part octave. Press the R-13 (FUNCTION) button. •...setting is layered. 1. E-18 Octave shift amount (Octave unit) Part name • This displays the transpose screen shown below appears on the keyboard. If you want to change the LOWER part octave. You can use octave shift to raise or lower the octave of a song, to ...
.... Hold down the R-20 (OCTAVE) button until the octave shift screen shown below . 2. Perform the same operation as in different octaves while the keyboard is applied to appear on the display, indicating that you can change the UPPER 2 part octave. Press the R-13 (FUNCTION) button. •...setting is layered. 1. E-18 Octave shift amount (Octave unit) Part name • This displays the transpose screen shown below appears on the keyboard. If you want to change the LOWER part octave. You can use octave shift to raise or lower the octave of a song, to ...

User Guide
Page 22
Applying Vibrato to Notes You can apply vibrato to notes you play on the keyboard. • The tempo setting will be canceled if you release the R-13 (FUNCTION) button before tapping the L-12 (TAP) button four times. 2. Releasing the wheel ...). After setting the tempo by hand. Vibrato is applied to appear. • Do not have the pitch bend wheel rotated as you turn on the keyboard (all UPPER 1, UPPER 2, LOWER part notes) by tapping, you then can use the procedure under initial default settings). • Instead of vibrato, you are playing...
Applying Vibrato to Notes You can apply vibrato to notes you play on the keyboard. • The tempo setting will be canceled if you release the R-13 (FUNCTION) button before tapping the L-12 (TAP) button four times. 2. Releasing the wheel ...). After setting the tempo by hand. Vibrato is applied to appear. • Do not have the pitch bend wheel rotated as you turn on the keyboard (all UPPER 1, UPPER 2, LOWER part notes) by tapping, you then can use the procedure under initial default settings). • Instead of vibrato, you are playing...
User Guide
Page 23
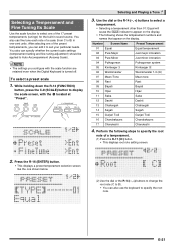
... settings (temperament setting and fine tuning adjustment) should be applied to Auto Accompaniment (Accomp Scale). • The settings you can also use the keyboard to specify the root note. While holding down the R-13 (FUNCTION) button, press the C-8 (SCALE) button to display the scale screen, ...with the scale function are retained even when the Digital Keyboard is turned off. Perform the following shows the temperament numbers and names that appear on the display. Number Screen Name Preset Temperament 01 Equal...
... settings (temperament setting and fine tuning adjustment) should be applied to Auto Accompaniment (Accomp Scale). • The settings you can also use the keyboard to specify the root note. While holding down the R-13 (FUNCTION) button, press the C-8 (SCALE) button to display the scale screen, ...with the scale function are retained even when the Digital Keyboard is turned off. Perform the following shows the temperament numbers and names that appear on the display. Number Screen Name Preset Temperament 01 Equal...

User Guide
Page 24
... R-15 (EXIT) button twice. • This will return to the screen that was displayed before you later change the setting value. You can also press a keyboard key to specify a note. (2) Use the R-17 (y) button to move the 0 to "Note", and then use the dial or R-14 (-, +) buttons to select the name...
... R-15 (EXIT) button twice. • This will return to the screen that was displayed before you later change the setting value. You can also press a keyboard key to specify a note. (2) Use the R-17 (y) button to move the 0 to "Note", and then use the dial or R-14 (-, +) buttons to select the name...
User Guide
Page 25
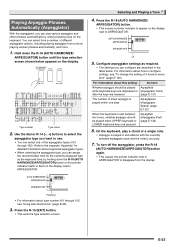
...type selection screen shown below . Type number Type name 2. Refer to the separate "Appendix" for the currently displayed type as the keyboard tone, by simply pressing keys on the display next to ARPEGGIATOR. Configure arpeggiator settings as required. • The settings you can configure... With the arpeggiator, you want to use. • You can select one beat ArpegSpeed (Arpeggiator Speed) (page E-132) When the keyboard is played in the table below appears on the display next to ARPEGGIATOR. You can assign the recommended tone for detailed information about type ...
...type selection screen shown below . Type number Type name 2. Refer to the separate "Appendix" for the currently displayed type as the keyboard tone, by simply pressing keys on the display next to ARPEGGIATOR. Configure arpeggiator settings as required. • The settings you can configure... With the arpeggiator, you want to use. • You can select one beat ArpegSpeed (Arpeggiator Speed) (page E-132) When the keyboard is played in the table below appears on the display next to ARPEGGIATOR. You can assign the recommended tone for detailed information about type ...


