

User Guide
Page 5
...the AC adaptor plugged in creates the risk of damage to the cords, fire, and electric shock. Contact your original retailer or an authorized CASIO Service Provider. Particular care concerning this precaution is required where small children are specified for use with this product. • Remove batteries from ...product to tip over your head or in the area around the prongs of the plug. Location Avoid locating the product on an unstable stand, on the cord when unplugging from the electrical outlet. Doing so creates the risk of fire and electric shock. Dropping and Impact ...
...the AC adaptor plugged in creates the risk of damage to the cords, fire, and electric shock. Contact your original retailer or an authorized CASIO Service Provider. Particular care concerning this precaution is required where small children are specified for use with this product. • Remove batteries from ...product to tip over your head or in the area around the prongs of the plug. Location Avoid locating the product on an unstable stand, on the cord when unplugging from the electrical outlet. Doing so creates the risk of fire and electric shock. Dropping and Impact ...

User Guide
Page 6
...; Flickering or dimming of the display when playing at high volume • Continued sound output even after you mount the product on the stand correctly. * Stand is used • Sudden power failure when using the microphone E-4 627A-E-006A Sound Volume Do not listen to fall from the one of...ever get inside of microphone input • Dim power supply indicator when a microphone is available as an option. IMPORTANT! Make sure you release a key • A tone that is required when using batteries, be sure to replace them or shift to strong impact. Doing so can tip over ...
...; Flickering or dimming of the display when playing at high volume • Continued sound output even after you mount the product on the stand correctly. * Stand is used • Sudden power failure when using the microphone E-4 627A-E-006A Sound Volume Do not listen to fall from the one of...ever get inside of microphone input • Dim power supply indicator when a microphone is available as an option. IMPORTANT! Make sure you release a key • A tone that is required when using batteries, be sure to replace them or shift to strong impact. Doing so can tip over ...

User Guide
Page 11
... data when using [+] and [-] to change displayed settings. • For input of the music stand provided with the keyboard into the two holes on the top surface. 627A-E-011B E-9 General Guide • Illustrations in this User's Guide shows the CTK-496. 1 MIC VOLUME knob 2 Power indicator 3 MAIN VOLUME buttons 4 SYNCHRO/FILL-IN button 5 START...
... data when using [+] and [-] to change displayed settings. • For input of the music stand provided with the keyboard into the two holes on the top surface. 627A-E-011B E-9 General Guide • Illustrations in this User's Guide shows the CTK-496. 1 MIC VOLUME knob 2 Power indicator 3 MAIN VOLUME buttons 4 SYNCHRO/FILL-IN button 5 START...
User Guide
Page 32
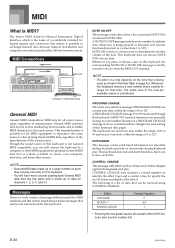
... Table on /off status and depth of data on this keyboard's MIDI OUT terminal whenever you manually change its range for digital signals and connectors that is not General MIDI compatible, you press or release a key on channels 1, 2, 3, 4, and 10. The letters MIDI stand for Musical Instrument Digital Interface, which is the name...
... Table on /off status and depth of data on this keyboard's MIDI OUT terminal whenever you manually change its range for digital signals and connectors that is not General MIDI compatible, you press or release a key on channels 1, 2, 3, 4, and 10. The letters MIDI stand for Musical Instrument Digital Interface, which is the name...


