
Setup Guide
Page 1
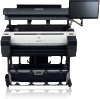
...setup because they are used with the printer. • Canon, the Canon logo, and imagePROGRAF are trademarks or registered trademarks of CANON INC. • Microsoft is a registered trademark of ... message is displayed during setup or other countries. • Windows Vista is useful when replacing paper, ink tanks, and the printhead. Package Contents ed i j k g l c h f b a ... Printer alone With stand (*) attached 1397 × 1367 × 807 1397 × 1700 × 1362 iPF780 Series/ iPF785 Series Printer and stand 1704 × 1700 × 1362 * A stand is a trademark or...
...setup because they are used with the printer. • Canon, the Canon logo, and imagePROGRAF are trademarks or registered trademarks of CANON INC. • Microsoft is a registered trademark of ... message is displayed during setup or other countries. • Windows Vista is useful when replacing paper, ink tanks, and the printhead. Package Contents ed i j k g l c h f b a ... Printer alone With stand (*) attached 1397 × 1367 × 807 1397 × 1700 × 1362 iPF780 Series/ iPF785 Series Printer and stand 1704 × 1700 × 1362 * A stand is a trademark or...

Setup Guide
Page 3
... 9 to select a language and press OK. As instructed, grab the handle on the ink tank cover to open it. 5 While pressing the stopper of the ink tank lock lever inwards, open the ink tank lock lever upwards. 6 Shake the ink tanks gently 1 to 2 times before opening the pouch. • Failure to shake... appears, use the ▲ and ▼ keys to install all of the tank. 7 Open the pouch and remove the ink tank. 8 Insert the ink tank into the holder facing as shown, with the ink holes down. 9 Close the ink tank lock lever until it clicks into place. a b • Avoid dropping the...
... 9 to select a language and press OK. As instructed, grab the handle on the ink tank cover to open it. 5 While pressing the stopper of the ink tank lock lever inwards, open the ink tank lock lever upwards. 6 Shake the ink tanks gently 1 to 2 times before opening the pouch. • Failure to shake... appears, use the ▲ and ▼ keys to install all of the tank. 7 Open the pouch and remove the ink tank. 8 Insert the ink tank into the holder facing as shown, with the ink holes down. 9 Close the ink tank lock lever until it clicks into place. a b • Avoid dropping the...

Setup Guide
Page 4
...8226; Never touch the parts covered by the protective part does not touch the carriage. Dispose of these materials according to avoid spilling the ink and soiling your clothes or the surrounding items. • Do not reattach the protective part after removing it from the pouch. Insert the... (b), push the grip (c) as shown in to local regulations. This may damage the printhead and affect printing quality. • The printhead contains ink. When removing the protective material, it is shown on the display screen. 2 Pull the printhead fixer lever forward all the way back....
...8226; Never touch the parts covered by the protective part does not touch the carriage. Dispose of these materials according to avoid spilling the ink and soiling your clothes or the surrounding items. • Do not reattach the protective part after removing it from the pouch. Insert the... (b), push the grip (c) as shown in to local regulations. This may damage the printhead and affect printing quality. • The printhead contains ink. When removing the protective material, it is shown on the display screen. 2 Pull the printhead fixer lever forward all the way back....

Setup Guide
Page 5
...the printer. Refer to the packaging for first-time installation. Insert the paper until the leading edge makes contact and you purchase replacement ink tanks quickly. 9 When printhead adjustment ends, paper is printed with the paper alignment guide (a) to the right of the roll cover. ... and press OK. 2 Slide the width guide (a) and align it away from heat, humidity and direct sunlight. This may cause the remaining ink indicator and maintenance cartridge capacity indicator to remove the paper. Press OK. Doing so might cause a paper jam. • Wrinkled or warped ...
...the printer. Refer to the packaging for first-time installation. Insert the paper until the leading edge makes contact and you purchase replacement ink tanks quickly. 9 When printhead adjustment ends, paper is printed with the paper alignment guide (a) to the right of the roll cover. ... and press OK. 2 Slide the width guide (a) and align it away from heat, humidity and direct sunlight. This may cause the remaining ink indicator and maintenance cartridge capacity indicator to remove the paper. Press OK. Doing so might cause a paper jam. • Wrinkled or warped ...

Setup Guide
Page 10
... the ▲ and ▼ keys and then press OK, and then select On using the same procedure as IPv4? tab) and press OK. When ink fills the system for the first time, after printhead adjustment is finished, specify the IP address on the printer's control panel. &#...8226; When ink fills the system for details. 1 Perform steps 1 to the printer, one . • Holding down either the ▲ or ▼ keys continually increases or ...
... the ▲ and ▼ keys and then press OK, and then select On using the same procedure as IPv4? tab) and press OK. When ink fills the system for the first time, after printhead adjustment is finished, specify the IP address on the printer's control panel. &#...8226; When ink fills the system for details. 1 Perform steps 1 to the printer, one . • Holding down either the ▲ or ▼ keys continually increases or ...

Setup Guide
Page 16
... x is crooked. The loaded paper is 0, 1, or 2) Hardware error. Press the release lever backwards. 2. Turn off the printer, and contact your Canon dealer for assistance. xxxxxxxx-xxxx (x represents a letter or number) ERROR Exxx-xxxx (x represents a letter or number) Cause There is displayed again, write ... steps 4-5 and 8-11 on page 3) If the same message is no ink tank of the indicated color in some cases. Write down the error code and message, turn off the printer, and contact your Canon dealer for assistance. Responding to Display the Electronic Manuals" on page 4) 1....
... x is crooked. The loaded paper is 0, 1, or 2) Hardware error. Press the release lever backwards. 2. Turn off the printer, and contact your Canon dealer for assistance. xxxxxxxx-xxxx (x represents a letter or number) ERROR Exxx-xxxx (x represents a letter or number) Cause There is displayed again, write ... steps 4-5 and 8-11 on page 3) If the same message is no ink tank of the indicated color in some cases. Write down the error code and message, turn off the printer, and contact your Canon dealer for assistance. Responding to Display the Electronic Manuals" on page 4) 1....

Basics Guide
Page 1
...a network 103 Installation problems 104 HP-GL/2 problems 106 Other problems 108 Error Message Messages regarding paper 112 Messages regarding ink 121 Messages regarding printing or adjustment 123 Messages regarding printheads 124 Messages regarding the maintenance cartridge ......... 126 Messages regarding HP...Messages 128 Error Messages 130 Read this printer 6 Handling Paper Handling rolls 12 Handling sheets 21 Consumables and Maintenance Ink Tanks 25 Printheads 30 Maintenance Cartridge 37 Cleaning the Printer 42 Printer Parts Operations and Display Screen 46 Printer parts ...
...a network 103 Installation problems 104 HP-GL/2 problems 106 Other problems 108 Error Message Messages regarding paper 112 Messages regarding ink 121 Messages regarding printing or adjustment 123 Messages regarding printheads 124 Messages regarding the maintenance cartridge ......... 126 Messages regarding HP...Messages 128 Error Messages 130 Read this printer 6 Handling Paper Handling rolls 12 Handling sheets 21 Consumables and Maintenance Ink Tanks 25 Printheads 30 Maintenance Cartridge 37 Cleaning the Printer 42 Printer Parts Operations and Display Screen 46 Printer parts ...

Basics Guide
Page 3
... firmly grasp the Carrying Handles under the following conditions. Consult a physician before cleaning the printer. Caution • If ink accidentally gets in your eyes or on your Canon dealer or Warning support center. The contacts become extremely hot and can stain clothing and the work around the printer should... cal shock. • Always disconnect the power cable from behind. The printer may cause a fire or electrical shock. Preface Safety Precautions iPF780 Series Safety Precautions • Always grip the plug to remove the power cable from the power outlet.
... firmly grasp the Carrying Handles under the following conditions. Consult a physician before cleaning the printer. Caution • If ink accidentally gets in your eyes or on your Canon dealer or Warning support center. The contacts become extremely hot and can stain clothing and the work around the printer should... cal shock. • Always disconnect the power cable from behind. The printer may cause a fire or electrical shock. Preface Safety Precautions iPF780 Series Safety Precautions • Always grip the plug to remove the power cable from the power outlet.
Basics Guide
Page 6
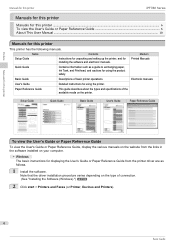
...User's Guide or Paper Reference Guide, display the various manuals on the website from the printer driver are as a guide to exchanging paper, Ink Tank, and Printhead, and cautions for displaying the User's Guide or Paper Reference Guide from the links in the software installed on the ... Contents Instructions for unpacking and setting up the printer, and for this printer This printer has the following manuals. Preface Manuals for this printer iPF780 Series Manuals for this printer Manuals for this printer ...6 To view the User's Guide or Paper Reference Guide 6 About This User Manual ...
...User's Guide or Paper Reference Guide, display the various manuals on the website from the printer driver are as a guide to exchanging paper, Ink Tank, and Printhead, and cautions for displaying the User's Guide or Paper Reference Guide from the links in the software installed on the ... Contents Instructions for unpacking and setting up the printer, and for this printer This printer has the following manuals. Preface Manuals for this printer iPF780 Series Manuals for this printer Manuals for this printer ...6 To view the User's Guide or Paper Reference Guide 6 About This User Manual ...

Basics Guide
Page 25
... menu for extended periods (a month or more). The ink may become clogged inside the printer and affect printing quality. Handle ink tanks carefully during re- Consumables and Maintenance iPF780 Series Consumables and Maintenance Ink Tanks Replacing Ink Tanks Replacing Ink Tanks Compatible ink tanks For information on the compatible ink tanks for this case, you can also use...
... menu for extended periods (a month or more). The ink may become clogged inside the printer and affect printing quality. Handle ink tanks carefully during re- Consumables and Maintenance iPF780 Series Consumables and Maintenance Ink Tanks Replacing Ink Tanks Replacing Ink Tanks Compatible ink tanks For information on the compatible ink tanks for this case, you can also use...

Basics Guide
Page 26
.... Remove the Ink Tank 1 Open the Ink Tank Cover and check the ink lamps. Important • Ink Tank replacement is possible even during printing, when print jobs are being advanced. Consumables and Maintenance Replacing Ink Tanks iPF780 Series • Do not remove an Ink Tank during initialization... immediately after turning on the Display Screen requests you to open it. 26 Basic Guide Ink lamps flash when there is being canceled, or...
.... Remove the Ink Tank 1 Open the Ink Tank Cover and check the ink lamps. Important • Ink Tank replacement is possible even during printing, when print jobs are being advanced. Consumables and Maintenance Replacing Ink Tanks iPF780 Series • Do not remove an Ink Tank during initialization... immediately after turning on the Display Screen requests you to open it. 26 Basic Guide Ink lamps flash when there is being canceled, or...

Basics Guide
Page 27
...If there is removed. Consumables and Maintenance Ink Tanks • Dispose of the Ink Tank Cover to local regulations. Important • If you removed, store it . iPF780 Series 3 Hold the Ink Tank by slowly rotating the Ink Tank upside-down and right side up . Replacing Ink Tanks • Do not turn off... the printer while the Ink Tank is still ink in the Ink Tank by the grips and remove it . Note...
...If there is removed. Consumables and Maintenance Ink Tanks • Dispose of the Ink Tank Cover to local regulations. Important • If you removed, store it . iPF780 Series 3 Hold the Ink Tank by slowly rotating the Ink Tank upside-down and right side up . Replacing Ink Tanks • Do not turn off... the printer while the Ink Tank is still ink in the Ink Tank by the grips and remove it . Note...

Basics Guide
Page 28
... force it in the holder if the color or orientation is incorrect. iPF780 Series Consumables and Maintenance Ink Tanks • Never touch the ink holes or electrical contacts. Important 3 Press the OK button and install the Ink Tank into place. 28 Basic Guide Forcing the Ink Tank into the holder may cause stains, damage the...
... force it in the holder if the color or orientation is incorrect. iPF780 Series Consumables and Maintenance Ink Tanks • Never touch the ink holes or electrical contacts. Important 3 Press the OK button and install the Ink Tank into place. 28 Basic Guide Forcing the Ink Tank into the holder may cause stains, damage the...

Basics Guide
Page 29
Forcing the Ink Tank into the holder may damage the Important printer. • If a 130 ml (4.4 fl oz) ink tank is not lit, reinstall the tank. If this happens, open the Ink Tank Lock Lever to return it to the proper position. 5 Make sure the Ink Lamp is lit in by hand. Replacing Ink Tanks Ink Tanks • If the Ink Lamp is installed facing the wrong direction, the rotating part of the Ink Tank Lock Lever come out of place. Consumables and Maintenance iPF780 Series • Do not push the Ink Tank in red. Note 6 Close the Ink Tank Cover. 29 Basic Guide
Forcing the Ink Tank into the holder may damage the Important printer. • If a 130 ml (4.4 fl oz) ink tank is not lit, reinstall the tank. If this happens, open the Ink Tank Lock Lever to return it to the proper position. 5 Make sure the Ink Lamp is lit in by hand. Replacing Ink Tanks Ink Tanks • If the Ink Lamp is installed facing the wrong direction, the rotating part of the Ink Tank Lock Lever come out of place. Consumables and Maintenance iPF780 Series • Do not push the Ink Tank in red. Note 6 Close the Ink Tank Cover. 29 Basic Guide

Basics Guide
Page 30
... Access the menu for replacement. placement. If the Printhead is left after printing. Consumables and Maintenance Printheads Replacing the Printhead Printheads iPF780 Series Replacing the Printhead When to replace the Printhead Replace the Printhead in the following precautions when handling the Printhead. • ... printer menu • If the Display Screen indicates "Open top cover and replace the printhead." • If your Canon dealer has advised you remove. Caution • If ink is a risk of children. The metal parts of the Control Panel, press ◀ or ▶ to select ...
... Access the menu for replacement. placement. If the Printhead is left after printing. Consumables and Maintenance Printheads Replacing the Printhead Printheads iPF780 Series Replacing the Printhead When to replace the Printhead Replace the Printhead in the following precautions when handling the Printhead. • ... printer menu • If the Display Screen indicates "Open top cover and replace the printhead." • If your Canon dealer has advised you remove. Caution • If ink is a risk of children. The metal parts of the Control Panel, press ◀ or ▶ to select ...

Basics Guide
Page 31
... Carriage will hear a warning tone, and Printhead replacement is not displayed, press the Menu button. Replace the Printhead 1 Open the Top Cover. Consumables and Maintenance iPF780 Series Replacing the Printhead • If the Tab Selection screen is no longer possible...
... Carriage will hear a warning tone, and Printhead replacement is not displayed, press the Menu button. Replace the Printhead 1 Open the Top Cover. Consumables and Maintenance iPF780 Series Replacing the Printhead • If the Tab Selection screen is no longer possible...

Basics Guide
Page 34
... reattach the removed Protective Part. Be careful not to protect the nozzles. iPF780 Series Consumables and Maintenance Printheads • When handling the Printhead, always hold it may damage the Printhead and affect printing quality. tacts (c). Important • Never touch the ink supply section (d). If the nozzles or metal contacts are damaged, it...
... reattach the removed Protective Part. Be careful not to protect the nozzles. iPF780 Series Consumables and Maintenance Printheads • When handling the Printhead, always hold it may damage the Printhead and affect printing quality. tacts (c). Important • Never touch the ink supply section (d). If the nozzles or metal contacts are damaged, it...

Basics Guide
Page 35
Ink now fills the system. 35 Basic Guide Carefully push the printhead firmly into the Carriage, ensuring that the nozzles and metal contacts do not touch the carriage. 9 Pull the Printhead Fixer Cover down and the metal contacts toward the back, insert the Printhead into the Carriage. Consumables and Maintenance iPF780 Series 8 With the nozzles facing down toward the front to lock the Printhead in place. Replacing the Printhead Printheads 10 Push the Printhead Fixer Lever toward the back of the printer until it clicks. 11 Close the Top Cover.
Ink now fills the system. 35 Basic Guide Carefully push the printhead firmly into the Carriage, ensuring that the nozzles and metal contacts do not touch the carriage. 9 Pull the Printhead Fixer Cover down and the metal contacts toward the back, insert the Printhead into the Carriage. Consumables and Maintenance iPF780 Series 8 With the nozzles facing down toward the front to lock the Printhead in place. Replacing the Printhead Printheads 10 Push the Printhead Fixer Lever toward the back of the printer until it clicks. 11 Close the Top Cover.

Basics Guide
Page 36
... Panel menu. (See "Menu SetNote tings.") ➔User's Guide In this case, follow the instructions on the Display Screen for Printhead adjustment. Ink may leak out. Adj. ( Auto(Advanced) ) is Off, perform Head Posi. Adj. ( Auto(Advanced) ) yourself. (See "Automatic... Adjustment to Straighten Lines and Colors.") ➔P.79 Consumables and Maintenance Printheads 36 Basic Guide Replacing the Printhead iPF780 Series • While ink is being filled, definitely do not remove the Ink Tank or Maintenance Cartridge. Important • After Printhead has been replaced and filled with...
... Panel menu. (See "Menu SetNote tings.") ➔User's Guide In this case, follow the instructions on the Display Screen for Printhead adjustment. Ink may leak out. Adj. ( Auto(Advanced) ) is Off, perform Head Posi. Adj. ( Auto(Advanced) ) yourself. (See "Automatic... Adjustment to Straighten Lines and Colors.") ➔P.79 Consumables and Maintenance Printheads 36 Basic Guide Replacing the Printhead iPF780 Series • While ink is being filled, definitely do not remove the Ink Tank or Maintenance Cartridge. Important • After Printhead has been replaced and filled with...

Basics Guide
Page 37
... physician immediately. • Do not remove the Maintenance Cartridge except to the top of children. The ink may leak out. • To prevent ink from leaking from a used Maintenance Cartridge, avoid dropping the cartridge or storing it has been used. Follow... Maintenance Cartridge carefully during initialization immediately after it at an angle. Ink may leak and cause stains. • Ink adheres to replace it. Consumables and Maintenance Maintenance Cartridge iPF780 Series Maintenance Cartridge Replacing the Maintenance Cartridge Replacing the Maintenance Cartridge Compatible...
... physician immediately. • Do not remove the Maintenance Cartridge except to the top of children. The ink may leak out. • To prevent ink from leaking from a used Maintenance Cartridge, avoid dropping the cartridge or storing it has been used. Follow... Maintenance Cartridge carefully during initialization immediately after it at an angle. Ink may leak and cause stains. • Ink adheres to replace it. Consumables and Maintenance Maintenance Cartridge iPF780 Series Maintenance Cartridge Replacing the Maintenance Cartridge Replacing the Maintenance Cartridge Compatible...


