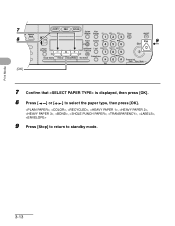
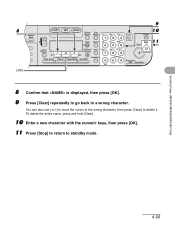
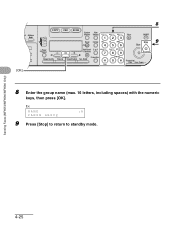
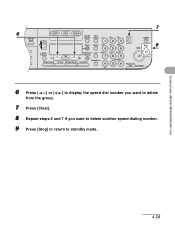
imageCLASS MF6500 Series Basic Guide
Page 11
Users in Canada xxvi Pre-Installation Requirements for Canon Facsimile Equipment xxvi Notice xxvii Laser Safety xxix CDRH Regulations xxix 1 Before Using the Machine 1-1 Machine Components 1-1 Operation Panel 1-3 Main Operation Panel 1-3 Facsimile Operation Panel (MF6550/MF6560/MF6580 Only 1-5 LCD (Standby Mode 1-6 Copy Mode 1-6 Fax Mode 1-6 Scan Mode 1-6 Toner Cartridge 1-7 Maintaining the Toner Cartridge 1-7 Timer...
imageCLASS MF6500 Series Basic Guide
Page 34
Operation Panel Before Using the Machine Main Operation Panel ● MF6550/MF6560/MF6580 A B C D E F G H IJ K L M NO P Q ed Address l Book 4 8 2 COPY FAX SCAN System Monitor View Settings @./ 1 ABC 2 DEF 3 Reset Collate GHI 4 JKL MNO 56 Paper Select .... 1-3 B Jam Location indicator Indicates the location of paper jams. C LCD display Displays messages and prompts during operation. D COPY key Press to switch to standby mode. F FAX key Press to switch to check fax transmission, print, copy, or report output status. K System Monitor key Press to Fax mode.
imageCLASS MF6500 Series Basic Guide
Page 37
Before Using the Machine LCD (Standby Mode) Copy Mode ● Without optional cassette A B C 100% LTR A TEXT O1 D E A Zoom ratio B Paper size C Quantity D Density E Image quality Fax Mode* A 12/31/2006 SUN 10:50 FaxOnly FINE B C A Date & Time B Receive mode C Image quality * MF6550/MF6560/MF6580 Only ● With optional cassette A B C 100% AUTO A TEXT O1 D E Scan Mode SCANNING MODE 1-6
imageCLASS MF6500 Series Basic Guide
Page 41
... can also enter values using numeric keys. 6 Press [Stop] to return to 30 minutes (in one-minute increments). You can set the interval from 3 to standby mode. 1-10 Before Using the Machine 4 ded Address al Book 5 04 08 2 [OK] COPY FAX SCAN System View Monitor Settings @./ ABC DEF Clear ON/OFF...
imageCLASS MF6500 Series Basic Guide
Page 43
Before Using the Machine Setting Auto Clear Time If the machine remains idle for a certain period of time, the display returns to standby mode (Auto Clear function). 1 2 ded Address al Book 3 04 08 2 [OK] COPY FAX SCAN System Monitor View Settings @./ 1 ABC 2 DEF 3 Reset Collate GHI 4 JKL MNO ...
imageCLASS MF6500 Series Basic Guide
Page 44
... Frame Erase Image Quality Density Enlarge/Reduce Two-Sided Tone SYMBOLS 0# Processing/ Data Error Power 4 Confirm that is displayed, then press [OK]. 5 Press [ ] or [ ] to standby mode. 1-13 You can also enter values using numeric keys. 6 Press [Stop] to return to select the desired interval, then press [OK].
imageCLASS MF6500 Series Basic Guide
Page 48
... [OK]. 17 Confirm that is displayed, then press [OK]. 18 Press [ ] or [ ] to select the day, then press [OK]. 19 Press [Stop] to return to standby mode. 1-17
imageCLASS MF6500 Series Basic Guide
Page 67
... you use the optional paper cassette, confirm that is displayed and repeat this step to set the paper size for . 9 Press [Stop] to return to standby mode. 3-10
imageCLASS MF6500 Series Basic Guide
Page 70
Print Media 7 ded Address 8 al Book 04 08 2 [OK] COPY FAX SCAN System View Monitor Settings @./ ABC DEF Clear ON/OFF 123C Reset Collate GHI JKL MNO Stop 9 456 Start Paper Select Additional 2 on 1 PQRS TUV WXYZ OK Functions 789 Frame Erase Image Quality Density Enlarge/Reduce Two-Sided Tone SYMBOLS 0# Processing/ Data Error Power 7 Confirm that is displayed, then press [OK]. 8 Press [ ] or [ ] to select the paper type, then press [OK]. , , , , , , , , , , 9 Press [Stop] to return to standby mode. 3-13
imageCLASS MF6500 Series Basic Guide
Page 72
... Requirements," on the platen glass or load it in the ADF. The FAX indicator lights up and the machine enters fax standby mode. Sending Faxes (MF6550/MF6560/MF6580 Only) Sending Faxes (MF6550/MF6560/MF6580 Only) Follow this procedure to adjust the resolution and density: See "Scan Settings," on p. 4-3. 4-1 For documents you can fax...
imageCLASS MF6500 Series Basic Guide
Page 80
... :A CAN 9 Press [Stop] to return to standby mode. 4-9 You can set for each destination. For details, see Chapter 1, "Advanced Fax Features," in the Advanced Guide. To register another one-touch speed dialing key, press [Additional Functions], then repeat the procedure from step 4. Sending Faxes (MF6550/MF6560/MF6580 Only) ded Address al Book...
imageCLASS MF6500 Series Basic Guide
Page 83
Sending Faxes (MF6550/MF6560/MF6580 Only) 8 ded Address al Book 04 08 2 [OK] COPY FAX SCAN System Monitor View Settings @./ 1 ABC 2 DEF 3 Reset Collate GHI 4 JKL MNO 56 ... 9 10 Clear ON/OFF C 11 Stop Start Processing/ Data Error Power 8 Confirm that is displayed, then press [OK]. 9 Press [Clear] repeatedly to go back to standby mode. 4-12 To delete the entire name, press and hold [Clear]. 10 Enter a new character with the numeric keys, then press [OK]. 11 Press [Stop...
imageCLASS MF6500 Series Basic Guide
Page 85
... by one. 7 Press [Stop] to return to delete all numbers, the registered name is displayed, then press [OK]. 6 Press and hold [Clear] to standby mode. Sending Faxes (MF6550/MF6560/MF6580 Only) 5 ded Address al Book 04 M4 08 2 [OK] 6 COPY FAX SCAN System View Monitor Settings @./ ABC DEF Clear ON/OFF 123C...
imageCLASS MF6500 Series Basic Guide
Page 88
For details, see Chapter 1, "Advanced Fax Features," in the Advanced Guide. NAME :A CAN 9 Press [Stop] to return to standby mode. 4-17 Sending Faxes (MF6550/MF6560/MF6580 Only) ded Address al Book 04 08 2 [OK] 8 COPY FAX SCAN System View Monitor Settings @./ ABC DEF Clear ON/OFF 123C Reset Collate ...
imageCLASS MF6500 Series Basic Guide
Page 91
Sending Faxes (MF6550/MF6560/MF6580 Only) 8 ded Address al Book 04 08 2 [OK] COPY FAX SCAN System Monitor View Settings @./ 1 ABC 2 DEF 3 Reset Collate GHI 4 JKL MNO 56 ... delete the entire name, press and hold [Clear]. 10 Enter a new character with the numeric keys, then press [OK]. 11 Press [Stop] to return to standby mode. 4-20
imageCLASS MF6500 Series Basic Guide
Page 93
...] to return to delete all numbers, the registered name is displayed, then press [OK]. 6 Press and hold [Clear] to standby mode. NOTE When deleting all the numbers, then press [OK]. Sending Faxes (MF6550/MF6560/MF6580 Only) 5 ded Address al Book 04 08 2 [OK] 6 COPY FAX SCAN System View Monitor Settings @./ ABC DEF...
imageCLASS MF6500 Series Basic Guide
Page 96
ded Address al Book 04 08 2 [OK] 8 COPY FAX SCAN System View Monitor Settings @./ ABC DEF Clear ON/OFF 123C Reset Collate GHI JKL MNO Stop 9 456 Start Paper Select Additional 2 on 1 PQRS TUV WXYZ OK Functions 789 Frame Erase Image Quality Density Enlarge/Reduce Two-Sided Tone SYMBOLS 0# Processing/ Data Error Power 8 Enter the group name (max. 16 letters, including spaces) with the numeric keys, then press [OK]. Ex. NAME :A CANON GROUP 9 Press [Stop] to return to standby mode. Sending Faxes (MF6550/MF6560/MF6580 Only) 4-25
imageCLASS MF6500 Series Basic Guide
Page 97
...Confirm that is displayed, then press [OK]. 6 Select the speed dialing number you want to add to edit, then press [OK]. Sending Faxes (MF6550/MF6560/MF6580 Only) ● Adding New Destination to Group 1 2 3 Coded Address Direct TX Pause Hook Redial Dial Book 4 5 01 02 03 ...Monitor ClSeeatrtin ON/OFF Reset C Colla 7 Stop Start Paper Select Image Quality Additional 2 on p. 4-23. 7 Press [Stop] to return to standby mode. 4-26 For details on entering the speed dialing number, see "Registering Group Dialing," on Functions OK Density Enlarge/Reduce Two-Sided Frame E rocessing...
imageCLASS MF6500 Series Basic Guide
Page 99
Sending Faxes (MF6550/MF6560/MF6580 Only) 6 ded Address al Book 04 08 2 7 COPY FAX SCAN System View Monitor Settings @./ ABC DEF Clear ON/OFF 123C Reset Collate GHI ... want to delete from the group. 7 Press [Clear]. 8 Repeat steps 6 and 7 if you want to delete another speed dialing number. 9 Press [Stop] to return to standby mode. 4-28
imageCLASS MF6500 Series Basic Guide
Page 100
Sending Faxes (MF6550/MF6560/MF6580 Only) ● Changing Group Name 1 2 ded Address 3 al Book 4 04 08 52 [OK] 6 COPY FAX SCAN System View Monitor Settings @./ ABC DEF Clear 7 ... Power 1 Press [Additional Functions]. 2 Press [ ] or [ ] to select , then press [OK]. 3 Press [ ] or [ ] to select , then press [OK]. 4 Press [ ] or [ ] to select a group dial to standby mode. 4-29 To delete the entire name, press and hold [Clear]. 7 Enter a new character with the numeric keys, then press [OK]. 8 Press [Stop] to return...