Quick Start Guide
Page 2
...1. In addition, the latest driver downloads, answers to frequently asked questions, product information, and "where to buy" instructions are subject to three full years of service and support coverage at www.canonesp.com. CarePAK must be purchased during your Canon service and support, call ... or visit our web site at a very attractive price. Serial Number (located on the back of the printer): Model Number (located on your CD-ROM: Purchase Date: Canon U.S.A. For further information about extending your product's 1 year limited warranty period. Extended Service and Support - www...
...1. In addition, the latest driver downloads, answers to frequently asked questions, product information, and "where to buy" instructions are subject to three full years of service and support coverage at www.canonesp.com. CarePAK must be purchased during your Canon service and support, call ... or visit our web site at a very attractive price. Serial Number (located on the back of the printer): Model Number (located on your CD-ROM: Purchase Date: Canon U.S.A. For further information about extending your product's 1 year limited warranty period. Extended Service and Support - www...
Quick Start Guide
Page 5
... Printing Becomes Faint or Colors are Incorrect 41 Printing the Nozzle Check Pattern 42 Print Head Cleaning 47 Print Head Deep Cleaning 52 Aligning the Print Head 57 Replacing an Ink Tank 61 Troubleshooting Cannot Install the Printer Driver 70 Print Quality is ...Digital Camera 82 Appendix Printing Photographs Directly from Canon Bubble Jet Direct Compatible Digital Cameras 84 User's Guide Table of Contents 86 Accessory Options 87 Traveling Abroad with the Printer 89 Specifications 91 Safety Precautions 94 Regulatory Information 96 CANON U.S.A., INC. LIMITED WARRANTY --- (USA Only...
... Printing Becomes Faint or Colors are Incorrect 41 Printing the Nozzle Check Pattern 42 Print Head Cleaning 47 Print Head Deep Cleaning 52 Aligning the Print Head 57 Replacing an Ink Tank 61 Troubleshooting Cannot Install the Printer Driver 70 Print Quality is ...Digital Camera 82 Appendix Printing Photographs Directly from Canon Bubble Jet Direct Compatible Digital Cameras 84 User's Guide Table of Contents 86 Accessory Options 87 Traveling Abroad with the Printer 89 Specifications 91 Safety Precautions 94 Regulatory Information 96 CANON U.S.A., INC. LIMITED WARRANTY --- (USA Only...
Quick Start Guide
Page 6
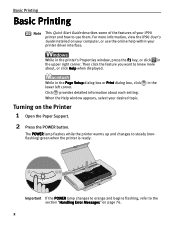
... Messages" on page 76. 2 Important If the POWER lamp changes to orange and begins flashing, refer to steady (nonflashing) green when the printer is ready. While in the Turning on your computer, or use them. Then click the feature you want to use the online help within ...your printer driver interface. Click provides detailed information about , or click Help when displayed. While in the printer's Properties window, press the F1 key, or click in the upper right corner. Basic Printing Basic...
... Messages" on page 76. 2 Important If the POWER lamp changes to orange and begins flashing, refer to steady (nonflashing) green when the printer is ready. While in the Turning on your computer, or use them. Then click the feature you want to use the online help within ...your printer driver interface. Click provides detailed information about , or click Help when displayed. While in the printer's Properties window, press the F1 key, or click in the upper right corner. Basic Printing Basic...
Quick Start Guide
Page 10
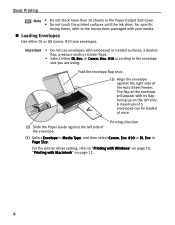
... of 5 envelopes can be loaded at once. (2) Slide the Paper Guide against the right side of the envelope. Env. #10 or DL Env. For the printer driver setting, refer to "Printing with Windows" on page 12. 6 or Comm. Printing direction (3) Select Envelope in Page Size. Important • Do not use envelopes with...
... of 5 envelopes can be loaded at once. (2) Slide the Paper Guide against the right side of the envelope. Env. #10 or DL Env. For the printer driver setting, refer to "Printing with Windows" on page 12. 6 or Comm. Printing direction (3) Select Envelope in Page Size. Important • Do not use envelopes with...
Quick Start Guide
Page 11
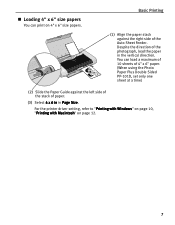
For the printer driver setting, refer to "Printing with Windows" on page 10, "Printing with Macintosh" on 4" x 6" size papers. Basic Printing (1) Align the paper stack against the left side ...
For the printer driver setting, refer to "Printing with Windows" on page 10, "Printing with Macintosh" on 4" x 6" size papers. Basic Printing (1) Align the paper stack against the left side ...
Quick Start Guide
Page 13
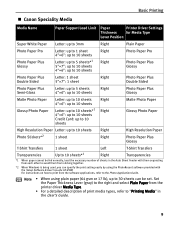
Set the Paper Thickness Lever (gray) to the right and select Plain Paper from the printer driver Media Type. • For a detailed description of sheets in the User's Guide. 9 For instructions on how to print from the software applications, refer to "...can be fed normally, load the necessary number of print media types, refer to the Photo Application Guide. Basic Printing Canon Speciality Media Media Name Paper Support Load Limit Paper Printer Driver Settings Thickness for Media Type Lever Position Super White Paper Letter: up to 3mm Right Plain Paper Photo Paper Pro Photo...
Set the Paper Thickness Lever (gray) to the right and select Plain Paper from the printer driver Media Type. • For a detailed description of sheets in the User's Guide. 9 For instructions on how to print from the software applications, refer to "...can be fed normally, load the necessary number of print media types, refer to the Photo Application Guide. Basic Printing Canon Speciality Media Media Name Paper Support Load Limit Paper Printer Driver Settings Thickness for Media Type Lever Position Super White Paper Letter: up to 3mm Right Plain Paper Photo Paper Pro Photo...
Quick Start Guide
Page 15
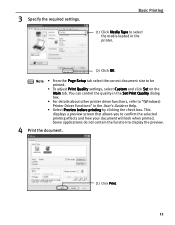
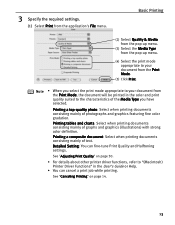
... Preview before printing by clicking the check box. You can control the quality in the Set Print Quality dialog box. • For details about other printer driver functions, refer to display the preview. 4 Print the document. (1) Click Print. 11 Some applications do not contain the function to "(Windows...
... Preview before printing by clicking the check box. You can control the quality in the Set Print Quality dialog box. • For details about other printer driver functions, refer to display the preview. 4 Print the document. (1) Click Print. 11 Some applications do not contain the function to "(Windows...
Quick Start Guide
Page 17
... Select the print mode appropriate to your document from the Print Mode, the document will be printed in the color and print quality suited to "(Macintosh) Printer Driver Functions" in the User's Guide or Help. • You can fine-tune Print Quality and Halftoning settings.... mainly of graphs and graphics (illustrations) with strong color definition. See "Canceling Printing" on page 30. • For details about other printer driver functions, refer to the characteristics of photographs and graphics featuring fine color gradation. Printing a top-quality photo: Select when printing...
... Select the print mode appropriate to your document from the Print Mode, the document will be printed in the color and print quality suited to "(Macintosh) Printer Driver Functions" in the User's Guide or Help. • You can fine-tune Print Quality and Halftoning settings.... mainly of graphs and graphics (illustrations) with strong color definition. See "Canceling Printing" on page 30. • For details about other printer driver functions, refer to the characteristics of photographs and graphics featuring fine color gradation. Printing a top-quality photo: Select when printing...
Quick Start Guide
Page 19
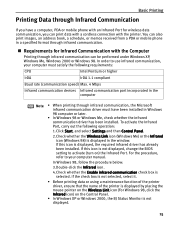
...check box is not selected, select it. • Before printing data or using a maintenance function of the printer driver, ensure that the name of the printer is not displayed. 15 Basic Printing Printing Data through Infrared Communication If you can print data with a cordless ...book, a schedule, or memos received from a PDA or mobile phone in a specified format through infrared communication, the Microsoft infrared communication driver must satisfy the following operation: 1.Click Start, and select Settings and then Control Panel. 2.Check whether the Wireless Link icon (Windows Me...
...check box is not selected, select it. • Before printing data or using a maintenance function of the printer driver, ensure that the name of the printer is not displayed. 15 Basic Printing Printing Data through Infrared Communication If you can print data with a cordless ...book, a schedule, or memos received from a PDA or mobile phone in a specified format through infrared communication, the Microsoft infrared communication driver must satisfy the following operation: 1.Click Start, and select Settings and then Control Panel. 2.Check whether the Wireless Link icon (Windows Me...
Quick Start Guide
Page 20
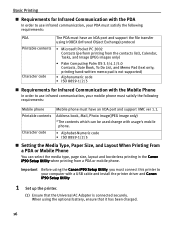
Important Before using the Canon iP90 Setup Utility, you must connect this printer to your mobile phone must satisfy the following requirements: PDA Printable contents Character code The PDA must have an IrDA port and support ...8859-1/2/5 Requirements for Infrared Communication with the PDA In order to use infrared communication, your computer with a USB cable and install the printer driver and Canon iP90 Setup Utility. 1 Set up the printer. (1) Ensure that it has been charged. 16 When using IrOBEX (Infrared Object Exchange) protocol • Microsoft Pocket PC 2002 Contacts ...
Important Before using the Canon iP90 Setup Utility, you must connect this printer to your mobile phone must satisfy the following requirements: PDA Printable contents Character code The PDA must have an IrDA port and support ...8859-1/2/5 Requirements for Infrared Communication with the PDA In order to use infrared communication, your computer with a USB cable and install the printer driver and Canon iP90 Setup Utility. 1 Set up the printer. (1) Ensure that it has been charged. 16 When using IrOBEX (Infrared Object Exchange) protocol • Microsoft Pocket PC 2002 Contacts ...
Quick Start Guide
Page 33
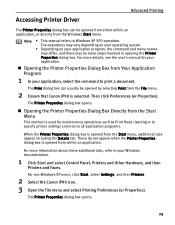
... print a document. The Printer Properties dialog box opens. 29 Accessing Printer Driver Advanced Printing The Printer Properties dialog box can usually be opened from either within an application. The Printer Properties dialog box opens. ...For more steps involved in opening the Printer Properties dialog box. For non-Windows XP users, click Start, select Settings, and then Printers. 2 Select the Canon...
... print a document. The Printer Properties dialog box opens. 29 Accessing Printer Driver Advanced Printing The Printer Properties dialog box can usually be opened from either within an application. The Printer Properties dialog box opens. ...For more steps involved in opening the Printer Properties dialog box. For non-Windows XP users, click Start, select Settings, and then Printers. 2 Select the Canon...
Quick Start Guide
Page 34
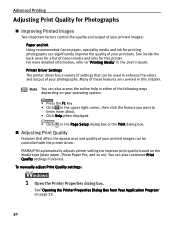
... in this printer. PIXMA iP90 automatically adjusts printer settings to improve print quality based on the media type (plain paper, Photo Paper Pro, and so on page 29. 30 To manually adjust Print Quality settings: 1 Open the Printer Properties dialog... ). See inside the back cover for a list of Canon media and inks for printing photographs can significantly improve the quality of your printouts. Printer Driver Settings The printer driver has a variety of settings that affect the appearance and ... to know more detailed information, refer to enhance the colors and output of your photographs.
... in this printer. PIXMA iP90 automatically adjusts printer settings to improve print quality based on the media type (plain paper, Photo Paper Pro, and so on page 29. 30 To manually adjust Print Quality settings: 1 Open the Printer Properties dialog... ). See inside the back cover for a list of Canon media and inks for printing photographs can significantly improve the quality of your printouts. Printer Driver Settings The printer driver has a variety of settings that affect the appearance and ... to know more detailed information, refer to enhance the colors and output of your photographs.
Quick Start Guide
Page 39
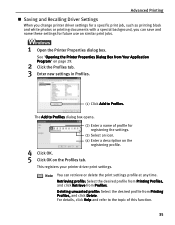
...the Profiles tab. 3 Enter new settings in Profiles. (1) Click Add to the topic of this function. 35 This registers your printer driver print settings. Retrieving profile: Select the desired profile from Printing Profiles, and click Retrieve from Printing Profiles, and click Delete. Note ... details, click Help and refer to Profiles. See "Opening the Printer Properties Dialog Box from Your Application Program" on the Profiles tab. Advanced Printing Saving and Recalling Driver Settings When you change printer driver settings for a specific print job, such as printing black and ...
...the Profiles tab. 3 Enter new settings in Profiles. (1) Click Add to the topic of this function. 35 This registers your printer driver print settings. Retrieving profile: Select the desired profile from Printing Profiles, and click Retrieve from Printing Profiles, and click Delete. Note ... details, click Help and refer to Profiles. See "Opening the Printer Properties Dialog Box from Your Application Program" on the Profiles tab. Advanced Printing Saving and Recalling Driver Settings When you change printer driver settings for a specific print job, such as printing black and ...
Quick Start Guide
Page 40
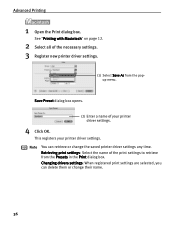
See "Printing with Macintosh" on page 12. 2 Select all of the necessary settings. 3 Register new printer driver settings. (1) Select Save As from the Presets in the Print dialog box. Save Preset dialog box opens. (2) Enter a name of ... menu. Retrieving print settings: Select the name of your printer driver settings. This registers your printer driver settings. 4 Click OK. Note You can delete them or change the saved printer driver settings any time. Advanced Printing 1 Open the Print dialog box. Changing drivers settings: When registered print settings are selected, you can...
See "Printing with Macintosh" on page 12. 2 Select all of the necessary settings. 3 Register new printer driver settings. (1) Select Save As from the Presets in the Print dialog box. Save Preset dialog box opens. (2) Enter a name of ... menu. Retrieving print settings: Select the name of your printer driver settings. This registers your printer driver settings. 4 Click OK. Note You can delete them or change the saved printer driver settings any time. Advanced Printing 1 Open the Print dialog box. Changing drivers settings: When registered print settings are selected, you can...
Quick Start Guide
Page 47
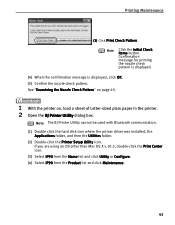
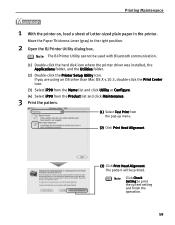
...Confirm the nozzle check pattern. Note The BJ Printer Utility cannot be used with Bluetooth communication. (1) Double-click the hard disk icon where the printer driver was installed, the Applications folder, and then the Utilities folder. (2) Double-click the Printer Setup Utility icon. See "Examining the Nozzle... Check Pattern" on page 45. 1 With the printer on, load a sheet of Letter-sized ...
...Confirm the nozzle check pattern. Note The BJ Printer Utility cannot be used with Bluetooth communication. (1) Double-click the hard disk icon where the printer driver was installed, the Applications folder, and then the Utilities folder. (2) Double-click the Printer Setup Utility icon. See "Examining the Nozzle... Check Pattern" on page 45. 1 With the printer on, load a sheet of Letter-sized ...
Quick Start Guide
Page 53
... three times, execute Print Head deep cleaning. Note The BJ Printer Utility cannot be printed. A nozzle check pattern will be used with Bluetooth communication. (1) Double-click the hard disk icon where the printer driver was installed, the Applications folder, and the Utilities folder. (2)... Double-click the Printer Setup Utility icon. When the confirmation message is turned on page 52. 1 Ensure that the printer is displayed, click OK. Do not perform...
... three times, execute Print Head deep cleaning. Note The BJ Printer Utility cannot be printed. A nozzle check pattern will be used with Bluetooth communication. (1) Double-click the hard disk icon where the printer driver was installed, the Applications folder, and the Utilities folder. (2)... Double-click the Printer Setup Utility icon. When the confirmation message is turned on page 52. 1 Ensure that the printer is displayed, click OK. Do not perform...
Quick Start Guide
Page 58
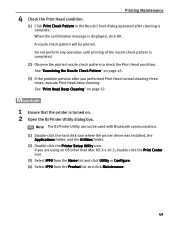
...used with Bluetooth communication. (1) Double-click the hard disk icon where the printer driver was installed, the Applications folder, and then the Utilities folder. (2) Double-click the Printer Setup Utility icon. Note The BJ Printer Utility cannot be damaged. See "Printing the Nozzle Check Pattern" on .... (4) If the problem persists, the Print Head may have run out of ink. Contact the Canon Customer Care Center. 1 Ensure that the printer is turned on. 2 Open the BJ Printer Utility dialog box. Printing Maintenance 4 Check the Print Head condition. (1) Print a nozzle check pattern...
...used with Bluetooth communication. (1) Double-click the hard disk icon where the printer driver was installed, the Applications folder, and then the Utilities folder. (2) Double-click the Printer Setup Utility icon. Note The BJ Printer Utility cannot be damaged. See "Printing the Nozzle Check Pattern" on .... (4) If the problem persists, the Print Head may have run out of ink. Contact the Canon Customer Care Center. 1 Ensure that the printer is turned on. 2 Open the BJ Printer Utility dialog box. Printing Maintenance 4 Check the Print Head condition. (1) Print a nozzle check pattern...
Quick Start Guide
Page 63
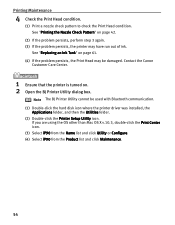
Note Click Check Setting to the right position. 2 Open the BJ Printer Utility dialog box. Printing Maintenance 1 With the printer on, load a sheet of Letter-sized plain paper in the printer. If you are using an OS other than Mac OS X v.10.3, double-click the Print Center icon. ... The pattern will be used with Bluetooth communication. (1) Double-click the hard disk icon where the printer driver was installed, the Applications folder, and the Utilities folder. (2) Double-click the Printer Setup Utility icon. Move the Paper Thickness Lever (gray) to print the current setting and finish ...
Note Click Check Setting to the right position. 2 Open the BJ Printer Utility dialog box. Printing Maintenance 1 With the printer on, load a sheet of Letter-sized plain paper in the printer. If you are using an OS other than Mac OS X v.10.3, double-click the Print Center icon. ... The pattern will be used with Bluetooth communication. (1) Double-click the hard disk icon where the printer driver was installed, the Applications folder, and the Utilities folder. (2) Double-click the Printer Setup Utility icon. Move the Paper Thickness Lever (gray) to print the current setting and finish ...
Quick Start Guide
Page 68
... counter in Windows XP or Windows 2000, the printer will not send the message asking for confirmation of the next print job. When both Black and Color. When an ink tank has been replaced, follow the procedure below to open the driver's Properties dialog box and manually reset the ink... tank counter in the Printer Properties dialog box" on page 65 2 Select the replaced ink ...
... counter in Windows XP or Windows 2000, the printer will not send the message asking for confirmation of the next print job. When both Black and Color. When an ink tank has been replaced, follow the procedure below to open the driver's Properties dialog box and manually reset the ink... tank counter in the Printer Properties dialog box" on page 65 2 Select the replaced ink ...
Quick Start Guide
Page 69
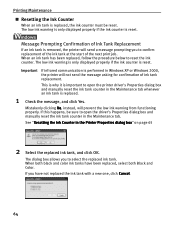
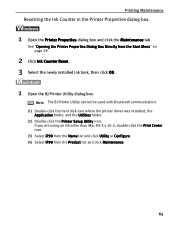
... with Bluetooth communication. (1) Double-click the hard disk icon where the printer driver was installed, the Application folder, and the Utilities folder. (2) Double-click the Printer Setup Utility icon. See "Opening the Printer Properties Dialog Box Directly from the Product list and click Maintenance. 65... page 29 2 Click Ink Counter Reset. 3 Select the newly installed ink tank, then click OK. 1 Open the BJ Printer Utility dialog box. Printing Maintenance Resetting the Ink Counter in the Printer Properties dialog box 1 Open the Printer Properties dialog box and click the Maintenance tab.
... with Bluetooth communication. (1) Double-click the hard disk icon where the printer driver was installed, the Application folder, and the Utilities folder. (2) Double-click the Printer Setup Utility icon. See "Opening the Printer Properties Dialog Box Directly from the Product list and click Maintenance. 65... page 29 2 Click Ink Counter Reset. 3 Select the newly installed ink tank, then click OK. 1 Open the BJ Printer Utility dialog box. Printing Maintenance Resetting the Ink Counter in the Printer Properties dialog box 1 Open the Printer Properties dialog box and click the Maintenance tab.


