iP90 Easy Setup Instructions
Page 1
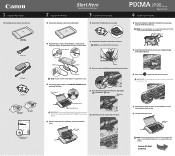
... the mark with the mark. PIXMA iP90 Photo Printer Power Cord AC Adapter Print Head BCI-15 Black Ink Tanks BCI-16 Color Ink Tanks Documentation and Software Kit 2 Prepare the Printer Start Here Easy Setup Instructions 3 Install the Print Head 1 Remove the shipping materials from the printer. 1 Remove the Print Head from the box. 1 Unpack the Printer 1 Carefully remove all items from...
... the mark with the mark. PIXMA iP90 Photo Printer Power Cord AC Adapter Print Head BCI-15 Black Ink Tanks BCI-16 Color Ink Tanks Documentation and Software Kit 2 Prepare the Printer Start Here Easy Setup Instructions 3 Install the Print Head 1 Remove the shipping materials from the printer. 1 Remove the Print Head from the box. 1 Unpack the Printer 1 Carefully remove all items from...

iP90 Easy Setup Instructions
Page 2
... License Agreement, then click Yes to "Aligning the Print Head" instructions in order to choose the options you to align the Print Head. Refer to continue. Specifications subject to install application software, electronic manual, utility and printer drivers. IMPORTANT: If your CD-ROM drive. 4... -screen instructions to "Troubleshooting" instructions in "Printer List". NOTE: Select Easy Install in order to install the remaining software. 10 Follow the on -line Help. Part no. Canon and BCI are registered trademarks and PIXMA is your computer cannnot detect a computer port,...
... License Agreement, then click Yes to "Aligning the Print Head" instructions in order to choose the options you to align the Print Head. Refer to continue. Specifications subject to install application software, electronic manual, utility and printer drivers. IMPORTANT: If your CD-ROM drive. 4... -screen instructions to "Troubleshooting" instructions in "Printer List". NOTE: Select Easy Install in order to install the remaining software. 10 Follow the on -line Help. Part no. Canon and BCI are registered trademarks and PIXMA is your computer cannnot detect a computer port,...

iP90 Quick Start Guide
Page 5
... Printing 14 Printing Data through Infrared Communication 15 Advanced Printing Printing Photographs Directly from a PictBridge Compliant Device 23 Accessing Printer Driver 29 Adjusting Print Quality for Photographs 30 Using the Bundle Software 37 Printing Borderless Photographs 38 Printing Maintenance When Printing Becomes Faint or Colors are Incorrect 41 Printing the Nozzle Check Pattern 42 Print Head Cleaning 47 Print Head Deep Cleaning 52 Aligning the Print Head...
... Printing 14 Printing Data through Infrared Communication 15 Advanced Printing Printing Photographs Directly from a PictBridge Compliant Device 23 Accessing Printer Driver 29 Adjusting Print Quality for Photographs 30 Using the Bundle Software 37 Printing Borderless Photographs 38 Printing Maintenance When Printing Becomes Faint or Colors are Incorrect 41 Printing the Nozzle Check Pattern 42 Print Head Cleaning 47 Print Head Deep Cleaning 52 Aligning the Print Head...

iP90 Quick Start Guide
Page 7
Basic Printing Important About the Power Plug When removing the power plug after turning off the printer, be sure to check that the POWER lamp is removed from the wall outlet with the POWER lamp lit or blinking, the printer cannot protect its print heads and may be unable to print. 3 If the power plug is not lit. Turning off the Printer 1 To turn off . When the POWER lamp stops blinking, the printer is turned off the printer, press the POWER button.
Basic Printing Important About the Power Plug When removing the power plug after turning off the printer, be sure to check that the POWER lamp is removed from the wall outlet with the POWER lamp lit or blinking, the printer cannot protect its print heads and may be unable to print. 3 If the power plug is not lit. Turning off the Printer 1 To turn off . When the POWER lamp stops blinking, the printer is turned off the printer, press the POWER button.

iP90 Quick Start Guide
Page 33
...user's manual for maintenance operations such as Print Head cleaning or to specify printer settings common to all application programs. When the Printer Properties dialog box is selected. The Printer Properties dialog box opens. „ Opening the Printer Properties Dialog Box Directly from the Start ... For non-Windows XP users, click Start, select Settings, and then Printers. 2 Select the Canon iP90 icon. 3 Open the File menu and select Printing Preferences (or Properties). Note • This manual refers to print a document. The operations may vary depending on your operating system. &#...
...user's manual for maintenance operations such as Print Head cleaning or to specify printer settings common to all application programs. When the Printer Properties dialog box is selected. The Printer Properties dialog box opens. „ Opening the Printer Properties Dialog Box Directly from the Start ... For non-Windows XP users, click Start, select Settings, and then Printers. 2 Select the Canon iP90 icon. 3 Open the File menu and select Printing Preferences (or Properties). Note • This manual refers to print a document. The operations may vary depending on your operating system. &#...
iP90 Quick Start Guide
Page 45
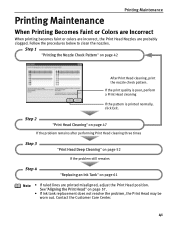
... Print Head may be worn out. See"Aligning the Print Head" on page 42 After Print Head cleaning, print the nozzle check pattern. If the print quality is poor, perform a Print Head cleaning If the pattern is printed normally, click Exit. Printing Maintenance Printing Maintenance When Printing Becomes Faint or Colors are Incorrect When printing becomes faint or colors are incorrect, the Print Head Nozzles are printed misaligned, adjust the Print Head...
... Print Head may be worn out. See"Aligning the Print Head" on page 42 After Print Head cleaning, print the nozzle check pattern. If the print quality is poor, perform a Print Head cleaning If the pattern is printed normally, click Exit. Printing Maintenance Printing Maintenance When Printing Becomes Faint or Colors are Incorrect When printing becomes faint or colors are incorrect, the Print Head Nozzles are printed misaligned, adjust the Print Head...

iP90 Quick Start Guide
Page 46
...printed results are blurred or the color is turned on, and then load a sheet of Letter paper. (2) Hold down the RESUME/CANCEL button until the POWER lamp flashes twice, and then release it immediately. „ Printing the Nozzle Check Pattern 1 With the printer on page 29. 3 Print...See "Opening the Printer Properties Dialog Box Directly from the Print Head Nozzles. Note The nozzle check pattern can also be printed by pressing the RESUME/CANCEL button on the printer. (1) Ensure that the printer is incorrect. Printing Maintenance Printing the Nozzle Check Pattern Print the nozzle check ...
...printed results are blurred or the color is turned on, and then load a sheet of Letter paper. (2) Hold down the RESUME/CANCEL button until the POWER lamp flashes twice, and then release it immediately. „ Printing the Nozzle Check Pattern 1 With the printer on page 29. 3 Print...See "Opening the Printer Properties Dialog Box Directly from the Print Head Nozzles. Note The nozzle check pattern can also be printed by pressing the RESUME/CANCEL button on the printer. (1) Ensure that the printer is incorrect. Printing Maintenance Printing the Nozzle Check Pattern Print the nozzle check ...
iP90 Quick Start Guide
Page 49
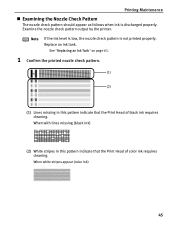
... nozzle check pattern output by the printer. See "Replacing an Ink Tank" on page 61. 1 Confirm the printed nozzle check pattern. (1) (2) (1) Lines missing in this pattern indicate that the Print Head of black ink requires cleaning. When with lines missing (black ink) (2) White stripes in this pattern indicate that the Print Head of color ink requires cleaning.
... nozzle check pattern output by the printer. See "Replacing an Ink Tank" on page 61. 1 Confirm the printed nozzle check pattern. (1) (2) (1) Lines missing in this pattern indicate that the Print Head of black ink requires cleaning. When with lines missing (black ink) (2) White stripes in this pattern indicate that the Print Head of color ink requires cleaning.

iP90 Quick Start Guide
Page 50
Printing Maintenance 2 When cleaning is necessary, click the Cleaning button on the Pattern Check dialog. * * *Click the Cleaning button on page 47. If there are neither missing lines nor white stripes in the nozzle check pattern, click Exit (Windows) or Quit (Macintosh) to Print Head cleaning. See "Print Head Cleaning" on the Pattern Check screen to proceed to finish the nozzle check. 46
Printing Maintenance 2 When cleaning is necessary, click the Cleaning button on the Pattern Check dialog. * * *Click the Cleaning button on page 47. If there are neither missing lines nor white stripes in the nozzle check pattern, click Exit (Windows) or Quit (Macintosh) to Print Head cleaning. See "Print Head Cleaning" on the Pattern Check screen to proceed to finish the nozzle check. 46
iP90 Quick Start Guide
Page 51
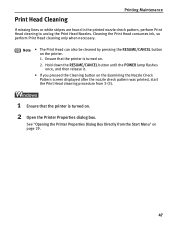
... the Print Head consumes ink, so perform Print Head cleaning only when necessary. Note • The Print Head can also be cleaned by pressing the RESUME/CANCEL button on . 2. Ensure that the printer is turned on the printer. 1. Print Head Cleaning Printing Maintenance If missing lines or white stripes are found in the printed nozzle check pattern, perform Print Head cleaning to unclog the Print Head...
... the Print Head consumes ink, so perform Print Head cleaning only when necessary. Note • The Print Head can also be cleaned by pressing the RESUME/CANCEL button on . 2. Ensure that the printer is turned on the printer. 1. Print Head Cleaning Printing Maintenance If missing lines or white stripes are found in the printed nozzle check pattern, perform Print Head cleaning to unclog the Print Head...

iP90 Quick Start Guide
Page 52
Printing Maintenance 3 Start Print Head Cleaning. (1) Click the Maintenance tab. (2) Click Cleaning. (3) Select the Print Head to be cleaned, and then click Execute. Confirmation message for Print Head Cleaning is displayed. (4) When the confirmation message is displayed, click OK. Print Head cleaning starts when the POWER lamp starts blinking. Important Do not perform any other operations until the Print Head cleaning finishes. Note Click the Initial Check Items button. This takes about 60 seconds. 48
Printing Maintenance 3 Start Print Head Cleaning. (1) Click the Maintenance tab. (2) Click Cleaning. (3) Select the Print Head to be cleaned, and then click Execute. Confirmation message for Print Head Cleaning is displayed. (4) When the confirmation message is displayed, click OK. Print Head cleaning starts when the POWER lamp starts blinking. Important Do not perform any other operations until the Print Head cleaning finishes. Note Click the Initial Check Items button. This takes about 60 seconds. 48

iP90 Quick Start Guide
Page 53
... Configure. (4) Select iP90 from the Product list and click Maintenance. 49 Printing Maintenance 4 Check the Print Head condition. (1) Click Print Check Pattern in the Nozzle Check dialog appeared after you are done. Note The BJ Printer Utility cannot be printed. When the confirmation message is completed. (2) Observe the printed nozzle check pattern to check the Print Head condition. Do not...
... Configure. (4) Select iP90 from the Product list and click Maintenance. 49 Printing Maintenance 4 Check the Print Head condition. (1) Click Print Check Pattern in the Nozzle Check dialog appeared after you are done. Note The BJ Printer Utility cannot be printed. When the confirmation message is completed. (2) Observe the printed nozzle check pattern to check the Print Head condition. Do not...

iP90 Quick Start Guide
Page 54
Print Head cleaning starts when the POWER lamp starts blinking. Important Do not perform any other operations until the Print Head cleaning finishes. Printing Maintenance 3 Start Print Head Cleaning. (1) Select Cleaning from the pop-up menu. (2) Click Cleaning. (3) Select the Print Head to be cleaned, and then click OK. This takes about 60 seconds. 50 Note Click the Initial Check Items button. Confirmation message for Print Head Cleaning is displayed.
Print Head cleaning starts when the POWER lamp starts blinking. Important Do not perform any other operations until the Print Head cleaning finishes. Printing Maintenance 3 Start Print Head Cleaning. (1) Select Cleaning from the pop-up menu. (2) Click Cleaning. (3) Select the Print Head to be cleaned, and then click OK. This takes about 60 seconds. 50 Note Click the Initial Check Items button. Confirmation message for Print Head Cleaning is displayed.

iP90 Quick Start Guide
Page 55
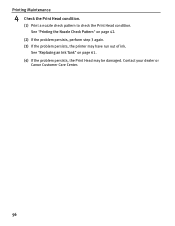
See "Examining the Nozzle Check Pattern" on page 52. 51 Printing Maintenance 4 Check the Print Head condition. (1) Click Print Check Pattern in the dialog appeared after you performed Print Head normal cleaning three times, execute Print Head deep cleaning. A nozzle check pattern will be printed. See "Print Head Deep Cleaning" on page 45. (3) If the problem persists after cleaning are done. Do not perform any operation until printing of the nozzle check pattern is completed. (2) Observe the printed nozzle check pattern to check the Print Head condition.
See "Examining the Nozzle Check Pattern" on page 52. 51 Printing Maintenance 4 Check the Print Head condition. (1) Click Print Check Pattern in the dialog appeared after you performed Print Head normal cleaning three times, execute Print Head deep cleaning. A nozzle check pattern will be printed. See "Print Head Deep Cleaning" on page 45. (3) If the problem persists after cleaning are done. Do not perform any operation until printing of the nozzle check pattern is completed. (2) Observe the printed nozzle check pattern to check the Print Head condition.

iP90 Quick Start Guide
Page 56
Print Head deep cleaning consumes more powerful process. See "Opening the Printer Properties Dialog Box Directly from the Start Menu" on . 2 Open the Printer Properties dialog box. Printing Maintenance Print Head Deep Cleaning If print quality does not improve by standard Print Head cleaning, try Print Head deep cleaning, which is a more ink than standard Print Head cleaning, so perform this procedure only when necessary. 1 Ensure that the printer is turned on page 29. 52
Print Head deep cleaning consumes more powerful process. See "Opening the Printer Properties Dialog Box Directly from the Start Menu" on . 2 Open the Printer Properties dialog box. Printing Maintenance Print Head Deep Cleaning If print quality does not improve by standard Print Head cleaning, try Print Head deep cleaning, which is a more ink than standard Print Head cleaning, so perform this procedure only when necessary. 1 Ensure that the printer is turned on page 29. 52

iP90 Quick Start Guide
Page 57
Printing Maintenance (1) Click the Maintenance tab. (2) Click Deep Cleaning. (3) Select the Print Head to three minutes). 53 Confirmation message for Print Head Deep Cleaning is displayed. (4) When the confirmation message is completed (about two to be cleaned, and then click Execute. Note Click the Initial Check Items button. Print Head deep cleaning starts when the POWER lamp starts blinking. Important Do not perform any other operations until the Print Head deep cleaning is displayed, click OK. 3 Start Print Head Deep Cleaning.
Printing Maintenance (1) Click the Maintenance tab. (2) Click Deep Cleaning. (3) Select the Print Head to three minutes). 53 Confirmation message for Print Head Deep Cleaning is displayed. (4) When the confirmation message is completed (about two to be cleaned, and then click Execute. Note Click the Initial Check Items button. Print Head deep cleaning starts when the POWER lamp starts blinking. Important Do not perform any other operations until the Print Head deep cleaning is displayed, click OK. 3 Start Print Head Deep Cleaning.

iP90 Quick Start Guide
Page 58
... Utility or Configure. (4) Select iP90 from the Product list and click Maintenance. 54 Contact your dealer or Canon Customer Care Center. 1 Ensure that the printer is turned on page 61. (4) If the problem persists, the Print Head may have run out of ink. Note The BJ Printer Utility cannot be damaged. See "Printing the Nozzle Check Pattern...
... Utility or Configure. (4) Select iP90 from the Product list and click Maintenance. 54 Contact your dealer or Canon Customer Care Center. 1 Ensure that the printer is turned on page 61. (4) If the problem persists, the Print Head may have run out of ink. Note The BJ Printer Utility cannot be damaged. See "Printing the Nozzle Check Pattern...

iP90 Quick Start Guide
Page 59
Confirmation message for Print Head Deep Cleaning is displayed. Print Head deep cleaning starts when the POWER lamp starts blinking. This takes about two to be cleaned, and then click OK. Important Do not perform any other operations until the Print Head deep cleaning finishes. 3 Start Print Head Deep Cleaning. Note Click the Initial Check Items button. Printing Maintenance (1) Select Cleaning from the pop-up menu. (2) Click Deep Cleaning. (3) Select the Print Head to three minutes. 55
Confirmation message for Print Head Deep Cleaning is displayed. Print Head deep cleaning starts when the POWER lamp starts blinking. This takes about two to be cleaned, and then click OK. Important Do not perform any other operations until the Print Head deep cleaning finishes. 3 Start Print Head Deep Cleaning. Note Click the Initial Check Items button. Printing Maintenance (1) Select Cleaning from the pop-up menu. (2) Click Deep Cleaning. (3) Select the Print Head to three minutes. 55
iP90 Quick Start Guide
Page 60
See "Printing the Nozzle Check Pattern" on page 61. (4) If the problem persists, the Print Head may have run out of ink. Contact your dealer or Canon Customer Care Center. 56 See "Replacing an Ink Tank" on page 42. (2) If the problem persists, perform step 3 again. (3) If the problem persists, the printer may be damaged. Printing Maintenance 4 Check the Print Head condition. (1) Print a nozzle check pattern to check the Print Head condition.
See "Printing the Nozzle Check Pattern" on page 61. (4) If the problem persists, the Print Head may have run out of ink. Contact your dealer or Canon Customer Care Center. 56 See "Replacing an Ink Tank" on page 42. (2) If the problem persists, perform step 3 again. (3) If the problem persists, the printer may be damaged. Printing Maintenance 4 Check the Print Head condition. (1) Print a nozzle check pattern to check the Print Head condition.
iP90 Quick Start Guide
Page 61
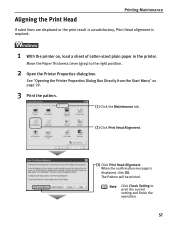
Aligning the Print Head Printing Maintenance If ruled lines are displaced or the print result is unsatisfactory, Print Head alignment is displayed, click OK. See "Opening the Printer Properties Dialog Box Directly from the Start Menu" on , load a sheet of Letter-sized plain paper in the printer. Move the Paper Thickness Lever (gray) to print the current setting and finish...
Aligning the Print Head Printing Maintenance If ruled lines are displaced or the print result is unsatisfactory, Print Head alignment is displayed, click OK. See "Opening the Printer Properties Dialog Box Directly from the Start Menu" on , load a sheet of Letter-sized plain paper in the printer. Move the Paper Thickness Lever (gray) to print the current setting and finish...


