iP90 Easy Setup Instructions
Page 1
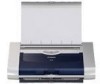
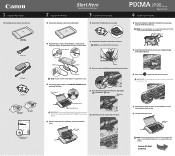
... Power Cord into the AC Adapter. mark 3 Press on the until it into place. PIXMA iP90 Photo Printer Power Cord AC Adapter Print Head BCI-15 Black Ink Tanks BCI-16 Color Ink Tanks Documentation and Software Kit 2 Prepare the Printer Start Here Easy Setup Instructions 3 Install the Print Head 1 Remove the shipping materials from...
... Power Cord into the AC Adapter. mark 3 Press on the until it into place. PIXMA iP90 Photo Printer Power Cord AC Adapter Print Head BCI-15 Black Ink Tanks BCI-16 Color Ink Tanks Documentation and Software Kit 2 Prepare the Printer Start Here Easy Setup Instructions 3 Install the Print Head 1 Remove the shipping materials from...

iP90 Easy Setup Instructions
Page 2
.... Installation of the USB cable to the computer, the other software. Canon and BCI are registered trademarks or trademarks of Canon Inc. IMPORTANT: If you may need to install application software, electronic manual, utility and printer drivers. The setup program should be 31.5 inch (80 cm) or... of each other products and brand names are registered trademarks and PIXMA is a trademark of their respective owners. QA7-3460-V01 © 2005 Canon Inc. NOTE: If print quality is not satisfactory after installing the printer, you may need to the Mac on -screen instructions to...
.... Installation of the USB cable to the computer, the other software. Canon and BCI are registered trademarks or trademarks of Canon Inc. IMPORTANT: If you may need to install application software, electronic manual, utility and printer drivers. The setup program should be 31.5 inch (80 cm) or... of each other products and brand names are registered trademarks and PIXMA is a trademark of their respective owners. QA7-3460-V01 © 2005 Canon Inc. NOTE: If print quality is not satisfactory after installing the printer, you may need to the Mac on -screen instructions to...
iP90 Quick Start Guide
Page 2
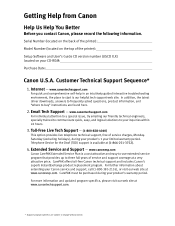
...to change without notice. Toll-Free Live Tech Support - (1-800-828-4040) This option provides live telephone technical support, free of the printer): Setup Software and User's Guide CD version number (USCD X.X) located on your inquiries within 24 hours. 3. Serial Number (located on the back... of the printer): Model Number (located on the top of service charges, MondaySaturday (excluding holidays), during your Canon service and support, call (1-800-385-2155), or visit our web site at (1-866-251-3752). ...
...to change without notice. Toll-Free Live Tech Support - (1-800-828-4040) This option provides live telephone technical support, free of the printer): Setup Software and User's Guide CD version number (USCD X.X) located on your inquiries within 24 hours. 3. Serial Number (located on the back... of the printer): Model Number (located on the top of service charges, MondaySaturday (excluding holidays), during your Canon service and support, call (1-800-385-2155), or visit our web site at (1-866-251-3752). ...

iP90 Quick Start Guide
Page 4
... licence. • All other countries. • Microsoft® and Windows® are not intended to your Canon PIXMA iP90 Photo Printer. All information regarding the accuracy thereof. Canon PIXMA iP90 Photo Printer Quick Start Guide Copyright This manual is copyrighted by Canon, Inc. and other product and brand names are owned by the Infrared Data Association. • The Bluetooth...
... licence. • All other countries. • Microsoft® and Windows® are not intended to your Canon PIXMA iP90 Photo Printer. All information regarding the accuracy thereof. Canon PIXMA iP90 Photo Printer Quick Start Guide Copyright This manual is copyrighted by Canon, Inc. and other product and brand names are owned by the Infrared Data Association. • The Bluetooth...

iP90 Quick Start Guide
Page 5
... for Photographs 30 Using the Bundle Software 37 Printing Borderless Photographs 38 Printing Maintenance When Printing Becomes Faint or Colors are Incorrect 41 Printing the Nozzle Check Pattern 42 Print Head Cleaning 47 Print Head Deep Cleaning 52 Aligning the...Digital Camera 82 Appendix Printing Photographs Directly from Canon Bubble Jet Direct Compatible Digital Cameras 84 User's Guide Table of Contents 86 Accessory Options 87 Traveling Abroad with the Printer 89 Specifications 91 Safety Precautions 94 Regulatory Information 96 CANON U.S.A., INC. LIMITED WARRANTY --- (USA Only ...
... for Photographs 30 Using the Bundle Software 37 Printing Borderless Photographs 38 Printing Maintenance When Printing Becomes Faint or Colors are Incorrect 41 Printing the Nozzle Check Pattern 42 Print Head Cleaning 47 Print Head Deep Cleaning 52 Aligning the...Digital Camera 82 Appendix Printing Photographs Directly from Canon Bubble Jet Direct Compatible Digital Cameras 84 User's Guide Table of Contents 86 Accessory Options 87 Traveling Abroad with the Printer 89 Specifications 91 Safety Precautions 94 Regulatory Information 96 CANON U.S.A., INC. LIMITED WARRANTY --- (USA Only ...
iP90 Quick Start Guide
Page 6
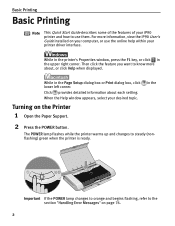
... to orange and begins flashing, refer to know more information, view the iP90 User's Guide installed on your computer, or use them. Then click the feature you want to the section "Handling Error Messages" on the Printer 1 Open the Paper Support. 2 Press the POWER button. in the ...Turning on page 76. 2 When the Help window appears, select your iP90 printer and how to steady (nonflashing) green when the printer is ready. While in the upper right corner. Basic Printing Basic Printing Note This Quick Start Guide describes some of ...
... to orange and begins flashing, refer to know more information, view the iP90 User's Guide installed on your computer, or use them. Then click the feature you want to the section "Handling Error Messages" on the Printer 1 Open the Paper Support. 2 Press the POWER button. in the ...Turning on page 76. 2 When the Help window appears, select your iP90 printer and how to steady (nonflashing) green when the printer is ready. While in the upper right corner. Basic Printing Basic Printing Note This Quick Start Guide describes some of ...

iP90 Quick Start Guide
Page 7
Basic Printing Important About the Power Plug When removing the power plug after turning off the printer, press the POWER button. Turning off the Printer 1 To turn off the printer, be unable to check that the POWER lamp is turned off. When the POWER lamp stops blinking, the printer is not lit. If the power plug is removed from the wall outlet with the POWER lamp lit or blinking, the printer cannot protect its print heads and may be sure to print. 3
Basic Printing Important About the Power Plug When removing the power plug after turning off the printer, press the POWER button. Turning off the Printer 1 To turn off the printer, be unable to check that the POWER lamp is turned off. When the POWER lamp stops blinking, the printer is not lit. If the power plug is removed from the wall outlet with the POWER lamp lit or blinking, the printer cannot protect its print heads and may be sure to print. 3

iP90 Quick Start Guide
Page 8
...direction until the paper becomes completely flat. 4 Using such paper will not only produce unsatisfactory results, but can also cause the printer to load speciality media into the printer. 1 Flatten the four corners of paper. Important When paper is curled, gently bend them in the User's Guide for ... • Envelopes with a double flap • Envelopes with pressure seals • Envelopes with an embossed or treated surface „ Preparing the Printer • For detailed information on the speciality media Canon provides for use the following types of the paper before loading it.
...direction until the paper becomes completely flat. 4 Using such paper will not only produce unsatisfactory results, but can also cause the printer to load speciality media into the printer. 1 Flatten the four corners of paper. Important When paper is curled, gently bend them in the User's Guide for ... • Envelopes with a double flap • Envelopes with pressure seals • Envelopes with an embossed or treated surface „ Preparing the Printer • For detailed information on the speciality media Canon provides for use the following types of the paper before loading it.

iP90 Quick Start Guide
Page 9
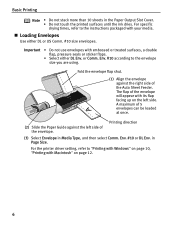
...secure the space for the media in the portrait position (short side facing down). Printing with dust and stain remaining on the printing result and printer. 3 Load the paper. „ Loading Plain Paper (1) Insert the paper into the Auto Sheet Feeder with printed sheets, they may be ... Align the paper stack against the left position for plain paper. When loading the 4"×6"paper, load sheets in use. Note • Place the printer on the area (desk, etc.) where the printed paper is ejected. Basic Printing (1) Open the Paper Support and Paper Output Slot Cover. (2) Move...
...secure the space for the media in the portrait position (short side facing down). Printing with dust and stain remaining on the printing result and printer. 3 Load the paper. „ Loading Plain Paper (1) Insert the paper into the Auto Sheet Feeder with printed sheets, they may be ... Align the paper stack against the left position for plain paper. When loading the 4"×6"paper, load sheets in use. Note • Place the printer on the area (desk, etc.) where the printed paper is ejected. Basic Printing (1) Open the Paper Support and Paper Output Slot Cover. (2) Move...
iP90 Quick Start Guide
Page 10
... envelope. in the Paper Output Slot Cover. • Do not touch the printed surfaces until the ink dries. Env. #10 or DL Env. For the printer driver setting, refer to the envelope size you are using. Important • Do not use envelopes with Macintosh" on the left side of the envelope...
... envelope. in the Paper Output Slot Cover. • Do not touch the printed surfaces until the ink dries. Env. #10 or DL Env. For the printer driver setting, refer to the envelope size you are using. Important • Do not use envelopes with Macintosh" on the left side of the envelope...
iP90 Quick Start Guide
Page 11
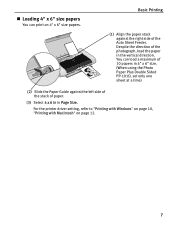
„ Loading 4" x 6" size papers You can load a maximum of 10 papers in the vertical direction. For the printer driver setting, refer to "Printing with Windows" on page 10, "Printing with Macintosh" on 4" x 6" size papers. Basic Printing (1) Align the paper stack against the left ...
„ Loading 4" x 6" size papers You can load a maximum of 10 papers in the vertical direction. For the printer driver setting, refer to "Printing with Windows" on page 10, "Printing with Macintosh" on 4" x 6" size papers. Basic Printing (1) Align the paper stack against the left ...
iP90 Quick Start Guide
Page 13
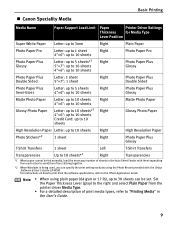
For instructions on how to print from the printer driver Media Type. • For a detailed description of sheets in the User's Guide. 9 Note • When using the Photo Record provided with them separating from ...) to the right and select Plain Paper from the software applications, refer to the Photo Application Guide. Basic Printing „ Canon Speciality Media Media Name Paper Support Load Limit Paper Printer Driver Settings Thickness for Media Type Lever Position Super White Paper Letter: up to 3mm Right Plain Paper Photo Paper Pro...
For instructions on how to print from the printer driver Media Type. • For a detailed description of sheets in the User's Guide. 9 Note • When using the Photo Record provided with them separating from ...) to the right and select Plain Paper from the software applications, refer to the Photo Application Guide. Basic Printing „ Canon Speciality Media Media Name Paper Support Load Limit Paper Printer Driver Settings Thickness for Media Type Lever Position Super White Paper Letter: up to 3mm Right Plain Paper Photo Paper Pro...
iP90 Quick Start Guide
Page 14
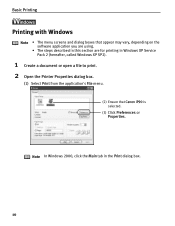
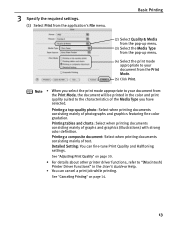
Note In Windows 2000, click the Main tab in Windows XP Service Pack 2 (hereafter, called Windows XP SP2). 1 Create a document or open a file to print. 2 Open the Printer Properties dialog box. (1) Select Print from the application's File menu. (2) Ensure that appear may vary, depending on the software application you are using. • The steps described in this section are for printing in the Print dialog box. 10 Basic Printing l Printing with Windows Note • The menu screens and dialog boxes that Canon iP90 is selected. (3) Click Preferences or Properties.
Note In Windows 2000, click the Main tab in Windows XP Service Pack 2 (hereafter, called Windows XP SP2). 1 Create a document or open a file to print. 2 Open the Printer Properties dialog box. (1) Select Print from the application's File menu. (2) Ensure that appear may vary, depending on the software application you are using. • The steps described in this section are for printing in the Print dialog box. 10 Basic Printing l Printing with Windows Note • The menu screens and dialog boxes that Canon iP90 is selected. (3) Click Preferences or Properties.

iP90 Quick Start Guide
Page 15
You can control the quality in the Set Print Quality dialog box. • For details about other printer driver functions, refer to "(Windows) Printer Driver Functions" in the printer. (2) Click OK. This displays a preview screen that allows you to be printed. • To adjust Print Quality settings, select Custom and click Set on the...
You can control the quality in the Set Print Quality dialog box. • For details about other printer driver functions, refer to "(Windows) Printer Driver Functions" in the printer. (2) Click OK. This displays a preview screen that allows you to be printed. • To adjust Print Quality settings, select Custom and click Set on the...

iP90 Quick Start Guide
Page 16
... and dialog boxes that appear may vary, depending on page 14. The Page Setup dialog box opens. (2) Select iP90 from Format for printing in progress by simply pressing the RESUME/ CANCEL button on the printer. See "Canceling Printing" on the software application you are using. • The steps described in this section...
... and dialog boxes that appear may vary, depending on page 14. The Page Setup dialog box opens. (2) Select iP90 from Format for printing in progress by simply pressing the RESUME/ CANCEL button on the printer. See "Canceling Printing" on the software application you are using. • The steps described in this section...
iP90 Quick Start Guide
Page 17
...consisting mainly of text. Printing a composite document: Select when printing documents consisting mainly of graphs and graphics (illustrations) with strong color definition. 3 Specify the required settings. (1) Select Print from the Print Mode. (5) Click Print. Detailed Setting: You can ... job while printing. See "Canceling Printing" on page 30. • For details about other printer driver functions, refer to "(Macintosh) Printer Driver Functions" in the color and print quality suited to your document from the application's File menu. Basic Printing (2) Select...
...consisting mainly of text. Printing a composite document: Select when printing documents consisting mainly of graphs and graphics (illustrations) with strong color definition. 3 Specify the required settings. (1) Select Print from the Print Mode. (5) Click Print. Detailed Setting: You can ... job while printing. See "Canceling Printing" on page 30. • For details about other printer driver functions, refer to "(Macintosh) Printer Driver Functions" in the color and print quality suited to your document from the application's File menu. Basic Printing (2) Select...

iP90 Quick Start Guide
Page 18
... icon. Printing is canceled and the paper is ejected. The Printer List opens. 3 Double-click the printer name displayed in the list, click Stop Printing. 14 To display the BJ Status Monitor, click Canon iP90 on the printer. 1 Press the RESUME/CANCEL button while printing. Basic Printing Canceling... the BJ Status Monitor to stop a job in your application program. The BJ Status Monitor opens automatically when a printer error occurs. 1 Select Print from the Printer pop-up menu. The Print dialog box opens. 2 Select Edit Printer List from the File menu in progress, click Pause.
... icon. Printing is canceled and the paper is ejected. The Printer List opens. 3 Double-click the printer name displayed in the list, click Stop Printing. 14 To display the BJ Status Monitor, click Canon iP90 on the printer. 1 Press the RESUME/CANCEL button while printing. Basic Printing Canceling... the BJ Status Monitor to stop a job in your application program. The BJ Status Monitor opens automatically when a printer error occurs. 1 Select Print from the Printer pop-up menu. The Print dialog box opens. 2 Select Edit Printer List from the File menu in progress, click Pause.
iP90 Quick Start Guide
Page 19
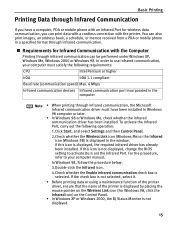
...phone in the window. In order to your computer must have a computer, PDA or mobile phone with an Infrared Port for Infrared Communication with the printer. If this icon is not displayed, change the BIOS setting to activate (turn on the Control Panel. • In Windows XP or Windows 2000,... installed. If the check box is not selected, select it. • Before printing data or using a maintenance function of the printer driver, ensure that the name of the printer is displayed by placing the mouse pointer on the Wireless Link icon (For Windows 98, click the Infrared icon) on ) the...
...phone in the window. In order to your computer must have a computer, PDA or mobile phone with an Infrared Port for Infrared Communication with the printer. If this icon is not displayed, change the BIOS setting to activate (turn on the Control Panel. • In Windows XP or Windows 2000,... installed. If the check box is not selected, select it. • Before printing data or using a maintenance function of the printer driver, ensure that the name of the printer is displayed by placing the mouse pointer on the Wireless Link icon (For Windows 98, click the Infrared icon) on ) the...
iP90 Quick Start Guide
Page 20
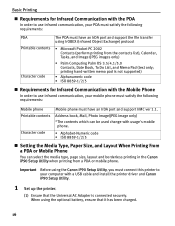
... The PDA must have an IrDA port and support IrMC ver 1.1. When using the Canon iP90 Setup Utility, you must connect this printer to your computer with a USB cable and install the printer driver and Canon iP90 Setup Utility. 1 Set up the printer. (1) Ensure that it has been charged. 16 Printable contents Address book, Mail, Photo image...
... The PDA must have an IrDA port and support IrMC ver 1.1. When using the Canon iP90 Setup Utility, you must connect this printer to your computer with a USB cable and install the printer driver and Canon iP90 Setup Utility. 1 Set up the printer. (1) Ensure that it has been charged. 16 Printable contents Address book, Mail, Photo image...
iP90 Quick Start Guide
Page 21
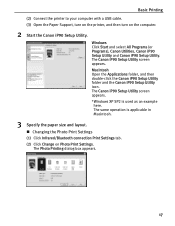
... screen appears. Windows Click Start and select All Programs (or Programs), Canon Utilities, Canon iP90 Setup Utility and Canon iP90 Setup Utility. Macintosh Open the Applications folder, and then double-click the Canon iP90 Setup Utility folder and the Canon iP90 Setup Utility icon. Basic Printing (2) Connect the printer to your computer with a USB cable. (3) Open the Paper Support, turn...
... screen appears. Windows Click Start and select All Programs (or Programs), Canon Utilities, Canon iP90 Setup Utility and Canon iP90 Setup Utility. Macintosh Open the Applications folder, and then double-click the Canon iP90 Setup Utility folder and the Canon iP90 Setup Utility icon. Basic Printing (2) Connect the printer to your computer with a USB cable. (3) Open the Paper Support, turn...


