
iP5000 Quick Start Guide
Page 49
... staining clothing or the surrounding area. Push the tab and remove the ink tank. The Print Head Holder moves to open. Printing Maintenance „ Replacing Ink Tanks When an ink tank runs out of ink, replace it using the following steps. 1 Ensure that the printer is on, and then push the upper center ( Front Cover...
... staining clothing or the surrounding area. Push the tab and remove the ink tank. The Print Head Holder moves to open. Printing Maintenance „ Replacing Ink Tanks When an ink tank runs out of ink, replace it using the following steps. 1 Ensure that the printer is on, and then push the upper center ( Front Cover...
iP5000 Quick Start Guide
Page 51
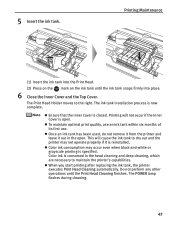
... on the ink tank until the Print Head Cleaning finishes. Printing will cause the ink tank to dry out and the printer may occur even when black-and-white or grayscale printing is closed. z Once an ink tank has been used, do not remove it from the printer and leave it is consumed in ...specified. Do not perform any other operations until the ink tank snaps firmly into place. 6 Close the Inner Cover and the Top Cover. Color ink is reinstalled. z Color ink consumption may not operate properly if it out in the head cleaning and deep cleaning, which are necessary to the right.
... on the ink tank until the Print Head Cleaning finishes. Printing will cause the ink tank to dry out and the printer may occur even when black-and-white or grayscale printing is closed. z Once an ink tank has been used, do not remove it from the printer and leave it is consumed in ...specified. Do not perform any other operations until the ink tank snaps firmly into place. 6 Close the Inner Cover and the Top Cover. Color ink is reinstalled. z Color ink consumption may not operate properly if it out in the head cleaning and deep cleaning, which are necessary to the right.
iP5000 Quick Start Guide
Page 71
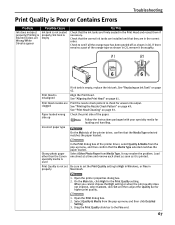
... are installed and that they are in (2), remove it is printed. See "Aligning the Print Head" on page 53. See "Print Head Cleaning" on page 61. Follow the instructions packaged with your specialty media for higher print quality. 1. It may resolve the problem. Print Quality is not set Be sure to set ...other than the Canon specialty media is used In the Print dialog box of the printer driver, select Quality & Media from the pop-up Check the print side of the paper. Incorrect paper type On the Main tab of the orange tape as shown in the Print Head and reseat them...
... are installed and that they are in (2), remove it is printed. See "Aligning the Print Head" on page 53. See "Print Head Cleaning" on page 61. Follow the instructions packaged with your specialty media for higher print quality. 1. It may resolve the problem. Print Quality is not set Be sure to set ...other than the Canon specialty media is used In the Print dialog box of the printer driver, select Quality & Media from the pop-up Check the print side of the paper. Incorrect paper type On the Main tab of the orange tape as shown in the Print Head and reseat them...
iP5000 Quick Start Guide
Page 79
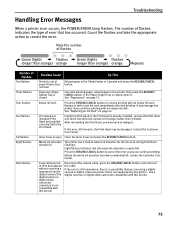
... camera or digital video camcorder connected is already installed, remove the Print Head and check the electrical contacts for the ink used during Print Head Cleaning. See "Paper Jams" on page 42. Print Head not installed/Print Head not installed correctly/Defective Print Head Install the Print Head. Waste ink absorber almost full The printer has a built-in the Sheet Feeder or Cassette and...
... camera or digital video camcorder connected is already installed, remove the Print Head and check the electrical contacts for the ink used during Print Head Cleaning. See "Paper Jams" on page 42. Print Head not installed/Print Head not installed correctly/Defective Print Head Install the Print Head. Waste ink absorber almost full The printer has a built-in the Sheet Feeder or Cassette and...
iP5000 Quick Start Guide
Page 84
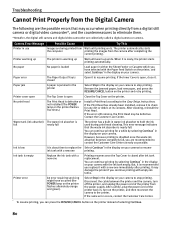
If the Print Head has already been installed, remove it to check for a while by selecting Continue* in the display on the printer and retry printing. You can press the RESUME/CANCEL button on your camera to stop printing. It may damage the printer if you continue printing with a new one immediately after printing. Troubleshooting Cannot Print Properly from the Digital...
If the Print Head has already been installed, remove it to check for a while by selecting Continue* in the display on the printer and retry printing. You can press the RESUME/CANCEL button on your camera to stop printing. It may damage the printer if you continue printing with a new one immediately after printing. Troubleshooting Cannot Print Properly from the Digital...

iP5000 Quick Start Guide
Page 93
... on the cord. Ensure that is kept clear at all times so you can easily unplug the power cord if necessary. Never remove the plug by pulling on the printer. Do not place any of 10% to excessive vibration. If any ink, consult a doctor immediately. AC 110-120 V, 50/60 Hz ... very hot and could cause burns. 89 The metal parts may leak out and stain clothing or the surrounding area. Do not place the printer on a Print Head after printing. Do not use a power supply source other than the one rated for service. If a child ingests any foreign object (metal or liquid) fall ...
... on the cord. Ensure that is kept clear at all times so you can easily unplug the power cord if necessary. Never remove the plug by pulling on the printer. Do not place any of 10% to excessive vibration. If any ink, consult a doctor immediately. AC 110-120 V, 50/60 Hz ... very hot and could cause burns. 89 The metal parts may leak out and stain clothing or the surrounding area. Do not place the printer on a Print Head after printing. Do not use a power supply source other than the one rated for service. If a child ingests any foreign object (metal or liquid) fall ...
iP5000 Easy Setup Instructions
Page 1
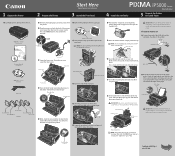
... Paper Output Tray NOTE: The printer will not feed properly. PIXMA iP5000 Series Photo Printer Photo Printer Series Quick Start Guide 1 Remove all items from the box. Raise the top cover. Protective Cap IMPORTANT: Be sure the printer is off and discard the orange protective cap. Auto Sheet Feeder Paper Guide IMPORTANT: Print Head Alignment (Step 6) requires that 8.5" x 11...
... Paper Output Tray NOTE: The printer will not feed properly. PIXMA iP5000 Series Photo Printer Photo Printer Series Quick Start Guide 1 Remove all items from the box. Raise the top cover. Protective Cap IMPORTANT: Be sure the printer is off and discard the orange protective cap. Auto Sheet Feeder Paper Guide IMPORTANT: Print Head Alignment (Step 6) requires that 8.5" x 11...
iP5000 Easy Setup Instructions
Page 2
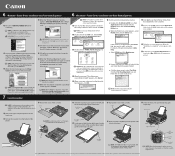
...Administrators group before continuing. 2 Double-click the CD-ROM icon, then the Mac OS X folder, then the Printer Driver folder. 3 Double-click the PIXMA iP5000 290.pkg icon, then follow the on-screen instructions. 4 When the message "The software was successfully installed" ...Canon is your product. 7 When the "Print Head Alignment" screen appears, ensure that letter size paper is completed" screen appears, click OK. 10 Double-click on the Product Registration icon, found in Thailand. The software will extend NOTE: When feeding paper from the bottom of the printer. 3 Remove...
...Administrators group before continuing. 2 Double-click the CD-ROM icon, then the Mac OS X folder, then the Printer Driver folder. 3 Double-click the PIXMA iP5000 290.pkg icon, then follow the on-screen instructions. 4 When the message "The software was successfully installed" ...Canon is your product. 7 When the "Print Head Alignment" screen appears, ensure that letter size paper is completed" screen appears, click OK. 10 Double-click on the Product Registration icon, found in Thailand. The software will extend NOTE: When feeding paper from the bottom of the printer. 3 Remove...


