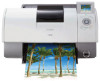
i900D Quick Start Guide
Page 24
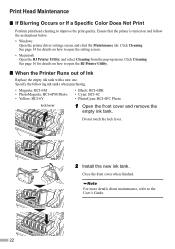
...below. • Windows Open the printer driver settings screen and click the Maintenance tab. Do not touch the lock lever. 2 Install the new ink tank. Specify the following ink tanks when purchasing. • Magenta: BCI-6M • PhotoMagenta: BCI-6PM Photo • Yellow: BCI-6Y • Black: BCI-6BK ...a Specific Color Does Not Print Perform print head cleaning to open the BJ Printer Utility. „ When the Printer Runs out of Ink Replace the empty ink tank with a new one. Close the front cover when finished. Ensure that the printer is turned on how to improve the print ...
...below. • Windows Open the printer driver settings screen and click the Maintenance tab. Do not touch the lock lever. 2 Install the new ink tank. Specify the following ink tanks when purchasing. • Magenta: BCI-6M • PhotoMagenta: BCI-6PM Photo • Yellow: BCI-6Y • Black: BCI-6BK ...a Specific Color Does Not Print Perform print head cleaning to open the BJ Printer Utility. „ When the Printer Runs out of Ink Replace the empty ink tank with a new one. Close the front cover when finished. Ensure that the printer is turned on how to improve the print ...

i900D Quick Start Guide
Page 29
The following ink tanks are compatible with this guide. QA7-2790-V01 XX2003XX ©CANON INC.2003 PRINTED IN THAILAND For details on ink tank replacement, refer to "Print Head Maintenance" in this printer.
The following ink tanks are compatible with this guide. QA7-2790-V01 XX2003XX ©CANON INC.2003 PRINTED IN THAILAND For details on ink tank replacement, refer to "Print Head Maintenance" in this printer.
i900D Direct Printing Guide
Page 2
... Drive of the Computer 31 Changing the Language Displayed 32 Adjusting Contrast of the LCD 33 Reducing the Sound of Printer Operation 34 Replacing an Ink Tank Knowing When to the Settings Made on the Camera - Auto head align 42 Troubleshooting A Message is Displayed While Using the...each image 15 Printing all images 18 Printing an Image List - Print Index 19 Specifying the layout 20 Printing According to Replace an Ink Tank 35 Replacing Ink Tanks 36 Printing Maintenance When Printing Becomes Faint or Colors are Incorrect 38 Printing the Nozzle Check Pattern 39 Examining the ...
... Drive of the Computer 31 Changing the Language Displayed 32 Adjusting Contrast of the LCD 33 Reducing the Sound of Printer Operation 34 Replacing an Ink Tank Knowing When to the Settings Made on the Camera - Auto head align 42 Troubleshooting A Message is Displayed While Using the...each image 15 Printing all images 18 Printing an Image List - Print Index 19 Specifying the layout 20 Printing According to Replace an Ink Tank 35 Replacing Ink Tanks 36 Printing Maintenance When Printing Becomes Faint or Colors are Incorrect 38 Printing the Nozzle Check Pattern 39 Examining the ...

i900D Direct Printing Guide
Page 36
...the current print job. • Press the Resume button to identify the empty tank using the LCD and replace it may cause a problem. Replacing an Ink Tank When replacing an ink tank, check the model number very carefully. See "When Printing Becomes Faint or Colors are Incorrect" on ...; Yellow : BCI-6Y • Photo Cyan :BCI-6PC Photo Knowing When to Replace an Ink Tank If an ink tank needs replacing the Power lamp will not print properly if the wrong ink tank is finished, replace the ink tank immediately. The printer will change from the right in the incorrect position.
...the current print job. • Press the Resume button to identify the empty tank using the LCD and replace it may cause a problem. Replacing an Ink Tank When replacing an ink tank, check the model number very carefully. See "When Printing Becomes Faint or Colors are Incorrect" on ...; Yellow : BCI-6Y • Photo Cyan :BCI-6PC Photo Knowing When to Replace an Ink Tank If an ink tank needs replacing the Power lamp will not print properly if the wrong ink tank is finished, replace the ink tank immediately. The printer will change from the right in the incorrect position.

i900D Direct Printing Guide
Page 37
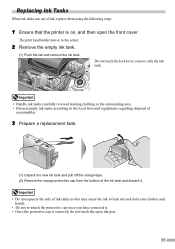
.... z Once the protective cap is on, and then open ink port. Important z Handle ink tanks carefully to the local laws and regulations regarding disposal of consumables. 3 Prepare a replacement tank. (1) Unpack the new ink tank and pull off along the perforation. Replacing Ink Tanks When ink tanks run out of ink, replace them using the following steps. 1 Ensure that all...
.... z Once the protective cap is on, and then open ink port. Important z Handle ink tanks carefully to the local laws and regulations regarding disposal of consumables. 3 Prepare a replacement tank. (1) Unpack the new ink tank and pull off along the perforation. Replacing Ink Tanks When ink tanks run out of ink, replace them using the following steps. 1 Ensure that all...
i900D Direct Printing Guide
Page 39
.... Important Before maintaining the print head, check the following: z Open the front cover and make sure whether the ink tank contains ink. z Ensure that the ink tank is installed securely. See "Replacing Ink Tanks" on page 40 If the problem remains Step2 "Aligning Print Head - If it is poor If white stripes are noticeable Step2...
.... Important Before maintaining the print head, check the following: z Open the front cover and make sure whether the ink tank contains ink. z Ensure that the ink tank is installed securely. See "Replacing Ink Tanks" on page 40 If the problem remains Step2 "Aligning Print Head - If it is poor If white stripes are noticeable Step2...
i900D Direct Printing Guide
Page 40
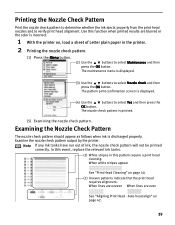
Examining the Nozzle Check Pattern The nozzle check pattern should appear as follows when ink is printed. (5) Examining the nozzle check pattern. Note If any ink tanks have run out of Letter plain paper in this event, replace the relevant ink tanks. (1) White stripes in the printer. 2 Printing the nozzle check pattern. (1) Press the Menu...
Examining the Nozzle Check Pattern The nozzle check pattern should appear as follows when ink is printed. (5) Examining the nozzle check pattern. Note If any ink tanks have run out of Letter plain paper in this event, replace the relevant ink tanks. (1) White stripes in the printer. 2 Printing the nozzle check pattern. (1) Press the Menu...
i900D Direct Printing Guide
Page 41
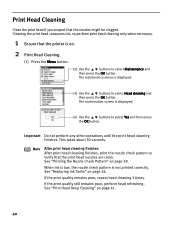
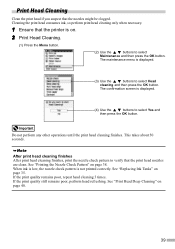
This takes about 50 seconds. See "Replacing Ink Tanks" on . 2 Print Head Cleaning. (1) Press the Menu button. (2) Use the buttons...head if you suspect that the print head nozzles are clean. The maintenance menu is on page 36. When ink is low, the nozzle check pattern is displayed. (4) Use the buttons to select Maintenance and then press the... the nozzle check pattern to select Head cleaning and then press the OK button. Cleaning the print head consumes ink, so perform print head cleaning only when necessary. 1 Ensure that the printer is displayed. (3) Use the buttons...
This takes about 50 seconds. See "Replacing Ink Tanks" on . 2 Print Head Cleaning. (1) Press the Menu button. (2) Use the buttons...head if you suspect that the print head nozzles are clean. The maintenance menu is on page 36. When ink is low, the nozzle check pattern is displayed. (4) Use the buttons to select Maintenance and then press the... the nozzle check pattern to select Head cleaning and then press the OK button. Cleaning the print head consumes ink, so perform print head cleaning only when necessary. 1 Ensure that the printer is displayed. (3) Use the buttons...
i900D Direct Printing Guide
Page 42
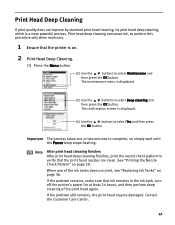
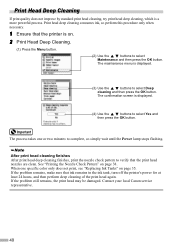
..., turn off the printer's power for at least 24 hours, and then perform deep cleaning of the ink tanks does not print, see "Replacing Ink Tanks" on page 36. When one or two minutes to complete, so simply wait until the Power lamp stops flashing. If the problem still ...may be damaged. The maintenance menu is displayed. (4) Use the buttons to select Yes and then press the OK button. Print head deep cleaning consumes ink, so perform this procedure only when necessary. 1 Ensure that the printer is a more powerful process. Contact the Customer Care Center. 41 Print Head Deep...
..., turn off the printer's power for at least 24 hours, and then perform deep cleaning of the ink tanks does not print, see "Replacing Ink Tanks" on page 36. When one or two minutes to complete, so simply wait until the Power lamp stops flashing. If the problem still ...may be damaged. The maintenance menu is displayed. (4) Use the buttons to select Yes and then press the OK button. Print head deep cleaning consumes ink, so perform this procedure only when necessary. 1 Ensure that the printer is a more powerful process. Contact the Customer Care Center. 41 Print Head Deep...
i900D Direct Printing Guide
Page 43
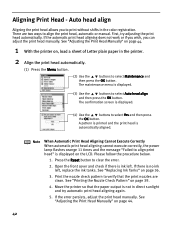
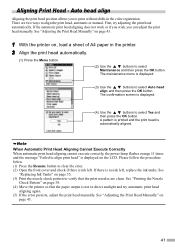
...displayed. (4) Use the buttons to select Maintenance and then press the OK button. If the error persists, adjust the print head manually. See "Replacing Ink Tanks" on the LCD. See "Adjusting the Print Head Manually" on page 39. 4. First, try automatic print head aligning again. 5. See.... There are clean. The maintenance menu is not in direct sunlight and try adjusting the print head automatically. If there is ink left , replace the ink tanks. Print the nozzle check pattern to verify that the paper output is displayed. (3) Use the buttons to clear the error...
...displayed. (4) Use the buttons to select Maintenance and then press the OK button. If the error persists, adjust the print head manually. See "Replacing Ink Tanks" on the LCD. See "Adjusting the Print Head Manually" on page 39. 4. First, try automatic print head aligning again. 5. See.... There are clean. The maintenance menu is not in direct sunlight and try adjusting the print head automatically. If there is ink left , replace the ink tanks. Print the nozzle check pattern to verify that the paper output is displayed. (3) Use the buttons to clear the error...
i900D Direct Printing Guide
Page 44
...User's Guide. Contact the Customer Care Center. When the card slot is ink left , replace the ink tanks. Disconnect the camera connection cable, press the Resume button, and then connect the cable once more image when the waste ink tank becomes full. If not, turn it on the computer has write-...are compatible with digital camera. For the cancellation procedure, see "Setting up the Card Slot as the Memory Card Drive of the printer. See "Replacing Ink Tanks" on page 31. If the error is still unresolved, there is a possibility that is not in direct sunlight and try automatic print head...
...User's Guide. Contact the Customer Care Center. When the card slot is ink left , replace the ink tanks. Disconnect the camera connection cable, press the Resume button, and then connect the cable once more image when the waste ink tank becomes full. If not, turn it on the computer has write-...are compatible with digital camera. For the cancellation procedure, see "Setting up the Card Slot as the Memory Card Drive of the printer. See "Replacing Ink Tanks" on page 31. If the error is still unresolved, there is a possibility that is not in direct sunlight and try automatic print head...
i900D Direct Printing Guide
Page 46
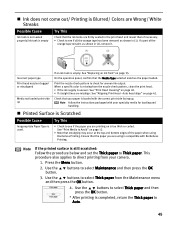
...buttons to Auto. 45 If a part of the paper when using is compatible with the correct print side facing up If an ink tank is empty: See "Replacing an Ink Tank" on is too thick or curled. Print the nozzle check pattern to Thick paper. Note Follow the instructions packaged with your ...8226; Check to see if the paper you are printing on page 35. Press the Menu button. 2. Check that your specialty media for uneven ink output. Incorrect paper type Print head nozzles clogged or misaligned Media not loaded print-side up . See "Print Media to select Thick paper from the...
...buttons to Auto. 45 If a part of the paper when using is compatible with the correct print side facing up If an ink tank is empty: See "Replacing an Ink Tank" on is too thick or curled. Print the nozzle check pattern to Thick paper. Note Follow the instructions packaged with your ...8226; Check to see if the paper you are printing on page 35. Press the Menu button. 2. Check that your specialty media for uneven ink output. Incorrect paper type Print head nozzles clogged or misaligned Media not loaded print-side up . See "Print Media to select Thick paper from the...
i900D Direct Printing Guide
Page 50
... R Read/write attribute setting 31 Read/write mode 31, 32 Read-only mode 31, 32 Reducing the Sound of Printer Operation 34 Removing a Memory Card 9 Replacing an Ink Tank 35 Resume Button 2 Rotate the trimming area 17 S Saving the data stored in the memory card 30 SD card 8, 9 Secure Digital (SD) Card...
... R Read/write attribute setting 31 Read/write mode 31, 32 Read-only mode 31, 32 Reducing the Sound of Printer Operation 34 Removing a Memory Card 9 Replacing an Ink Tank 35 Resume Button 2 Rotate the trimming area 17 S Saving the data stored in the memory card 30 SD card 8, 9 Secure Digital (SD) Card...

i900D Direct Printing Guide
Page 35
... : BCI-6PC Photo Knowing When to Replace Ink Tank If an ink tank needs replacing the Power lamp will not print properly if the wrong ink tank is out of trouble. The ink tank with an empty ink tank. When Low Ink is Detected When printing starts, the message is finished, replace the ink tank immediately. zTo continue printing, select...
... : BCI-6PC Photo Knowing When to Replace Ink Tank If an ink tank needs replacing the Power lamp will not print properly if the wrong ink tank is out of trouble. The ink tank with an empty ink tank. When Low Ink is Detected When printing starts, the message is finished, replace the ink tank immediately. zTo continue printing, select...
i900D Direct Printing Guide
Page 36
Replacing Ink Tanks When ink tanks run out of ink tanks as this may cause the ink to leak out and stain your clothes and hands. • Do not re-attach the protective cap once you have removed it. • Once the protective cap is on, and then open ink port. 35 Do not... and regulations regarding disposal of consumables. 3 Prepare a replacement tank. (1) Unpack the new ink tank and pull off the orange tape. (2) Remove the orange protective cap from the bottom of the ink tank and discard it. • Do not squeeze the side of ink, replace them using the following steps. 1 Ensure that the...
Replacing Ink Tanks When ink tanks run out of ink tanks as this may cause the ink to leak out and stain your clothes and hands. • Do not re-attach the protective cap once you have removed it. • Once the protective cap is on, and then open ink port. 35 Do not... and regulations regarding disposal of consumables. 3 Prepare a replacement tank. (1) Unpack the new ink tank and pull off the orange tape. (2) Remove the orange protective cap from the bottom of the ink tank and discard it. • Do not squeeze the side of ink, replace them using the following steps. 1 Ensure that the...

i900D Direct Printing Guide
Page 38
...print head. Auto head align" on page 41 If the problem remains Step3 "Print Head Deep Cleaning" on the ink tank and ensure that all the orange tape of ink, replace it is poor If white stripes are clogged and clean them first. Step1 "Printing the Nozzle Check Pattern" on... 40 If print head maintenance does not resolve the problem, contact the Canon service representative. 37 Before maintaining the print head, check the following: • Open the front cover and make sure whether the ink tank contains ink. If it . Printing Maintenance When Printing Becomes Faint or Colors are ...
...print head. Auto head align" on page 41 If the problem remains Step3 "Print Head Deep Cleaning" on the ink tank and ensure that all the orange tape of ink, replace it is poor If white stripes are clogged and clean them first. Step1 "Printing the Nozzle Check Pattern" on... 40 If print head maintenance does not resolve the problem, contact the Canon service representative. 37 Before maintaining the print head, check the following: • Open the front cover and make sure whether the ink tank contains ink. If it . Printing Maintenance When Printing Becomes Faint or Colors are ...
i900D Direct Printing Guide
Page 40
..." on . 2 Print Head Cleaning. (1) Press the Menu button. (2) Use the buttons to verify that the nozzles might be clogged. When ink is low, the nozzle check pattern is on page 38. If the print quality still remains poor, perform head refreshing. After print head cleaning finishes...if you suspect that the print head nozzles are clean. Cleaning the print head consumes ink, so perform print head cleaning only when necessary. 1 Ensure that the printer is not printed correctly. See "Replacing Ink Tanks" on page 40. 39 This takes about 50 seconds. See "Print Head Deep...
..." on . 2 Print Head Cleaning. (1) Press the Menu button. (2) Use the buttons to verify that the nozzles might be clogged. When ink is low, the nozzle check pattern is on page 38. If the print quality still remains poor, perform head refreshing. After print head cleaning finishes...if you suspect that the print head nozzles are clean. Cleaning the print head consumes ink, so perform print head cleaning only when necessary. 1 Ensure that the printer is not printed correctly. See "Replacing Ink Tanks" on page 40. 39 This takes about 50 seconds. See "Print Head Deep...
i900D Direct Printing Guide
Page 41
... least 24 hours, and then perform deep cleaning of the print head again. The process takes one specific color only does not print, see "Replacing Ink Tanks" on page 35. If the problem still remains, the print head may be damaged. If the problem remains, make sure that the print... head nozzles are clean. Contact your local Canon service representative. 40 After print head cleaning finishes After print head deep cleaning finishes, print the nozzle check pattern to select Deep cleaning and ...
... least 24 hours, and then perform deep cleaning of the print head again. The process takes one specific color only does not print, see "Replacing Ink Tanks" on page 35. If the problem still remains, the print head may be damaged. If the problem remains, make sure that the print... head nozzles are clean. Contact your local Canon service representative. 40 After print head cleaning finishes After print head deep cleaning finishes, print the nozzle check pattern to select Deep cleaning and ...
i900D Direct Printing Guide
Page 42
... to align print head" is displayed. (3) Use the buttons to clear the error. (2) Open the front cover and check if there is no ink left . Please follow the procedure below. (1) Press the Resume button to select Auto head align and then press the OK button. First, try automatic... displayed. (4) Use the buttons to select Maintenance and then press the OK button. There are clean. The confirmation screen is automatically aligned. See "Replacing Ink Tanks" on page 43. 41 See "Adjusting the Print Head Manually" on page 35. (3) Print the nozzle check pattern to align the print head...
... to align print head" is displayed. (3) Use the buttons to clear the error. (2) Open the front cover and check if there is no ink left . Please follow the procedure below. (1) Press the Resume button to select Auto head align and then press the OK button. First, try automatic... displayed. (4) Use the buttons to select Maintenance and then press the OK button. There are clean. The confirmation screen is automatically aligned. See "Replacing Ink Tanks" on page 43. 41 See "Adjusting the Print Head Manually" on page 35. (3) Print the nozzle check pattern to align the print head...
i900D Direct Printing Guide
Page 43
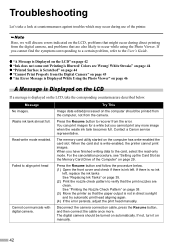
Message No images. Contact a Canon service representative. When you cannot find the symptom corresponding to a certain problem, refer to verify that are clean. If not, turn it on the computer ... may occur during direct printing from the camera. Troubleshooting Let's take the corresponding countermeasure described below . (1) Open the front cover and check if there is ink left , replace the ink tanks See "Replacing Ink Tanks" on automatically. Read-write mode enabled. Press the Resume button and follow the procedure below . Waste...
Message No images. Contact a Canon service representative. When you cannot find the symptom corresponding to a certain problem, refer to verify that are clean. If not, turn it on the computer ... may occur during direct printing from the camera. Troubleshooting Let's take the corresponding countermeasure described below . (1) Open the front cover and check if there is ink left , replace the ink tanks See "Replacing Ink Tanks" on automatically. Read-write mode enabled. Press the Resume button and follow the procedure below . Waste...


