
i900D Quick Start Guide
Page 1
BUBBLE JET PRINTER Quick Start Guide Table of Contents Preface 1 Shipping Materials 1 Introduction 1 Setting Up 2 Preparing the Printer 2 Connecting the Printer to the Computer 2 Installing the Print Head 4 Loading Paper 7 Installing the Printer Driver 8 Aligning the Print Head 14 Basic Operations 18 Printing with Windows 18 Printing with Macintosh 20 Print Head Maintenance 22 Appendix 23 Notes on Handling the USB Interface (for Windows Users) 23 For Further Details... 23 Specifications 24 BE QA7-2790-V01
BUBBLE JET PRINTER Quick Start Guide Table of Contents Preface 1 Shipping Materials 1 Introduction 1 Setting Up 2 Preparing the Printer 2 Connecting the Printer to the Computer 2 Installing the Print Head 4 Loading Paper 7 Installing the Printer Driver 8 Aligning the Print Head 14 Basic Operations 18 Printing with Windows 18 Printing with Macintosh 20 Print Head Maintenance 22 Appendix 23 Notes on Handling the USB Interface (for Windows Users) 23 For Further Details... 23 Specifications 24 BE QA7-2790-V01

i900D Quick Start Guide
Page 6
...operate. The POWER lamp flashes and the printer begins to plug the power cord into the power outlet. „ Installing the Print Head 1 Plug the printer in the country of purchase. print head holder 4 Do not place heavy objects on the power cord. • Never use any power supply other than... the standard power supply available in . 2 Turn on the computer yet. The print head holder moves to the center. 4 Remove the tape. Using the incorrect voltage and frequency could cause a fire or electric shock. • Always push...
...operate. The POWER lamp flashes and the printer begins to plug the power cord into the power outlet. „ Installing the Print Head 1 Plug the printer in the country of purchase. print head holder 4 Do not place heavy objects on the power cord. • Never use any power supply other than... the standard power supply available in . 2 Turn on the computer yet. The print head holder moves to the center. 4 Remove the tape. Using the incorrect voltage and frequency could cause a fire or electric shock. • Always push...
i900D Quick Start Guide
Page 7
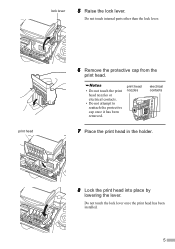
print head nozzles electrical contacts 7 Place the print head in the holder. 8 Lock the print head into place by lowering the lever. Do not touch internal parts other than the lock lever. Do not touch the lock lever once the print head has been installed. 5 print head 6 Remove the protective cap from the print head. • Do not touch the print head nozzles or electrical contacts. • Do not attempt to reattach the protective cap once it has been removed. lock lever 5 Raise the lock lever.
print head nozzles electrical contacts 7 Place the print head in the holder. 8 Lock the print head into place by lowering the lever. Do not touch internal parts other than the lock lever. Do not touch the lock lever once the print head has been installed. 5 print head 6 Remove the protective cap from the print head. • Do not touch the print head nozzles or electrical contacts. • Do not attempt to reattach the protective cap once it has been removed. lock lever 5 Raise the lock lever.
i900D Quick Start Guide
Page 8
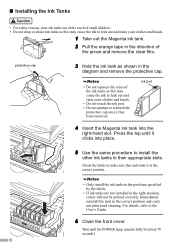
...tank in their appropriate slots. ink port 4 Insert the Magenta ink tank into place. 5 Use the same procedure to install the other ink tanks in the correct position and carry out print head cleaning. Wait until it has been removed. Check the labels to the User's Guide. 6 Close the front cover.... „ Installing the Ink Tanks • For safety reasons, store ink tanks out of the reach of the arrow and...
...tank in their appropriate slots. ink port 4 Insert the Magenta ink tank into place. 5 Use the same procedure to install the other ink tanks in the correct position and carry out print head cleaning. Wait until it has been removed. Check the labels to the User's Guide. 6 Close the front cover.... „ Installing the Ink Tanks • For safety reasons, store ink tanks out of the reach of the arrow and...
i900D Quick Start Guide
Page 10
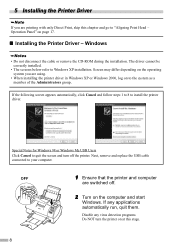
... printer driver in Windows XP or Windows 2000, log on to install the printer driver. Operation Panel" on at this chapter and go to your computer. Next, remove and replace the USB cable connected to "Aligning Print Head - If any virus detection programs. Do NOT turn off . 2 ...Turn on the operating system you are printing with only Direct Print, skip this stage. 8 Windows • Do not disconnect the cable or remove the CD-ROM during the installation. Screen may differ depending ...
... printer driver in Windows XP or Windows 2000, log on to install the printer driver. Operation Panel" on at this chapter and go to your computer. Next, remove and replace the USB cable connected to "Aligning Print Head - If any virus detection programs. Do NOT turn off . 2 ...Turn on the operating system you are printing with only Direct Print, skip this stage. 8 Windows • Do not disconnect the cable or remove the CD-ROM during the installation. Screen may differ depending ...
i900D Quick Start Guide
Page 12
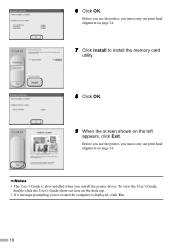
To view the User's Guide, double-click the User's Guide short-cut icon on the desk top. • If a message prompting you must carry out print head alignment on page 14. • The User's Guide is displayed, click Yes. 10 Before you use the printer, you must carry out print head alignment on the left appears, click Exit. 6 Click OK. Before you use the printer, you to install the memory card utility. 8 Click OK. 9 When the screen shown on page 14. 7 Click Install to restart the computer is also installed when you install the printer driver.
To view the User's Guide, double-click the User's Guide short-cut icon on the desk top. • If a message prompting you must carry out print head alignment on page 14. • The User's Guide is displayed, click Yes. 10 Before you use the printer, you must carry out print head alignment on the left appears, click Exit. 6 Click OK. Before you use the printer, you to install the memory card utility. 8 Click OK. 9 When the screen shown on page 14. 7 Click Install to restart the computer is also installed when you install the printer driver.
i900D Quick Start Guide
Page 15
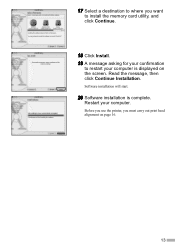
Read the message, then click Continue Installation. 17 Select a destination to restart your computer. Restart your computer is complete. Software installation will start. 20 Software installation is displayed on page 16. 13 Before you use the printer, you want to install the memory card utility, and click Continue. 18 Click Install. 19 A message asking for your confirmation to where you must carry out print head alignment on the screen.
Read the message, then click Continue Installation. 17 Select a destination to restart your computer. Restart your computer is complete. Software installation will start. 20 Software installation is displayed on page 16. 13 Before you use the printer, you want to install the memory card utility, and click Continue. 18 Click Install. 19 A message asking for your confirmation to where you must carry out print head alignment on the screen.
i900D Quick Start Guide
Page 17
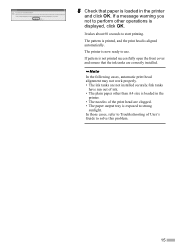
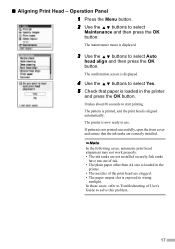
If pattern is aligned automatically. The printer is exposed to use. In the following cases, automatic print head alignment may not work properly. • The ink tanks are not installed securely./Ink tanks have run out of ink. • The plain paper other operations is loaded ...in the printer. • The nozzles of User's Guide to start printing. In those cases, refer to Troubleshooting of the print head are correctly installed. The pattern is printed, and the print head is not printed successfully open the front cover and ensure that paper is displayed, click OK....
If pattern is aligned automatically. The printer is exposed to use. In the following cases, automatic print head alignment may not work properly. • The ink tanks are not installed securely./Ink tanks have run out of ink. • The plain paper other operations is loaded ...in the printer. • The nozzles of User's Guide to start printing. In those cases, refer to Troubleshooting of the print head are correctly installed. The pattern is printed, and the print head is not printed successfully open the front cover and ensure that paper is displayed, click OK....
i900D Quick Start Guide
Page 18
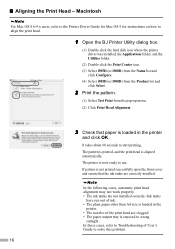
... the printer driver was installed, the Applications folder, and the Utilities folder. (2) Double-click the Print Center icon. (3) Select i905D (or i900D) from the Name list and click Configure. (4) Select i905D (or i900D) from the Product list and click Select. 2 Print the pattern. (1) Select Test Print from the pop-up menu. (2) Click Print Head Alignment. 3 Check that the...
... the printer driver was installed, the Applications folder, and the Utilities folder. (2) Double-click the Print Center icon. (3) Select i905D (or i900D) from the Name list and click Configure. (4) Select i905D (or i900D) from the Product list and click Select. 2 Print the pattern. (1) Select Test Print from the pop-up menu. (2) Click Print Head Alignment. 3 Check that the...
i900D Quick Start Guide
Page 19
... sunlight. It takes about 60 seconds to select Maintenance and then press the OK button. In the following cases, automatic print head alignment may not work properly. • The ink tanks are not installed securely./Ink tanks have run out of ink. • The plain paper other than A4 size is loaded in...
... sunlight. It takes about 60 seconds to select Maintenance and then press the OK button. In the following cases, automatic print head alignment may not work properly. • The ink tanks are not installed securely./Ink tanks have run out of ink. • The plain paper other than A4 size is loaded in...
i900D Quick Start Guide
Page 24
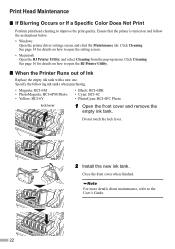
...; If Blurring Occurs or If a Specific Color Does Not Print Perform print head cleaning to the User's Guide. 22 See page 14 for details on how to open the BJ Printer Utility....tank with a new one. Click Cleaning. Close the front cover when finished. For more details about maintenance, refer to improve the print quality. Click Cleaning. See page 16 for details on and follow the instructions below. • Windows Open the printer driver settings ... Open the BJ Printer Utility, and select Cleaning from the pop-up menu. Do not touch the lock lever. 2 Install the new ink tank.
...; If Blurring Occurs or If a Specific Color Does Not Print Perform print head cleaning to the User's Guide. 22 See page 14 for details on how to open the BJ Printer Utility....tank with a new one. Click Cleaning. Close the front cover when finished. For more details about maintenance, refer to improve the print quality. Click Cleaning. See page 16 for details on and follow the instructions below. • Windows Open the printer driver settings ... Open the BJ Printer Utility, and select Cleaning from the pop-up menu. Do not touch the lock lever. 2 Install the new ink tank.
i900D Easy Setup Instructions
Page 1
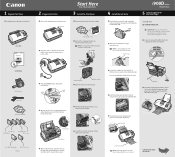
... the protective tape. 4 Tilt the print head toward the left . Serial Number click 5 Write down until they click. Load a sheet of an ink tank. Shipping Tape Start Here Easy Setup Instructions 3 Install the Print Head 1 Remove the print head from the print head nozzles. Tear at notch to the ...left edge of the print head holder. Protective Cap For USB Port: 1 TURN THE PRINTER OFF. Paper Guide 5 Close...
... the protective tape. 4 Tilt the print head toward the left . Serial Number click 5 Write down until they click. Load a sheet of an ink tank. Shipping Tape Start Here Easy Setup Instructions 3 Install the Print Head 1 Remove the print head from the print head nozzles. Tear at notch to the ...left edge of the print head holder. Protective Cap For USB Port: 1 TURN THE PRINTER OFF. Paper Guide 5 Close...
i900D Easy Setup Instructions
Page 2
...Turn the knob to the right until it points at PRINT. Canon is your computer. 13 Start the print head alignment procedure. Double-click the Utilities folder, then the Print Center icon. When the Printer List screen appears, select i900D, then click the Configure icon. 2 Close any open...Click Install. When a message asking for the printer driver to align the print head appears, click OK. 2 Double-click the CD-ROM icon, then the Mac OS X folder, then the Printer Driver folder. 3 Double-click the i900D.mpkg icon. 11 Start the print head alignment procedure. Click the Print Head Alignment...
...Turn the knob to the right until it points at PRINT. Canon is your computer. 13 Start the print head alignment procedure. Double-click the Utilities folder, then the Print Center icon. When the Printer List screen appears, select i900D, then click the Configure icon. 2 Close any open...Click Install. When a message asking for the printer driver to align the print head appears, click OK. 2 Double-click the CD-ROM icon, then the Mac OS X folder, then the Printer Driver folder. 3 Double-click the i900D.mpkg icon. 11 Start the print head alignment procedure. Click the Print Head Alignment...

i900D Direct Printing Guide
Page 38
...Color ink consumption may not function properly. The ink tank installation process is specified. Color ink is consumed in the printer may occur even when black-and-white or grayscale printing is now complete. An ink tank left out in the print head holder. (2) Press on the "PUSH" mark until the... ink tank snaps firmly into place. 5 Close the front cover. 4 Install the ink tank. (1) Insert the ink tank in ...
...Color ink consumption may not function properly. The ink tank installation process is specified. Color ink is consumed in the printer may occur even when black-and-white or grayscale printing is now complete. An ink tank left out in the print head holder. (2) Press on the "PUSH" mark until the... ink tank snaps firmly into place. 5 Close the front cover. 4 Install the ink tank. (1) Insert the ink tank in ...
i900D Direct Printing Guide
Page 39
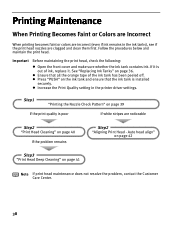
... Nozzle Check Pattern" on page 40 If the problem remains Step2 "Aligning Print Head - z Increase the Print Quality setting in the ink tanks), see if the print head nozzles are noticeable Step2 "Print Head Cleaning" on page 39 If the print quality is installed securely. If it . z Ensure that the ink tank is poor If white stripes are clogged...
... Nozzle Check Pattern" on page 40 If the problem remains Step2 "Aligning Print Head - z Increase the Print Quality setting in the ink tanks), see if the print head nozzles are noticeable Step2 "Print Head Cleaning" on page 39 If the print quality is installed securely. If it . z Ensure that the ink tank is poor If white stripes are clogged...
i900D Direct Printing Guide
Page 47
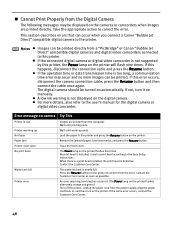
.... Remove the jammed paper, load new media, and press the Resume button. When there is a print head installed, the print head is nearly full. The waste ink tank is defective. The digital camera should be printed directly from a "PictBridge" or Canon "Bubble Jet Direct" compatible digital cameras and digital video camcorders connected to this printer, the Power...
.... Remove the jammed paper, load new media, and press the Resume button. When there is a print head installed, the print head is nearly full. The waste ink tank is defective. The digital camera should be printed directly from a "PictBridge" or Canon "Bubble Jet Direct" compatible digital cameras and digital video camcorders connected to this printer, the Power...

i900D Direct Printing Guide
Page 37
... out in the open . The print head holder moves to maintain the printer's capabilities. 36 Color ink is specified. 4 Install the ink tank. (1) Insert the ink tank in the head cleaning and deep cleaning, which are necessary to the right. The ink tank installation process is now complete. •...; To maintain optimal Print Quality, use an ink tank within six ...
... out in the open . The print head holder moves to maintain the printer's capabilities. 36 Color ink is specified. 4 Install the ink tank. (1) Insert the ink tank in the head cleaning and deep cleaning, which are necessary to the right. The ink tank installation process is now complete. •...; To maintain optimal Print Quality, use an ink tank within six ...

i900D Direct Printing Guide
Page 38
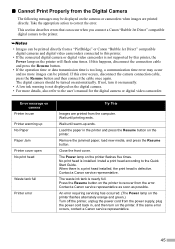
...ensure that the ink tank is installed securely. • Increase the Print Quality setting in the ink tanks), see if the print head nozzles are clogged and clean them first. Step1 "Printing the Nozzle Check Pattern" on page 38 If the print quality is out of the ink.... Auto head align" on page 41 If the problem remains Step3 "Print Head Deep Cleaning" on page 39 Step2 "Aligning Print Head - If it is poor If white stripes are noticeable Step2 "Print Head Cleaning" on page 40 If print head maintenance does not resolve the problem, contact the Canon service representative...
...ensure that the ink tank is installed securely. • Increase the Print Quality setting in the ink tanks), see if the print head nozzles are clogged and clean them first. Step1 "Printing the Nozzle Check Pattern" on page 38 If the print quality is out of the ink.... Auto head align" on page 41 If the problem remains Step3 "Print Head Deep Cleaning" on page 39 Step2 "Aligning Print Head - If it is poor If white stripes are noticeable Step2 "Print Head Cleaning" on page 40 If print head maintenance does not resolve the problem, contact the Canon service representative...
i900D Direct Printing Guide
Page 46
... five times. Load the paper in , and then turn it on manually. • A low ink warning is defective. When there is a print head installed, the print head is not displayed on the printer. Contact a Canon service representative as soon as possible. An error requiring servicing has occurred. (The Power lamp on the printer flashes alternately orange...
... five times. Load the paper in , and then turn it on manually. • A low ink warning is defective. When there is a print head installed, the print head is not displayed on the printer. Contact a Canon service representative as soon as possible. An error requiring servicing has occurred. (The Power lamp on the printer flashes alternately orange...


