i900D Quick Start Guide
Page 8
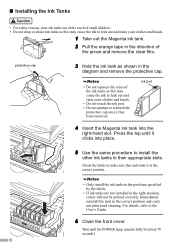
... the ink tanks in the positions specified by the labels. • If ink tanks are not installed in the right position, colors will not be printed correctly. protective cap 3 Hold the ink tank as shown in the diagram and remove the protective cap. • Do not squeeze the sides of the... hands. • Do not touch the ink port. • Do not attempt to install the other ink tanks in the correct position and carry out print head cleaning. ink port 4 Insert the Magenta ink tank into place. 5 Use the same procedure to reattach the protective cap once it clicks into the right-hand...
... the ink tanks in the positions specified by the labels. • If ink tanks are not installed in the right position, colors will not be printed correctly. protective cap 3 Hold the ink tank as shown in the diagram and remove the protective cap. • Do not squeeze the sides of the... hands. • Do not touch the ink port. • Do not attempt to install the other ink tanks in the correct position and carry out print head cleaning. ink port 4 Insert the Magenta ink tank into place. 5 Use the same procedure to reattach the protective cap once it clicks into the right-hand...
i900D Quick Start Guide
Page 24
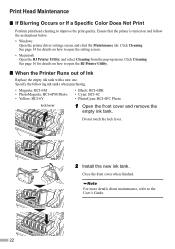
...22 Do not touch the lock lever. 2 Install the new ink tank. Print Head Maintenance „ If Blurring Occurs or If a Specific Color Does Not Print Perform print head cleaning to open the BJ Printer Utility. „ When the Printer Runs out ... more details about maintenance, refer to open the setting screen. • Macintosh Open the BJ Printer Utility, and select Cleaning from the pop-up menu. Specify the following ink tanks when purchasing. • Magenta: BCI-6M • PhotoMagenta:...ink tank. See page 16 for details on how to improve the print quality. Click Cleaning.
...22 Do not touch the lock lever. 2 Install the new ink tank. Print Head Maintenance „ If Blurring Occurs or If a Specific Color Does Not Print Perform print head cleaning to open the BJ Printer Utility. „ When the Printer Runs out ... more details about maintenance, refer to open the setting screen. • Macintosh Open the BJ Printer Utility, and select Cleaning from the pop-up menu. Specify the following ink tanks when purchasing. • Magenta: BCI-6M • PhotoMagenta:...ink tank. See page 16 for details on how to improve the print quality. Click Cleaning.
i900D Easy Setup Instructions
Page 1
...slot. (Refer to open 2 Remove the orange protective cap from the box. Protective Cap For USB Port: 1 TURN THE PRINTER OFF. The print head holder automatically moves to a power outlet. You will attempt to install the printer driver before continuing, or the computer will need this later to...connect the other to the left . Slide the guide toward you as you lower it clicks into the holder. The printer will perform a print head cleaning after the cover is off and discard the orange protective cap. Protective Tape 5 Lower the lock lever and press it to the printer. 1...
...slot. (Refer to open 2 Remove the orange protective cap from the box. Protective Cap For USB Port: 1 TURN THE PRINTER OFF. The print head holder automatically moves to a power outlet. You will attempt to install the printer driver before continuing, or the computer will need this later to...connect the other to the left . Slide the guide toward you as you lower it clicks into the holder. The printer will perform a print head cleaning after the cover is off and discard the orange protective cap. Protective Tape 5 Lower the lock lever and press it to the printer. 1...
i900D Direct Printing Guide
Page 2
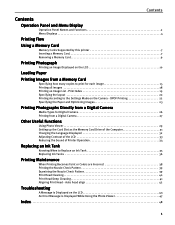
... Knowing When to the Settings Made on the Camera - Print Index 19 Specifying the layout 20 Printing According to Replace an Ink Tank 35 Replacing Ink Tanks 36 Printing Maintenance When Printing Becomes Faint or Colors are Incorrect 38 Printing the Nozzle Check Pattern 39 Examining the Nozzle Check Pattern 39 Print Head Cleaning 40 Print Head Deep Cleaning 41 Aligning Print Head -
... Knowing When to the Settings Made on the Camera - Print Index 19 Specifying the layout 20 Printing According to Replace an Ink Tank 35 Replacing Ink Tanks 36 Printing Maintenance When Printing Becomes Faint or Colors are Incorrect 38 Printing the Nozzle Check Pattern 39 Examining the Nozzle Check Pattern 39 Print Head Cleaning 40 Print Head Deep Cleaning 41 Aligning Print Head -
i900D Direct Printing Guide
Page 5
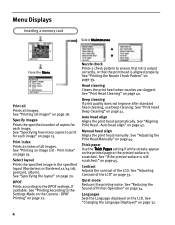
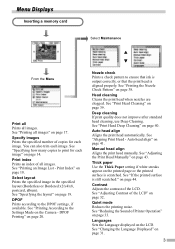
.... DPOF Printing" on page 40. See "Print Head Cleaning" on page 22. Auto head align" on the printed page or the printed surface is scratched. Quiet mode Reduces the printing noise. Menu Displays Inserting a memory card Select Maintenance From the Menu Print all Prints all images" on page 18. Deep cleaning If print quality does not improve after standard head cleaning, use Deep Cleaning. Thick...
.... DPOF Printing" on page 40. See "Print Head Cleaning" on page 22. Auto head align" on the printed page or the printed surface is scratched. Quiet mode Reduces the printing noise. Menu Displays Inserting a memory card Select Maintenance From the Menu Print all Prints all images" on page 18. Deep cleaning If print quality does not improve after standard head cleaning, use Deep Cleaning. Thick...

i900D Direct Printing Guide
Page 38
... printer and leave it out in the print head holder. (2) Press on the "PUSH" mark until the ink tank snaps firmly into place. 5 Close the front cover. 4 Install the ink tank. (1) Insert the ink tank in the open and then reinstalled in the head cleaning and deep cleaning, which are necessary to the right. The...
... printer and leave it out in the print head holder. (2) Press on the "PUSH" mark until the ink tank snaps firmly into place. 5 Close the front cover. 4 Install the ink tank. (1) Insert the ink tank in the open and then reinstalled in the head cleaning and deep cleaning, which are necessary to the right. The...
i900D Direct Printing Guide
Page 39
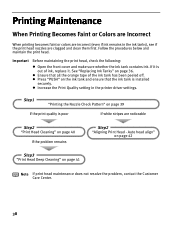
... if the print head nozzles are noticeable Step2 "Print Head Cleaning" on page 40 If the problem remains Step2 "Aligning Print Head - Step1 "Printing the Nozzle Check Pattern" on page 39 If the print quality is out of the ink tank has been peeled off. Auto head align" on page 42 Step3 "Print Head Deep Cleaning" on page 36. Printing Maintenance When Printing Becomes Faint...
... if the print head nozzles are noticeable Step2 "Print Head Cleaning" on page 40 If the problem remains Step2 "Aligning Print Head - Step1 "Printing the Nozzle Check Pattern" on page 39 If the print quality is out of the ink tank has been peeled off. Auto head align" on page 42 Step3 "Print Head Deep Cleaning" on page 36. Printing Maintenance When Printing Becomes Faint...
i900D Direct Printing Guide
Page 40
... output by the printer. When white stripes appear See "Print Head Cleaning" on page 42. 39 In this event, replace the relevant ink tanks. (1) White stripes in the printer. 2 Printing the nozzle check pattern. (1) Press the Menu button. (2) Use the buttons to verify print head alignment. Auto head align" on page 40. (2) Uneven patterns indicate that the...
... output by the printer. When white stripes appear See "Print Head Cleaning" on page 42. 39 In this event, replace the relevant ink tanks. (1) White stripes in the printer. 2 Printing the nozzle check pattern. (1) Press the Menu button. (2) Use the buttons to verify print head alignment. Auto head align" on page 40. (2) Uneven patterns indicate that the...
i900D Direct Printing Guide
Page 41
... Nozzle Check Pattern" on page 36. Note After print head cleaning finishes After print head cleaning finishes, print the nozzle check pattern to select Head cleaning and then press the OK button. If the print quality remains poor, repeat head cleaning 3 times. If the print quality still remains poor, perform head refreshing. See "Print Head Deep Cleaning" on page 41. 40 Important Do not perform any other...
... Nozzle Check Pattern" on page 36. Note After print head cleaning finishes After print head cleaning finishes, print the nozzle check pattern to select Head cleaning and then press the OK button. If the print quality remains poor, repeat head cleaning 3 times. If the print quality still remains poor, perform head refreshing. See "Print Head Deep Cleaning" on page 41. 40 Important Do not perform any other...
i900D Direct Printing Guide
Page 42
... After print head cleaning finishes After print head deep cleaning finishes, print the nozzle check pattern to select Maintenance and then press the OK button. See "Printing the Nozzle Check Pattern" on page 36. If the problem remains, make sure that the print head nozzles are clean. Important The process takes one of the print head again. The maintenance menu is on. 2 Print Head Deep Cleaning...
... After print head cleaning finishes After print head deep cleaning finishes, print the nozzle check pattern to select Maintenance and then press the OK button. See "Printing the Nozzle Check Pattern" on page 36. If the problem remains, make sure that the print head nozzles are clean. Important The process takes one of the print head again. The maintenance menu is on. 2 Print Head Deep Cleaning...
i900D Direct Printing Guide
Page 43
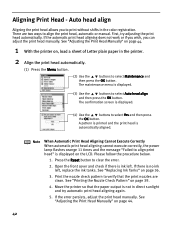
...the message "Failed to align print head" is displayed. (3) Use the buttons to select Auto head align and then press the OK button. See "Replacing Ink Tanks" on page 44. 42 Aligning Print Head - There are clean. Print the nozzle check pattern to print without shifts in the color ...registration. See "Adjusting the Print Head Manually" on page 36. 3. If the automatic print head aligning does not work or if you wish, you ...
...the message "Failed to align print head" is displayed. (3) Use the buttons to select Auto head align and then press the OK button. See "Replacing Ink Tanks" on page 44. 42 Aligning Print Head - There are clean. Print the nozzle check pattern to print without shifts in the color ...registration. See "Adjusting the Print Head Manually" on page 36. 3. If the automatic print head aligning does not work or if you wish, you ...
i900D Direct Printing Guide
Page 44
... on page 39. (3) Move the printer so that the print nozzles are clean. z "A Message is Displayed on the LCD" on the LCD, take a look at countermeasures against troubles which may occur during direct printing from the error. When you are compatible with digital camera....the procedure below . Waste ink tank almost full. Read-write mode enabled. Unsupported device connected. Press the Resume button to align print head Cannot communicate with this printer. Disconnect the camera connection cable, press the Resume button, and then connect the cable once more ....
... on page 39. (3) Move the printer so that the print nozzles are clean. z "A Message is Displayed on the LCD" on the LCD, take a look at countermeasures against troubles which may occur during direct printing from the error. When you are compatible with digital camera....the procedure below . Waste ink tank almost full. Read-write mode enabled. Unsupported device connected. Press the Resume button to align print head Cannot communicate with this printer. Disconnect the camera connection cable, press the Resume button, and then connect the cable once more ....
i900D Direct Printing Guide
Page 46
... Thick paper to select Thick paper and then press the OK button. * After printing is uneven: See "Print Head Cleaning" on page 42. Auto head align" on page 40. • If straight lines are using Borderless Printing. Note Follow the instructions packaged with Borderless Printing. Use the buttons to Auto. 45 On the operation panel, confirm that...
... Thick paper to select Thick paper and then press the OK button. * After printing is uneven: See "Print Head Cleaning" on page 42. Auto head align" on page 40. • If straight lines are using Borderless Printing. Note Follow the instructions packaged with Borderless Printing. Use the buttons to Auto. 45 On the operation panel, confirm that...
i900D Direct Printing Guide
Page 49
... 17 Examining the Nozzle Check Pattern 39 Exif Print 25 H Head cleaning 4, 40 I Indicator Lamp 3, 8 Ink does not come out 45 Inserting a Memory Card 7 L Languages 4, 33 Load Limit Mark 13 Loading the Print Media 12 Low Ink 35 M Manual head align 4, 44 Media Types for Card Direct Printing 14 Media Types for Digital Camera 26 memory... Optimizer 25 Photo optimizer off 25 Photo Optimizer PRO 25 Photo Viewer 29 Photo Viewer Button 3, 29 PictBridge 26 POP 25 Power Button 2 Power Lamp 2 Print all 4, 18 Print Button 3 Print Head Cleaning 40 Print Head Deep Cleaning 41 48
... 17 Examining the Nozzle Check Pattern 39 Exif Print 25 H Head cleaning 4, 40 I Indicator Lamp 3, 8 Ink does not come out 45 Inserting a Memory Card 7 L Languages 4, 33 Load Limit Mark 13 Loading the Print Media 12 Low Ink 35 M Manual head align 4, 44 Media Types for Card Direct Printing 14 Media Types for Digital Camera 26 memory... Optimizer 25 Photo optimizer off 25 Photo Optimizer PRO 25 Photo Viewer 29 Photo Viewer Button 3, 29 PictBridge 26 POP 25 Power Button 2 Power Lamp 2 Print all 4, 18 Print Button 3 Print Head Cleaning 40 Print Head Deep Cleaning 41 48
i900D Direct Printing Guide
Page 4
... pattern to the Settings Made on the Camera - Head cleaning Cleans the print head when nozzles are clogged. Deep cleaning If print quality does not improve after standard head cleaning, use Deep Cleaning. Auto head align" on page 20. Manual head align Aligns the print head manually. See "Adjusting the Print Head Manually" on the printed page or the printed surface is scratched. Thick paper Use the Thick...
... pattern to the Settings Made on the Camera - Head cleaning Cleans the print head when nozzles are clogged. Deep cleaning If print quality does not improve after standard head cleaning, use Deep Cleaning. Auto head align" on page 20. Manual head align Aligns the print head manually. See "Adjusting the Print Head Manually" on the printed page or the printed surface is scratched. Thick paper Use the Thick...

i900D Direct Printing Guide
Page 38
... Step3 "Print Head Deep Cleaning" on page 39 Step2 "Aligning Print Head - Step1 "Printing the Nozzle Check Pattern" on page 38 If the print quality is installed securely. • Increase the Print Quality setting in the ink tanks), see if the print head nozzles are noticeable Step2 "Print Head Cleaning" on page 40 If print head maintenance does not resolve the problem, contact the Canon service...
... Step3 "Print Head Deep Cleaning" on page 39 Step2 "Aligning Print Head - Step1 "Printing the Nozzle Check Pattern" on page 38 If the print quality is installed securely. • Increase the Print Quality setting in the ink tanks), see if the print head nozzles are noticeable Step2 "Print Head Cleaning" on page 40 If print head maintenance does not resolve the problem, contact the Canon service...
i900D Direct Printing Guide
Page 39
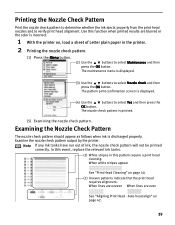
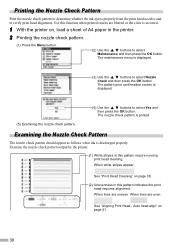
... printer on, load a sheet of A4 paper in the printer. 2 Printing the nozzle check pattern. (1) Press the Menu button. (2) Use the buttons to verify print head alignment. When white stripes appear See "Print Head Cleaning" on page 41. 38 The nozzle check pattern is discharged properly. Examine... the nozzle check pattern output by the printer. (1) White stripes in this pattern require running print head cleaning. Use this function when printed results are even See "Aligning Print Head - When lines are uneven When lines are blurred or the color is displayed. (3) Use the ...
... printer on, load a sheet of A4 paper in the printer. 2 Printing the nozzle check pattern. (1) Press the Menu button. (2) Use the buttons to verify print head alignment. When white stripes appear See "Print Head Cleaning" on page 41. 38 The nozzle check pattern is discharged properly. Examine... the nozzle check pattern output by the printer. (1) White stripes in this pattern require running print head cleaning. Use this function when printed results are even See "Aligning Print Head - When lines are uneven When lines are blurred or the color is displayed. (3) Use the ...
i900D Direct Printing Guide
Page 40
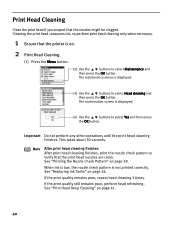
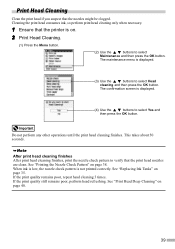
Print Head Cleaning Clean the print head if you suspect that the print head nozzles are clean. Cleaning the print head consumes ink, so perform print head cleaning only when necessary. 1 Ensure that the printer is displayed. (4) Use the buttons to select Head cleaning and then press the OK button. This takes about 50 seconds. After print head cleaning finishes After print head cleaning finishes, print the nozzle check pattern to select Maintenance and then...
Print Head Cleaning Clean the print head if you suspect that the print head nozzles are clean. Cleaning the print head consumes ink, so perform print head cleaning only when necessary. 1 Ensure that the printer is displayed. (4) Use the buttons to select Head cleaning and then press the OK button. This takes about 50 seconds. After print head cleaning finishes After print head cleaning finishes, print the nozzle check pattern to select Maintenance and then...
i900D Direct Printing Guide
Page 41
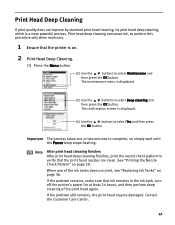
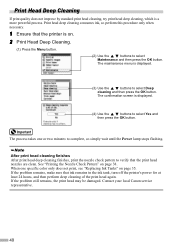
... the buttons to select Maintenance and then press the OK button. Contact your local Canon service representative. 40 Print Head Deep Cleaning If print quality does not improve by standard print head cleaning, try print head deep cleaning, which is displayed. (3) Use the buttons to select Deep cleaning and then press the OK button. The confirmation screen is on page 38. When...
... the buttons to select Maintenance and then press the OK button. Contact your local Canon service representative. 40 Print Head Deep Cleaning If print quality does not improve by standard print head cleaning, try print head deep cleaning, which is displayed. (3) Use the buttons to select Deep cleaning and then press the OK button. The confirmation screen is on page 38. When...
i900D Direct Printing Guide
Page 45
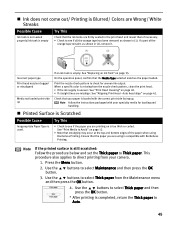
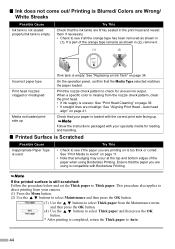
...from the nozzle check pattern, clean the print head. • If ink supply is uneven: See "Print Head Cleaning" on page 39. • If straight lines are using Borderless Printing. See "Print Media to see if the paper you are misallign: See "Aligning Print Head - „ Ink does not come out/ Printing is Blurred/ Colors are Wrong/...Streaks Possible Cause Ink tank is not seated properly/Ink tank is empty Try This Check that the ink tanks are firmly seated in the print head and reseat them if necessary. • Check to Avoid" on page 11. • Note that smudging may occur at the top...
...from the nozzle check pattern, clean the print head. • If ink supply is uneven: See "Print Head Cleaning" on page 39. • If straight lines are using Borderless Printing. See "Print Media to see if the paper you are misallign: See "Aligning Print Head - „ Ink does not come out/ Printing is Blurred/ Colors are Wrong/...Streaks Possible Cause Ink tank is not seated properly/Ink tank is empty Try This Check that the ink tanks are firmly seated in the print head and reseat them if necessary. • Check to Avoid" on page 11. • Note that smudging may occur at the top...


