i860_spec.pdf
Page 1
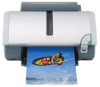
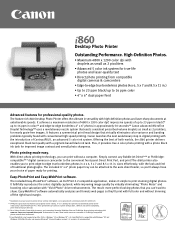
... maximum resolution of 4800 x 1200 color dpi*, impressive speeds of paper ready for improved image contrast and overall photo sharpness. The i860 printer also enables you can be attached to the auto sheet feeder, so you'll always have your choice of up to 23... is not supported on system configuration, software, document complexity, print mode and page coverage. *** For a listing of ContrastPLUS, an advanced 5 color ink system. Canon launches the next evolutionary step in . With direct photo printing technology, you to print edge-to share. The included 4" x 6" photo paper tray...
... maximum resolution of 4800 x 1200 color dpi*, impressive speeds of paper ready for improved image contrast and overall photo sharpness. The i860 printer also enables you can be attached to the auto sheet feeder, so you'll always have your choice of up to 23... is not supported on system configuration, software, document complexity, print mode and page coverage. *** For a listing of ContrastPLUS, an advanced 5 color ink system. Canon launches the next evolutionary step in . With direct photo printing technology, you to print edge-to share. The included 4" x 6" photo paper tray...
i860_spec.pdf
Page 2
... PhotoStitch are compatible with InstantExchange warranty program Ordering Information Printer and Accessories i860 Desktop Photo Printer Auto Duplex Printing Unit Paper Feed Cassette Unit Ink Tanks BCI-6Bk Black BCI-6C Cyan BCI-6M Magenta BCI-6Y Yellow BCI-3eBk Black Canon Specialty Papers Glossy Photo Cards (4" x 6"/20 sheets) Glossy Photo Paper (8.5" x 11...
... PhotoStitch are compatible with InstantExchange warranty program Ordering Information Printer and Accessories i860 Desktop Photo Printer Auto Duplex Printing Unit Paper Feed Cassette Unit Ink Tanks BCI-6Bk Black BCI-6C Cyan BCI-6M Magenta BCI-6Y Yellow BCI-3eBk Black Canon Specialty Papers Glossy Photo Cards (4" x 6"/20 sheets) Glossy Photo Paper (8.5" x 11...
i860 Quick Start Guide
Page 3
...‰ Quick Start Guide ‰ Print Head ‰ 5 Ink Tanks * Cables should be observed for safe operation. For details on cable specifications, refer to your computer. All rights reserved. Trademark Notices • Canon® is a registered trademark of this Quick Start Guide are ...exactly the same with the i860. Check that , if ignored, could result in the U.S. Instructions that all the following...
...‰ Quick Start Guide ‰ Print Head ‰ 5 Ink Tanks * Cables should be observed for safe operation. For details on cable specifications, refer to your computer. All rights reserved. Trademark Notices • Canon® is a registered trademark of this Quick Start Guide are ...exactly the same with the i860. Check that , if ignored, could result in the U.S. Instructions that all the following...
i860 Quick Start Guide
Page 7
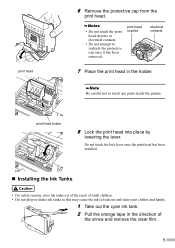
... 7 Place the print head in the direction of small children. • Do not drop or shake ink tanks as this may cause the ink to leak out and stain your clothes and hands. 1 Take out the cyan ink tank. 2 Pull the orange tape in the holder. Do not touch the lock lever once... the print head has been installed. „ Installing the Ink Tanks • For safety reasons, store ink tanks out of the reach of the arrow and remove the clear film. 5 print head 6 Remove the protective cap from the print...
... 7 Place the print head in the direction of small children. • Do not drop or shake ink tanks as this may cause the ink to leak out and stain your clothes and hands. 1 Take out the cyan ink tank. 2 Pull the orange tape in the holder. Do not touch the lock lever once... the print head has been installed. „ Installing the Ink Tanks • For safety reasons, store ink tanks out of the reach of the arrow and remove the clear film. 5 print head 6 Remove the protective cap from the print...
i860 Quick Start Guide
Page 8
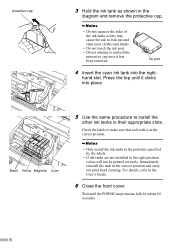
...make sure that each tank is in the correct position. • Only install the ink tanks in the positions specified by the labels. • If ink tanks are not installed in their appropriate slots. ink port 4 Insert the cyan ink tank into place. Immediately reinstall the tank in the correct position and carry out...the diagram and remove the protective cap. • Do not squeeze the sides of the ink tanks as this may cause the ink to leak out and stain your clothes and hands. • Do not touch the ink port. • Do not attempt to reattach the protective cap once it clicks into ...
...make sure that each tank is in the correct position. • Only install the ink tanks in the positions specified by the labels. • If ink tanks are not installed in their appropriate slots. ink port 4 Insert the cyan ink tank into place. Immediately reinstall the tank in the correct position and carry out...the diagram and remove the protective cap. • Do not squeeze the sides of the ink tanks as this may cause the ink to leak out and stain your clothes and hands. • Do not touch the ink port. • Do not attempt to reattach the protective cap once it clicks into ...

i860 Quick Start Guide
Page 15
... to the Printer Driver Guide for Mac OS 9 for instructions on the left is not printed successfully, open the front cover and ensure that the ink tanks are correctly installed. If the pattern on how to use. The printer is now ready to align the print head. 1 Open the BJ Printer...
... to the Printer Driver Guide for Mac OS 9 for instructions on the left is not printed successfully, open the front cover and ensure that the ink tanks are correctly installed. If the pattern on how to use. The printer is now ready to align the print head. 1 Open the BJ Printer...
i860 Quick Start Guide
Page 16
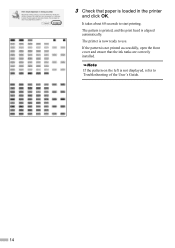
3 Check that the ink tanks are correctly installed. The pattern is printed, and the print head is loaded in the printer and click OK. The printer is now ready to Troubleshooting of the User's Guide. 14 If the pattern on the left is not printed successfully, open the front cover and ensure that paper is aligned automatically. If the pattern is not displayed, refer to use. It takes about 60 seconds to start printing.
3 Check that the ink tanks are correctly installed. The pattern is printed, and the print head is loaded in the printer and click OK. The printer is now ready to Troubleshooting of the User's Guide. 14 If the pattern on the left is not printed successfully, open the front cover and ensure that paper is aligned automatically. If the pattern is not displayed, refer to use. It takes about 60 seconds to start printing.
i860 Quick Start Guide
Page 23
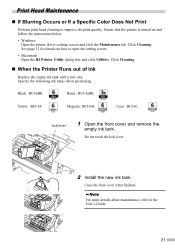
...setting screen. • Macintosh Open the BJ Printer Utility dialog box and click Utilities. Specify the following ink tanks when purchasing. Click Cleaning. „ When the Printer Runs out of Ink Replace the empty ink tank with a new one. Black : BCI-6BK Black : BCI-3eBK Yellow : BCI-6Y Magenta :... BCI-6M Cyan : BCI-6C lock lever 1 Open the front cover and remove the empty ink tank. For more details about maintenance, refer to improve the print quality. Print Head Maintenance „ If Blurring Occurs or If a Specific Color Does ...
...setting screen. • Macintosh Open the BJ Printer Utility dialog box and click Utilities. Specify the following ink tanks when purchasing. Click Cleaning. „ When the Printer Runs out of Ink Replace the empty ink tank with a new one. Black : BCI-6BK Black : BCI-3eBK Yellow : BCI-6Y Magenta :... BCI-6M Cyan : BCI-6C lock lever 1 Open the front cover and remove the empty ink tank. For more details about maintenance, refer to improve the print quality. Print Head Maintenance „ If Blurring Occurs or If a Specific Color Does ...

i860 Quick Start Guide
Page 28
The following ink tanks are compatible with this guide. QA7-2874-V02 XX2003XX ©CANON INC.2003 PRINTED IN THAILAND For details on ink tank replacement, refer to "Print Head Maintenance" in this printer.
The following ink tanks are compatible with this guide. QA7-2874-V02 XX2003XX ©CANON INC.2003 PRINTED IN THAILAND For details on ink tank replacement, refer to "Print Head Maintenance" in this printer.
i860 Easy Setup Instructions
Page 1
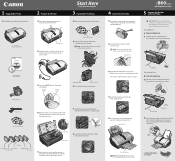
... 2 Plug the power cord into their assigned slots. 5 Close the front cover and extend the paper rest and paper output tray. Protective cap i860 Series Desktop Photo Printer 5 Connect the Printer and Load Paper IMPORTANT: Be sure the printer is off and discard the orange protective cap. You will ... the serial number located to the center. Documentation and Software Kit Photo Paper Tray Power Cord 3 Press the POWER button. i 860 Series Print Head Ink Tanks BCI-6BK Black BCI-6Y Yellow BCI-3eBK Black BCI-6M Magenta BCI-6C Cyan Protective tape Serial number 5 Write down until...
... 2 Plug the power cord into their assigned slots. 5 Close the front cover and extend the paper rest and paper output tray. Protective cap i860 Series Desktop Photo Printer 5 Connect the Printer and Load Paper IMPORTANT: Be sure the printer is off and discard the orange protective cap. You will ... the serial number located to the center. Documentation and Software Kit Photo Paper Tray Power Cord 3 Press the POWER button. i 860 Series Print Head Ink Tanks BCI-6BK Black BCI-6Y Yellow BCI-3eBK Black BCI-6M Magenta BCI-6C Cyan Protective tape Serial number 5 Write down until...


