User Guide
Page 3
... 65 Routine Maintenance 66 When to Replace Ink Tank and Maintain Print Head 67 Replacing an Ink Tank 68 Printing the Nozzle Check Pattern 73 Print Head Cleaning 77 Print Head Deep Cleaning 80 Cleaning the Paper Feed Roller 83 Transporting the Printer 84 Printing Media 88 Compatible Media Types 89 Envelopes ...91 High...
... 65 Routine Maintenance 66 When to Replace Ink Tank and Maintain Print Head 67 Replacing an Ink Tank 68 Printing the Nozzle Check Pattern 73 Print Head Cleaning 77 Print Head Deep Cleaning 80 Cleaning the Paper Feed Roller 83 Transporting the Printer 84 Printing Media 88 Compatible Media Types 89 Envelopes ...91 High...

User Guide
Page 13
... of flammable solvents (alcohol, thinners. If a child ingests any foreign object (metal or liquid) falls into the printer, unplug the power cord and call for service. Do not shake print heads or ink tanks. The metal parts may leak out and stain clothing or the surrounding area. Ink may be... very hot and could cause burns. 13 If any ink, consult a doctor immediately. Never touch the electrical contacts on top of the printer. Do not place metal...
... of flammable solvents (alcohol, thinners. If a child ingests any foreign object (metal or liquid) falls into the printer, unplug the power cord and call for service. Do not shake print heads or ink tanks. The metal parts may leak out and stain clothing or the surrounding area. Ink may be... very hot and could cause burns. 13 If any ink, consult a doctor immediately. Never touch the electrical contacts on top of the printer. Do not place metal...

User Guide
Page 17
Print Head Holder Install the print head here. Inside the Printer 17 Once the print head is installed, do not touch this lever. Print Head Lock Lever Locks the print head into the holder. Inside the Printer Printer Parts and Their Functions Paper Thickness Lever Adjusts the gap between the print head and the surface of the printing paper.
Print Head Holder Install the print head here. Inside the Printer 17 Once the print head is installed, do not touch this lever. Print Head Lock Lever Locks the print head into the holder. Inside the Printer Printer Parts and Their Functions Paper Thickness Lever Adjusts the gap between the print head and the surface of the printing paper.
User Guide
Page 21
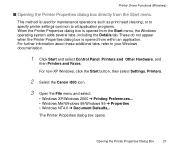
... maintenance operations such as print head cleaning, or to specify printer settings common to your Windows documentation. 1 Click Start and select Control Panel, Printers and Other Hardware, and then Printers and Faxes. The Printer Properties dialog box opens. For non-XP Windows, click the Start button, then select Settings, Printers. 2 Select the Canon i850 icon. 3 Open the File...
... maintenance operations such as print head cleaning, or to specify printer settings common to your Windows documentation. 1 Click Start and select Control Panel, Printers and Other Hardware, and then Printers and Faxes. The Printer Properties dialog box opens. For non-XP Windows, click the Start button, then select Settings, Printers. 2 Select the Canon i850 icon. 3 Open the File...
User Guide
Page 34
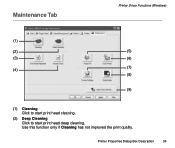
Printer Properties Dialog Box Description 34 Use this function only if Cleaning has not improved the print quality. Maintenance Tab Printer Driver Functions (Windows) (1) (2) (5) (3) (6) (4) (7) (8) (9) (1) Cleaning Click to start print head cleaning. (2) Deep Cleaning Click to start print head deep cleaning.
Printer Properties Dialog Box Description 34 Use this function only if Cleaning has not improved the print quality. Maintenance Tab Printer Driver Functions (Windows) (1) (2) (5) (3) (6) (4) (7) (8) (9) (1) Cleaning Click to start print head cleaning. (2) Deep Cleaning Click to start print head deep cleaning.
User Guide
Page 35
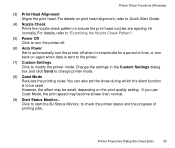
... during which the silent function is sent to the printer. (7) Custom Settings Click to ensure the print head nozzles are ejecting ink normally. However, the effect may become slower than normal. (9) Start Status Monitor... Printer Properties Dialog Box Description 35 Change the settings in ..., refer to Quick Start Guide. (4) Nozzle Check Prints the nozzle check pattern to modify the printer mode. Printer Driver Functions (Windows) (3) Print Head Alignment Aligns the print head. If you use Quiet Mode, the print speed may be used. For details on the print quality setting. ...
... during which the silent function is sent to the printer. (7) Custom Settings Click to ensure the print head nozzles are ejecting ink normally. However, the effect may become slower than normal. (9) Start Status Monitor... Printer Properties Dialog Box Description 35 Change the settings in ..., refer to Quick Start Guide. (4) Nozzle Check Prints the nozzle check pattern to modify the printer mode. Printer Driver Functions (Windows) (3) Print Head Alignment Aligns the print head. If you use Quiet Mode, the print speed may be used. For details on the print quality setting. ...
User Guide
Page 44
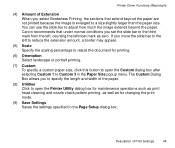
... paper size. The Custom Dialog Box allows you set the slide bar to open the Printer Utility dialog box for maintenance operations such as print head cleaning and nozzle check pattern printing, as well as zero. Canon recommends that extend beyond the paper are not printed because the image is enlarged to adjust... left, counting the leftmost mark as for changing the print mode. (9) Save Settings Saves the settings specified in the Paper Size popup menu. Printer Driver Functions (Macintosh) (4) Amount of Print Settings 44
... paper size. The Custom Dialog Box allows you set the slide bar to open the Printer Utility dialog box for maintenance operations such as print head cleaning and nozzle check pattern printing, as well as zero. Canon recommends that extend beyond the paper are not printed because the image is enlarged to adjust... left, counting the leftmost mark as for changing the print mode. (9) Save Settings Saves the settings specified in the Paper Size popup menu. Printer Driver Functions (Macintosh) (4) Amount of Print Settings 44
User Guide
Page 46
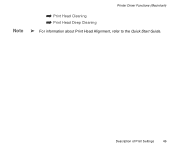
Note Printer Driver Functions (Macintosh) ¬ Print Head Cleaning ¬ Print Head Deep Cleaning ® For information about Print Head Alignment, refer to the Quick Start Guide. Description of Print Settings 46
Note Printer Driver Functions (Macintosh) ¬ Print Head Cleaning ¬ Print Head Deep Cleaning ® For information about Print Head Alignment, refer to the Quick Start Guide. Description of Print Settings 46
User Guide
Page 66
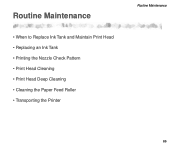
Routine Maintenance • When to Replace Ink Tank and Maintain Print Head • Replacing an Ink Tank • Printing the Nozzle Check Pattern • Print Head Cleaning • Print Head Deep Cleaning • Cleaning the Paper Feed Roller • Transporting the Printer Routine Maintenance 66
Routine Maintenance • When to Replace Ink Tank and Maintain Print Head • Replacing an Ink Tank • Printing the Nozzle Check Pattern • Print Head Cleaning • Print Head Deep Cleaning • Cleaning the Paper Feed Roller • Transporting the Printer Routine Maintenance 66
User Guide
Page 68
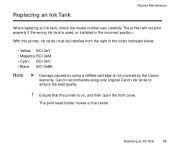
... tanks must be installed from the right in the incorrect position. The print head holder moves to ensure the best quality. 1 Ensure that the printer is on, and then open the front cover. Canon recommends using a refilled cartridge is used, or installed in the order indicated below. • Yellow: BCI-3eY ...• Magenta: BCI-3eM • Cyan: BCI-3eC • Black: BCI-3eBK Note ® Damage caused by the Canon warranty. Replacing an Ink Tank 68 The printer will not print properly if the wrong ink tank is not covered by using only original...
... tanks must be installed from the right in the incorrect position. The print head holder moves to ensure the best quality. 1 Ensure that the printer is on, and then open the front cover. Canon recommends using a refilled cartridge is used, or installed in the order indicated below. • Yellow: BCI-3eY ...• Magenta: BCI-3eM • Cyan: BCI-3eC • Black: BCI-3eBK Note ® Damage caused by the Canon warranty. Replacing an Ink Tank 68 The printer will not print properly if the wrong ink tank is not covered by using only original...
User Guide
Page 72
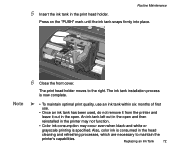
...ink tank snaps firmly into place. Replacing an Ink Tank 72 Note 6 Close the front cover. An ink tank left out in the head cleaning and refreshing processes, which are necessary to the right. The ink tank installation process is now complete. ® • To maintain ...has been used, do not remove it from the printer and leave it out in the open and then reinstalled in the print head holder. The print head holder moves to maintain the printer's capabilities. Routine Maintenance 5 Insert the ink tank in the printer may not function. • Color ink consumption may...
...ink tank snaps firmly into place. Replacing an Ink Tank 72 Note 6 Close the front cover. An ink tank left out in the head cleaning and refreshing processes, which are necessary to the right. The ink tank installation process is now complete. ® • To maintain ...has been used, do not remove it from the printer and leave it out in the open and then reinstalled in the print head holder. The print head holder moves to maintain the printer's capabilities. Routine Maintenance 5 Insert the ink tank in the printer may not function. • Color ink consumption may...
User Guide
Page 73
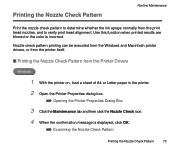
... the Maintenance tab and then click the Nozzle Check icon. 4 When the confirmation message is incorrect. s Printing the Nozzle Check Pattern from the printer itself. Use this function when printed results are blurred or the color is displayed, click OK. ¬ Examining the Nozzle Check Pattern Printing the Nozzle... Check Pattern 73 Printing the Nozzle Check Pattern Routine Maintenance Print the nozzle check pattern to determine whether the ink sprays normally from the print head nozzles, and to verify print...
... the Maintenance tab and then click the Nozzle Check icon. 4 When the confirmation message is incorrect. s Printing the Nozzle Check Pattern from the printer itself. Use this function when printed results are blurred or the color is displayed, click OK. ¬ Examining the Nozzle Check Pattern Printing the Nozzle... Check Pattern 73 Printing the Nozzle Check Pattern Routine Maintenance Print the nozzle check pattern to determine whether the ink sprays normally from the print head nozzles, and to verify print...

User Guide
Page 76
Horizontal stripes in these patterns indicate the print head requires alignment. Examine the nozzle check pattern output by the printer. Lines missing here indicate the print head requires cleaning. Unevenness in these patterns indicates the print head requires alignment. Printing the Nozzle Check Pattern 76 Routine Maintenance s Examining the Nozzle Check Pattern The nozzle check pattern should appear as follows when ink is discharged properly.
Horizontal stripes in these patterns indicate the print head requires alignment. Examine the nozzle check pattern output by the printer. Lines missing here indicate the print head requires cleaning. Unevenness in these patterns indicates the print head requires alignment. Printing the Nozzle Check Pattern 76 Routine Maintenance s Examining the Nozzle Check Pattern The nozzle check pattern should appear as follows when ink is discharged properly.
User Guide
Page 77
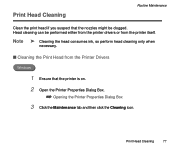
Print Head Cleaning Routine Maintenance Clean the print head if you suspect that the printer is on. 2 Open the Printer Properties Dialog Box. ¬ Opening the Printer Properties Dialog Box 3 Click the Maintenance tab and then click the Cleaning icon. Head cleaning can be clogged. Note ® Cleaning the head consumes ink, so perform head cleaning only when necessary. Print Head Cleaning 77 s Cleaning the Print Head from the Printer Drivers Windows 1 Ensure that the nozzles might be performed either from the printer drivers or from the printer itself.
Print Head Cleaning Routine Maintenance Clean the print head if you suspect that the printer is on. 2 Open the Printer Properties Dialog Box. ¬ Opening the Printer Properties Dialog Box 3 Click the Maintenance tab and then click the Cleaning icon. Head cleaning can be clogged. Note ® Cleaning the head consumes ink, so perform head cleaning only when necessary. Print Head Cleaning 77 s Cleaning the Print Head from the Printer Drivers Windows 1 Ensure that the nozzles might be performed either from the printer drivers or from the printer itself.

User Guide
Page 78
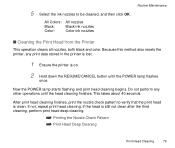
Print Head Cleaning 78 All Colors: All nozzles Black: Black ink nozzles Color: Color ink nozzles 5 Macintosh When the confirmation message is displayed, click OK. 1 Ensure the printer is on. 2 Open the Page Setup dialog box. The Page Setup dialog box can normally be cleaned, and then click Execute. Routine Maintenance 4 Select the ink nozzles to open the Printer Utility dialog box. 4 Select Cleaning from the pull-down menu, and then click the Cleaning icon. in the File menu. 3 Click the Utilities button to be opened by selecting Page Setup...
Print Head Cleaning 78 All Colors: All nozzles Black: Black ink nozzles Color: Color ink nozzles 5 Macintosh When the confirmation message is displayed, click OK. 1 Ensure the printer is on. 2 Open the Page Setup dialog box. The Page Setup dialog box can normally be cleaned, and then click Execute. Routine Maintenance 4 Select the ink nozzles to open the Printer Utility dialog box. 4 Select Cleaning from the pull-down menu, and then click the Cleaning icon. in the File menu. 3 Click the Utilities button to be opened by selecting Page Setup...
User Guide
Page 79
...the third cleaning, perform print head deep cleaning. ¬ Printing the Nozzle Check Pattern ¬ Print Head Deep Cleaning Print Head Cleaning 79 All Colors: All nozzles Black: Black ink nozzles Color: Color ink nozzles s Cleaning the Print Head from the Printer This operation cleans all nozzles..., both black and color. This takes about 40 seconds. Because this method also resets the printer, any other operations until the POWER lamp flashes once. If...
...the third cleaning, perform print head deep cleaning. ¬ Printing the Nozzle Check Pattern ¬ Print Head Deep Cleaning Print Head Cleaning 79 All Colors: All nozzles Black: Black ink nozzles Color: Color ink nozzles s Cleaning the Print Head from the Printer This operation cleans all nozzles..., both black and color. This takes about 40 seconds. Because this method also resets the printer, any other operations until the POWER lamp flashes once. If...

User Guide
Page 80
... cleaning, which is a more ink than standard print head cleaning, so perform this procedure only when necessary. Windows 1 Ensure the printer is displayed, click OK. Note ® Print head deep cleaning consumes more powerful process. Print Head Deep Cleaning 80 Perform print head deep cleaning from the printer driver. All Colors: All nozzles Black: Black ink...
... cleaning, which is a more ink than standard print head cleaning, so perform this procedure only when necessary. Windows 1 Ensure the printer is displayed, click OK. Note ® Print head deep cleaning consumes more powerful process. Print Head Deep Cleaning 80 Perform print head deep cleaning from the printer driver. All Colors: All nozzles Black: Black ink...

User Guide
Page 81
...The process takes one or two minutes to be opened by selecting Page Setup... Routine Maintenance Macintosh 1 Ensure the printer is on. 2 Open the Page Setup dialog box. Print Head Deep Cleaning 81 All Colors: All nozzles Black: Black ink nozzles Color: Color ink nozzles Now the POWER lamp... starts flashing and print head deep cleaning begins. in the File menu. 3 Click the Utilities button to open the Printer Utility dialog box. 4 Select Cleaning from the pull-down menu, and then click the Deep Cleaning ...
...The process takes one or two minutes to be opened by selecting Page Setup... Routine Maintenance Macintosh 1 Ensure the printer is on. 2 Open the Page Setup dialog box. Print Head Deep Cleaning 81 All Colors: All nozzles Black: Black ink nozzles Color: Color ink nozzles Now the POWER lamp... starts flashing and print head deep cleaning begins. in the File menu. 3 Click the Utilities button to open the Printer Utility dialog box. 4 Select Cleaning from the pull-down menu, and then click the Deep Cleaning ...

User Guide
Page 82
Be sure to verify that there are sufficient ink levels in all ink tanks before turning off printer. If not, check that the head is still not clean, the print head may be worn out. If the head is clean. Contact a Canon service representative. ¬ Printing the Nozzle Check Pattern Print Head Deep Cleaning 82 Routine Maintenance After print head deep cleaning finishes, print the nozzle check pattern to perform another print head deep cleaning 24 hours after turning off printer.
Be sure to verify that there are sufficient ink levels in all ink tanks before turning off printer. If not, check that the head is still not clean, the print head may be worn out. If the head is clean. Contact a Canon service representative. ¬ Printing the Nozzle Check Pattern Print Head Deep Cleaning 82 Routine Maintenance After print head deep cleaning finishes, print the nozzle check pattern to perform another print head deep cleaning 24 hours after turning off printer.

User Guide
Page 128
Windows 1 Open the Printer Properties dialog box. 2 Click the Maintenance tab. 3 Click Print Head Alignment. Ensure you align the print head every time you install a new print head. Print Quality is Poor or Contains Errors 128 Straight Lines are Misaligned Troubleshooting s Align the print head. Follow the instructions on the screen.
Windows 1 Open the Printer Properties dialog box. 2 Click the Maintenance tab. 3 Click Print Head Alignment. Ensure you align the print head every time you install a new print head. Print Quality is Poor or Contains Errors 128 Straight Lines are Misaligned Troubleshooting s Align the print head. Follow the instructions on the screen.


