i350 Quick Start Guide
Page 1
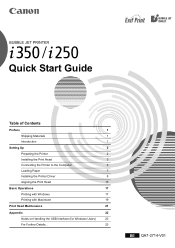
BUBBLE JET PRINTER Quick Start Guide Table of Contents Preface 1 Shipping Materials 1 Introduction 1 Setting Up 2 Preparing the Printer 2 Installing the Print Head 3 Connecting the Printer to the Computer 6 Loading Paper 7 Installing the Printer Driver 8 Aligning the Print Head 13 Basic Operations 17 Printing with Windows 17 Printing with Macintosh 19 Print Head Maintenance 21 Appendix 22 Notes on Handling the USB Interface (for Windows Users) 23 For Further Details... 23 BE QA7-2714-V01
BUBBLE JET PRINTER Quick Start Guide Table of Contents Preface 1 Shipping Materials 1 Introduction 1 Setting Up 2 Preparing the Printer 2 Installing the Print Head 3 Connecting the Printer to the Computer 6 Loading Paper 7 Installing the Printer Driver 8 Aligning the Print Head 13 Basic Operations 17 Printing with Windows 17 Printing with Macintosh 19 Print Head Maintenance 21 Appendix 22 Notes on Handling the USB Interface (for Windows Users) 23 For Further Details... 23 BE QA7-2714-V01
i350 Quick Start Guide
Page 5
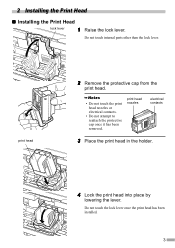
Do not touch internal parts other than the lock lever. print head 2 Remove the protective cap from the print head. • Do not touch the print head nozzles or electrical contacts. • Do not attempt to reattach the protective cap once it has been removed. 2 Installing the Print Head „ Installing the Print Head lock lever 1 Raise the lock lever. Do not touch the lock lever once the print head has been installed. 3 print head nozzles electrical contacts 3 Place the print head in the holder. 4 Lock the print head into place by lowering the lever.
Do not touch internal parts other than the lock lever. print head 2 Remove the protective cap from the print head. • Do not touch the print head nozzles or electrical contacts. • Do not attempt to reattach the protective cap once it has been removed. 2 Installing the Print Head „ Installing the Print Head lock lever 1 Raise the lock lever. Do not touch the lock lever once the print head has been installed. 3 print head nozzles electrical contacts 3 Place the print head in the holder. 4 Lock the print head into place by lowering the lever.
i350 Quick Start Guide
Page 11
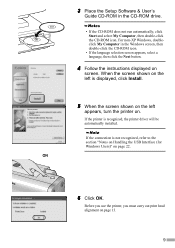
Before you use the printer, you must carry out print head alignment on page 22. If the printer is displayed, click Install. 5 When the screen shown on the left is recognized, the printer driver will be automatically installed. When the screen shown on the left appears, turn the printer on. 3 Place the Setup Software & User...
Before you use the printer, you must carry out print head alignment on page 22. If the printer is displayed, click Install. 5 When the screen shown on the left is recognized, the printer driver will be automatically installed. When the screen shown on the left appears, turn the printer on. 3 Place the Setup Software & User...
i350 Quick Start Guide
Page 13
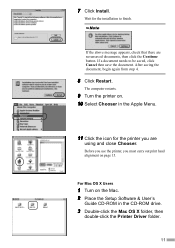
... Mac OS X Users 1 Turn on the Mac. 2 Place the Setup Software & User's Guide CD-ROM in the Apple Menu. 11 Click the icon for the installation to be saved, click Cancel then save the document. The computer restarts. 9 Turn the printer on page 15. Before you use the printer, you are... from step 4. 8 Click Restart. If the above message appears, check that there are using and close Chooser. Wait for the printer you must carry out print head alignment on . 10 Select Chooser in the CD-ROM drive. 3 Double-click the Mac OS X folder, then double-click the Printer Driver folder. 11...
... Mac OS X Users 1 Turn on the Mac. 2 Place the Setup Software & User's Guide CD-ROM in the Apple Menu. 11 Click the icon for the installation to be saved, click Cancel then save the document. The computer restarts. 9 Turn the printer on page 15. Before you use the printer, you are... from step 4. 8 Click Restart. If the above message appears, check that there are using and close Chooser. Wait for the printer you must carry out print head alignment on . 10 Select Chooser in the CD-ROM drive. 3 Double-click the Mac OS X folder, then double-click the Printer Driver folder. 11...
i350 Quick Start Guide
Page 14
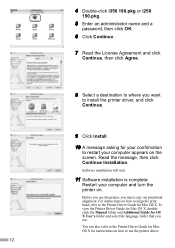
...the Printer Driver Guide for Mac OS X for instructions on how to use the printer, you must carry out print head alignment. Software installation will start. 11 Software installation is complete. Restart your computer appears on the screen. To view the Printer Driver Guide for Mac OS X,... i350 190.pkg or i250 190.pkg. 5 Enter an administrator name and a password, then click OK. 6 Click Continue. 7 Read the License Agreement and click Continue, then click Agree. 8 Select a destination to where you want to install the printer driver, and click Continue. 9 Click Install. 10 A message asking...
...the Printer Driver Guide for Mac OS X for instructions on how to use the printer, you must carry out print head alignment. Software installation will start. 11 Software installation is complete. Restart your computer appears on the screen. To view the Printer Driver Guide for Mac OS X,... i350 190.pkg or i250 190.pkg. 5 Enter an administrator name and a password, then click OK. 6 Click Continue. 7 Read the License Agreement and click Continue, then click Agree. 8 Select a destination to where you want to install the printer driver, and click Continue. 9 Click Install. 10 A message asking...
i350 Quick Start Guide
Page 17
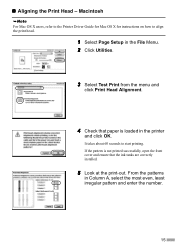
... takes about 60 seconds to align the print head. 1 Select Page Setup in the File Menu. 2 Click Utilities. 3 Select Test Print from the menu and click Print Head Alignment. 4 Check that the ink tanks are correctly installed. 5 Look at the print-out. If the pattern is not printed successfully, open the front cover and ensure that paper is...
... takes about 60 seconds to align the print head. 1 Select Page Setup in the File Menu. 2 Click Utilities. 3 Select Test Print from the menu and click Print Head Alignment. 4 Check that the ink tanks are correctly installed. 5 Look at the print-out. If the pattern is not printed successfully, open the front cover and ensure that paper is...
i350 Quick Start Guide
Page 23
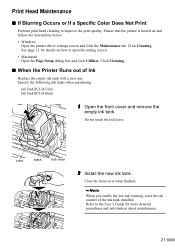
Click Cleaning. „ When the Printer Runs out of the ink tank installed. See page 13 for details on and follow the instructions below. • Windows Open the printer driver settings screen and click the Maintenance tab. Ink ... the User's Guide for more detailed procedures and information about maintenance. 21 color black lock lever 2 Install the new ink tank. Click Cleaning. Refer to open the setting screen. • Macintosh Open the Page Setup dialog box and click Utilities. Print Head Maintenance „ If Blurring Occurs or If a Specific Color Does Not...
Click Cleaning. „ When the Printer Runs out of the ink tank installed. See page 13 for details on and follow the instructions below. • Windows Open the printer driver settings screen and click the Maintenance tab. Ink ... the User's Guide for more detailed procedures and information about maintenance. 21 color black lock lever 2 Install the new ink tank. Click Cleaning. Refer to open the setting screen. • Macintosh Open the Page Setup dialog box and click Utilities. Print Head Maintenance „ If Blurring Occurs or If a Specific Color Does Not...
i350 Easy Setup Instructions
Page 1
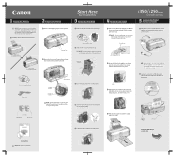
Start Here 3 Install the Print Head Remove the print head from its package. NOTE: The serial number is securely seated. 4 Install the Ink Tanks i350/i250 Series Color Bubble Jet Printer 5 Connect the Printer To Your Computer Remove the black ink tank (BCI-24 Black...) from its package and pull off the orange protective cap. Close the front cover. Electrical contacts i350/i250 Series Print Head Power Cord Packing material Print head...
Start Here 3 Install the Print Head Remove the print head from its package. NOTE: The serial number is securely seated. 4 Install the Ink Tanks i350/i250 Series Color Bubble Jet Printer 5 Connect the Printer To Your Computer Remove the black ink tank (BCI-24 Black...) from its package and pull off the orange protective cap. Close the front cover. Electrical contacts i350/i250 Series Print Head Power Cord Packing material Print head...
i350 Easy Setup Instructions
Page 2
... the alignment procedure. IMPORTANT: To ensure highest Step 7 Align the Print Head. When asked to the BJ printer driver Installer" screen appears, click Continue. Then follow the on to the right of Canon Inc. Double-click the i350 190.pkg or i250 190.pkg icon. From the Application folder, double-click on the inside of...
... the alignment procedure. IMPORTANT: To ensure highest Step 7 Align the Print Head. When asked to the BJ printer driver Installer" screen appears, click Continue. Then follow the on to the right of Canon Inc. Double-click the i350 190.pkg or i250 190.pkg icon. From the Application folder, double-click on the inside of...


