
ZoomBrowser EX 6.5 for Windows Instruction Manual
Page 9
... Appendices Transferring Images Transferring Images by [Connect to Camera]. 1 Connect the camera to the computer with the supplied interface cable. 2 Turn on the desktop to start ZoomBrowser EX and open when the camera is connected. IMPORTANT • The instructions in the AutoPlay window....the Computer". • With some versions of Contents 9 Double click . With Windows XP, click [Canon CameraWindow] then [OK] in this case, double-click the ZoomBrowser EX icon on the camera power, set it to playback mode and prepare it to communicate with the computer. 3 When a window ...
... Appendices Transferring Images Transferring Images by [Connect to Camera]. 1 Connect the camera to the computer with the supplied interface cable. 2 Turn on the desktop to start ZoomBrowser EX and open when the camera is connected. IMPORTANT • The instructions in the AutoPlay window....the Computer". • With some versions of Contents 9 Double click . With Windows XP, click [Canon CameraWindow] then [OK] in this case, double-click the ZoomBrowser EX icon on the camera power, set it to playback mode and prepare it to communicate with the computer. 3 When a window ...

DV Network Software Ver.1 Software Instruction Manual
Page 12
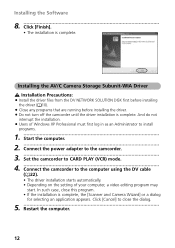
... XP Professional must first log in as an Administrator to install programs. 1 Start the computer. 2 Connect the power adapter to the camcorder. 3 Set the camcorder to CARD PLAY (VCR) mode. 4 Connect the camcorder to close this program. • If the installation is complete, the [Scanner and Camera Wizard] or a... first before installing the driver ( 10). ¡ Close any programs that are running before installing the driver. ¡ Do not turn off the camcorder until the driver installation is complete. Installing the Software 8 Click [Finish]. • The installation is complete.
... XP Professional must first log in as an Administrator to install programs. 1 Start the computer. 2 Connect the power adapter to the camcorder. 3 Set the camcorder to CARD PLAY (VCR) mode. 4 Connect the camcorder to close this program. • If the installation is complete, the [Scanner and Camera Wizard] or a... first before installing the driver ( 10). ¡ Close any programs that are running before installing the driver. ¡ Do not turn off the camcorder until the driver installation is complete. Installing the Software 8 Click [Finish]. • The installation is complete.

DV Network Software Ver.1 Software Instruction Manual
Page 22
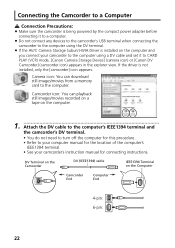
...Attach the DV cable to the computer's IEEE1394 terminal and the camcorder's DV terminal. • You do not need to turn off the computer for this procedure. • Refer to the computer. Camcorder icon: You can download still images/movies from a memory card...camcorder is being powered by the compact power adapter before connecting it to a computer. ¡ Do not connect any devices to the camcorder's USB terminal when connecting the camcorder to the computer using a DV cable and set it to CARD PLAY (VCR) mode, [Canon Camera Storage Device] (camera icon) or [Canon DV Camcorder] (camcorder...
...Attach the DV cable to the computer's IEEE1394 terminal and the camcorder's DV terminal. • You do not need to turn off the computer for this procedure. • Refer to the computer. Camcorder icon: You can download still images/movies from a memory card...camcorder is being powered by the compact power adapter before connecting it to a computer. ¡ Do not connect any devices to the camcorder's USB terminal when connecting the camcorder to the computer using a DV cable and set it to CARD PLAY (VCR) mode, [Canon Camera Storage Device] (camera icon) or [Canon DV Camcorder] (camcorder...

DV Network Software Ver.1 Software Instruction Manual
Page 23
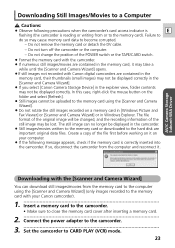
Do not turn off the camcorder or the computer. - The file format of the original image will be changed, and the recording information of the still image may be uploaded to ... a copy of the POWER switch or the TAPE/CARD switch. ¡ Format the memory card with the camcorder. ¡ If numerous still images/movies are contained in the memory card, it may take a while until the [Scanner and Camera Wizard] opens. ¡If still images not recorded with Canon digital camcorders are contained in the...
Do not turn off the camcorder or the computer. - The file format of the original image will be changed, and the recording information of the still image may be uploaded to ... a copy of the POWER switch or the TAPE/CARD switch. ¡ Format the memory card with the camcorder. ¡ If numerous still images/movies are contained in the memory card, it may take a while until the [Scanner and Camera Wizard] opens. ¡If still images not recorded with Canon digital camcorders are contained in the...
DV Messenger Ver 1.0 Instruction Manual
Page 12
... must first log in as an Administrator to install programs. 1 Start the computer. 2 Connect the power adapter to the camcorder. 3 Set the camcorder to CARD PLAY (VCR) mode. 4 Connect the camcorder to close this program. • If the installation is complete, the [Scanner and Camera Wizard] ...DISK first before installing the driver ( 10). ¡ Close any programs that are running before installing the driver. ¡ Do not turn off the camcorder until the driver installation is complete. In such case, close the dialog. 5 Restart the computer. 12 Installing the Software 8 Click [...
... must first log in as an Administrator to install programs. 1 Start the computer. 2 Connect the power adapter to the camcorder. 3 Set the camcorder to CARD PLAY (VCR) mode. 4 Connect the camcorder to close this program. • If the installation is complete, the [Scanner and Camera Wizard] ...DISK first before installing the driver ( 10). ¡ Close any programs that are running before installing the driver. ¡ Do not turn off the camcorder until the driver installation is complete. In such case, close the dialog. 5 Restart the computer. 12 Installing the Software 8 Click [...
DV Messenger Ver 1.0 Instruction Manual
Page 22
... on a tape on the computer. 1 Attach the DV cable to the computer's IEEE1394 terminal and the camcorder's DV terminal. • You do not need to turn off the computer for this procedure. • Refer to your computer manual for the location of the computer...not installed, only the [camcorder] icon appears. Connecting the Camcorder to a Computer Connection Precautions: ¡ Make sure the camcorder is being powered by the compact power adapter before connecting it to CARD PLAY (VCR) mode, [Canon Camera Storage Device] (camera icon) or [Canon DV Camcorder] (camcorder icon) appears in the ...
... on a tape on the computer. 1 Attach the DV cable to the computer's IEEE1394 terminal and the camcorder's DV terminal. • You do not need to turn off the computer for this procedure. • Refer to your computer manual for the location of the computer...not installed, only the [camcorder] icon appears. Connecting the Camcorder to a Computer Connection Precautions: ¡ Make sure the camcorder is being powered by the compact power adapter before connecting it to CARD PLAY (VCR) mode, [Canon Camera Storage Device] (camera icon) or [Canon DV Camcorder] (camcorder icon) appears in the ...
DV Messenger Ver 1.0 Instruction Manual
Page 23
... may not be lost. Create a copy of the POWER switch or the TAPE/CARD switch. ¡ Format the memory card with the camcorder. ¡ If numerous still images/movies are contained in Windows Explorer. Do not turn off the camcorder or the computer. - Do not change the position ...memory card data to do so may take a while until the [Scanner and Camera Wizard] opens. ¡If still images not recorded with Canon digital camcorders are important original data files. Do not remove the memory card or detach the DV cable. - Downloading Still Images/Movies to a Computer Cautions:...
... may not be lost. Create a copy of the POWER switch or the TAPE/CARD switch. ¡ Format the memory card with the camcorder. ¡ If numerous still images/movies are contained in Windows Explorer. Do not turn off the camcorder or the computer. - Do not change the position ...memory card data to do so may take a while until the [Scanner and Camera Wizard] opens. ¡If still images not recorded with Canon digital camcorders are important original data files. Do not remove the memory card or detach the DV cable. - Downloading Still Images/Movies to a Computer Cautions:...
ZR70 ZR65 Instruction Manual
Page 6
......5 Thank You for Choosing a Canon 9 Introducing the ZR70 MC/ZR65 MC/ZR60 10 Components Guide ...11 Mastering the Basics Introduction Preparations Using a Household Power Source 15 Attaching and Charging the Battery Pack 16 Installing the Backup Battery 19 Preparing the Camcorder 20 Loading a Cassette ...22 ...the Light-up Buttons 51 Other Camcorder Settings 52 Recording Changing the Recording Mode (SP/LP 54 Recording Still Images on a Tape 55 Using the Recording Programs 57 Using Digital Effects...61 Using the Multi-Image Screen 67 Turning Off the Image Stabilizer 69 ...
......5 Thank You for Choosing a Canon 9 Introducing the ZR70 MC/ZR65 MC/ZR60 10 Components Guide ...11 Mastering the Basics Introduction Preparations Using a Household Power Source 15 Attaching and Charging the Battery Pack 16 Installing the Backup Battery 19 Preparing the Camcorder 20 Loading a Cassette ...22 ...the Light-up Buttons 51 Other Camcorder Settings 52 Recording Changing the Recording Mode (SP/LP 54 Recording Still Images on a Tape 55 Using the Recording Programs 57 Using Digital Effects...61 Using the Multi-Image Screen 67 Turning Off the Image Stabilizer 69 ...
ZR70 ZR65 Instruction Manual
Page 10
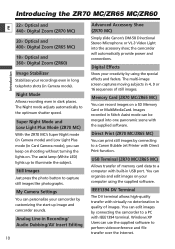
... 440× Digital Zoom (ZR70 MC) 20× Optical and 400× Digital Zoom (ZR65 MC) 18× Optical and 360× Digital Zoom (ZR60)...press the photo button to the optimum shutter speed. the camcorder will automatically provide power and connections. Images recorded in Camera mode). Super Night ...Canon Bubble Jet Printer with Direct Print function. The multi-image screen captures moving subjects in Card Camera mode), you can personalize your camcorder by connecting the camcorder to illuminate the subject. My Camera Settings You can keep on shooting without turning...
... 440× Digital Zoom (ZR70 MC) 20× Optical and 400× Digital Zoom (ZR65 MC) 18× Optical and 360× Digital Zoom (ZR60)...press the photo button to the optimum shutter speed. the camcorder will automatically provide power and connections. Images recorded in Camera mode). Super Night ...Canon Bubble Jet Printer with Direct Print function. The multi-image screen captures moving subjects in Card Camera mode), you can personalize your camcorder by connecting the camcorder to illuminate the subject. My Camera Settings You can keep on shooting without turning...
ZR70 ZR65 Instruction Manual
Page 15
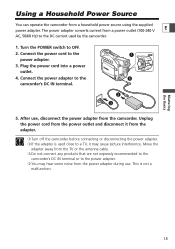
... used close to OFF. 2. Mastering the Basics 15 The power adapter converts current from the camcorder. Using a Household Power Source You can operate the camcorder from the adapter. ❍ Turn off the camcorder before connecting or disconnecting the power adapter. ❍ If the adapter is not a malfunction. Turn the POWER switch to a TV, it may cause picture interference. Unplug...
... used close to OFF. 2. Mastering the Basics 15 The power adapter converts current from the camcorder. Using a Household Power Source You can operate the camcorder from the adapter. ❍ Turn off the camcorder before connecting or disconnecting the power adapter. ❍ If the adapter is not a malfunction. Turn the POWER switch to a TV, it may cause picture interference. Unplug...
ZR70 ZR65 Instruction Manual
Page 16
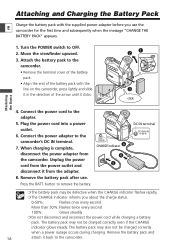
... charging is complete, disconnect the power adapter from the adapter. 8. w q POWER CAMERA OFF(PVLCARY) e click Mastering the Basics 4. Remove the battery pack and 16 attach it from the camcorder. Press the BATT. Connect the power cord to remove the battery. Turn the POWER switch to the camcorder's DC IN terminal. 7. Connect the power adapter to OFF. 2. The battery...
... charging is complete, disconnect the power adapter from the adapter. 8. w q POWER CAMERA OFF(PVLCARY) e click Mastering the Basics 4. Remove the battery pack and 16 attach it from the camcorder. Press the BATT. Connect the power cord to remove the battery. Turn the POWER switch to the camcorder's DC IN terminal. 7. Connect the power adapter to OFF. 2. The battery...
ZR70 ZR65 Instruction Manual
Page 17
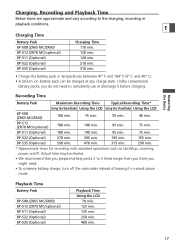
... (Optional) 590 min. 470 min. 315 min. 250 min. * Approximate times for recording with repeated operations such as start/stop, zooming, power on/off the camcorder instead of leaving it before charging. Actual time may be charged at any charge state. BP-522 (Optional) 370 min. 295 min. 195 ...min. 155 min. Unlike conventional battery packs, you do not need . • To conserve battery charge, turn off . BP-512 (ZR70 MC/optional...
... (Optional) 590 min. 470 min. 315 min. 250 min. * Approximate times for recording with repeated operations such as start/stop, zooming, power on/off the camcorder instead of leaving it before charging. Actual time may be charged at any charge state. BP-522 (Optional) 370 min. 295 min. 195 ...min. 155 min. Unlike conventional battery packs, you do not need . • To conserve battery charge, turn off . BP-512 (ZR70 MC/optional...
ZR70 ZR65 Instruction Manual
Page 22
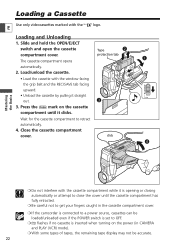
... get your fingers caught in the cassette compartment cover. ❍ If the camcorder is connected to a power source, cassettes can be loaded/unloaded even if the POWER switch is set to OFF. ❍ v flashes if no cassette is inserted when turning on the power (in CAMERA and PLAY (VCR) mode). ❍ With some types of...
... get your fingers caught in the cassette compartment cover. ❍ If the camcorder is connected to a power source, cassettes can be loaded/unloaded even if the POWER switch is set to OFF. ❍ v flashes if no cassette is inserted when turning on the power (in CAMERA and PLAY (VCR) mode). ❍ With some types of...
ZR70 ZR65 Instruction Manual
Page 27
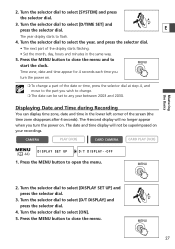
... Press the MENU button to select [D/T DISPLAY] and press the selector dial. 4. Press the MENU button to close the menu and to the part you turn the power on. ❍ To change . ❍ The date can display time zone, date and time in the same way. 5. MENU Time zone, date ...and time appear for 4 seconds each time you turn the power on your recordings. Turn the selector dial to flash. 4. MENU 27 E The year display starts to select [DISPLAY SET UP] and press the selector dial. 3. Displaying...
... Press the MENU button to select [D/T DISPLAY] and press the selector dial. 4. Press the MENU button to close the menu and to the part you turn the power on. ❍ To change . ❍ The date can display time zone, date and time in the same way. 5. MENU Time zone, date ...and time appear for 4 seconds each time you turn the power on your recordings. Turn the selector dial to flash. 4. MENU 27 E The year display starts to select [DISPLAY SET UP] and press the selector dial. 3. Displaying...
ZR70 ZR65 Instruction Manual
Page 29
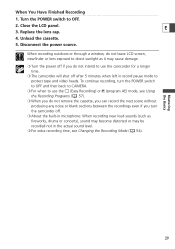
...Have Finished Recording 1. E 3. To continue recording, turn the camcorder off. ❍ About the built-in microphone: When recording near loud sounds (such as it may be recorded not in record pause mode to use the camcorder for a longer time. ❍ The camcorder will shut off after 5 minutes when left in the... do not remove the cassette, you can record the next scene without producing any noise or blank sections between the recordings even if you turn the POWER switch to OFF and then back to CAMERA. ❍ For when to protect tape and video heads. Replace the lens cap. 4....
...Have Finished Recording 1. E 3. To continue recording, turn the camcorder off. ❍ About the built-in microphone: When recording near loud sounds (such as it may be recorded not in record pause mode to use the camcorder for a longer time. ❍ The camcorder will shut off after 5 minutes when left in the... do not remove the cassette, you can record the next scene without producing any noise or blank sections between the recordings even if you turn the POWER switch to OFF and then back to CAMERA. ❍ For when to protect tape and video heads. Replace the lens cap. 4....

ZR70 ZR65 Instruction Manual
Page 51
...8226; OFF: Buttons do not light up. The color changes when you press a button and turns back when you release the button. • PUSH ON: The buttons light up when you press a button and turn off when you press a button. Select [BUTTONLIGHT], set to the desired color and close the... green, orange, blue, yellow, turquoise and purple. ZR70 MC Setting the Light-up Buttons The buttons above the LCD panel light up E when the camcorder's power is on . You cannot change the color of the Buttons CAMERA PLAY (VCR) CARD CAMERA CARD PLAY (VCR) ( 44) SYSTEM LIGHT COLOR•...
...8226; OFF: Buttons do not light up. The color changes when you press a button and turns back when you release the button. • PUSH ON: The buttons light up when you press a button and turn off when you press a button. Select [BUTTONLIGHT], set to the desired color and close the... green, orange, blue, yellow, turquoise and purple. ZR70 MC Setting the Light-up Buttons The buttons above the LCD panel light up E when the camcorder's power is on . You cannot change the color of the Buttons CAMERA PLAY (VCR) CARD CAMERA CARD PLAY (VCR) ( 44) SYSTEM LIGHT COLOR•...

ZR70 ZR65 Instruction Manual
Page 52
...PLAY (VCR) ( 44) SYSTEM BEEP ON To turn off the beep, all camcorder sounds including the ones of the My Camera settings will be turned off , and unusual conditions of Features 52 The beep will hear a beep upon camcorder operations such as power on , open the menu and select [SYSTEM].... Recording in 16:9 (Wide Screen TV Recording) You can record in wide screen mode. Other Camcorder Settings E Beep ...
...PLAY (VCR) ( 44) SYSTEM BEEP ON To turn off the beep, all camcorder sounds including the ones of the My Camera settings will be turned off , and unusual conditions of Features 52 The beep will hear a beep upon camcorder operations such as power on , open the menu and select [SYSTEM].... Recording in 16:9 (Wide Screen TV Recording) You can record in wide screen mode. Other Camcorder Settings E Beep ...
ZR70 ZR65 Instruction Manual
Page 56
Using the Full Range of Features 56 Keep the PHOTO button pressed halfway and adjust the focus with the selector dial. ❍ When you turn the POWER switch to OFF while the camcorder is recording the still image, it will not turn off until recording is complete. ❍ Record still images under sufficient lighting condition (in which you can identify E the subject on the screen). ❍ If a subject is unsuitable for autofocus, F continues to flash.
Using the Full Range of Features 56 Keep the PHOTO button pressed halfway and adjust the focus with the selector dial. ❍ When you turn the POWER switch to OFF while the camcorder is recording the still image, it will not turn off until recording is complete. ❍ Record still images under sufficient lighting condition (in which you can identify E the subject on the screen). ❍ If a subject is unsuitable for autofocus, F continues to flash.
ZR70 ZR65 Instruction Manual
Page 71
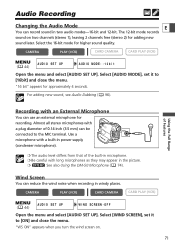
Select the 16-bit mode for recording. Use a microphone with a built-in power supply (condenser microphone). ❍ The audio level differs from that of the built-in microphone. ❍ Be careful with a plug diameter of Features Recording with ... and select [AUDIO SET UP]. Wind Screen You can record sound in two audio modes-16-bit and 12-bit. "WS ON" appears when you turn the wind screen on two channels (stereo 1), leaving 2 channels free (stereo 2) for approximately 4 seconds. For adding new sound, see Audio Dubbing ( 96). Audio Recording Changing...
Select the 16-bit mode for recording. Use a microphone with a built-in power supply (condenser microphone). ❍ The audio level differs from that of the built-in microphone. ❍ Be careful with a plug diameter of Features Recording with ... and select [AUDIO SET UP]. Wind Screen You can record sound in two audio modes-16-bit and 12-bit. "WS ON" appears when you turn the wind screen on two channels (stereo 1), leaving 2 channels free (stereo 2) for approximately 4 seconds. For adding new sound, see Audio Dubbing ( 96). Audio Recording Changing...
ZR70 ZR65 Instruction Manual
Page 73
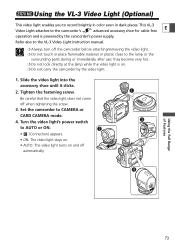
... not touch or place flammable material or plastic close to the VL-3 Video Light instruction manual. ❍ Always turn off when tightening the screw. 3. Set the camcorder to the camcorder's advanced accessory shoe for cable-free operation and is on and off automatically. LOCK q e CAMERA OFF(PVLCARY)... LOCK r AUTO ON OFF LOCK Using the Full Range of Features 73 w LOCK • AUTO: The video light turns on . ❍ Do not carry the camcorder by the camcorder's power supply. they become very hot. ❍ Do not look directly at the lamp while the video light is...
... not touch or place flammable material or plastic close to the VL-3 Video Light instruction manual. ❍ Always turn off when tightening the screw. 3. Set the camcorder to the camcorder's advanced accessory shoe for cable-free operation and is on and off automatically. LOCK q e CAMERA OFF(PVLCARY)... LOCK r AUTO ON OFF LOCK Using the Full Range of Features 73 w LOCK • AUTO: The video light turns on . ❍ Do not carry the camcorder by the camcorder's power supply. they become very hot. ❍ Do not look directly at the lamp while the video light is...


