
ZR100/200/300 Brochure
Page 1
...(ZR300) 20x Optical Zoom Lens (ZR200/ZR100) What sets a Canon camcorder apart from all the others? Unlike camcorders which only record a vertically stretched picture, Canon's ZR300, ZR200 and ZR100 use with crisp, high-quality images. It's the only camcorder made by a company renowned for print or... and digital photos have different color requirements, ≥ DV utilizes two different color techniques to Use Offering a sleek, slim design, the camcorder is the only camcorder manufacturer certified for indoor shots, sporting matches or panoramic views. The ZR300, ZR200 and ZR100's optical...
...(ZR300) 20x Optical Zoom Lens (ZR200/ZR100) What sets a Canon camcorder apart from all the others? Unlike camcorders which only record a vertically stretched picture, Canon's ZR300, ZR200 and ZR100 use with crisp, high-quality images. It's the only camcorder made by a company renowned for print or... and digital photos have different color requirements, ≥ DV utilizes two different color techniques to Use Offering a sleek, slim design, the camcorder is the only camcorder manufacturer certified for indoor shots, sporting matches or panoramic views. The ZR300, ZR200 and ZR100's optical...

ZR100/200/300 Brochure
Page 2
... • Remote Control Included (ZR300/ZR200) • Selectable Display Languages • Digital Effects/Fades • My Camera Function Tele-Converter TL-28 Increases photo length by ...: f=2.8-61.6mm, f/1.6-3.6, 22x power zoom ZR200: f=2.8-56mm, f/1.6-3.2, 20x power zoom ZR100: f=2.8-56mm, f/1.6-3.2, 20x power zoom LCD Screen 2.4-inch. Other names and products not...camcorder to capture e-mail ready photos without a computer. DE C.V. Low-Light Features The camcorder's Night Mode allows you want to a Canon Compact Photo Printer, Canon PIXMA Photo Printer, or any of Canon...
... • Remote Control Included (ZR300/ZR200) • Selectable Display Languages • Digital Effects/Fades • My Camera Function Tele-Converter TL-28 Increases photo length by ...: f=2.8-61.6mm, f/1.6-3.6, 22x power zoom ZR200: f=2.8-56mm, f/1.6-3.2, 20x power zoom ZR100: f=2.8-56mm, f/1.6-3.2, 20x power zoom LCD Screen 2.4-inch. Other names and products not...camcorder to capture e-mail ready photos without a computer. DE C.V. Low-Light Features The camcorder's Night Mode allows you want to a Canon Compact Photo Printer, Canon PIXMA Photo Printer, or any of Canon...

Instruction Manual
Page 2
WARNING! Digital Video Camcorder, ZR100 systems This device complies with Part 15 of copyrighted ... the product. If this device must accept any changes or modifications to the presence of FCC Rules. One Canon Plaza, Lake Success, NY 11042, U.S.A. Tel No. (516)328-5600 CAUTION: TO PREVENT ELECTRIC SHOCK,...energy and, if not installed and use in a residential installation. Important Introduction Usage Instructions WARNING! Inc. Canon U.S.A. Do not make any interference received, including interference that to Part 15 of important operating and maintenance (...
WARNING! Digital Video Camcorder, ZR100 systems This device complies with Part 15 of copyrighted ... the product. If this device must accept any changes or modifications to the presence of FCC Rules. One Canon Plaza, Lake Success, NY 11042, U.S.A. Tel No. (516)328-5600 CAUTION: TO PREVENT ELECTRIC SHOCK,...energy and, if not installed and use in a residential installation. Important Introduction Usage Instructions WARNING! Inc. Canon U.S.A. Do not make any interference received, including interference that to Part 15 of important operating and maintenance (...

Instruction Manual
Page 3
...810 of serious damage to the antenna discharge unit, connection to fit, contact your home, operating instructions should be operated only E ZR100 A and all its accessories. combination should be followed. Power Sources - Retain Instructions - Power Adapter is equipped with care. ...recommended polarized plug. portable communication devices or other power sources 2. If an sources of power supply to the Canon Digital Video Camcorder Power Adapter should be sure the antenna is connected to overturn. 3 outside antenna is grounded permanently damage the ...
...810 of serious damage to the antenna discharge unit, connection to fit, contact your home, operating instructions should be operated only E ZR100 A and all its accessories. combination should be followed. Power Sources - Retain Instructions - Power Adapter is equipped with care. ...recommended polarized plug. portable communication devices or other power sources 2. If an sources of power supply to the Canon Digital Video Camcorder Power Adapter should be sure the antenna is connected to overturn. 3 outside antenna is grounded permanently damage the ...

Instruction Manual
Page 6
...Accessories 8 Components Guide 9 Basic Functions Preparations Preparing the Power Supply 12 Loading/Unloading a Cassette 15 Installing the Backup Battery 16 Preparing the Camcorder 17 Adjusting the LCD Screen 18 Setting the Time Zone, Date and Time 19 Recording Recording Movies on a Tape 22 Zooming...26 Tips for...Balance 46 Setting the Shutter Speed 48 Using the Self-Timer 50 Changing the Recording Mode (SP/LP 51 Audio Recording 52 Using Digital Effects 53 Widescreen TV Recording (16:9 57 Playback Magnifying the Image 58 Displaying the Data Code 59 End Search...61 Playing Back ...
...Accessories 8 Components Guide 9 Basic Functions Preparations Preparing the Power Supply 12 Loading/Unloading a Cassette 15 Installing the Backup Battery 16 Preparing the Camcorder 17 Adjusting the LCD Screen 18 Setting the Time Zone, Date and Time 19 Recording Recording Movies on a Tape 22 Zooming...26 Tips for...Balance 46 Setting the Shutter Speed 48 Using the Self-Timer 50 Changing the Recording Mode (SP/LP 51 Audio Recording 52 Using Digital Effects 53 Widescreen TV Recording (16:9 57 Playback Magnifying the Image 58 Displaying the Data Code 59 End Search...61 Playing Back ...

Instruction Manual
Page 7
Introduction Editing Recording to a VCR or Digital Video Device 67 Recording from Analog Video Devices (VCR, TV or Camcorder 69 Recording from Digital Video Devices (DV Dubbing 70 E Converting Analog Signals into Digital Signals (Analog-Digital Converter) ...72 Transferring Video Recordings to a Computer 74 Additional Information Screen Displays 75 List of Messages 77 Maintenance/Others 78 Troubleshooting 83 System Diagram (Availability differs from area to area 86 Optional Accessories 87 Specifications 90 Item Codes ...92 Index...93 7
Introduction Editing Recording to a VCR or Digital Video Device 67 Recording from Analog Video Devices (VCR, TV or Camcorder 69 Recording from Digital Video Devices (DV Dubbing 70 E Converting Analog Signals into Digital Signals (Analog-Digital Converter) ...72 Transferring Video Recordings to a Computer 74 Additional Information Screen Displays 75 List of Messages 77 Maintenance/Others 78 Troubleshooting 83 System Diagram (Availability differs from area to area 86 Optional Accessories 87 Specifications 90 Item Codes ...92 Index...93 7

Instruction Manual
Page 26
Press the zoom lever slightly for a faster zoom. Keep at least 1 m (3.3 ft.) to zoom out (wideangle). Zoom in (telephoto). At wide-angle, you can focus on a subject as close as 1 cm (0.39 in.). The zoom speed is equipped with optical zoom and digital zoom. Move it toward T to zoom in Zoom out Zoom lever 20x Optical Zoom CAMERA PLAY (VCR) Move the zoom lever toward W to the subject. Press harder for a slow zoom. Zooming The camcorder is slightly faster in record pause mode. 26
Press the zoom lever slightly for a faster zoom. Keep at least 1 m (3.3 ft.) to zoom out (wideangle). Zoom in (telephoto). At wide-angle, you can focus on a subject as close as 1 cm (0.39 in.). The zoom speed is equipped with optical zoom and digital zoom. Move it toward T to zoom in Zoom out Zoom lever 20x Optical Zoom CAMERA PLAY (VCR) Move the zoom lever toward W to the subject. Press harder for a slow zoom. Zooming The camcorder is slightly faster in record pause mode. 26

Instruction Manual
Page 27
...option. 5. With digital zoom, image resolution becomes lower the more you zoom in dark blue when set to close the menu. Digital zoom cannot be used in the Night mode. Digital zoom cannot be used when the multi-image screen is activated, the camcorder automatically switches between optical... and digital zoom. Turn the SET dial to open the menu. 2....
...option. 5. With digital zoom, image resolution becomes lower the more you zoom in dark blue when set to close the menu. Digital zoom cannot be used in the Night mode. Digital zoom cannot be used when the multi-image screen is activated, the camcorder automatically switches between optical... and digital zoom. Turn the SET dial to open the menu. 2....

Instruction Manual
Page 29
... LCD panel. About the screen display: During playback, the time code gives the hours, minutes, seconds and frames. button to begin playback. 5. E 1. Set the camcorder to PLAY (VCR). 2. Set the POWER switch to PLAY (VCR) mode. Press the button to stop playback. To use the viewfinder, close the LCD... panel with the screen facing outward. 3. The remaining tape time may not appear when the time left is distorted, clean the video heads using a Canon Head Cleaning Cassette or a commercially available digital video head-cleaning cassette ( 78).
... LCD panel. About the screen display: During playback, the time code gives the hours, minutes, seconds and frames. button to begin playback. 5. E 1. Set the camcorder to PLAY (VCR). 2. Set the POWER switch to PLAY (VCR) mode. Press the button to stop playback. To use the viewfinder, close the LCD... panel with the screen facing outward. 3. The remaining tape time may not appear when the time left is distorted, clean the video heads using a Canon Head Cleaning Cassette or a commercially available digital video head-cleaning cassette ( 78).

Instruction Manual
Page 41
... sacrificing color. Press the NIGHT MODE button. • " " appears. • Pressing the NIGHT MODE button again resets the camcorder to record in other modes. In such case, adjust the focus manually. Digital zoom and multi-image screen cannot be changed while a night mode is activated. 41 Set the program selector to...
... sacrificing color. Press the NIGHT MODE button. • " " appears. • Pressing the NIGHT MODE button again resets the camcorder to record in other modes. In such case, adjust the focus manually. Digital zoom and multi-image screen cannot be changed while a night mode is activated. 41 Set the program selector to...

Instruction Manual
Page 47
...; Use the auto setting for normal outdoor scenes. When the program selector is set to EASY, white balance is preset to [AUTO]. The camcorder retains the custom white balance setting even if you turn it off the digital zoom. Custom white balance may keep flashing.
...; Use the auto setting for normal outdoor scenes. When the program selector is set to EASY, white balance is preset to [AUTO]. The camcorder retains the custom white balance setting even if you turn it off the digital zoom. Custom white balance may keep flashing.

Instruction Manual
Page 51
E CAMERA PLAY (VCR) MENU ( 34) VCR SETUP REC MODE SP To change to [LP] and close the menu. Depending on this camcorder, or vice versa, picture and sound may become distorted and the time code may not be distorted. We recommend using the SP mode for important ... Mode (SP/LP) You can choose between SP (standard play) and LP (long play back a tape that has been recorded in LP mode with another digital device on the nature and usage condition of the tape, picture and sound recorded in both SP and LP modes on the same tape, the...
E CAMERA PLAY (VCR) MENU ( 34) VCR SETUP REC MODE SP To change to [LP] and close the menu. Depending on this camcorder, or vice versa, picture and sound may become distorted and the time code may not be distorted. We recommend using the SP mode for important ... Mode (SP/LP) You can choose between SP (standard play) and LP (long play back a tape that has been recorded in LP mode with another digital device on the nature and usage condition of the tape, picture and sound recorded in both SP and LP modes on the same tape, the...

Instruction Manual
Page 56
...the next sequence disappears after another. • FAST, MODERATE, SLOW: The set it off the digital effect when you do not use it. The camcorder retains the setting even if you press the DIGITAL EFFECTS ON/OFF button. Press the start/stop button to EASY. - During DV dubbing. Using ... You can be captured each time you turn it to [MULTI-S]. 3. Select [D.E.SELECT] and set number of sequences and close the menu. Press the DIGITAL EFFECTS ON/OFF button. • MANUAL: Images will be captured at the set the program selector to [FAST], [MODERATE] or [SLOW]: Playback pause...
...the next sequence disappears after another. • FAST, MODERATE, SLOW: The set it off the digital effect when you do not use it. The camcorder retains the setting even if you press the DIGITAL EFFECTS ON/OFF button. Press the start/stop button to EASY. - During DV dubbing. Using ... You can be captured each time you turn it to [MULTI-S]. 3. Select [D.E.SELECT] and set number of sequences and close the menu. Press the DIGITAL EFFECTS ON/OFF button. • MANUAL: Images will be captured at the set the program selector to [FAST], [MODERATE] or [SLOW]: Playback pause...

Instruction Manual
Page 67
...Recording Editing to a VCR or Digital Video Device E You can copy recordings with virtually no generation loss in image and sound quality. Connected device: Begin recording when the scene you can copy your recordings by connecting the camcorder to a VCR or a digital video device. Stop playback. 67... Set the camcorder to the instruction manual of the digital video device. Locate the scene you wish to record pause mode. 3. Play back...
...Recording Editing to a VCR or Digital Video Device E You can copy recordings with virtually no generation loss in image and sound quality. Connected device: Begin recording when the scene you can copy your recordings by connecting the camcorder to a VCR or a digital video device. Stop playback. 67... Set the camcorder to the instruction manual of the digital video device. Locate the scene you wish to record pause mode. 3. Play back...

Instruction Manual
Page 68
Proper operation cannot be slightly lower than that of the edited tape will be guaranteed for all digital video devices equipped with a DV terminal. If the picture does not appear, reconnect the DV cable or turn the camcorder off and back on again. - If operation does not work, use the AV terminal. We recommend powering the camcorder from a household power source. 68 When connecting a VCR, the quality of the original. When connecting a digital video device: -
Proper operation cannot be slightly lower than that of the edited tape will be guaranteed for all digital video devices equipped with a DV terminal. If the picture does not appear, reconnect the DV cable or turn the camcorder off and back on again. - If operation does not work, use the AV terminal. We recommend powering the camcorder from a household power source. 68 When connecting a VCR, the quality of the original. When connecting a digital video device: -

Instruction Manual
Page 70
Set the camcorder to restart recording. 8. Press the / button when the scene you can check the picture on again. You can record from other digital video devices equipped with a DV terminal with the logo recording in SD system in picture and sound quality. Press the button to stop recording. ... with virtually no loss in SP or LP format (note that [AV DV] is set to [OFF] ( 72). 3. CAMERA PLAY (VCR) 1. Connect the camcorder to the digital video device. See Connecting a Digital Video Device ( 67). 2. Make sure that signals from a household power source. 70
Set the camcorder to restart recording. 8. Press the / button when the scene you can check the picture on again. You can record from other digital video devices equipped with a DV terminal with the logo recording in SD system in picture and sound quality. Press the button to stop recording. ... with virtually no loss in SP or LP format (note that [AV DV] is set to [OFF] ( 72). 3. CAMERA PLAY (VCR) 1. Connect the camcorder to the digital video device. See Connecting a Digital Video Device ( 67). 2. Make sure that signals from a household power source. 70
Instruction Manual
Page 72
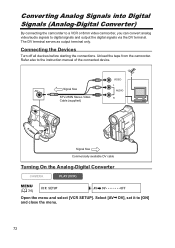
Connecting the Devices Turn off all devices before starting the connections. Converting Analog Signals into Digital Signals (Analog-Digital Converter) By connecting the camcorder to a VCR or 8mm video camcorder, you can convert analog video/audio signals to the instruction manual of the connected device. The... terminal serves as output terminal only. Unload the tape from the camcorder. Signal flow STV-250N Stereo Video Cable (supplied) VIDEO L AUDIO R Signal flow Commercially available DV cable Turning On the Analog-Digital Converter CAMERA PLAY (VCR) MENU ( 34) VCR SETUP AV DV...
Connecting the Devices Turn off all devices before starting the connections. Converting Analog Signals into Digital Signals (Analog-Digital Converter) By connecting the camcorder to a VCR or 8mm video camcorder, you can convert analog video/audio signals to the instruction manual of the connected device. The... terminal serves as output terminal only. Unload the tape from the camcorder. Signal flow STV-250N Stereo Video Cable (supplied) VIDEO L AUDIO R Signal flow Commercially available DV cable Turning On the Analog-Digital Converter CAMERA PLAY (VCR) MENU ( 34) VCR SETUP AV DV...

Instruction Manual
Page 73
We recommend powering the camcorder from analog to digital signals might not work properly (e.g., signals that include copyright protective signals or anomalous signals such as ghost signals). For normal use, set to [ON], digital signals cannot E be able to transfer converted signals via the DV terminal. If it ...is set [AV DV] to [OFF]. Depending on the software and the specifications of your computer, you may not be input via the camcorder's DV terminal. ...
We recommend powering the camcorder from analog to digital signals might not work properly (e.g., signals that include copyright protective signals or anomalous signals such as ghost signals). For normal use, set to [ON], digital signals cannot E be able to transfer converted signals via the DV terminal. If it ...is set [AV DV] to [OFF]. Depending on the software and the specifications of your computer, you may not be input via the camcorder's DV terminal. ...

Instruction Manual
Page 75
...Displays on the TV Screen When you connect a TV for recording, you can select to hide the camcorder displays on the LCD screen to [OFF] and close the menu. The displays appear on the TV... screen. Select [TV SCREEN], Additional Information 75 For playback, you can show the camcorder displays on the TV screen. ]. Select [DISPLAYS], set it to have a clear screen for 2 seconds. CAMERA PLAY...8226; The displays appear while a playback image is magnified or a digital effect is activated. • Tape operation displays appear for playback.
...Displays on the TV Screen When you connect a TV for recording, you can select to hide the camcorder displays on the LCD screen to [OFF] and close the menu. The displays appear on the TV... screen. Select [TV SCREEN], Additional Information 75 For playback, you can show the camcorder displays on the TV screen. ]. Select [DISPLAYS], set it to have a clear screen for 2 seconds. CAMERA PLAY...8226; The displays appear while a playback image is magnified or a digital effect is activated. • Tape operation displays appear for playback.

Instruction Manual
Page 77
.... - WRONG FORMAT You attempted to dub a copyright protected tape. CHECK THE INPUT DV cable is not connected, or the connected digital device is protected. Additional Information 77 This message E 19 DATE AND TIME appears each time you turn the power on until you...signal is exhausted. CHANGE THE BATTERY Battery pack is received during analog line-in the camcorder. 79 BEEN DETECTED TAPE END Tape reached the end. REMOVE THE CASSETTE Camcorder stopped operating to protect the tape. CONDENSATION HAS Condensation has been detected in RESTRICTED recording,...
.... - WRONG FORMAT You attempted to dub a copyright protected tape. CHECK THE INPUT DV cable is not connected, or the connected digital device is protected. Additional Information 77 This message E 19 DATE AND TIME appears each time you turn the power on until you...signal is exhausted. CHANGE THE BATTERY Battery pack is received during analog line-in the camcorder. 79 BEEN DETECTED TAPE END Tape reached the end. REMOVE THE CASSETTE Camcorder stopped operating to protect the tape. CONDENSATION HAS Condensation has been detected in RESTRICTED recording,...


