
Instruction Manual
Page 2
Digital Video Camcorder, ZR100 systems This device complies with class B limits in the manual. Use of shielded cable is encouraged to try to correct the interference by turning the equipment off and on the rights of electric shock to ... Part 15 of the FCC Rules. This equipment generates, uses and can be required to the presence of copyrighted materials may cause undesired operation. One Canon Plaza, Lake Success, NY 11042, U.S.A. Important Introduction Usage Instructions WARNING! TO REDUCE THE RISK OF ELECTRIC SHOCK AND TO REDUCE ANNOYING INTERFERENCE, USE THE ...
Digital Video Camcorder, ZR100 systems This device complies with class B limits in the manual. Use of shielded cable is encouraged to try to correct the interference by turning the equipment off and on the rights of electric shock to ... Part 15 of the FCC Rules. This equipment generates, uses and can be required to the presence of copyrighted materials may cause undesired operation. One Canon Plaza, Lake Success, NY 11042, U.S.A. Important Introduction Usage Instructions WARNING! TO REDUCE THE RISK OF ELECTRIC SHOCK AND TO REDUCE ANNOYING INTERFERENCE, USE THE ...

Instruction Manual
Page 3
... to overturn. 3 The product may cause the product and cart combination to product. Power Sources - Unplug this manual as to the Canon Digital Video Camcorder Power Adapter should be followed. Do not use the camera close to TV transmitters, particular attention to plugs and the...wire to an antenna discharge unit, serious injury to fit, contact your home, operating instructions should be operated only E ZR100 A and all its accessories. All operating and maintenance instructions should be adhered to 9. for the grounding electrode. Heed Warnings - Power Cord...
... to overturn. 3 The product may cause the product and cart combination to product. Power Sources - Unplug this manual as to the Canon Digital Video Camcorder Power Adapter should be followed. Do not use the camera close to TV transmitters, particular attention to plugs and the...wire to an antenna discharge unit, serious injury to fit, contact your home, operating instructions should be operated only E ZR100 A and all its accessories. All operating and maintenance instructions should be adhered to 9. for the grounding electrode. Heed Warnings - Power Cord...

Instruction Manual
Page 5
...Button and switches to the LCD and the viewfinder screen. Using this Manual Thank you for future reference. E Change the display language before you use the camcorder and retain it for purchasing the Canon ZR100. CAMERA : Function cannot be used to refer to menu items ...displayed on the camcorder. [ ] are used in the United States and other countries. &#...
...Button and switches to the LCD and the viewfinder screen. Using this Manual Thank you for future reference. E Change the display language before you use the camcorder and retain it for purchasing the Canon ZR100. CAMERA : Function cannot be used to refer to menu items ...displayed on the camcorder. [ ] are used in the United States and other countries. &#...

Instruction Manual
Page 6
Table of contents Introduction Using this Manual 5 Checking Supplied Accessories 8 Components Guide 9 Basic Functions Preparations Preparing the Power Supply 12 Loading/Unloading a Cassette 15 Installing the Backup Battery 16 Preparing the Camcorder 17 Adjusting the LCD Screen 18 Setting the Time Zone, Date and Time 19 Recording ...Using the Recording Programs 38 Using the Night Mode 41 Skin Detail Function 42 Adjusting the AE Shift 43 Adjusting the Focus Manually 44 Setting the White Balance 46 Setting the Shutter Speed 48 Using the Self-Timer 50 Changing the Recording Mode (SP/...
Table of contents Introduction Using this Manual 5 Checking Supplied Accessories 8 Components Guide 9 Basic Functions Preparations Preparing the Power Supply 12 Loading/Unloading a Cassette 15 Installing the Backup Battery 16 Preparing the Camcorder 17 Adjusting the LCD Screen 18 Setting the Time Zone, Date and Time 19 Recording ...Using the Recording Programs 38 Using the Night Mode 41 Skin Detail Function 42 Adjusting the AE Shift 43 Adjusting the Focus Manually 44 Setting the White Balance 46 Setting the Shutter Speed 48 Using the Self-Timer 50 Changing the Recording Mode (SP/...

Instruction Manual
Page 32
...the white audio terminal L (left), the red plug to the red audio terminal R (right) and the yellow plug to the TV or VCR instruction manual. Playing Back on the TV/VCR. Signal flow STV-250N Stereo Video Cable (supplied) VIDEO AUDIO L R 1. Connect the STV-250N Stereo Video Cable... to VIDEO. If connecting to a VCR, set the input selector to the camcorder's AV terminal and the audio/video terminals on a TV Screen TVs with Video ID-1 system: Recordings made in the widescreen mode will be automatically played...
...the white audio terminal L (left), the red plug to the red audio terminal R (right) and the yellow plug to the TV or VCR instruction manual. Playing Back on the TV/VCR. Signal flow STV-250N Stereo Video Cable (supplied) VIDEO AUDIO L R 1. Connect the STV-250N Stereo Video Cable... to VIDEO. If connecting to a VCR, set the input selector to the camcorder's AV terminal and the audio/video terminals on a TV Screen TVs with Video ID-1 system: Recordings made in the widescreen mode will be automatically played...

Instruction Manual
Page 38
...It prevents the subject from being underexposed. Using Recording the Recording Programs Easy Recording Program The camcorder adjusts focus, exposure and other settings automatically. Program AE Modes Auto The camcorder adjusts focus, exposure and other settings automatically, allowing you to record in bright places such as.... Sports Use this mode in dimly lit places. 38 The blur effect increases the more you have the option of adjusting the settings manually. Sand & Snow Use this mode to telephoto. However, you zoom to record sports scenes (such as tennis or golf) or moving...
...It prevents the subject from being underexposed. Using Recording the Recording Programs Easy Recording Program The camcorder adjusts focus, exposure and other settings automatically. Program AE Modes Auto The camcorder adjusts focus, exposure and other settings automatically, allowing you to record in bright places such as.... Sports Use this mode in dimly lit places. 38 The blur effect increases the more you have the option of adjusting the settings manually. Sand & Snow Use this mode to telephoto. However, you zoom to record sports scenes (such as tennis or golf) or moving...

Instruction Manual
Page 41
Press the NIGHT MODE button. • " " appears. • Pressing the NIGHT MODE button again resets the camcorder to . 2. Set the program selector to the Auto mode. Moving subjects may leave a trailing afterimage. Picture quality may not work as well as ... screen. Autofocus may not be as good as in other modes. E Night Mode Program selector NIGHT MODE button 1. In such case, adjust the focus manually. Digital zoom and multi-image screen cannot be used while a night mode is activated. The program AE mode cannot be used, without sacrificing...
Press the NIGHT MODE button. • " " appears. • Pressing the NIGHT MODE button again resets the camcorder to . 2. Set the program selector to the Auto mode. Moving subjects may leave a trailing afterimage. Picture quality may not work as well as ... screen. Autofocus may not be as good as in other modes. E Night Mode Program selector NIGHT MODE button 1. In such case, adjust the focus manually. Digital zoom and multi-image screen cannot be used while a night mode is activated. The program AE mode cannot be used, without sacrificing...
Instruction Manual
Page 44
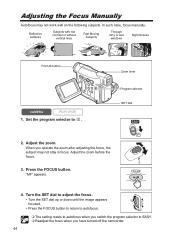
... the program selector to . "MF" appears. 4. Set the program selector to EASY. Readjust the focus when you have turned off the camcorder. 44 In such case, focus manually. Reflective surfaces Subjects with low contrast or without vertical lines Fast Moving Subjects Through dirty or wet windows Night Scenes FOCUS button CAMERA...
... the program selector to . "MF" appears. 4. Set the program selector to EASY. Readjust the focus when you have turned off the camcorder. 44 In such case, focus manually. Reflective surfaces Subjects with low contrast or without vertical lines Fast Moving Subjects Through dirty or wet windows Night Scenes FOCUS button CAMERA...

Instruction Manual
Page 45
E Press the FOCUS button more than 2 seconds after step 2 in Adjusting the Focus Manually. Advanced Functions Recording Infinity Focus Use this function when you operate the zoom or turn the SET dial, " " disappears and the camcorder changes to focus on faraway subjects such as mountains or fireworks. When you wish to manual focus. 45 "MF " appears.
E Press the FOCUS button more than 2 seconds after step 2 in Adjusting the Focus Manually. Advanced Functions Recording Infinity Focus Use this function when you operate the zoom or turn the SET dial, " " disappears and the camcorder changes to focus on faraway subjects such as mountains or fireworks. When you wish to manual focus. 45 "MF " appears.

Instruction Manual
Page 48
Setting the Shutter Speed You can adjust the shutter speed manually to make stable shots of fluorescent lighting and adjusts the shutter speed accordingly. Set the program AE mode to . 2. Moving objects such as basketball: 1/100 ... with high shutter speeds. Recording under fluorescent lights: In Easy Recording, Auto or Night mode, the camcorder automatically detects the flicker of fast moving subjects. Close the menu. Do not point the camcorder directly at the sun when the shutter speed is set the shutter speed to 1/100. The...
Setting the Shutter Speed You can adjust the shutter speed manually to make stable shots of fluorescent lighting and adjusts the shutter speed accordingly. Set the program AE mode to . 2. Moving objects such as basketball: 1/100 ... with high shutter speeds. Recording under fluorescent lights: In Easy Recording, Auto or Night mode, the camcorder automatically detects the flicker of fast moving subjects. Close the menu. Do not point the camcorder directly at the sun when the shutter speed is set the shutter speed to 1/100. The...

Instruction Manual
Page 56
... EFFECTS ON/OFF button for more than 1 second cancels the images one after the last image. Press the DIGITAL EFFECTS ON/OFF button. • MANUAL: Images will be used in the following cases: - Using the Multi-Image Screen You can be captured each time you turn it to [MULTI-S]. ...sequence disappears after another. • FAST, MODERATE, SLOW: The set it off the digital effect when you do not use it. The camcorder retains the setting even if you press the DIGITAL EFFECTS ON/OFF button. Select [M.S.SPLIT], select the number of images will be selected: fast (every...
... EFFECTS ON/OFF button for more than 1 second cancels the images one after the last image. Press the DIGITAL EFFECTS ON/OFF button. • MANUAL: Images will be used in the following cases: - Using the Multi-Image Screen You can be captured each time you turn it to [MULTI-S]. ...sequence disappears after another. • FAST, MODERATE, SLOW: The set it off the digital effect when you do not use it. The camcorder retains the setting even if you press the DIGITAL EFFECTS ON/OFF button. Select [M.S.SPLIT], select the number of images will be selected: fast (every...

Instruction Manual
Page 67
... record pause mode. 3. Play back the tape. 5. Connected device: Load a blank cassette and set the device to the instruction manual of the digital video device. Stop recording when copying is complete. 6. Editing Signal flow Commercially available DV cable Recording CAMERA PLAY (VCR) ...1. Set the camcorder to copy appears. Connected device: Begin recording when the scene you wish to PLAY (VCR) mode and load a recorded cassette. 2....
... record pause mode. 3. Play back the tape. 5. Connected device: Load a blank cassette and set the device to the instruction manual of the digital video device. Stop recording when copying is complete. 6. Editing Signal flow Commercially available DV cable Recording CAMERA PLAY (VCR) ...1. Set the camcorder to copy appears. Connected device: Begin recording when the scene you wish to PLAY (VCR) mode and load a recorded cassette. 2....
Instruction Manual
Page 72
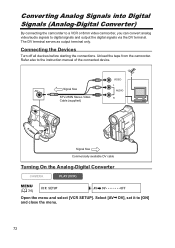
... [AV DV], set it to the instruction manual of the connected device. Refer also to [ON] and close the menu. 72 Unload the tape from the camcorder. Converting Analog Signals into Digital Signals (Analog-Digital Converter) By connecting the camcorder to a VCR or 8mm video camcorder, you can convert analog video/audio signals to...
... [AV DV], set it to the instruction manual of the connected device. Refer also to [ON] and close the menu. 72 Unload the tape from the camcorder. Converting Analog Signals into Digital Signals (Analog-Digital Converter) By connecting the camcorder to a VCR or 8mm video camcorder, you can convert analog video/audio signals to...

Instruction Manual
Page 74
... With DV Messenger, you have connected the camcorder, disconnect and reconnect the DV cable. Transferring Video Recordings to a Computer Transferring Using a DV Cable You can transfer recordings to computer. www.canondv.com www.canon.ca www.canon-asia.com 74 IEEE1394 (DV) terminal Commercially ... operating systems later than Mac OS 9, and will be installed automatically. Use the editing software supplied with your camcorder. Refer to the instruction manual of your computer. If the computer freezes while you can perform a videoconference using your computer/capture ...
... With DV Messenger, you have connected the camcorder, disconnect and reconnect the DV cable. Transferring Video Recordings to a Computer Transferring Using a DV Cable You can transfer recordings to computer. www.canondv.com www.canon.ca www.canon-asia.com 74 IEEE1394 (DV) terminal Commercially ... operating systems later than Mac OS 9, and will be installed automatically. Use the editing software supplied with your camcorder. Refer to the instruction manual of your computer. If the computer freezes while you can perform a videoconference using your computer/capture ...

Instruction Manual
Page 84
Cassette is blurred. Camcorder will not start /stop button Camcorder is not adjusted. Viewfinder picture is protected (" " Change the ... not loaded. Insert the backup battery with 16 the + side facing outward and set to a mode Set the camcorder to appear. recorded in a lower volume sound (such as fireworks, than the CAMERA CAMERA mode. Cassette is distorted...time are Set the time zone, date and 19 DATE AND TIME" appears on the the cassette. screen). Camcorder is set the time zone, date and time. Autofocus does not work on Bright light in the actual ...
Cassette is blurred. Camcorder will not start /stop button Camcorder is not adjusted. Viewfinder picture is protected (" " Change the ... not loaded. Insert the backup battery with 16 the + side facing outward and set to a mode Set the camcorder to appear. recorded in a lower volume sound (such as fireworks, than the CAMERA CAMERA mode. Cassette is distorted...time are Set the time zone, date and 19 DATE AND TIME" appears on the the cassette. screen). Camcorder is set the time zone, date and time. Autofocus does not work on Bright light in the actual ...

Instruction Manual
Page 85
...]. 72 TV screen. terminal. Additional Information 85 dub copyright protected tape. SET dial. Refer also to [OFF]. 72 Dubbing may work via the camcorder's DV terminal does not work. not set to PLAY (VCR) mode. (VCR) mode. Video heads are dirty. No sound from the built-in... Speaker volume is turned off , or is Set the camcorder to [ON]. Editing Problem Dubbing via the AV - E Cassette is not loaded. Solution Set [AV DV] to the instruction manual of the connected device. Tape is running, but image will not appear on the...
...]. 72 TV screen. terminal. Additional Information 85 dub copyright protected tape. SET dial. Refer also to [OFF]. 72 Dubbing may work via the camcorder's DV terminal does not work. not set to PLAY (VCR) mode. (VCR) mode. Video heads are dirty. No sound from the built-in... Speaker volume is turned off , or is Set the camcorder to [ON]. Editing Problem Dubbing via the AV - E Cassette is not loaded. Solution Set [AV DV] to the instruction manual of the connected device. Tape is running, but image will not appear on the...

Instruction Manual
Page 90
....5-1070 mm 16:9 recording : 44.2-884 mm 11 elements in 8 groups 28 mm TTL autofocus, manual focusing possible 1 m (3.3 ft.); 1 cm (0.39 in.) on maximum wide angle Auto white balance...(IEEE 1394 compliant) Power/Others Power supply (rated) Power consumption (AF on) Operating temperature Dimensions (W x H x D) Weight (camcorder body only) 7.4 V DC 2.3W (using viewfinder), 3.1W (using LCD screen in normal brightness) 0 - 40 °C (... min., LP: 120 min. Specifications ZR100 System Video Recording System Audio Recording System Television System Image Sensor Tape Format Tape Speed Maximum Recording Time (80...
....5-1070 mm 16:9 recording : 44.2-884 mm 11 elements in 8 groups 28 mm TTL autofocus, manual focusing possible 1 m (3.3 ft.); 1 cm (0.39 in.) on maximum wide angle Auto white balance...(IEEE 1394 compliant) Power/Others Power supply (rated) Power consumption (AF on) Operating temperature Dimensions (W x H x D) Weight (camcorder body only) 7.4 V DC 2.3W (using viewfinder), 3.1W (using LCD screen in normal brightness) 0 - 40 °C (... min., LP: 120 min. Specifications ZR100 System Video Recording System Audio Recording System Television System Image Sensor Tape Format Tape Speed Maximum Recording Time (80...

Instruction Manual
Page 93
Index 12bit audio 62 16:9 widescreen 57 6-second auto date 60 F Faders 53 E Fast forward 30 A Focusing 44 Abroad, using the camcorder 82 Accessories 8, 87 AE Shift 43 G Grip belt 17 Analog line-in 69 Analog-digital converter 72 Audio mode 52 Auto 38 I Image stabilizer ...18 Lens cap 17 Low light mode 38 LP mode 51 Beep 65 Brightness 65 M Maintenance 78 C Computer 74 Condensation 79 Connections - TV, VCR 32 Manual focus 44 Menus 34 Multi-image screen 54 My Camera settings 63 Copyright signals 71 N D Night mode 41 Data code 59 Date and time 19...
Index 12bit audio 62 16:9 widescreen 57 6-second auto date 60 F Faders 53 E Fast forward 30 A Focusing 44 Abroad, using the camcorder 82 Accessories 8, 87 AE Shift 43 G Grip belt 17 Analog line-in 69 Analog-digital converter 72 Audio mode 52 Auto 38 I Image stabilizer ...18 Lens cap 17 Low light mode 38 LP mode 51 Beep 65 Brightness 65 M Maintenance 78 C Computer 74 Condensation 79 Connections - TV, VCR 32 Manual focus 44 Menus 34 Multi-image screen 54 My Camera settings 63 Copyright signals 71 N D Night mode 41 Data code 59 Date and time 19...


