
ZR100/200/300 Brochure
Page 1
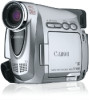
... 22x Optical Zoom Lens (ZR300) 20x Optical Zoom Lens (ZR200/ZR100) What sets a Canon camcorder apart from all the others? Unlike camcorders which only record a vertically stretched picture, Canon's ZR300, ZR200 and ZR100 use with both video and digital photos. It's the only camcorder made by a company renowned for photography and broadcast television goes into every lens...
... 22x Optical Zoom Lens (ZR300) 20x Optical Zoom Lens (ZR200/ZR100) What sets a Canon camcorder apart from all the others? Unlike camcorders which only record a vertically stretched picture, Canon's ZR300, ZR200 and ZR100 use with both video and digital photos. It's the only camcorder made by a company renowned for photography and broadcast television goes into every lens...

ZR100/200/300 Brochure
Page 2
...450,000 pixels Lens ZR300: f=2.8-61.6mm, f/1.6-3.6, 22x power zoom ZR200: f=2.8-56mm, f/1.6-3.2, 20x power zoom ZR100: f=2.8-56mm, f/1.6-3.2, 20x power zoom LCD Screen 2.4-inch. ZR300/ZR200/ZR100 KIT LCD Backlight For shooting on the move. • Program Auto Exposure • Motion JPEG (ZR300/... photos to change without a tripod. Subject to your PC directly from the camcorder's menu. Warning: Unauthorized recording of copyrighted materials may be contrary to a Canon Compact Photo Printer, Canon PIXMA Photo Printer, or any of different paper sizes with family and friends....
...450,000 pixels Lens ZR300: f=2.8-61.6mm, f/1.6-3.6, 22x power zoom ZR200: f=2.8-56mm, f/1.6-3.2, 20x power zoom ZR100: f=2.8-56mm, f/1.6-3.2, 20x power zoom LCD Screen 2.4-inch. ZR300/ZR200/ZR100 KIT LCD Backlight For shooting on the move. • Program Auto Exposure • Motion JPEG (ZR300/... photos to change without a tripod. Subject to your PC directly from the camcorder's menu. Warning: Unauthorized recording of copyrighted materials may be contrary to a Canon Compact Photo Printer, Canon PIXMA Photo Printer, or any of different paper sizes with family and friends....

Instruction Manual
Page 2
...Do not make any interference received, including interference that interference will not occur in the literature accompanying the product. Digital Video Camcorder, ZR100 systems This device complies with class B limits in the manual. TO REDUCE THE RISK OF ELECTRIC SHOCK AND TO REDUCE ...ANNOYING INTERFERENCE, USE THE RECOMMENDED ACCESSORIES ONLY. Important Introduction Usage Instructions WARNING! Canon U.S.A. Important Warning CAUTION RISK OF ELECTRIC SHOCK DO NOT OPEN CAUTION: TO REDUCE THE RISK OF ELECTRIC SHOCK, DO NOT REMOVE...
...Do not make any interference received, including interference that interference will not occur in the literature accompanying the product. Digital Video Camcorder, ZR100 systems This device complies with class B limits in the manual. TO REDUCE THE RISK OF ELECTRIC SHOCK AND TO REDUCE ...ANNOYING INTERFERENCE, USE THE RECOMMENDED ACCESSORIES ONLY. Important Introduction Usage Instructions WARNING! Canon U.S.A. Important Warning CAUTION RISK OF ELECTRIC SHOCK DO NOT OPEN CAUTION: TO REDUCE THE RISK OF ELECTRIC SHOCK, DO NOT REMOVE...

Instruction Manual
Page 3
...reference. 11. IMPORTANT SAFETY INSTRUCTIONS In these safety instructions the word "product" 10. The CA-570 Compact refers to the Canon Digital Video Camcorder Power Adapter should be retained such as to . 4. Retain Instructions - Polarization - Follow Instructions - Do not use this.... combination should be adhered to provide some protection against them. The safety and operating instructions should be operated only E ZR100 A and all its accessories. liquid or aerosol cleaners. in this product near water or in wire to an antenna discharge...
...reference. 11. IMPORTANT SAFETY INSTRUCTIONS In these safety instructions the word "product" 10. The CA-570 Compact refers to the Canon Digital Video Camcorder Power Adapter should be retained such as to . 4. Retain Instructions - Polarization - Follow Instructions - Do not use this.... combination should be adhered to provide some protection against them. The safety and operating instructions should be operated only E ZR100 A and all its accessories. liquid or aerosol cleaners. in this product near water or in wire to an antenna discharge...

Instruction Manual
Page 5
...manual carefully before you begin ( 64). Symbols and References Used in This Manual : Precautions related to the camcorder operation. : Additional topics that complement the basic operating procedures. : Reference page number. ...; Capital letters are used to refer to menu items displayed on the camcorder. [ ] are trademarks of Apple Computer, Inc., registered in the United States and/or other countries. ... Please read this Manual Thank you use the camcorder and retain it for purchasing the Canon ZR100.
...manual carefully before you begin ( 64). Symbols and References Used in This Manual : Precautions related to the camcorder operation. : Additional topics that complement the basic operating procedures. : Reference page number. ...; Capital letters are used to refer to menu items displayed on the camcorder. [ ] are trademarks of Apple Computer, Inc., registered in the United States and/or other countries. ... Please read this Manual Thank you use the camcorder and retain it for purchasing the Canon ZR100.

Instruction Manual
Page 6
... Manual 5 Checking Supplied Accessories 8 Components Guide 9 Basic Functions Preparations Preparing the Power Supply 12 Loading/Unloading a Cassette 15 Installing the Backup Battery 16 Preparing the Camcorder 17 Adjusting the LCD Screen 18 Setting the Time Zone, Date and Time 19 Recording Recording Movies on a Tape 22 Zooming...26 Tips for Making...:9 57 Playback Magnifying the Image 58 Displaying the Data Code 59 End Search...61 Playing Back a Tape with Added Sound 62 Other Functions Customizing the Camcorder 63 Changing the Display Language 64 Other...
... Manual 5 Checking Supplied Accessories 8 Components Guide 9 Basic Functions Preparations Preparing the Power Supply 12 Loading/Unloading a Cassette 15 Installing the Backup Battery 16 Preparing the Camcorder 17 Adjusting the LCD Screen 18 Setting the Time Zone, Date and Time 19 Recording Recording Movies on a Tape 22 Zooming...26 Tips for Making...:9 57 Playback Magnifying the Image 58 Displaying the Data Code 59 End Search...61 Playing Back a Tape with Added Sound 62 Other Functions Customizing the Camcorder 63 Changing the Display Language 64 Other...

Instruction Manual
Page 7
Introduction Editing Recording to a VCR or Digital Video Device 67 Recording from Analog Video Devices (VCR, TV or Camcorder 69 Recording from Digital Video Devices (DV Dubbing 70 E Converting Analog Signals into Digital Signals (Analog-Digital Converter) ...72 Transferring Video Recordings to a Computer 74 Additional Information Screen Displays 75 List of Messages 77 Maintenance/Others 78 Troubleshooting 83 System Diagram (Availability differs from area to area 86 Optional Accessories 87 Specifications 90 Item Codes ...92 Index...93 7
Introduction Editing Recording to a VCR or Digital Video Device 67 Recording from Analog Video Devices (VCR, TV or Camcorder 69 Recording from Digital Video Devices (DV Dubbing 70 E Converting Analog Signals into Digital Signals (Analog-Digital Converter) ...72 Transferring Video Recordings to a Computer 74 Additional Information Screen Displays 75 List of Messages 77 Maintenance/Others 78 Troubleshooting 83 System Diagram (Availability differs from area to area 86 Optional Accessories 87 Specifications 90 Item Codes ...92 Index...93 7
Instruction Manual
Page 8
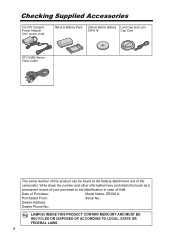
...of theft. Write down the number and other information here and retain this product can be found at the battery attachment unit of the camcorder. Checking Supplied Accessories CA-570 Compact Power Adapter (incl. power cord) NB-2LH Battery Pack Lithium Button Battery Lens Cap and Lens ...Stereo Video Cable The serial number of this book as a permanent record of your purchase to aid identification in case of Purchase: Model Name: ZR100 A Purchased From: Serial No.: Dealer Address: Dealer Phone No.: Hg LAMP(S) INSIDE THIS PRODUCT CONTAIN MERCURY AND MUST BE RECYCLED OR DISPOSED ...
...of theft. Write down the number and other information here and retain this product can be found at the battery attachment unit of the camcorder. Checking Supplied Accessories CA-570 Compact Power Adapter (incl. power cord) NB-2LH Battery Pack Lithium Button Battery Lens Cap and Lens ...Stereo Video Cable The serial number of this book as a permanent record of your purchase to aid identification in case of Purchase: Model Name: ZR100 A Purchased From: Serial No.: Dealer Address: Dealer Phone No.: Hg LAMP(S) INSIDE THIS PRODUCT CONTAIN MERCURY AND MUST BE RECYCLED OR DISPOSED ...

Instruction Manual
Page 12
...is complete. 4. Plug the power cord into a power outlet. It glows steadily when charging is complete, disconnect the power adapter from the camcorder. Remove the battery pack after use. DC IN terminal 12 The CHARGE indicator starts flashing. Press the BATT. Connect the power adapter to... Preparing Preparations the Power Supply Attaching the Battery Pack 1. Turn the POWER switch to remove the battery. Attach the battery pack to the camcorder. • Remove the terminal cover of the battery pack. • Press lightly and slide it in the direction of the arrow until...
...is complete. 4. Plug the power cord into a power outlet. It glows steadily when charging is complete, disconnect the power adapter from the camcorder. Remove the battery pack after use. DC IN terminal 12 The CHARGE indicator starts flashing. Press the BATT. Connect the power adapter to... Preparing Preparations the Power Supply Attaching the Battery Pack 1. Turn the POWER switch to remove the battery. Attach the battery pack to the camcorder. • Remove the terminal cover of the battery pack. • Press lightly and slide it in the direction of the arrow until...

Instruction Manual
Page 13
...cause picture interference. the battery power will not be charged correctly even if the CHARGE indicator glows steady. Connect the power cord to the camcorder. When the power adapter or battery pack is defective, the CHARGE indicator flashes rapidly (at about 2 flashes/second) and charging ...This is used close to OFF. 2. The battery pack may also not be charged correctly when a power outage occurs during use the camcorder without worrying about the charge status. 0-50%: Flashes once every second More than 50%: Flashes twice every second 100%: Glows steadily 13 ...
...cause picture interference. the battery power will not be charged correctly even if the CHARGE indicator glows steady. Connect the power cord to the camcorder. When the power adapter or battery pack is defective, the CHARGE indicator flashes rapidly (at about 2 flashes/second) and charging ...This is used close to OFF. 2. The battery pack may also not be charged correctly when a power outage occurs during use the camcorder without worrying about the charge status. 0-50%: Flashes once every second More than 50%: Flashes twice every second 100%: Glows steadily 13 ...

Instruction Manual
Page 14
... min. 160 min. 120 min. 105 min. 220 min. * Approximate times for recording with repeated operations such as start/stop, zooming, power on/off the camcorder instead of 0 °C to 40 °C (32 °F to 104 °F), the CHARGE indicator flashes rapidly and charging stops. A lithium ion battery pack can...
... min. 160 min. 120 min. 105 min. 220 min. * Approximate times for recording with repeated operations such as start/stop, zooming, power on/off the camcorder instead of 0 °C to 40 °C (32 °F to 104 °F), the CHARGE indicator flashes rapidly and charging stops. A lithium ion battery pack can...
Instruction Manual
Page 15
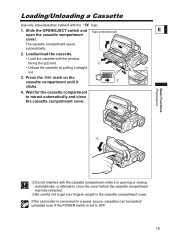
Press the mark on the cassette compartment until it clicks. 4. If the camcorder is connected to a power source, cassettes can be loaded/ unloaded even if the POWER switch is opening or closing automatically, or attempt to OFF. 15 ...
Press the mark on the cassette compartment until it clicks. 4. If the camcorder is connected to a power source, cassettes can be loaded/ unloaded even if the POWER switch is opening or closing automatically, or attempt to OFF. 15 ...

Instruction Manual
Page 16
" flashes in red to retain the settings. 1. Close the cover. Connect a power source to the camcorder when replacing the backup battery to inform 16 Insert the backup battery with the + side facing outward. 3. Installing the Backup Battery The backup battery (lithium button battery CR1616) allows the camcorder to be replaced. The backup battery has a life span of about a year. " you that it needs to retain date, time ( 19) and other camcorder settings while the power source is disconnected. Open the backup battery cover. 2.
" flashes in red to retain the settings. 1. Close the cover. Connect a power source to the camcorder when replacing the backup battery to inform 16 Insert the backup battery with the + side facing outward. 3. Installing the Backup Battery The backup battery (lithium button battery CR1616) allows the camcorder to be replaced. The backup battery has a life span of about a year. " you that it needs to retain date, time ( 19) and other camcorder settings while the power source is disconnected. Open the backup battery cover. 2.

Instruction Manual
Page 17
Pull out the viewfinder. 3. Attaching the Lens Cap 1. Turn on the cord. Pass the grip belt through the loop on the camcorder and keep the LCD panel closed. 2. Adjust the grip belt so that you can reach the zoom lever with your index finger, and the start/...stop button with your thumb. 17 Basic Functions Preparations Preparing the Camcorder Adjusting the Viewfinder (Dioptric Adjustment) E 1. Push the viewfinder back in. Hook the lens cap on the lens cap when attaching/removing it over the lens...
Pull out the viewfinder. 3. Attaching the Lens Cap 1. Turn on the cord. Pass the grip belt through the loop on the camcorder and keep the LCD panel closed. 2. Adjust the grip belt so that you can reach the zoom lever with your index finger, and the start/...stop button with your thumb. 17 Basic Functions Preparations Preparing the Camcorder Adjusting the Viewfinder (Dioptric Adjustment) E 1. Push the viewfinder back in. Hook the lens cap on the lens cap when attaching/removing it over the lens...

Instruction Manual
Page 18
... the LCD BACKLIGHT button. This setting does not affect the brightness of the recording or the viewfinder screen. When using a battery pack, the camcorder retains the setting even if you change the position of the LCD screen between normal and bright by 180 degrees inward.
... the LCD BACKLIGHT button. This setting does not affect the brightness of the recording or the viewfinder screen. When using a battery pack, the camcorder retains the setting even if you change the position of the LCD screen between normal and bright by 180 degrees inward.

Instruction Manual
Page 19
... setting is New York. 4. To adjust for daylight saving time, select the time zone with the next to select the setting option that represents your camcorder, or when you have replaced the backup battery. The time zone setting appears (see table on the next page).
... setting is New York. 4. To adjust for daylight saving time, select the time zone with the next to select the setting option that represents your camcorder, or when you have replaced the backup battery. The time zone setting appears (see table on the next page).

Instruction Manual
Page 20
... time, you do not need to reset the clock each time you have set the time zone to the one of your destination, and the camcorder automatically adjusts the clock. 20 Time zone 1 LONDON 2 PARIS 3 CAIRO 4 MOSCOW 5 DUBAI 6 KARACHI 7 DACCA 8 BANGKOK 9 H. Press the MENU button to close the menu and to...
... time, you do not need to reset the clock each time you have set the time zone to the one of your destination, and the camcorder automatically adjusts the clock. 20 Time zone 1 LONDON 2 PARIS 3 CAIRO 4 MOSCOW 5 DUBAI 6 KARACHI 7 DACCA 8 BANGKOK 9 H. Press the MENU button to close the menu and to...

Instruction Manual
Page 22
... recording. Close the LCD panel. 3. Set the POWER switch to OFF. 2. Turn the POWER switch to CAMERA. 3. Replace the lens cap. 4. Set the camcorder to check if the camcorder operates correctly. Unload the cassette. 5. Recording 1. Open the LCD panel. 4. Disconnect the power source. 22 Remove the lens cap. 2. If necessary, clean the...
... recording. Close the LCD panel. 3. Set the POWER switch to OFF. 2. Turn the POWER switch to CAMERA. 3. Replace the lens cap. 4. Set the camcorder to check if the camcorder operates correctly. Unload the cassette. 5. Recording 1. Open the LCD panel. 4. Disconnect the power source. 22 Remove the lens cap. 2. If necessary, clean the...

Instruction Manual
Page 23
Less than 99.99% of the pixels may occasionally misfire or appear as black or green dots. To continue recording, turn the camcorder off after 5 minutes when left in the actual sound level. This is being recorded (LCD MIRROR OFF). The viewfinder switches on the recorded image ...and does not constitute a malfunction. The camcorder will shut off . Bright light may make it is not a malfunction. Turn the SET dial to select [LCD MIRROR] and press the SET dial...
Less than 99.99% of the pixels may occasionally misfire or appear as black or green dots. To continue recording, turn the camcorder off after 5 minutes when left in the actual sound level. This is being recorded (LCD MIRROR OFF). The viewfinder switches on the recorded image ...and does not constitute a malfunction. The camcorder will shut off . Bright light may make it is not a malfunction. Turn the SET dial to select [LCD MIRROR] and press the SET dial...

Instruction Manual
Page 24
...battery symbol indicates the charge status of the tape, the indication may not appear. • Depending on the condition under which battery pack and camcorder are too short. 24 When " " flashes " " flashes in minutes." When [LCD MIRROR] is set to close the menu. Remaining ... seconds, the remaining tape time may not be displayed correctly. • " " starts flashing in hours, minutes and seconds. Recording reminder The camcorder counts from 1 to avoid scenes that are used. 5. Press the MENU button to [ON], some screen displays appear mirrorreversed. END" flashes when...
...battery symbol indicates the charge status of the tape, the indication may not appear. • Depending on the condition under which battery pack and camcorder are too short. 24 When " " flashes " " flashes in minutes." When [LCD MIRROR] is set to close the menu. Remaining ... seconds, the remaining tape time may not be displayed correctly. • " " starts flashing in hours, minutes and seconds. Recording reminder The camcorder counts from 1 to avoid scenes that are used. 5. Press the MENU button to [ON], some screen displays appear mirrorreversed. END" flashes when...


