
XL H1S / XL H1A Instruction Manual
Page 5
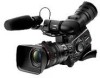
...) • and more freedom to HDV specifications ( 50). DIGIC DV II image processor The next generation of the camcorder's operation. you even more ! 5 Advanced Professional Features Pro level connectivity An industry-standard HD/SD SDI terminal for video recordings compliant with the XL H1S / XL H1A. Enhanced customization Custom functions ( 104) and custom display ( 110...
...) • and more freedom to HDV specifications ( 50). DIGIC DV II image processor The next generation of the camcorder's operation. you even more ! 5 Advanced Professional Features Pro level connectivity An industry-standard HD/SD SDI terminal for video recordings compliant with the XL H1S / XL H1A. Enhanced customization Custom functions ( 104) and custom display ( 110...

XL H1S / XL H1A Instruction Manual
Page 14
...screw ( 25) Strap mount ( 25) INPUT terminals (CH1/CH2, XLR) ( 58) SHUTTER buttons ( 65, 67) PHONES LEVEL dial (headphone) terminal HDV indicator ( 40) HDV/DV terminal ( 87, 93, 95) terminal switches (CH1,CH2) ( 58) switches (CH1,CH2) ( 58) / (card/tape) switch ( 121) CARD access indicator ( 121) ... with the mark to the terminal. Operation cannot be guaranteed for Local Application Control Bus System. The terminal allows you to the camcorder. To use tripods with devices not bearing the mark. Some buttons of connected devices may not operate or may operate differently than ...
...screw ( 25) Strap mount ( 25) INPUT terminals (CH1/CH2, XLR) ( 58) SHUTTER buttons ( 65, 67) PHONES LEVEL dial (headphone) terminal HDV indicator ( 40) HDV/DV terminal ( 87, 93, 95) terminal switches (CH1,CH2) ( 58) switches (CH1,CH2) ( 58) / (card/tape) switch ( 121) CARD access indicator ( 121) ... with the mark to the terminal. Operation cannot be guaranteed for Local Application Control Bus System. The terminal allows you to the camcorder. To use tripods with devices not bearing the mark. Some buttons of connected devices may not operate or may operate differently than ...
XL H1S / XL H1A Instruction Manual
Page 36
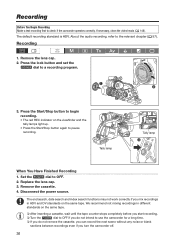
...Press the lock button and set the dial to the relevant chapter ( 57). Disconnect the power source. We recommend not mixing recordings in HDV and DV standards on the same tape. About the audio recording, refer to a recording program. 3. Press the Start/Stop button to begin recording. •... a cassette, wait until the tape counter stops completely before you start recording. Turn the dial to OFF if you turn the camcorder off. 36 The end search, date search and index search functions may not work correctly if you mix recordings in different standards on the viewfinder...
...Press the lock button and set the dial to the relevant chapter ( 57). Disconnect the power source. We recommend not mixing recordings in HDV and DV standards on the same tape. About the audio recording, refer to a recording program. 3. Press the Start/Stop button to begin recording. •... a cassette, wait until the tape counter stops completely before you start recording. Turn the dial to OFF if you turn the camcorder off. 36 The end search, date search and index search functions may not work correctly if you mix recordings in different standards on the viewfinder...

XL H1S / XL H1A Instruction Manual
Page 40
... [LETTERBOX] to HD. If the position of the 16:9 aspect ratio. (Note that not all XL lenses are compatible with the RC-72.) 40 Select the aspect ratio as a high-definition (HD) camera. &#...When recording in the center of the screen with the Video ID-1 system. Otherwise, change immediately; Since the camcorder's screen has an aspect ratio of 16:9, when you set the MODE SELECT switch to SD 4:3 the picture... will appear in 4:3, you play back on the tape in DV standard or to [OFF], the MODE SELECT switch will not change the aspect ratio of the ...
... [LETTERBOX] to HD. If the position of the 16:9 aspect ratio. (Note that not all XL lenses are compatible with the RC-72.) 40 Select the aspect ratio as a high-definition (HD) camera. &#...When recording in the center of the screen with the Video ID-1 system. Otherwise, change immediately; Since the camcorder's screen has an aspect ratio of 16:9, when you set the MODE SELECT switch to SD 4:3 the picture... will appear in 4:3, you play back on the tape in DV standard or to [OFF], the MODE SELECT switch will not change the aspect ratio of the ...
XL H1S / XL H1A Instruction Manual
Page 41
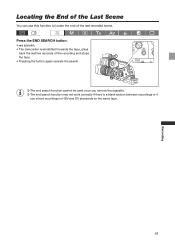
Locating the End of the Last Scene You can use this function to locate the end of the recording and stops the tape. • Pressing the button again cancels the search. The end search function cannot be used once you remove the cassette. The end search function may not work correctly if there is a blank section between recordings or if you mixed recordings in HDV and DV standards on the same tape. 41 Recording Press the END SEARCH button. • appears. • The camcorder rewinds/fast forwards the tape, plays back the last few seconds of the last recorded scene.
Locating the End of the Last Scene You can use this function to locate the end of the recording and stops the tape. • Pressing the button again cancels the search. The end search function cannot be used once you remove the cassette. The end search function may not work correctly if there is a blank section between recordings or if you mixed recordings in HDV and DV standards on the same tape. 41 Recording Press the END SEARCH button. • appears. • The camcorder rewinds/fast forwards the tape, plays back the last few seconds of the last recorded scene.
XL H1S / XL H1A Instruction Manual
Page 46
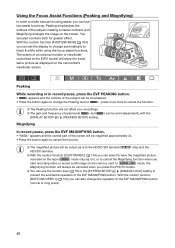
... viewfinder connected to the EVF2 socket will show the exact same picture as it is to the HD/SD SDI terminal ( only) and the HDV/DV terminal. With the custom function [CUSTOM REC] ( 104) you can select to have the magnified picture recorded on the tape ( mode only...) as displayed on the camcorder's viewfinder screen. Magnifying can set independently with the In record pause, press the EVF MAGNIFYING button. • "MAGN." appears and the central part of ...
... viewfinder connected to the EVF2 socket will show the exact same picture as it is to the HD/SD SDI terminal ( only) and the HDV/DV terminal. With the custom function [CUSTOM REC] ( 104) you can select to have the magnified picture recorded on the tape ( mode only...) as displayed on the camcorder's viewfinder screen. Magnifying can set independently with the In record pause, press the EVF MAGNIFYING button. • "MAGN." appears and the central part of ...
XL H1S / XL H1A Instruction Manual
Page 56
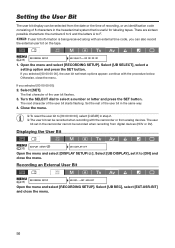
... the menu and select [RECORDING SETUP]. If you selected [00 00 00 00]: 2. The next character of the user bit in the camcorder cannot be recorded when recording with the camcorder or from analog devices. Select [UB DISPLAY], set it to F. MENU ( 33) RECORDING SETUP UB SELECT•••00 00... [UB REC], select [EXT.USR-BIT] and close the menu. continue with an external time code, you can be selected from digital devices (HDV or DV). Set the rest of the user bit starts flashing. Displaying the User Bit MENU DISPLAY SETUP/ ( 33) UB DISPLAY•OFF Open the menu and...
... the menu and select [RECORDING SETUP]. If you selected [00 00 00 00]: 2. The next character of the user bit in the camcorder cannot be recorded when recording with the camcorder or from analog devices. Select [UB DISPLAY], set it to F. MENU ( 33) RECORDING SETUP UB SELECT•••00 00... [UB REC], select [EXT.USR-BIT] and close the menu. continue with an external time code, you can be selected from digital devices (HDV or DV). Set the rest of the user bit starts flashing. Displaying the User Bit MENU DISPLAY SETUP/ ( 33) UB DISPLAY•OFF Open the menu and...
XL H1S / XL H1A Instruction Manual
Page 57
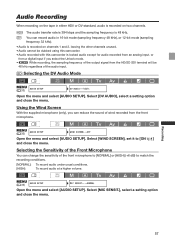
... other channels unused. • Audio cannot be dubbed using this camcorder. • Audio recorded with this camcorder is locked audio except for audio recorded from an analog input, or from the front microphone. SD Selecting the DV Audio Mode MENU ( 33) AUDIO SETUP DV AUDIO•••16bit Open the menu and select...
... other channels unused. • Audio cannot be dubbed using this camcorder. • Audio recorded with this camcorder is locked audio except for audio recorded from an analog input, or from the front microphone. SD Selecting the DV Audio Mode MENU ( 33) AUDIO SETUP DV AUDIO•••16bit Open the menu and select...

XL H1S / XL H1A Instruction Manual
Page 81
... Press the CUSTOM KEY (1 or 2) button. The time code superimposed on the video signal output from the TC-OUT*, HD/SD SDI*, (LANC) and HDV/DV terminals will not be put on hold. (* only.) • The time code hold will be displayed with the custom keys. Press the custom key button... recording and playback or change the position of the time code. • While on hold, the time code will be canceled when you turn the camcorder on hold . Pressing the button will lock the EXP. Button Lock Press the CUSTOM KEY (1 or 2) button. Press the custom key button again to prevent...
... Press the CUSTOM KEY (1 or 2) button. The time code superimposed on the video signal output from the TC-OUT*, HD/SD SDI*, (LANC) and HDV/DV terminals will not be put on hold. (* only.) • The time code hold will be displayed with the custom keys. Press the custom key button... recording and playback or change the position of the time code. • While on hold, the time code will be canceled when you turn the camcorder on hold . Pressing the button will lock the EXP. Button Lock Press the CUSTOM KEY (1 or 2) button. Press the custom key button again to prevent...
XL H1S / XL H1A Instruction Manual
Page 85
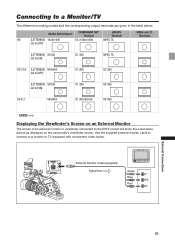
... corresponding output terminals are given in the table below: HD/SD SDI Terminal* COMPONENT OUT Terminal HDV/DV Terminal HD [LETTERBOX] 1920x1080 set to [OFF] D3 (1440x1080) MPEG TS VIDEO and Terminals [LETTERBOX...to [ON] D1 (SD) MPEG TS SD 16:9 [LETTERBOX] 640x480 set to [OFF] D1 (SD) DV (SD) [LETTERBOX] SD SDI set to a monitor or TV equipped with component video inputs. Use the ...supplied external monitor cable to connect to [ON] D1 (SD) DV (SD) SD 4:3 640x480 D1 (SD) Normal DV (SD) * only. Displaying the Viewfinder's Screen on an External Monitor The ...
... corresponding output terminals are given in the table below: HD/SD SDI Terminal* COMPONENT OUT Terminal HDV/DV Terminal HD [LETTERBOX] 1920x1080 set to [OFF] D3 (1440x1080) MPEG TS VIDEO and Terminals [LETTERBOX...to [ON] D1 (SD) MPEG TS SD 16:9 [LETTERBOX] 640x480 set to [OFF] D1 (SD) DV (SD) [LETTERBOX] SD SDI set to a monitor or TV equipped with component video inputs. Use the ...supplied external monitor cable to connect to [ON] D1 (SD) DV (SD) SD 4:3 640x480 D1 (SD) Normal DV (SD) * only. Displaying the Viewfinder's Screen on an External Monitor The ...

XL H1S / XL H1A Instruction Manual
Page 87
.... 87 Select [HD DOWN-CONV], select a setting option and close the menu. 3 Using the HDV/DV Terminal External Connections CV-250F DV Cable (optional) or commercially available 6 pin-6 pin DV cable 4-pin 6-pin • When connecting the camcorder to SD with the following procedure. 2 Using the COMPONENT OUT Terminal Open the terminal cover White... TV or monitor you may need to carry out a procedure on the monitor or TV to recognize the camera. • If necessary, turn on the DV conversion and select whether to convert a tape recorded in HD to a monitor or TV that supports...
.... 87 Select [HD DOWN-CONV], select a setting option and close the menu. 3 Using the HDV/DV Terminal External Connections CV-250F DV Cable (optional) or commercially available 6 pin-6 pin DV cable 4-pin 6-pin • When connecting the camcorder to SD with the following procedure. 2 Using the COMPONENT OUT Terminal Open the terminal cover White... TV or monitor you may need to carry out a procedure on the monitor or TV to recognize the camera. • If necessary, turn on the DV conversion and select whether to convert a tape recorded in HD to a monitor or TV that supports...

XL H1S / XL H1A Instruction Manual
Page 92
...built-in record pause mode: Camcorder and external device: start recording as the external device continues recording. While both this camcorder and a connected device are recording, if this camcorder for DV control. With some non-Canon devices the DV control may notice a brief ...interruption of the audio on the connected device. 92 MENU SYSTEM SETUP/ ( 33) DV CONTROL•••...
...built-in record pause mode: Camcorder and external device: start recording as the external device continues recording. While both this camcorder and a connected device are recording, if this camcorder for DV control. With some non-Canon devices the DV control may notice a brief ...interruption of the audio on the connected device. 92 MENU SYSTEM SETUP/ ( 33) DV CONTROL•••...

XL H1S / XL H1A Instruction Manual
Page 93
... on the wireless controller). • The camcorder enters the record pause mode. In this camcorder. Open the menu and select [AUDIO SETUP]. In this camcorder's internal time code. 1. External Connections HDV/DV In When recording from such tape via the DV terminal, "COPYRIGHT PROTECTED DUBBING RESTRICTED" appears ... diagram to an analog device refer to Section 4 of the tape. We recommend powering the camcorder from the analog video input (SD standard). Recording an External Video Signal (HDV/DV In, Analog Line-In) You can record on the tape an external video signal, either ...
... on the wireless controller). • The camcorder enters the record pause mode. In this camcorder. Open the menu and select [AUDIO SETUP]. In this camcorder's internal time code. 1. External Connections HDV/DV In When recording from such tape via the DV terminal, "COPYRIGHT PROTECTED DUBBING RESTRICTED" appears ... diagram to an analog device refer to Section 4 of the tape. We recommend powering the camcorder from the analog video input (SD standard). Recording an External Video Signal (HDV/DV In, Analog Line-In) You can record on the tape an external video signal, either ...
XL H1S / XL H1A Instruction Manual
Page 94
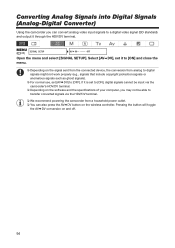
... the wireless controller. Converting Analog Signals into Digital Signals (Analog-Digital Converter) Using the camcorder you may not be input via the HDV/DV terminal. We recommend powering the camcorder from analog to digital signals might not work properly (e.g., signals that include copyright protection signals... or anomalous signals such as ghost signals). For normal use, set [AV DV] to transfer converted signals via the camcorder's HDV/DV terminal. Depending on and off. 94 Select [AV DV], set it to [ON] and close the menu. Depending on the signal ...
... the wireless controller. Converting Analog Signals into Digital Signals (Analog-Digital Converter) Using the camcorder you may not be input via the HDV/DV terminal. We recommend powering the camcorder from analog to digital signals might not work properly (e.g., signals that include copyright protection signals... or anomalous signals such as ghost signals). For normal use, set [AV DV] to transfer converted signals via the camcorder's HDV/DV terminal. Depending on and off. 94 Select [AV DV], set it to [ON] and close the menu. Depending on the signal ...

XL H1S / XL H1A Instruction Manual
Page 95
... compatible with video capturing capability installed. DV output: Set [PLAYBACK STD] to the camcorder: - DV output of the connected computer. For video output from the computer to [DV]. - DV input: Set [PLAYBACK STD] to [OFF]. - CV-250F DV Cable (optional) or commercially available 6 pin-6 pin DV cable IEEE1394 (DV) terminal 4-pin 6-pin Operation may not operate...
... compatible with video capturing capability installed. DV output: Set [PLAYBACK STD] to the camcorder: - DV output of the connected computer. For video output from the computer to [DV]. - DV input: Set [PLAYBACK STD] to [OFF]. - CV-250F DV Cable (optional) or commercially available 6 pin-6 pin DV cable IEEE1394 (DV) terminal 4-pin 6-pin Operation may not operate...
XL H1S / XL H1A Instruction Manual
Page 109
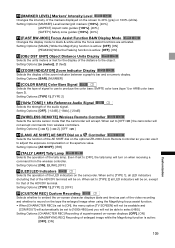
...a graphic bar and a numeric display. When set to [1080i/480i] and you can use to the object. Setting Options: [ 1], [ 2], [OFF ] ] the camcorder will 17 [LANC AE SHIFT] AE SHIFT Dial on a Controller Selects the function of the AE SHIFT dial on the optional ZR-2000 Zoom Remote...REC] is set to 40% (gray) or 100% (white). When set to [TYPE 2] all LED indicators (including that of the HDV/DV terminal) will be on the camcorder. Setting Options: [CHARACTER REC] Recording of superimposed on-screen displays: [OFF], [ON] [MAGNIFYING REC] Recording of enlarged image while the Magnifying...
...a graphic bar and a numeric display. When set to [1080i/480i] and you can use to the object. Setting Options: [ 1], [ 2], [OFF ] ] the camcorder will 17 [LANC AE SHIFT] AE SHIFT Dial on a Controller Selects the function of the AE SHIFT dial on the optional ZR-2000 Zoom Remote...REC] is set to 40% (gray) or 100% (white). When set to [TYPE 2] all LED indicators (including that of the HDV/DV terminal) will be on the camcorder. Setting Options: [CHARACTER REC] Recording of superimposed on-screen displays: [OFF], [ON] [MAGNIFYING REC] Recording of enlarged image while the Magnifying...
XL H1S / XL H1A Instruction Manual
Page 111
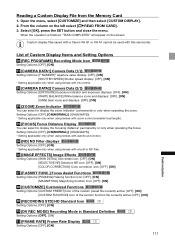
... 1. List of the custom function file currently active: [OFF], [ON] 09 [RECORDING STD] HD Standard Icon Setting Options: [OFF], [ON] 10 [DV REC MODE] Recording Mode in ND filter. 06 [IMAGE EFFECTS] Image Effects Setting Options: [SKIN DETAIL] Skin detail icon: [OFF], [ON] [SELECTIVE NR...Options: [OFF], [ON(NORMAL)], [ON(ALWAYS)] * Setting applicable only when using lenses with this camcorder. Open the menu, select [CUSTOMIZE] and then select [CUSTOM DISPLAY]. 2. Custom display files saved with a Canon XH G1 or XH A1 cannot be used with iris control. 02 [CAMERA DATA2] Camera Data (2/2)...
... 1. List of the custom function file currently active: [OFF], [ON] 09 [RECORDING STD] HD Standard Icon Setting Options: [OFF], [ON] 10 [DV REC MODE] Recording Mode in ND filter. 06 [IMAGE EFFECTS] Image Effects Setting Options: [SKIN DETAIL] Skin detail icon: [OFF], [ON] [SELECTIVE NR...Options: [OFF], [ON(NORMAL)], [ON(ALWAYS)] * Setting applicable only when using lenses with this camcorder. Open the menu, select [CUSTOMIZE] and then select [CUSTOM DISPLAY]. 2. Custom display files saved with a Canon XH G1 or XH A1 cannot be used with iris control. 02 [CAMERA DATA2] Camera Data (2/2)...
XL H1S / XL H1A Instruction Manual
Page 114
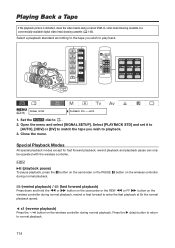
...playback) / (fast forward playback) Press down and hold the or button on the camcorder or the REW or FF button on the wireless controller during normal playback. Select [PLAYBACK STD] and set it to [AUTO], [HDV] or [DV] to match the tape you wish to play ) button to enter the fast ...playback at 8x the normal playback speed. Playing Playback Back a Tape If the playback picture is distorted, clean the video heads using a Canon DVM-CL video head cleaning cassette or a commercially...
...playback) / (fast forward playback) Press down and hold the or button on the camcorder or the REW or FF button on the wireless controller during normal playback. Select [PLAYBACK STD] and set it to [AUTO], [HDV] or [DV] to match the tape you wish to play ) button to enter the fast ...playback at 8x the normal playback speed. Playing Playback Back a Tape If the playback picture is distorted, clean the video heads using a Canon DVM-CL video head cleaning cassette or a commercially...

XL H1S / XL H1A Instruction Manual
Page 115
... on the wireless controller (rewind playback) / (fast forward playback) Plays back the tape at about 1/3 normal speed. button on the camcorder or the PAUSE button on the wireless controller during playback pause. Press the (play ) button to return to normal playback. Press the SLOW...playback) / x2 (forward x2 playback) Plays back at the switch point between recordings in HDV and DV standards on the wireless controller during some special playback modes. The camcorder stops the tape automatically after 4 minutes 30 seconds in playback pause mode to normal playback. ...
... on the wireless controller (rewind playback) / (fast forward playback) Plays back the tape at about 1/3 normal speed. button on the camcorder or the PAUSE button on the wireless controller during playback pause. Press the (play ) button to return to normal playback. Press the SLOW...playback) / x2 (forward x2 playback) Plays back at the switch point between recordings in HDV and DV standards on the wireless controller during some special playback modes. The camcorder stops the tape automatically after 4 minutes 30 seconds in playback pause mode to normal playback. ...
XL H1S / XL H1A Instruction Manual
Page 117
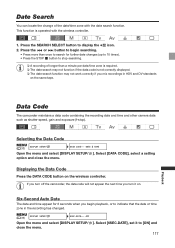
...; A recording of the date/time zone with the wireless controller. 1. Displaying the Data Code Press the DATA CODE button on . If you turn off the camcorder, the data code will not appear the next time you begin searching. • Press more than a minute per date/time zone is required. The... appear for further date changes (up to 10 times). • Press the STOP button to indicate that the date or time zone in HDV and DV standards on the same tape. Press the or button to begin playback, or to stop ). Select [6SEC.DATE], set it on the wireless controller. ...
...; A recording of the date/time zone with the wireless controller. 1. Displaying the Data Code Press the DATA CODE button on . If you turn off the camcorder, the data code will not appear the next time you begin searching. • Press more than a minute per date/time zone is required. The... appear for further date changes (up to 10 times). • Press the STOP button to indicate that the date or time zone in HDV and DV standards on the same tape. Press the or button to begin playback, or to stop ). Select [6SEC.DATE], set it on the wireless controller. ...

