

XL H1S / XL H1A Instruction Manual
Page 3
... service this product yourself as opening or removing covers may expose you to dangerous voltage or other power sources such as battery power, refer to instructions in a fire or electric shock. Retain Instructions - The safety and operating instructions should be ...1. Objects and Liquid Entry - Introduction IMPORTANT SAFETY INSTRUCTIONS In these safety instructions the word "product" refers to the Canon HD Video Camera Recorder XL H1S A / XL H1A A and all servicing to qualified service personnel. 3 Follow Instructions - All operating and maintenance instructions should be cleaned ...
... service this product yourself as opening or removing covers may expose you to dangerous voltage or other power sources such as battery power, refer to instructions in a fire or electric shock. Retain Instructions - The safety and operating instructions should be ...1. Objects and Liquid Entry - Introduction IMPORTANT SAFETY INSTRUCTIONS In these safety instructions the word "product" refers to the Canon HD Video Camera Recorder XL H1S A / XL H1A A and all servicing to qualified service personnel. 3 Follow Instructions - All operating and maintenance instructions should be cleaned ...

XL H1S / XL H1A Instruction Manual
Page 4
...with the same type number CA-920. b.If any service or repairs to this product from the wall outlet and all power sources including battery, and refer servicing to its normal operation. Safety Check - When the power-supply cord or plug is required, please return it to rain...result in performance. f. When the product exhibits a distinct change in fire, electric shock or other hazards. 21. When replacement parts are covered by Canon or that have fallen into, the product. c. When replacement of any liquid has been spilled onto, or objects have the same characteristics as the...
...with the same type number CA-920. b.If any service or repairs to this product from the wall outlet and all power sources including battery, and refer servicing to its normal operation. Safety Check - When the power-supply cord or plug is required, please return it to rain...result in performance. f. When the product exhibits a distinct change in fire, electric shock or other hazards. 21. When replacement parts are covered by Canon or that have fallen into, the product. c. When replacement of any liquid has been spilled onto, or objects have the same characteristics as the...

XL H1S / XL H1A Instruction Manual
Page 6
..., menu options in boldface indicate the default setting. The supplied lens, Canon HD Video Lens 20x Zoom XL 5.4-108 mm L IS III, is referred to as indicated in rechargeable battery has discharged completely. Press the MENU button. 2. The time zone setting appears. Setting... LICENSE IS AVAILABLE FROM MPEG LA, L.L.C., 250 STEELE STREET, SUITE 300, DENVER, COLORADO 80206. 6 To adjust for purchasing the Canon XL H1S / XL H1A. Should your camcorder fail to operate correctly, refer to select [SYSTEM SETUP/ ] and press the SET button. 3. Menu item shown at its default...
..., menu options in boldface indicate the default setting. The supplied lens, Canon HD Video Lens 20x Zoom XL 5.4-108 mm L IS III, is referred to as indicated in rechargeable battery has discharged completely. Press the MENU button. 2. The time zone setting appears. Setting... LICENSE IS AVAILABLE FROM MPEG LA, L.L.C., 250 STEELE STREET, SUITE 300, DENVER, COLORADO 80206. 6 To adjust for purchasing the Canon XL H1S / XL H1A. Should your camcorder fail to operate correctly, refer to select [SYSTEM SETUP/ ] and press the SET button. 3. Menu item shown at its default...

XL H1S / XL H1A Instruction Manual
Page 10
...microphone holder) Tripod Adapter Base SS-1100 Shoulder Strap Camcorder Dust Cap Canon HD Video Lens 20x Zoom XL 5.4-108 mm L IS III (incl. Write down the number and other information here and retain this product can be found at the battery attachment unit of theft. soft case) Lens Cap and... Dust Cap Lens Hood The serial number of this book as a permanent record of your purchase to aid identification in case of the camcorder. Date of Purchase: Model Name: XL H1S A / XL H1A A Purchased From: Serial No...
...microphone holder) Tripod Adapter Base SS-1100 Shoulder Strap Camcorder Dust Cap Canon HD Video Lens 20x Zoom XL 5.4-108 mm L IS III (incl. Write down the number and other information here and retain this product can be found at the battery attachment unit of theft. soft case) Lens Cap and... Dust Cap Lens Hood The serial number of this book as a permanent record of your purchase to aid identification in case of the camcorder. Date of Purchase: Model Name: XL H1S A / XL H1A A Purchased From: Serial No...

XL H1S / XL H1A Instruction Manual
Page 13
...) VIDEO OUT terminal (BNC) ( 88) VIDEO IN/OUT terminal (RCA) ( 88) OUT terminals (CH1/CH2, RCA) ( 90) IN terminals (CH1/CH2, RCA) ( 58) Terminal cover Battery attachment unit ( 17) BATT. RELEASE button ( 17) HD/SD SDI terminal* ( 86) GENLOCK terminal* ( 54) TC-OUT terminal* ( 54) * only. button ( 108) Cassette compartment ( 31...
...) VIDEO OUT terminal (BNC) ( 88) VIDEO IN/OUT terminal (RCA) ( 88) OUT terminals (CH1/CH2, RCA) ( 90) IN terminals (CH1/CH2, RCA) ( 58) Terminal cover Battery attachment unit ( 17) BATT. RELEASE button ( 17) HD/SD SDI terminal* ( 86) GENLOCK terminal* ( 54) TC-OUT terminal* ( 54) * only. button ( 108) Cassette compartment ( 31...

XL H1S / XL H1A Instruction Manual
Page 17
...completed. 4. Guideline BATT. The indicator will stay on when the charging is completed, remove the battery pack from the compact power adapter. Turn the dial to the camcorder. Slide the battery pack up, in the direction of the arrow until it from the compact power Charge indicator adapter.... 5. Holding the BATT. RELEASE button Preparations 17 Align the battery pack with the guideline and press lightly. ...
...completed. 4. Guideline BATT. The indicator will stay on when the charging is completed, remove the battery pack from the compact power adapter. Turn the dial to the camcorder. Slide the battery pack up, in the direction of the arrow until it from the compact power Charge indicator adapter.... 5. Holding the BATT. RELEASE button Preparations 17 Align the battery pack with the guideline and press lightly. ...
XL H1S / XL H1A Instruction Manual
Page 18
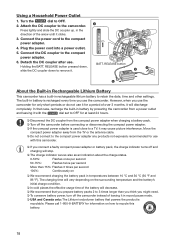
... USA and Canada only: The Lithium ion/polymer battery that case, recharge the built-in rechargeable lithium battery to 3 times longer than you think you might need. To conserve battery power, turn off the camcorder before connecting or disconnecting the compact power adapter. ... Power Outlet 1. Turn the dial to the compact power adapter. 4. RELEASE button About the Built-in Rechargeable Lithium Battery This camcorder has a built-in battery by powering the camcorder from a power outlet and leaving it with the dial set to OFF for at least 24 hours. ...
... USA and Canada only: The Lithium ion/polymer battery that case, recharge the built-in rechargeable lithium battery to 3 times longer than you think you might need. To conserve battery power, turn off the camcorder before connecting or disconnecting the compact power adapter. ... Power Outlet 1. Turn the dial to the compact power adapter. 4. RELEASE button About the Built-in Rechargeable Lithium Battery This camcorder has a built-in battery by powering the camcorder from a power outlet and leaving it with the dial set to OFF for at least 24 hours. ...

XL H1S / XL H1A Instruction Manual
Page 19
...-1000 monochrome viewfinder2 115 min. 175 min. 240 min. 330 min. HD 6x L Lens Supplied color viewfinder 90 min. 135 min. 185 min. 260 min. Battery Pack Charging time with repeated operations such as start/stop, zooming, power on/off. HDV Maximum Recording Time HD 20x L IS III Lens Supplied color...
...-1000 monochrome viewfinder2 115 min. 175 min. 240 min. 330 min. HD 6x L Lens Supplied color viewfinder 90 min. 135 min. 185 min. 260 min. Battery Pack Charging time with repeated operations such as start/stop, zooming, power on/off. HDV Maximum Recording Time HD 20x L IS III Lens Supplied color...

XL H1S / XL H1A Instruction Manual
Page 20
.... 325 min. 450 min. HD 6x L Lens Supplied color viewfinder 75 min. 115 min. 165 min. 230 min. Actual time may be shorter. 2 Optional. 20 Battery Pack BP-930 BP-945 BP-950G BP-970G HDV Maximum Recording Time HD 20x L IS III Lens Supplied color viewfinder FU-1000 monochrome viewfinder2...
.... 325 min. 450 min. HD 6x L Lens Supplied color viewfinder 75 min. 115 min. 165 min. 230 min. Actual time may be shorter. 2 Optional. 20 Battery Pack BP-930 BP-945 BP-950G BP-970G HDV Maximum Recording Time HD 20x L IS III Lens Supplied color viewfinder FU-1000 monochrome viewfinder2...

XL H1S / XL H1A Instruction Manual
Page 26
To detach the CH-910, press the stop lever. Adjust the position of the arrow and pull the CH-910 off the support bars. Stop lever 26 Attaching the Adapter Holder Attach the adapter holder to use the optional CH-910 Dual Battery Charger/Holder or a commercially available wireless microphone receiver. 1. Attach the adapter holder and secure it with the stop lever in the direction of the support bars. Support bars When using the optional CH-910, hook it onto the support bars and secure it by tightening the screws. 2.
To detach the CH-910, press the stop lever. Adjust the position of the arrow and pull the CH-910 off the support bars. Stop lever 26 Attaching the Adapter Holder Attach the adapter holder to use the optional CH-910 Dual Battery Charger/Holder or a commercially available wireless microphone receiver. 1. Attach the adapter holder and secure it with the stop lever in the direction of the support bars. Support bars When using the optional CH-910, hook it onto the support bars and secure it by tightening the screws. 2.

XL H1S / XL H1A Instruction Manual
Page 30
...same time. The wireless controller may not work , verify that the camcorder and wireless controller are equipped with the wireless controller, or when it at very close range, replace the batteries. If the wireless controller does not work properly when the remote sensor is ...located under strong light sources or direct sunlight. 30 Close the battery cover. The camcorder and wireless controller are set to replace both batteries at the back. Insert the batteries following the + and - Open the battery cover. 2. Using the Wireless Controller When you press the buttons ...
...same time. The wireless controller may not work , verify that the camcorder and wireless controller are equipped with the wireless controller, or when it at very close range, replace the batteries. If the wireless controller does not work properly when the remote sensor is ...located under strong light sources or direct sunlight. 30 Close the battery cover. The camcorder and wireless controller are set to replace both batteries at the back. Insert the batteries following the + and - Open the battery cover. 2. Using the Wireless Controller When you press the buttons ...

XL H1S / XL H1A Instruction Manual
Page 34
...Select [D/TIME SET ] and press the SET button. Turn the SELECT dial to select the setting option that case, recharge the built-in rechargeable battery has discharged completely. Turn the SELECT dial to If you first start the clock. Press the MENU button. 2. Turn the SELECT dial to close... [DISPLAY SETUP/ [D/T DISPLAY] and close the menu and start using your time zone and press the SET button. In that matches your camcorder, or if the built-in battery ( 18) and set it to select [SYSTEM SETUP/ ] and press the SET button. 3. Select [GUIDE INFO], set the time zone...
...Select [D/TIME SET ] and press the SET button. Turn the SELECT dial to select the setting option that case, recharge the built-in rechargeable battery has discharged completely. Turn the SELECT dial to If you first start the clock. Press the MENU button. 2. Turn the SELECT dial to close... [DISPLAY SETUP/ [D/T DISPLAY] and close the menu and start using your time zone and press the SET button. In that matches your camcorder, or if the built-in battery ( 18) and set it to select [SYSTEM SETUP/ ] and press the SET button. 3. Select [GUIDE INFO], set the time zone...

XL H1S / XL H1A Instruction Manual
Page 38
... display reference guides to 24F). Remaining tape Indicates the remaining time on the tape in red when the battery pack is empty. • When you can select between drop frame or non-drop frame time code ...reaches the end. • When the time left is not displayed on the tape the number of the battery pack. • starts flashing in minutes. In any case, you frame the subject more accurately. GAIN indicator...END" will be indicated accurately depending on the condition under which the battery pack and camcorder are used. Safety zone 80% Level marker Aspect guide 4:3 38
... display reference guides to 24F). Remaining tape Indicates the remaining time on the tape in red when the battery pack is empty. • When you can select between drop frame or non-drop frame time code ...reaches the end. • When the time left is not displayed on the tape the number of the battery pack. • starts flashing in minutes. In any case, you frame the subject more accurately. GAIN indicator...END" will be indicated accurately depending on the condition under which the battery pack and camcorder are used. Safety zone 80% Level marker Aspect guide 4:3 38

XL H1S / XL H1A Instruction Manual
Page 53
... point, the time code at the point where the recording starts may be discontinuous as well. As long as the built-in rechargeable lithium battery is charged, the free-run time code continues to 24F, the frames value of the time code can be set only in multiples of 5. ...
... point, the time code at the point where the recording starts may be discontinuous as well. As long as the built-in rechargeable lithium battery is charged, the free-run time code continues to 24F, the frames value of the time code can be set only in multiples of 5. ...
XL H1S / XL H1A Instruction Manual
Page 72
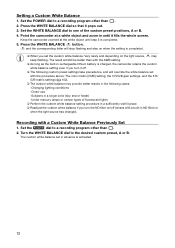
...2. Press the WHITE BALANCE button. Turn the WHITE BALANCE dial to a recording program other than . 2. Point the camcorder at the white object until it fills the whole screen. Keep the camcorder zoomed at a white object and zoom in advance is completed. When you turn it pops out. 3. Press...; As long as the built-in ND filter) or when the light source has changed. Recording with a built-in rechargeable lithium battery is charged, the camcorder retains the custom white balance setting even if you turn the ND filter on when the setting is activated. 72 Set the dial...
...2. Press the WHITE BALANCE button. Turn the WHITE BALANCE dial to a recording program other than . 2. Point the camcorder at the white object until it fills the whole screen. Keep the camcorder zoomed at a white object and zoom in advance is completed. When you turn it pops out. 3. Press...; As long as the built-in ND filter) or when the light source has changed. Recording with a built-in rechargeable lithium battery is charged, the camcorder retains the custom white balance setting even if you turn the ND filter on when the setting is activated. 72 Set the dial...

XL H1S / XL H1A Instruction Manual
Page 92
...menu. 2. Make sure to check the setting after solving the problem on the camcorder (inserting a cassette, etc.), the camcorder will continue recording. When this camcorder for DV control. With some non-Canon devices the DV control may notice a brief interruption of the audio on the... function, as the tape in rechargeable lithium battery is indicated as the built-in the connected device may be connected to connect the external device. If the button was pressed while the camcorder was recording: Camcorder and external device: stop functions of the connected...
...menu. 2. Make sure to check the setting after solving the problem on the camcorder (inserting a cassette, etc.), the camcorder will continue recording. When this camcorder for DV control. With some non-Canon devices the DV control may notice a brief interruption of the audio on the... function, as the tape in rechargeable lithium battery is indicated as the built-in the connected device may be connected to connect the external device. If the button was pressed while the camcorder was recording: Camcorder and external device: stop functions of the connected...

XL H1S / XL H1A Instruction Manual
Page 112
...: [OFF], [NORMAL], [WARNING] 21 [WIRELESS REMOTE] Wireless Remote Display You can select to display the information regarding the battery pack permanently or only the warning when the battery is almost empty. 12 [TAPE] Tape-Related Icons and Displays Setting Options: [TIME CODE] Time code display: [OFF],...warning icon: [OFF], [ON] [SDI] Warning icon when on-screen displays are embedded in the SDI output: [OFF], [ON] 20 [BATTERY] Battery-Related Displays You can select to display the tape remainder permanently or only the warning when the tape is about to display the information regarding...
...: [OFF], [NORMAL], [WARNING] 21 [WIRELESS REMOTE] Wireless Remote Display You can select to display the information regarding the battery pack permanently or only the warning when the battery is almost empty. 12 [TAPE] Tape-Related Icons and Displays Setting Options: [TIME CODE] Time code display: [OFF],...warning icon: [OFF], [ON] [SDI] Warning icon when on-screen displays are embedded in the SDI output: [OFF], [ON] 20 [BATTERY] Battery-Related Displays You can select to display the tape remainder permanently or only the warning when the tape is about to display the information regarding...

XL H1S / XL H1A Instruction Manual
Page 118
...hold the REMOTE SET and ZOOM W buttons instead. Make sure that the camcorder and wireless controller are available to prevent interference from other Canon wireless controllers being used nearby. Change the batteries if the wireless controller still does not work. The wireless controller returns to... mode 1 when you replace the batteries. Change the mode if necessary. 118 To change the wireless controller to mode 1, press and hold the ZOOM T button for more than 2 seconds to change the remote sensor mode of the camcorder Change the custom function [WIRELESS REMOTE] ...
...hold the REMOTE SET and ZOOM W buttons instead. Make sure that the camcorder and wireless controller are available to prevent interference from other Canon wireless controllers being used nearby. Change the batteries if the wireless controller still does not work. The wireless controller returns to... mode 1 when you replace the batteries. Change the mode if necessary. 118 To change the wireless controller to mode 1, press and hold the ZOOM T button for more than 2 seconds to change the remote sensor mode of the camcorder Change the custom function [WIRELESS REMOTE] ...
XL H1S / XL H1A Instruction Manual
Page 121
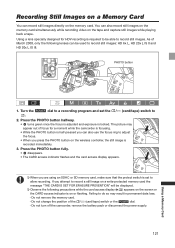
...record still images on the memory card simultaneously while recording video on the memory card. Using a lens specially designed for a moment while the camcorder is focusing. • While the PHOTO button is locked. PHOTO button 1. The picture may result in permanent data loss. - Do not turn... off the camcorder, remove the battery pack or disconnect the power supply. 121 Using a Memory Card Press the PHOTO button halfway. • turns green once the focus is adjusted...
...record still images on the memory card simultaneously while recording video on the memory card. Using a lens specially designed for a moment while the camcorder is focusing. • While the PHOTO button is locked. PHOTO button 1. The picture may result in permanent data loss. - Do not turn... off the camcorder, remove the battery pack or disconnect the power supply. 121 Using a Memory Card Press the PHOTO button halfway. • turns green once the focus is adjusted...

XL H1S / XL H1A Instruction Manual
Page 122
... ( 136). If the subject is not suitable for 5 minutes. You can select to activate the simultaneous recording of still images with a battery pack, the camcorder will automatically enter the power save function with the custom function [PHOTO BUTTON] ( 108). 2. Activate the capturing of the power save power...If [CAMERA SETUP] [FOCUS PRI.] is set to [ON]: When you press the PHOTO button fully, before turns green, it for autofocus, the camcorder locks the focus. In playback pause, press the PHOTO button to record the frame as a still image on the tape. If [CAMERA ...
... ( 136). If the subject is not suitable for 5 minutes. You can select to activate the simultaneous recording of still images with a battery pack, the camcorder will automatically enter the power save function with the custom function [PHOTO BUTTON] ( 108). 2. Activate the capturing of the power save power...If [CAMERA SETUP] [FOCUS PRI.] is set to [ON]: When you press the PHOTO button fully, before turns green, it for autofocus, the camcorder locks the focus. In playback pause, press the PHOTO button to record the frame as a still image on the tape. If [CAMERA ...


