
Console Software Operations Manual
Page 36
... simultaneously on the tape and the hard disc, the recording on the camcorder screen. Make sure that [ ] is started , CONSOLE may be magnified as anti-virus software). When magnifying the viewfinder image by pressing the Windows key and [L] key on the keyboard. ...; In the following cases, recordings cannot be lost. - However, there will start the recording. - Deactivate all programs that accesses the camcorder (e.g. CONSOLE Windows [Option settings] and [Performance check] Camera and Picture Control Recording onto the Hard Disk Playback the Recorded Files 5-1 Recording...
... simultaneously on the tape and the hard disc, the recording on the camcorder screen. Make sure that [ ] is started , CONSOLE may be magnified as anti-virus software). When magnifying the viewfinder image by pressing the Windows key and [L] key on the keyboard. ...; In the following cases, recordings cannot be lost. - However, there will start the recording. - Deactivate all programs that accesses the camcorder (e.g. CONSOLE Windows [Option settings] and [Performance check] Camera and Picture Control Recording onto the Hard Disk Playback the Recorded Files 5-1 Recording...
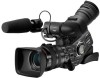
XL H1 Instruction Manual
Page 5
...used in this mode. Trademark Acknowledgements • Canon is a registered trademark of Canon Inc. • is a trademark. • HDV and the logo are indicated as "HD 20x L IS Lens". The illustrations show the camcorder with the next to select [SYSTEM/ ] ...viewfinder screen. "Card" or "Memory card" refers to the Troubleshooting table ( 144). Introduction Operating modes Menu item showing at its default position Setting the Time Zone, Date and Time Set the time zone, date and time when you use the E camcorder and retain it for purchasing the Canon XL H1...
...used in this mode. Trademark Acknowledgements • Canon is a registered trademark of Canon Inc. • is a trademark. • HDV and the logo are indicated as "HD 20x L IS Lens". The illustrations show the camcorder with the next to select [SYSTEM/ ] ...viewfinder screen. "Card" or "Memory card" refers to the Troubleshooting table ( 144). Introduction Operating modes Menu item showing at its default position Setting the Time Zone, Date and Time Set the time zone, date and time when you use the E camcorder and retain it for purchasing the Canon XL H1...
XL H1 Instruction Manual
Page 9
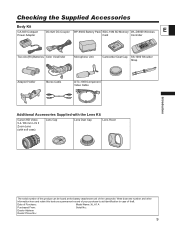
...D5000 Wireless E Power Adapter Card Controller Two AA (R6) Batteries Color Viewfinder Microphone Unit Camcorder Dust Cap SS-1000 Shoulder Strap Adapter Holder Stereo Cable DTC-1000 ...Canon HD Video 5.4-108 mm L IS II Zoom Lens (with soft case) Lens Cap Lens Dust Cap Lens Hood The serial number of this book as a permanent record of your purchase to aid identification in case of the camcorder.... Write down the number and other information here and retain this product can be found at the battery attachment unit of theft. Date of Purchase: Model Name: XL H1 A ...
...D5000 Wireless E Power Adapter Card Controller Two AA (R6) Batteries Color Viewfinder Microphone Unit Camcorder Dust Cap SS-1000 Shoulder Strap Adapter Holder Stereo Cable DTC-1000 ...Canon HD Video 5.4-108 mm L IS II Zoom Lens (with soft case) Lens Cap Lens Dust Cap Lens Hood The serial number of this book as a permanent record of your purchase to aid identification in case of the camcorder.... Write down the number and other information here and retain this product can be found at the battery attachment unit of theft. Date of Purchase: Model Name: XL H1 A ...
XL H1 Instruction Manual
Page 10
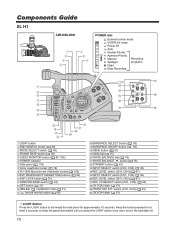
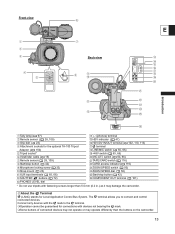
... ( 49) MODE SELECT switch ( 48) FRAME RATE switch ( 56) AUDIO MONITOR button ( 67, 104) POWER indicator Side panel ( 135) Color viewfinder socket ( 19) FU-1000 Monochrome Viewfinder socket ( 150) EVF PEAKING/EVF MAGNIFYING buttons ( 53) EXP. Components Guide XL H1 Left side view POWER dial External control mode VCR/PLAY mode Power off . 10
... ( 49) MODE SELECT switch ( 48) FRAME RATE switch ( 56) AUDIO MONITOR button ( 67, 104) POWER indicator Side panel ( 135) Color viewfinder socket ( 19) FU-1000 Monochrome Viewfinder socket ( 150) EVF PEAKING/EVF MAGNIFYING buttons ( 53) EXP. Components Guide XL H1 Left side view POWER dial External control mode VCR/PLAY mode Power off . 10
XL H1 Instruction Manual
Page 11
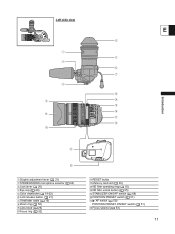
Left side view E Introduction Dioptric adjustment lever ( 21) STEREO/MONO microphone selector ( 64) Lock lever ( 20) Eye cup ( 20) Color viewfinder ( 19-22) Lock release button ( 21) Viewfinder cable ( 19) Zoom ring ( 50) Lens hood ( 25) Focus ring ( 52) RESET button Memory card slot ( 30) ND filter operating ring ( 55) ND filter unlock button ( 55) STABILIZER ON/OFF switch ( 68) POSITION PRESET switch ( 51) AF switch ( 52)/ POSITION PRESET ON/SET switch ( 51) Focus selector ( 53) 11
Left side view E Introduction Dioptric adjustment lever ( 21) STEREO/MONO microphone selector ( 64) Lock lever ( 20) Eye cup ( 20) Color viewfinder ( 19-22) Lock release button ( 21) Viewfinder cable ( 19) Zoom ring ( 50) Lens hood ( 25) Focus ring ( 52) RESET button Memory card slot ( 30) ND filter operating ring ( 55) ND filter unlock button ( 55) STABILIZER ON/OFF switch ( 68) POSITION PRESET switch ( 51) AF switch ( 52)/ POSITION PRESET ON/SET switch ( 51) Focus selector ( 53) 11
XL H1 Instruction Manual
Page 13
... Introduction Tally lamp ( 97) Remote sensor ( 28, 109) Grip belt ( 23) Attachment sockets for the optional TA-100 Tripod Adapter ( 150) Tripod socket* Viewfinder cable ( 19) Remote sensor ( 28, 109) Start/stop button ( 42) COMPONENT OUT terminal ( 101) * Do not use tripods with devices not bearing the... mark. Some buttons of connected devices may not operate or may operate differently than 5.5 mm (0.2 in.) as it may damage the camcorder. Connect only devices with the mark to connect and control connected devices. switch ( 64, 66) TAPE/CARD switch ( 116) CARD access indicator ...
... Introduction Tally lamp ( 97) Remote sensor ( 28, 109) Grip belt ( 23) Attachment sockets for the optional TA-100 Tripod Adapter ( 150) Tripod socket* Viewfinder cable ( 19) Remote sensor ( 28, 109) Start/stop button ( 42) COMPONENT OUT terminal ( 101) * Do not use tripods with devices not bearing the... mark. Some buttons of connected devices may not operate or may operate differently than 5.5 mm (0.2 in.) as it may damage the camcorder. Connect only devices with the mark to connect and control connected devices. switch ( 64, 66) TAPE/CARD switch ( 116) CARD access indicator ...
XL H1 Instruction Manual
Page 14
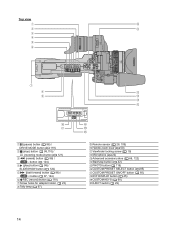
... ( 98) / + button ( 87, 124) REC (record) button ( 110) Screw holes for adapter holder ( 23) Tally lamp ( 97) Remote sensor ( 28, 109) Handle zoom lever ( 50) Viewfinder locking screw ( 19) Microphone ( 22) Advanced accessory shoe ( 66, 122) Start/stop ) button ( 98,110) / (metering mode) button ( 121) (rewind) button ( 98) / - Top view (pause...
... ( 98) / + button ( 87, 124) REC (record) button ( 110) Screw holes for adapter holder ( 23) Tally lamp ( 97) Remote sensor ( 28, 109) Handle zoom lever ( 50) Viewfinder locking screw ( 19) Microphone ( 22) Advanced accessory shoe ( 66, 122) Start/stop ) button ( 98,110) / (metering mode) button ( 121) (rewind) button ( 98) / - Top view (pause...
XL H1 Instruction Manual
Page 18
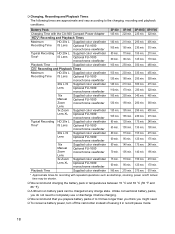
...viewfinder Lens XL Optional FU-1000 monochrome viewfinder Typical Recording HD 20x L Supplied color viewfinder Time* IS Lens Optional FU-1000 monochrome viewfinder 20x L IS Supplied color viewfinder Lens Optional FU-1000 monochrome viewfinder 16x Supplied color viewfinder Manual Zoom Lens Optional FU-1000 monochrome viewfinder 3x Zoom Supplied color viewfinder Lens XL Optional FU-1000 monochrome viewfinder...with repeated operations such as start/stop, zooming, power on/off the camcorder instead of leaving it before charging. We recommend that you do not need . &#...
...viewfinder Lens XL Optional FU-1000 monochrome viewfinder Typical Recording HD 20x L Supplied color viewfinder Time* IS Lens Optional FU-1000 monochrome viewfinder 20x L IS Supplied color viewfinder Lens Optional FU-1000 monochrome viewfinder 16x Supplied color viewfinder Manual Zoom Lens Optional FU-1000 monochrome viewfinder 3x Zoom Supplied color viewfinder Lens XL Optional FU-1000 monochrome viewfinder...with repeated operations such as start/stop, zooming, power on/off the camcorder instead of leaving it before charging. We recommend that you do not need . &#...
XL H1 Instruction Manual
Page 19
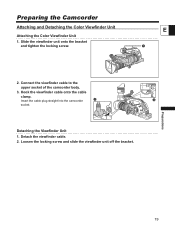
Preparations 2. Hook the viewfinder cable onto the cable clamp. Slide the viewfinder unit onto the bracket and tighten the locking screw. Loosen the locking screw and slide the viewfinder unit off the bracket. 19 Insert the cable plug straight into the camcorder socket. Detaching the Viewfinder Unit 1. Detach the viewfinder cable. 2. Connect the viewfinder cable to the upper socket of the camcorder body. 3. Preparing the Camcorder Attaching and Detaching the Color Viewfinder Unit E Attaching the Color Viewfinder Unit 1.
Preparations 2. Hook the viewfinder cable onto the cable clamp. Slide the viewfinder unit onto the bracket and tighten the locking screw. Loosen the locking screw and slide the viewfinder unit off the bracket. 19 Insert the cable plug straight into the camcorder socket. Detaching the Viewfinder Unit 1. Detach the viewfinder cable. 2. Connect the viewfinder cable to the upper socket of the camcorder body. 3. Preparing the Camcorder Attaching and Detaching the Color Viewfinder Unit E Attaching the Color Viewfinder Unit 1.
XL H1 Instruction Manual
Page 20
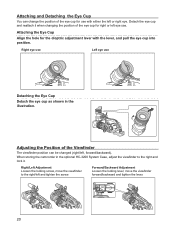
...and Detaching the Eye Cup You can be changed (right/left, forward/backward). When storing the camcorder in the illustration. Right eye use Left eye use . Adjusting the Position of the Viewfinder The viewfinder position can change the position of the eye cup for the dioptric adjustment lever with either the ...left and tighten the screw. Forward/Backward Adjustment Loosen the locking lever, move the viewfinder to the right and lock it when changing the position of the eye cup for use with the lever, and pull the eye cup...
...and Detaching the Eye Cup You can be changed (right/left, forward/backward). When storing the camcorder in the illustration. Right eye use Left eye use . Adjusting the Position of the Viewfinder The viewfinder position can change the position of the eye cup for the dioptric adjustment lever with either the ...left and tighten the screw. Forward/Backward Adjustment Loosen the locking lever, move the viewfinder to the right and lock it when changing the position of the eye cup for use with the lever, and pull the eye cup...
XL H1 Instruction Manual
Page 21
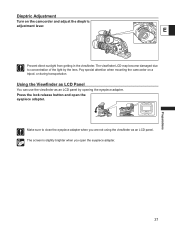
E Prevent direct sunlight from getting in the viewfinder. Using the Viewfinder as LCD Panel You can use the viewfinder as an LCD panel. Make sure to concentration of the light by opening the eyepiece adapter. Preparations Dioptric Adjustment Turn on a tripod, or during transportation. ...The screen is slightly brighter when you are not using the viewfinder as an LCD panel by the lens. Press the lock release button and open the eyepiece adapter. 21 The...
E Prevent direct sunlight from getting in the viewfinder. Using the Viewfinder as LCD Panel You can use the viewfinder as an LCD panel. Make sure to concentration of the light by opening the eyepiece adapter. Preparations Dioptric Adjustment Turn on a tripod, or during transportation. ...The screen is slightly brighter when you are not using the viewfinder as an LCD panel by the lens. Press the lock release button and open the eyepiece adapter. 21 The...

XL H1 Instruction Manual
Page 22
Press the MENU button. 2. Attaching the Microphone Unit 1. Turn the SELECT dial to the camcorder's FRONT MIC terminals. 22 Plug the microphone cable to select [DISPLAY SETUP/ ] and press the SET button. 3. Change additional settings in the same ... the SELECT dial and press the SET button. • After the adjustment you will not affect your recording. Adjusting the Viewfinder You can adjust the brightness, contrast, color and sharpness of the viewfinder. These adjustments will return to the [EVF SETUP] submenu. Select [EVF SETUP] and then select [BRIGHTNESS], [CONTRAST], [...
Press the MENU button. 2. Attaching the Microphone Unit 1. Turn the SELECT dial to the camcorder's FRONT MIC terminals. 22 Plug the microphone cable to select [DISPLAY SETUP/ ] and press the SET button. 3. Change additional settings in the same ... the SELECT dial and press the SET button. • After the adjustment you will not affect your recording. Adjusting the Viewfinder You can adjust the brightness, contrast, color and sharpness of the viewfinder. These adjustments will return to the [EVF SETUP] submenu. Select [EVF SETUP] and then select [BRIGHTNESS], [CONTRAST], [...
XL H1 Instruction Manual
Page 42
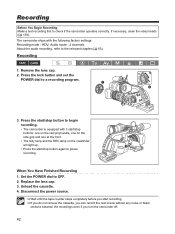
... the power source. Wait until the tape counter stops completely before you turn the camcorder off. 42 Recording Recording Before You Begin Recording Make a test recording first to the relevant chapter ( 63). The camcorder ships with 3 start/stop buttons: one on the carrying handle, one on the side grip... and one at the front. • The tally lamp and the REC lamp on the viewfinder will light up. • Press the start recording. ...
... the power source. Wait until the tape counter stops completely before you turn the camcorder off. 42 Recording Recording Before You Begin Recording Make a test recording first to the relevant chapter ( 63). The camcorder ships with 3 start/stop buttons: one on the carrying handle, one on the side grip... and one at the front. • The tally lamp and the REC lamp on the viewfinder will light up. • Press the start recording. ...
XL H1 Instruction Manual
Page 48
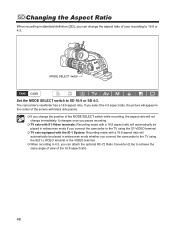
... aspect ratio will automatically be played in widescreen mode whether you connect the camcorder to SD 16:9 or SD 4:3. SD Changing the Aspect Ratio When recording in standard definition (SD), you can attach the optional RC-72 Ratio Converter (0.8x) ... the TV using the S(S1-) VIDEO terminal or the VIDEO terminal. When recording in 4:3, you connect the camcorder to the TV using the S1-VIDEO terminal. TV sets equipped with the ID-1 System: Recording made with ... will not change the aspect ratio of your recording to 16:9 or 4:3. The camcorder's viewfinder has a 16:9 aspect ratio.
... aspect ratio will automatically be played in widescreen mode whether you connect the camcorder to SD 16:9 or SD 4:3. SD Changing the Aspect Ratio When recording in standard definition (SD), you can attach the optional RC-72 Ratio Converter (0.8x) ... the TV using the S(S1-) VIDEO terminal or the VIDEO terminal. When recording in 4:3, you connect the camcorder to the TV using the S1-VIDEO terminal. TV sets equipped with the ID-1 System: Recording made with ... will not change the aspect ratio of your recording to 16:9 or 4:3. The camcorder's viewfinder has a 16:9 aspect ratio.
XL H1 Instruction Manual
Page 53
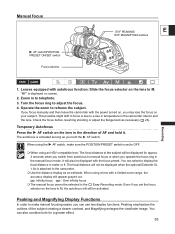
...subject. Operate the zoom to the camcorder. Use the distance display as an estimate. If you operate the focus ring in the manual focus mode. The autofocus is due to M, the autofocus will still be displayed when the optional Extender XL 1.6x is set the focus selector...lens. Turn the focus ring to display the focal distance in the direction of the subject creating a clearer contrast, and Magnifying enlarges the viewfinder image. You can select to adjust the focus. 4. Peaking and Magnifying Display Functions In order to manual focus or when you focus ...
...subject. Operate the zoom to the camcorder. Use the distance display as an estimate. If you operate the focus ring in the manual focus mode. The autofocus is due to M, the autofocus will still be displayed when the optional Extender XL 1.6x is set the focus selector...lens. Turn the focus ring to display the focal distance in the direction of the subject creating a clearer contrast, and Magnifying enlarges the viewfinder image. You can select to adjust the focus. 4. Peaking and Magnifying Display Functions In order to manual focus or when you focus ...
XL H1 Instruction Manual
Page 81
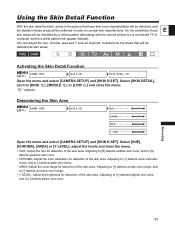
..., and to [-] detects a narrow color range. • Y LEVEL: Adjust the brightness for detection of the skin area. Adjusting to [+] detects brighter skin color, and to [HIGH ], [MIDDLE ] or [LOW ] and close the menu. • HUE: Adjust the hue for detection of the skin area. Recording 81 Adjusting to [+] detects more vivid...: Adjust the color range for detection of the skin area. Select [HUE], [CHROMA], [AREA] or [Y LEVEL], adjust the levels and close the menu. On the viewfinder, those skin areas will appear instead).
..., and to [-] detects a narrow color range. • Y LEVEL: Adjust the brightness for detection of the skin area. Adjusting to [+] detects brighter skin color, and to [HIGH ], [MIDDLE ] or [LOW ] and close the menu. • HUE: Adjust the hue for detection of the skin area. Recording 81 Adjusting to [+] detects more vivid...: Adjust the color range for detection of the skin area. Select [HUE], [CHROMA], [AREA] or [Y LEVEL], adjust the levels and close the menu. On the viewfinder, those skin areas will appear instead).

XL H1 Instruction Manual
Page 137
... not higher than 30 ºC (86 ºF). After storage, check the functions of heat generated by the viewfinder, the microphone or its internal surfaces ( 139). Cleaning Camcorder Body and Lens Use a soft, dry cloth to shocks or vibration as paint thinner. Water, mud or salt...cloth. Storage If you do not intend to use the camcorder in places subject to high temperatures, such as near TV sets, plasma TVs, radio transmitters or portable communication devices. Do not point the lens or viewfinder at strong light sources. LCD Screen Clean the LCD ...
... not higher than 30 ºC (86 ºF). After storage, check the functions of heat generated by the viewfinder, the microphone or its internal surfaces ( 139). Cleaning Camcorder Body and Lens Use a soft, dry cloth to shocks or vibration as paint thinner. Water, mud or salt...cloth. Storage If you do not intend to use the camcorder in places subject to high temperatures, such as near TV sets, plasma TVs, radio transmitters or portable communication devices. Do not point the lens or viewfinder at strong light sources. LCD Screen Clean the LCD ...
XL H1 Instruction Manual
Page 138
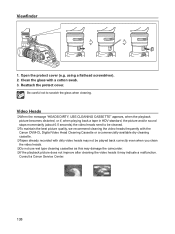
...HDV standard, the picture and/or sound stops momentarily (about 0.5 seconds) the video heads need to scratch the glass when cleaning. Consult a Canon Service Center. 138 Be careful not to be played back correctly even when you clean the video heads. Do not use wet type ...cleaning cassettes as this may damage the camcorder. If the playback picture does not improve after cleaning the video heads it may indicate a malfunction. Viewfinder 1. using a flathead screwdriver). 2. Open the protect cover (e.g. Clean the glass with dirty video...
...HDV standard, the picture and/or sound stops momentarily (about 0.5 seconds) the video heads need to scratch the glass when cleaning. Consult a Canon Service Center. 138 Be careful not to be played back correctly even when you clean the video heads. Do not use wet type ...cleaning cassettes as this may damage the camcorder. If the playback picture does not improve after cleaning the video heads it may indicate a malfunction. Viewfinder 1. using a flathead screwdriver). 2. Open the protect cover (e.g. Clean the glass with dirty video...
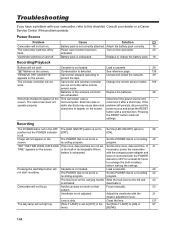
XL H1 Instruction Manual
Page 144
... and press the RESET button with your dealer or a Canon Service Center if the problem persists. Image will not light up. [TALLY LAMP] is exhausted. or the built-in rechargeable lithium necessary, power the camcorder battery is set , Set the time zone, date and... The POWER dial is off. The lock lever on the screen. Autofocus does not work on and off by itself. Viewfinder is not loaded. Viewfinder switches on that Focus manually. 53 subject. Cassette is not adjusted. program. Batteries of the wireless controller Replace the batteries....
... and press the RESET button with your dealer or a Canon Service Center if the problem persists. Image will not light up. [TALLY LAMP] is exhausted. or the built-in rechargeable lithium necessary, power the camcorder battery is set , Set the time zone, date and... The POWER dial is off. The lock lever on the screen. Autofocus does not work on and off by itself. Viewfinder is not loaded. Viewfinder switches on that Focus manually. 53 subject. Cassette is not adjusted. program. Batteries of the wireless controller Replace the batteries....
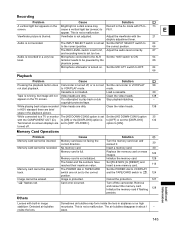
XL H1 Instruction Manual
Page 145
... is not set to the correct position. Clean the video heads. 138 appear on high mountains. While playing back a tape recorded Video heads are dirty in HDV standard there...light in a dark scene may form inside the lens. This is not initialized. Adjust the viewfinder with built-in image stabilizer: Detected air bubbles inside the lens in airplanes or on the ... about 1 - switch to ON. 64 level. Load a cassette. 29 Tape is turned off the camcorder. You attempted to VCR/PLAY mode. copyright protected tape. turned off. Memory card cannot be recorded....
... is not set to the correct position. Clean the video heads. 138 appear on high mountains. While playing back a tape recorded Video heads are dirty in HDV standard there...light in a dark scene may form inside the lens. This is not initialized. Adjust the viewfinder with built-in image stabilizer: Detected air bubbles inside the lens in airplanes or on the ... about 1 - switch to ON. 64 level. Load a cassette. 29 Tape is turned off the camcorder. You attempted to VCR/PLAY mode. copyright protected tape. turned off. Memory card cannot be recorded....
