

Instruction Manual
Page 3
... to the Canon HD Camcorder XA25 / XA20 and all its accessories. 1 Read these instructions. 2 Keep these instructions. 3 Heed all warnings. 4 Follow all instructions. 5 Do not use attachments/accessories specified by the manufacturer. 11 Unplug this apparatus near water. 6 Clean only with dry cloth. 7 Do not install near any way, such as power-supply cord...
... to the Canon HD Camcorder XA25 / XA20 and all its accessories. 1 Read these instructions. 2 Keep these instructions. 3 Heed all warnings. 4 Follow all instructions. 5 Do not use attachments/accessories specified by the manufacturer. 11 Unplug this apparatus near water. 6 Clean only with dry cloth. 7 Do not install near any way, such as power-supply cord...
Instruction Manual
Page 13
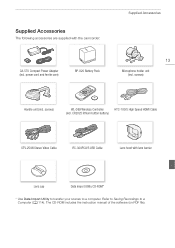
...STV-250N Stereo Video Cable IFC-300PCU/S USB Cable Lens hood with the camcorder: CA-570 Compact Power Adapter (incl. power cord and ferrite core) BP-820 Battery Pack Supplied Accessories 13 Microphone holder unit (incl. screws) WL-D89 Wireless Controller HTC-100/S High Speed HDMI... Cable (incl. Supplied Accessories The following accessories are supplied with lens barrier Lens cap Data Import Utility CD-ROM...
...STV-250N Stereo Video Cable IFC-300PCU/S USB Cable Lens hood with the camcorder: CA-570 Compact Power Adapter (incl. power cord and ferrite core) BP-820 Battery Pack Supplied Accessories 13 Microphone holder unit (incl. screws) WL-D89 Wireless Controller HTC-100/S High Speed HDMI... Cable (incl. Supplied Accessories The following accessories are supplied with lens barrier Lens cap Data Import Utility CD-ROM...

Instruction Manual
Page 22
...• Turn off the camcorder before restoring the power supply. • If remaining battery time is an issue, you can power the camcorder using the compact power adapter so the battery pack will not be consumed. Be sure to wait until the green POWER/CHG indicator goes out. • Do not ...Battery Pack 5 Charging will start . • The battery pack will be charged only when the camcorder is off. • If the power supply was on, the green POWER/CHG indicator will go out when the battery pack is fully charged. 22 • If the indicator flashes, refer to Troubleshooting (A 158). ...
...• Turn off the camcorder before restoring the power supply. • If remaining battery time is an issue, you can power the camcorder using the compact power adapter so the battery pack will not be consumed. Be sure to wait until the green POWER/CHG indicator goes out. • Do not ...Battery Pack 5 Charging will start . • The battery pack will be charged only when the camcorder is off. • If the power supply was on, the green POWER/CHG indicator will go out when the battery pack is fully charged. 22 • If the indicator flashes, refer to Troubleshooting (A 158). ...

Instruction Manual
Page 25
... the Camcorder Using the Lens Hood and Lens Cap While recording, the supplied lens hood with lens barrier is effective for reducing stray light that can...hood clockwise until it stops with a click (ባ). • Be careful not to turn it counterclockwise. Use the supplied lens cap when carrying the camcorder or storing it after use. * Note that the lens hood is aligned with the...the OLED panel 180 degrees to let the subject watch the recording. 1 Pull out the viewfinder. 2 Use the power switch to deform the lens hood. • Make sure that the lens cap and the lens hood with lens...
... the Camcorder Using the Lens Hood and Lens Cap While recording, the supplied lens hood with lens barrier is effective for reducing stray light that can...hood clockwise until it stops with a click (ባ). • Be careful not to turn it counterclockwise. Use the supplied lens cap when carrying the camcorder or storing it after use. * Note that the lens hood is aligned with the...the OLED panel 180 degrees to let the subject watch the recording. 1 Pull out the viewfinder. 2 Use the power switch to deform the lens hood. • Make sure that the lens cap and the lens hood with lens...
Instruction Manual
Page 43
... 43 Zooming in bright places, it on a computer (A 114). • When recording in (zooming toward T); IMPORTANT • Observe the following icons. Canon shall not be difficult to use the OLED screen. NOTES • The START/STOP button on or flashing. Return the lever to its previous position..., the video (stream) file in cases such as one of the Intelligent IS modes. Do not disconnect the power source or turn off the camcorder. - With the supplied software, Data Import Utility, you start or stop recording with the camcorder, the connected device will also start or...
... 43 Zooming in bright places, it on a computer (A 114). • When recording in (zooming toward T); IMPORTANT • Observe the following icons. Canon shall not be difficult to use the OLED screen. NOTES • The START/STOP button on or flashing. Return the lever to its previous position..., the video (stream) file in cases such as one of the Intelligent IS modes. Do not disconnect the power source or turn off the camcorder. - With the supplied software, Data Import Utility, you start or stop recording with the camcorder, the connected device will also start or...

Instruction Manual
Page 46
...order to save it may be continuous. Alternatively, you can join relay scenes recorded on both memory cards as a single scene and save power when using a battery pack (A 25). Even in the following table. However, the actual number of the OLED screen with a long ...use only the viewfinder in bright places, it on a computer (A 114). • For scenes with the q > [OLED Brightness] setting. With the supplied software, Data Import Utility, you can capture a photo from a movie during relay recording, the video will be split approximately every 4 GB. Reviewing the...
...order to save it may be continuous. Alternatively, you can join relay scenes recorded on both memory cards as a single scene and save power when using a battery pack (A 25). Even in the following table. However, the actual number of the OLED screen with a long ...use only the viewfinder in bright places, it on a computer (A 114). • For scenes with the q > [OLED Brightness] setting. With the supplied software, Data Import Utility, you can capture a photo from a movie during relay recording, the video will be split approximately every 4 GB. Reviewing the...
Instruction Manual
Page 80
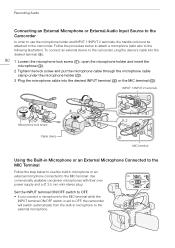
Use commercially available condenser microphones with their own power supply and a ∅ 3.5 mm mini-stereo plug. Set the INPUT terminal ON/OFF switch to OFF. • If you connect a microphone to the MIC terminal while ...
Use commercially available condenser microphones with their own power supply and a ∅ 3.5 mm mini-stereo plug. Set the INPUT terminal ON/OFF switch to OFF. • If you connect a microphone to the MIC terminal while ...
Instruction Manual
Page 86
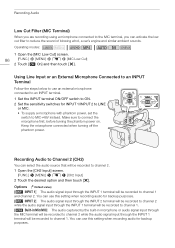
... 1 and channel 2. You can select the audio source that will be recorded to channel 1. Keep the microphone connected when turning off the phantom power. Recording Audio to Channel 2 (CH2) You can use this setting when recording audio for backup purposes. You can activate the low cut filter... the INPUT terminal ON/OFF switch to ON. 2 Set the sensitivity switches for INPUT 1/INPUT 2 to LINE or MIC. • To supply a microphone with phantom power, set the switch to MIC+48V instead. Using Line Input or an External Microphone Connected to an INPUT Terminal Follow the steps below to...
... 1 and channel 2. You can select the audio source that will be recorded to channel 1. Keep the microphone connected when turning off the phantom power. Recording Audio to Channel 2 (CH2) You can use this setting when recording audio for backup purposes. You can activate the low cut filter... the INPUT terminal ON/OFF switch to ON. 2 Set the sensitivity switches for INPUT 1/INPUT 2 to LINE or MIC. • To supply a microphone with phantom power, set the switch to MIC+48V instead. Using Line Input or an External Microphone Connected to an INPUT Terminal Follow the steps below to...
Instruction Manual
Page 107
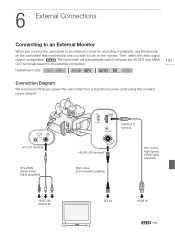
...or playback, use on the monitor. AV OUT terminal STV-250N Stereo Video Cable (supplied) VIDEO IN/ AUDIO IN HDMI OUT terminal HD/SD-SDI terminal* BNC cable (commercially available) HTC-100/S ...High Speed HDMI Cable (supplied) SDI IN HDMI IN * only The camcorder will automatically switch between the AV OUT and HDMI OUT... the terminal on the camcorder that matches the one you power the camcorder from a household power outlet using the compact power adapter. Then, select the video signal output configuration.
...or playback, use on the monitor. AV OUT terminal STV-250N Stereo Video Cable (supplied) VIDEO IN/ AUDIO IN HDMI OUT terminal HD/SD-SDI terminal* BNC cable (commercially available) HTC-100/S ...High Speed HDMI Cable (supplied) SDI IN HDMI IN * only The camcorder will automatically switch between the AV OUT and HDMI OUT... the terminal on the camcorder that matches the one you power the camcorder from a household power outlet using the compact power adapter. Then, select the video signal output configuration.

Instruction Manual
Page 114
... your choice. 8Saving RecordSingas vtoianCgom/Sputheraring Recordings Saving/Sharing Recordings Saving Recordings to a Computer 114 Using the supplied software Data Import Utility to save them as single scenes with them as a single scene. For more ...details, check the Data Import Utility Software Guide, a PDF file* in the [\Manual\English] folder of the supplied Data Import Utility CD-ROM. * Adobe® Reader® 6 or later is required to view the PDF ... additional advantage of automatically joining scenes that you power the camcorder from a household power outlet using the compact...
... your choice. 8Saving RecordSingas vtoianCgom/Sputheraring Recordings Saving/Sharing Recordings Saving Recordings to a Computer 114 Using the supplied software Data Import Utility to save them as single scenes with them as a single scene. For more ...details, check the Data Import Utility Software Guide, a PDF file* in the [\Manual\English] folder of the supplied Data Import Utility CD-ROM. * Adobe® Reader® 6 or later is required to view the PDF ... additional advantage of automatically joining scenes that you power the camcorder from a household power outlet using the compact...
Instruction Manual
Page 115
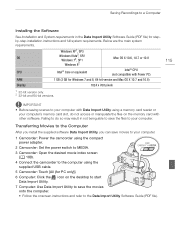
...computer. Below are the main system requirements. icon on the memory card with other software. Transferring Movies to the Computer After you install the supplied software Data Import Utility, you can save the movies onto the computer. • Follow the onscreen instructions and refer to the Data Import ..., SP2 OS Windows 72, SP1 Mac OS X 10.6, 10.7 or 10.8 Windows 82 CPU Intel® Core or equivalent Intel® CPU (not compatible with Power PC) RAM 1 GB (2 GB for Windows 7 and 8, 64-bit version and Mac OS X 10.7 and 10.8) Display 1024 x 768 pixels 1 32-bit version ...
...computer. Below are the main system requirements. icon on the memory card with other software. Transferring Movies to the Computer After you install the supplied software Data Import Utility, you can save the movies onto the computer. • Follow the onscreen instructions and refer to the Data Import ..., SP2 OS Windows 72, SP1 Mac OS X 10.6, 10.7 or 10.8 Windows 82 CPU Intel® Core or equivalent Intel® CPU (not compatible with Power PC) RAM 1 GB (2 GB for Windows 7 and 8, 64-bit version and Mac OS X 10.7 and 10.8) Display 1024 x 768 pixels 1 32-bit version ...
Instruction Manual
Page 119
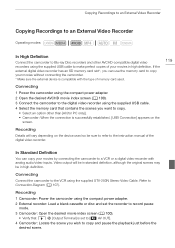
... sure the external device is successfully established, [USB Connection] appears on the device used . Connecting Connect the camcorder to the VCR using the supplied USB cable. 4 Select the memory card that q > [Output Terminal] is set the recorder to record pause mode. 3 Camcorder: Open the... inputs. Video output will vary depending on the screen. Refer to the digital video recorder using the supplied STV-250N Stereo Video Cable. Recording 1 Camcorder: Power the camcorder using the compact power adapter. 2 External recorder: Load a blank cassette or disc and set to [Ò AV OUT...
... sure the external device is successfully established, [USB Connection] appears on the device used . Connecting Connect the camcorder to the VCR using the supplied USB cable. 4 Select the memory card that q > [Output Terminal] is set the recorder to record pause mode. 3 Camcorder: Open the... inputs. Video output will vary depending on the screen. Refer to the digital video recorder using the supplied STV-250N Stereo Video Cable. Recording 1 Camcorder: Power the camcorder using the compact power adapter. 2 External recorder: Load a blank cassette or disc and set to [Ò AV OUT...

Instruction Manual
Page 156
... a problem with this camcorder. - The battery may be heard while the compact power adapter is turned off so charging can start. - The camcorder cannot communicate with your dealer or a Canon Service Center if the problem persists. 156 CHECK THIS FIRST Power supply • Is the battery charged? The battery pack is not a malfunction. Charge...
... a problem with this camcorder. - The battery may be heard while the compact power adapter is turned off so charging can start. - The camcorder cannot communicate with your dealer or a Canon Service Center if the problem persists. 156 CHECK THIS FIRST Power supply • Is the battery charged? The battery pack is not a malfunction. Charge...
Instruction Manual
Page 160
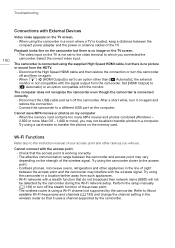
... photos on the strength of the TV. The effective communication range between the camcorder and access point may interfere with the monitor. Try using the supplied High Speed HDMI cable, but there is located, keep a distance between the access point and the camcorder may vary depending on the memory card. Perform... the video terminal to About available Wi-Fi frequencies and channels (A 182) and change the channel setting in the line of sight between the compact power adapter and the power or antenna cables of the wireless signal.
... photos on the strength of the TV. The effective communication range between the camcorder and access point may interfere with the monitor. Try using the supplied High Speed HDMI cable, but there is located, keep a distance between the access point and the camcorder may vary depending on the memory card. Perform... the video terminal to About available Wi-Fi frequencies and channels (A 182) and change the channel setting in the line of sight between the compact power adapter and the power or antenna cables of the wireless signal.

Instruction Manual
Page 163
... recording/playback. Memory card A/B writing error Attempt to recover the data? (Can take up to record movies on the camcorder if power supply was accidentally interrupted while the camcorder was writing to prevent accidental erasure. Troubleshooting Check the memory card - This message will appear the... - Initialize the memory card with one rated SD Speed Class 4, 6 or 10. You may result in the memory card with the supplied USB cable, the camcorder cannot be copied onto the memory card. Card Unable to recognize the data - Memory card cover is write-protected...
... recording/playback. Memory card A/B writing error Attempt to recover the data? (Can take up to record movies on the camcorder if power supply was accidentally interrupted while the camcorder was writing to prevent accidental erasure. Troubleshooting Check the memory card - This message will appear the... - Initialize the memory card with one rated SD Speed Class 4, 6 or 10. You may result in the memory card with the supplied USB cable, the camcorder cannot be copied onto the memory card. Card Unable to recognize the data - Memory card cover is write-protected...

Instruction Manual
Page 164
... of scenes on the memory card selected. Cannot copy the scene. Some scenes were recorded using slow & fast motion, you turn on the camcorder if power supply was accidentally interrupted while the camcorder was writing on the memory card is updating the memory card. Do not disconnect the... power source. - This photo cannot be copied. - There are no scenes on the memory card has reached 3,999 (the maximum number of the memory card - Delete ...
... of scenes on the memory card selected. Cannot copy the scene. Some scenes were recorded using slow & fast motion, you turn on the camcorder if power supply was accidentally interrupted while the camcorder was writing on the memory card is updating the memory card. Do not disconnect the... power source. - This photo cannot be copied. - There are no scenes on the memory card has reached 3,999 (the maximum number of the memory card - Delete ...

Instruction Manual
Page 173
...Central America; Asia: Only in any country with the NTSC system. Maintenance/Others Using the Camcorder Abroad Power Sources You can only play back your recordings on TVs compatible with power supply between 100 and 240 V AC, 50/60 Hz. NTSC is used in the following regions/countries: ...Americas: All of South America (except in French territories like Micronesia, Samoa and Tonga. Consult a Canon Service Center for information on a TV ...
...Central America; Asia: Only in any country with the NTSC system. Maintenance/Others Using the Camcorder Abroad Power Sources You can only play back your recordings on TVs compatible with power supply between 100 and 240 V AC, 50/60 Hz. NTSC is used in the following regions/countries: ...Americas: All of South America (except in French territories like Micronesia, Samoa and Tonga. Consult a Canon Service Center for information on a TV ...

Instruction Manual
Page 177
...for recording with the Tele-converter is attached. • The minimum focusing distance at full telephoto with repeated operations such as start/stop, zooming, and power on/off. Playback OLED 230 min. 240 min. 245 min. 250 min. 350 min. 365 min. 365 min. 370 min. Recording MP4 ... This Tele-converter lens increases the focal length of the camcorder lens by a factor of 1.5. • The Tele-converter cannot be used together with the supplied lens hood with lens barrier. • The image stabilizer is not as effective when the Tele-converter is 1.3 m (4.3 ft.). 177 Recording (typical)*...
...for recording with the Tele-converter is attached. • The minimum focusing distance at full telephoto with repeated operations such as start/stop, zooming, and power on/off. Playback OLED 230 min. 240 min. 245 min. 250 min. 350 min. 365 min. 365 min. 370 min. Recording MP4 ... This Tele-converter lens increases the focal length of the camcorder lens by a factor of 1.5. • The Tele-converter cannot be used together with the supplied lens hood with lens barrier. • The image stabilizer is not as effective when the Tele-converter is 1.3 m (4.3 ft.). 177 Recording (typical)*...
Instruction Manual
Page 181
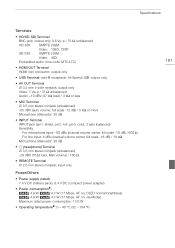
output only • AV OUT Terminal ∅ 3.5 mm 4-pole minijack; input only Power/Others • Power supply (rated) 7.4 V DC (battery pack), 8.4 V DC (compact power adapter) • Power consumption: 4.8 W 4.7 W (17 Mbps, AF on, OLED normal brightness) 4.9 W 4.7 W (17 Mbps, AF on, viewfinder) Maximum rated power consumption: 13.6 W • Operating temperature: 0 - 40 °C (32 - 104 °F) 181 output...
output only • AV OUT Terminal ∅ 3.5 mm 4-pole minijack; input only Power/Others • Power supply (rated) 7.4 V DC (battery pack), 8.4 V DC (compact power adapter) • Power consumption: 4.8 W 4.7 W (17 Mbps, AF on, OLED normal brightness) 4.9 W 4.7 W (17 Mbps, AF on, viewfinder) Maximum rated power consumption: 13.6 W • Operating temperature: 0 - 40 °C (32 - 104 °F) 181 output...
Instruction Manual
Page 182
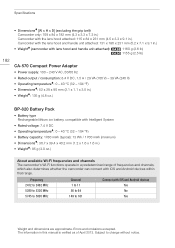
...: 131 x 180 x 231 mm (5.2 x 7.1 x 9.1 in.) • Weight (camcorder with lens hood and handle unit attached): 1160 g (2.6 lb) 1155 g (2.5 lb) 182 CA-570 Compact Power Adapter • Power supply: 100 - 240 V AC, 50/60 Hz • Rated output / consumption: 8.4 V DC, 1.5 A / 29 VA (100 V) - 39 VA (240 V) • Operating temperature: 0 - 40 °C (32...
...: 131 x 180 x 231 mm (5.2 x 7.1 x 9.1 in.) • Weight (camcorder with lens hood and handle unit attached): 1160 g (2.6 lb) 1155 g (2.5 lb) 182 CA-570 Compact Power Adapter • Power supply: 100 - 240 V AC, 50/60 Hz • Rated output / consumption: 8.4 V DC, 1.5 A / 29 VA (100 V) - 39 VA (240 V) • Operating temperature: 0 - 40 °C (32...


