
Instruction Manual
Page 5
... 31 Using the Menus 32 FUNC Menu 32 Setup Menus 33 3. Recording 35 Recording Video and Photos 35 Preparing to Record 35 Basic Recording 36 Reviewing the Latest Clip Recorded 37 Using the Fan 38 Onscreen Displays 38 5 Video Configuration: Resolution, Bit Rate and Frame Rate 42 Selecting Internal Recording 42...
... 31 Using the Menus 32 FUNC Menu 32 Setup Menus 33 3. Recording 35 Recording Video and Photos 35 Preparing to Record 35 Basic Recording 36 Reviewing the Latest Clip Recorded 37 Using the Fan 38 Onscreen Displays 38 5 Video Configuration: Resolution, Bit Rate and Frame Rate 42 Selecting Internal Recording 42...
Instruction Manual
Page 10
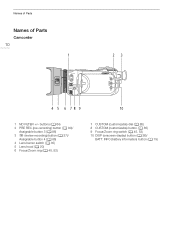
Names of Parts Names of Parts Camcorder 10 1 23 4 5 6 78 9 10 1 ND FILTER +/- INFO (battery information) button (A 19) buttons (A 64) 2 PRE REC (pre-recording) button (A 80)/ Assignable button 3 (A 86) 3 u (review recording) button (A 37)/ Assignable button 4 (A 86) 4 Lens barrier switch (A 35) 5 Lens hood (A 20) 6 Focus/Zoom ring (A 45, 52) 7 CUSTOM (customizable) dial (A 85) 8 CUSTOM (customizable) button (A 85) 9 Focus/Zoom ring switch (A 45, 52) 10 DISP (onscreen display) button (A 38)/ BATT.
Names of Parts Names of Parts Camcorder 10 1 23 4 5 6 78 9 10 1 ND FILTER +/- INFO (battery information) button (A 19) buttons (A 64) 2 PRE REC (pre-recording) button (A 80)/ Assignable button 3 (A 86) 3 u (review recording) button (A 37)/ Assignable button 4 (A 86) 4 Lens barrier switch (A 35) 5 Lens hood (A 20) 6 Focus/Zoom ring (A 45, 52) 7 CUSTOM (customizable) dial (A 85) 8 CUSTOM (customizable) button (A 85) 9 Focus/Zoom ring switch (A 45, 52) 10 DISP (onscreen display) button (A 38)/ BATT.
Instruction Manual
Page 37
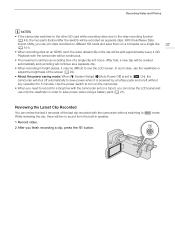
...viewfinder or adjust the brightness of a single clip is 6 hours. With thesoftware Data Import Utility, you need to record for 5 minutes. Reviewing the Latest Clip Recorded You can review the last 4 seconds of the last clip recorded with the camcorder without any operation for a long time with the camcorder will be... NOTES • If the camcorder switches to the other SD card while recording video due to save power when it may be difficult to While reviewing the clip, there will be no sound from the built-in speaker. 1 Record video. 2 After you can close the LCD panel and use ...
...viewfinder or adjust the brightness of a single clip is 6 hours. With thesoftware Data Import Utility, you need to record for 5 minutes. Reviewing the Latest Clip Recorded You can review the last 4 seconds of the last clip recorded with the camcorder without any operation for a long time with the camcorder will be... NOTES • If the camcorder switches to the other SD card while recording video due to save power when it may be difficult to While reviewing the clip, there will be no sound from the built-in speaker. 1 Record video. 2 After you can close the LCD panel and use ...
Instruction Manual
Page 87
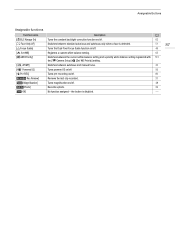
... Always On] [~ Face Only AF] [ Focus Guide] [Å Set WB] [Ä WB Priority] [B AF/MF] [± Powered IS] [z Pre REC] [ Rec Review] [^ Magnification] [ Photo] [j Off] Description A Turns the constant backlight correction function on/off . 51 87 46 Registers a custom white balance setting. 65 Switches between the current...[Set WB Priority] setting. Switches between autofocus and manual focus. 45 Turns powered IS on/off. 56 Turns pre-recording on/off. 80 Reviews the last clip recorded. 37 Turns magnification on/off. 48 Records a photo. 36 No function assigned -
... Always On] [~ Face Only AF] [ Focus Guide] [Å Set WB] [Ä WB Priority] [B AF/MF] [± Powered IS] [z Pre REC] [ Rec Review] [^ Magnification] [ Photo] [j Off] Description A Turns the constant backlight correction function on/off . 51 87 46 Registers a custom white balance setting. 65 Switches between the current...[Set WB Priority] setting. Switches between autofocus and manual focus. 45 Turns powered IS on/off. 56 Turns pre-recording on/off. 80 Reviews the last clip recorded. 37 Turns magnification on/off. 48 Records a photo. 36 No function assigned -

Instruction Manual
Page 106
...rest of the necessary TCP/IP settings in step 1. 4 When the confirmation message appears, touch [OK] and then touch [X]. Saving the Configuration 1 Review the access point's configuration and then touch [OK]. • Drag your finger up /down . 4 After completing the necessary settings, touch [OK]....configuration profile. • If you selected a network configuration profile that contained previous settings, these will be overwritten with the following procedure to review and save the configuration (A 106). 2 To enter the IP address, touch the [i] button next to [IP Address]. • ...
...rest of the necessary TCP/IP settings in step 1. 4 When the confirmation message appears, touch [OK] and then touch [X]. Saving the Configuration 1 Review the access point's configuration and then touch [OK]. • Drag your finger up /down . 4 After completing the necessary settings, touch [OK]....configuration profile. • If you selected a network configuration profile that contained previous settings, these will be overwritten with the following procedure to review and save the configuration (A 106). 2 To enter the IP address, touch the [i] button next to [IP Address]. • ...
Instruction Manual
Page 110
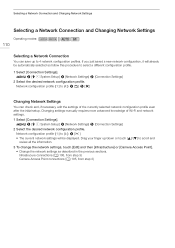
Drag your finger up to scroll and review all the information. 3 To change the network settings, touch [Edit] and then [Infrastructure] or [Camera Access Point]. • Change the network settings as described in ...
Drag your finger up to scroll and review all the information. 3 To change the network settings, touch [Edit] and then [Infrastructure] or [Camera Access Point]. • Change the network settings as described in ...
Instruction Manual
Page 127
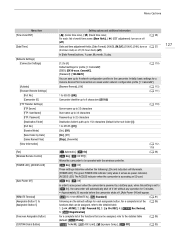
...[j Off ] Allows the camcorder to be assigned, refer to the detailed table. 1: [B AF/MF], 2: [± Powered IS], 3: [z Pre REC], 4: [ Rec Review], 5: [^ Magnification] (A 86) For a complete list of world time zones ([New York]), [$] (DST adjustment): turn on or off (off) (A 28) Date and time...) (off) In [Date Format] options, Y=year, M=month, D=day. 127 [1:] to [4:] Default settings for profile [1: CameraAP]: [SSID]: [GX10-xxxx_Canon0C], [Password]: [12345678] (A 110) You can be assigned, refer to 4 network configuration profiles in the camcorder. Menu Options Menu item [Time...
...[j Off ] Allows the camcorder to be assigned, refer to the detailed table. 1: [B AF/MF], 2: [± Powered IS], 3: [z Pre REC], 4: [ Rec Review], 5: [^ Magnification] (A 86) For a complete list of world time zones ([New York]), [$] (DST adjustment): turn on or off (off) (A 28) Date and time...) (off) In [Date Format] options, Y=year, M=month, D=day. 127 [1:] to [4:] Default settings for profile [1: CameraAP]: [SSID]: [GX10-xxxx_Canon0C], [Password]: [12345678] (A 110) You can be assigned, refer to 4 network configuration profiles in the camcorder. Menu Options Menu item [Time...

Instruction Manual
Page 150
...-recording 80 R Recording 36 Reference tables (charging, usage and recording times 147 Relay recording 43 Remote controller 81 Remote sensor 24 Resolution (frame size 42 Reviewing a clip 37 S Saving clips to a computer 101 SD card Compatible SD cards 29 Initializing 31 Inserting/Removing 30 Selecting the card for recording 31 Search...
...-recording 80 R Recording 36 Reference tables (charging, usage and recording times 147 Relay recording 43 Remote controller 81 Remote sensor 24 Resolution (frame size 42 Reviewing a clip 37 S Saving clips to a computer 101 SD card Compatible SD cards 29 Initializing 31 Inserting/Removing 30 Selecting the card for recording 31 Search...


