User Guide
Page 4
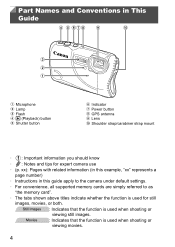
... under default settings. • For convenience, all supported memory cards are simply referred to as "the memory card". • The tabs shown above titles indicate whether the function is used for expert camera use • (p. Movies : Indicates that the function is used when shooting or viewing movies. 4 Part Names and Conventions in this example, "xx" represents a page number) • Instructions in This Guide Microphone Lamp Flash 1 (Playback) button Shutter button Indicator Power button GPS antenna Lens Shoulder strap/carabiner strap mount • : Important...
... under default settings. • For convenience, all supported memory cards are simply referred to as "the memory card". • The tabs shown above titles indicate whether the function is used for expert camera use • (p. Movies : Indicates that the function is used when shooting or viewing movies. 4 Part Names and Conventions in this example, "xx" represents a page number) • Instructions in This Guide Microphone Lamp Flash 1 (Playback) button Shutter button Indicator Power button GPS antenna Lens Shoulder strap/carabiner strap mount • : Important...
User Guide
Page 6
... 2 Compatible Memory Cards 2 Preliminary Notes and Legal Information 3 Part Names and Conventions in Program AE Mode (G Mode 100 Image Brightness (Exposure Compensation 101 Color and Continuous Shooting .... 104 Shooting Range and Focusing...... 109 Flash 117 6 Playback Mode 121 Viewing 122 Browsing and Filtering Images...... 128 Image Viewing Options 131 Protecting Images 134 Erasing Images 138 Rotating Images 140 Image Categories 142 Editing Still Images 146 Editing Movies 151 7 Setting Menu 153 Adjusting Basic Camera Functions 154 8 Accessories 163 Tips on Using Included...
... 2 Compatible Memory Cards 2 Preliminary Notes and Legal Information 3 Part Names and Conventions in Program AE Mode (G Mode 100 Image Brightness (Exposure Compensation 101 Color and Continuous Shooting .... 104 Shooting Range and Focusing...... 109 Flash 117 6 Playback Mode 121 Viewing 122 Browsing and Filtering Images...... 128 Image Viewing Options 131 Protecting Images 134 Erasing Images 138 Rotating Images 140 Image Categories 142 Editing Still Images 146 Editing Movies 151 7 Setting Menu 153 Adjusting Basic Camera Functions 154 8 Accessories 163 Tips on Using Included...

User Guide
Page 22
... longer displayed. • The current time is displayed if you wait too long in step 2 after pressing the m button before you press the n button. Press the opqr buttons to dismiss the time display and repeat step 2. • You can be changed as needed. Initial Preparations Display Language The display language can also change the display language by pressing the n button and choosing [Language ] on the 3 tab. 22 Enter Playback mode. Set the display language.
... longer displayed. • The current time is displayed if you wait too long in step 2 after pressing the m button before you press the n button. Press the opqr buttons to dismiss the time display and repeat step 2. • You can be changed as needed. Initial Preparations Display Language The display language can also change the display language by pressing the n button and choosing [Language ] on the 3 tab. 22 Enter Playback mode. Set the display language.
User Guide
Page 28
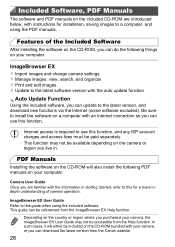
... latest version, and download new functions via the Internet (some software excluded). ImageBrowser EX User Guide Refer to this for installation, saving images to a computer, and using the included software. PDF Manuals Installing the software on the CD-ROM will either be included on the CD-ROM bundled with the information in . ImageBrowser EX Import images and change camera settings Manage images: view, search, and organize Print and edit images Update to the latest...
... latest version, and download new functions via the Internet (some software excluded). ImageBrowser EX User Guide Refer to this for installation, saving images to a computer, and using the included software. PDF Manuals Installing the software on the CD-ROM will either be included on the CD-ROM bundled with the information in . ImageBrowser EX Import images and change camera settings Manage images: view, search, and organize Print and edit images Update to the latest...

User Guide
Page 30
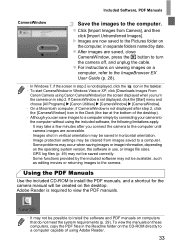
... Software and PDF Manuals Windows 7 and Mac OS X 10.6 are used here for the sake of the included interface cable (p. 2) in the orientation shown, insert the plug fully into the camera terminal ( ). 30 Click [Easy Installation] and follow the onscreen instructions to connect the camera, connect it , and then double-click the icon displayed. Insert the included CD-ROM (DIGITAL CAMERA Solution Disk) (p. 2) in the computer's CD-ROM drive. When a message...
... Software and PDF Manuals Windows 7 and Mac OS X 10.6 are used here for the sake of the included interface cable (p. 2) in the orientation shown, insert the plug fully into the camera terminal ( ). 30 Click [Easy Installation] and follow the onscreen instructions to connect the camera, connect it , and then double-click the icon displayed. Insert the included CD-ROM (DIGITAL CAMERA Solution Disk) (p. 2) in the computer's CD-ROM drive. When a message...
User Guide
Page 31
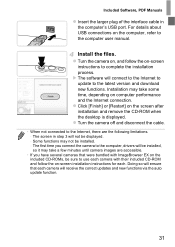
... sure to use each camera with their included CD-ROM and follow the on-screen instructions to the computer, drivers will be installed, so it may take some time, depending on the computer, refer to the latest version and download new functions. Install the files. Included Software, PDF Manuals Insert the larger plug of the interface cable in step 3 will not be displayed. - For details about USB connections on...
... sure to use each camera with their included CD-ROM and follow the on-screen instructions to the computer, drivers will be installed, so it may take some time, depending on the computer, refer to the latest version and download new functions. Install the files. Included Software, PDF Manuals Insert the larger plug of the interface cable in step 3 will not be displayed. - For details about USB connections on...
User Guide
Page 33
... displayed after you turn the camera off, and unplug the cable. It may occur when saving images or image information, depending on the operating system version, the software in Windows Vista or XP, click [Downloads Images From Canon Camera using Canon CameraWindow] on computers that do not meet the system requirements (p. 29). Some problems may take a few minutes after step 2, click the [CameraWindow] icon in step 2. Images shot in horizontal orientation. - Image protection settings...
... displayed after you turn the camera off, and unplug the cable. It may occur when saving images or image information, depending on the operating system version, the software in Windows Vista or XP, click [Downloads Images From Canon Camera using Canon CameraWindow] on computers that do not meet the system requirements (p. 29). Some problems may take a few minutes after step 2, click the [CameraWindow] icon in step 2. Images shot in horizontal orientation. - Image protection settings...

User Guide
Page 50
...; Saving GPS log files is not possible when the memory card writeprotect tab is in the locked position. For this reason, if the camera is off and you do any of the following things. -Display the log files -Display the date/time setting screen -Display the time zone setting screen • Removing the battery after battery replacement, turn it off again before removing the memory card. • When using the logger function, exercise caution when turning the camera over...
...; Saving GPS log files is not possible when the memory card writeprotect tab is in the locked position. For this reason, if the camera is off and you do any of the following things. -Display the log files -Display the date/time setting screen -Display the time zone setting screen • Removing the battery after battery replacement, turn it off again before removing the memory card. • When using the logger function, exercise caution when turning the camera over...
User Guide
Page 51
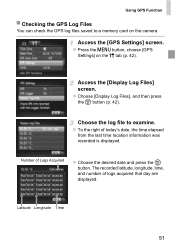
... n button, choose [GPS Settings] on the camera. Choose [Display Log Files], and then press the m button (p. 42). Access the [GPS Settings] screen. X To the right of Logs Acquired Choose the desired date and press the m button. Access the [Display Log Files] screen. Choose the log file to a memory card on the 3 tab (p. 42). Number of today's date, the time elapsed from the last time location information was recorded is displayed. Using GPS Function Checking...
... n button, choose [GPS Settings] on the camera. Choose [Display Log Files], and then press the m button (p. 42). Access the [GPS Settings] screen. X To the right of Logs Acquired Choose the desired date and press the m button. Access the [Display Log Files] screen. Choose the log file to a memory card on the 3 tab (p. 42). Number of today's date, the time elapsed from the last time location information was recorded is displayed. Using GPS Function Checking...

User Guide
Page 90
... camera in mode. - Before each shot. • Any sounds from camera operations during movie recording will be muted. If the daylight saving time (p. 20) or time zone settings have been changed . • Clips are recorded for Other Purposes Still Images Movies Auto Clip Recording (Movie Digest) You can be viewed by shooting still images. Follow step 1 on the same day in other ways. • Battery life is and cannot be changed (p. 160) - If the movie file size...
... camera in mode. - Before each shot. • Any sounds from camera operations during movie recording will be muted. If the daylight saving time (p. 20) or time zone settings have been changed . • Clips are recorded for Other Purposes Still Images Movies Auto Clip Recording (Movie Digest) You can be viewed by shooting still images. Follow step 1 on the same day in other ways. • Battery life is and cannot be changed (p. 160) - If the movie file size...

User Guide
Page 105
Color and Continuous Shooting Custom White Balance For image colors that look unnatural if you are shooting. Aim the camera at a plain white subject, so that will illuminate your shot, adjust white balance to choose . Press the n button. X The tint of the screen changes once the white balance data has been recorded. • Colors may look natural under the same light source that the entire screen is white. Set the white balance under the light in "Adjusting White Balance" to suit the light source...
Color and Continuous Shooting Custom White Balance For image colors that look unnatural if you are shooting. Aim the camera at a plain white subject, so that will illuminate your shot, adjust white balance to choose . Press the n button. X The tint of the screen changes once the white balance data has been recorded. • Colors may look natural under the same light source that the entire screen is white. Set the white balance under the light in "Adjusting White Balance" to suit the light source...

User Guide
Page 119
... image stabilization. *The setting is changed to [Off]. Movies Deactivating Powered IS Powered IS reduces slow camera shake that may occur when recording telephoto movies. Choose [Powered IS], and then choose [Off] (p. 42). • [Powered IS] settings are not applied when [IS Mode] is set [IS Mode] to [Continuous] for the Continuous shooting conditions is active only at the moment of shooting. Configure the setting. Flash Still Images Changing the IS Mode Settings Movies Access the setting screen. Shoot...
... image stabilization. *The setting is changed to [Off]. Movies Deactivating Powered IS Powered IS reduces slow camera shake that may occur when recording telephoto movies. Choose [Powered IS], and then choose [Off] (p. 42). • [Powered IS] settings are not applied when [IS Mode] is set [IS Mode] to [Continuous] for the Continuous shooting conditions is active only at the moment of shooting. Configure the setting. Flash Still Images Changing the IS Mode Settings Movies Access the setting screen. Shoot...

User Guide
Page 159
... can change how the camera assigns file numbers. Image numbering is reset to the ImageBrowser EX User Guide (p. 28) for information on the card folder structure and image formats. Date-Based Image Storage Instead of saving images in folders created each month, you switch memory cards. Adjusting Basic Camera Functions File Numbering Your shots are numbered consecutively (until the 9999th shot is created. • Regardless of the option selected in this setting, shots may be saved in folders created on the shooting date. 159 Choose [File Numbering...
... can change how the camera assigns file numbers. Image numbering is reset to the ImageBrowser EX User Guide (p. 28) for information on the card folder structure and image formats. Date-Based Image Storage Instead of saving images in folders created each month, you switch memory cards. Adjusting Basic Camera Functions File Numbering Your shots are numbered consecutively (until the 9999th shot is created. • Regardless of the option selected in this setting, shots may be saved in folders created on the shooting date. 159 Choose [File Numbering...

User Guide
Page 162
... [Sound Options] (p. 155), image registered in [Start-up Image] (p. 156), [Time Zone] (p. 160), and [Video System] (p. 171) - The shooting mode (p. 77) - Configure the setting. Logged location information and shooting date and time (p. 48) 162 Access the [Reset All] screen. Adjusting Basic Camera Functions Display Language Change the display language as needed. Choose [Language ], and then press the m button. Press the opqr buttons to choose [OK], and then press the m button. Custom white balance data you can also access the [Language] screen in Color...
... [Sound Options] (p. 155), image registered in [Start-up Image] (p. 156), [Time Zone] (p. 160), and [Video System] (p. 171) - The shooting mode (p. 77) - Configure the setting. Logged location information and shooting date and time (p. 48) 162 Access the [Reset All] screen. Adjusting Basic Camera Functions Display Language Change the display language as needed. Choose [Language ], and then press the m button. Press the opqr buttons to choose [OK], and then press the m button. Custom white balance data you can also access the [Language] screen in Color...
User Guide
Page 184
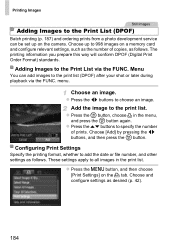
... the date or file number, and other settings as desired (p. 42). 184 Adding Images to the Print List via the FUNC. Choose an image. Press the n button, and then choose [Print Settings] on a memory card and configure relevant settings, such as the number of prints. Printing Images Still Images Adding Images to the Print List (DPOF) Batch printing (p. 187) and ordering prints from a photo development service can add images to the print list (DPOF) after your shot...
... the date or file number, and other settings as desired (p. 42). 184 Adding Images to the Print List via the FUNC. Choose an image. Press the n button, and then choose [Print Settings] on a memory card and configure relevant settings, such as the number of prints. Printing Images Still Images Adding Images to the Print List (DPOF) Batch printing (p. 187) and ordering prints from a photo development service can add images to the print list (DPOF) after your shot...

User Guide
Page 190
... use is permitted (p. 3). Remove the Eye-Fi card before entering hospitals, aircraft, or other areas where transmission is set to the card's user manual or contact the manufacturer for instructions on the shooting screen (in regular information display mode) or playback screen (in simple information display mode). (Gray) Not connected (Blinking white) Connecting (White) Connected (Animated) Transfer in progress Interrupted Not communicating Error acquiring Eye-Fi card information (Restart the camera. To resolve this icon may indicate a problem with the card.) Images labeled...
... use is permitted (p. 3). Remove the Eye-Fi card before entering hospitals, aircraft, or other areas where transmission is set to the card's user manual or contact the manufacturer for instructions on the shooting screen (in regular information display mode) or playback screen (in simple information display mode). (Gray) Not connected (Blinking white) Connecting (White) Connected (Animated) Transfer in progress Interrupted Not communicating Error acquiring Eye-Fi card information (Restart the camera. To resolve this icon may indicate a problem with the card.) Images labeled...

User Guide
Page 196
... the lighting in flash shots. Shooting Movies The elapsed time shown is incorrect, or recording is interrupted. • Use the camera to format the memory card, or switch to a card that even if the elapsed time display is incorrect, the length of the memory card (p. 158). • Lower the image quality (p. 70). • Switch to shoot, because the lamp is not possible to a memory card that pass in Each Shooting Mode", "FUNC. Note that supports high-speed recording...
... the lighting in flash shots. Shooting Movies The elapsed time shown is incorrect, or recording is interrupted. • Use the camera to format the memory card, or switch to a card that even if the elapsed time display is incorrect, the length of the memory card (p. 158). • Lower the image quality (p. 70). • Switch to shoot, because the lamp is not possible to a memory card that pass in Each Shooting Mode", "FUNC. Note that supports high-speed recording...

User Guide
Page 199
... a Canon Customer Support Help Desk. Print error • Check the paper size setting. A camera error was detected. Switch to Playback mode to print computer-edited images or images shot with ink absorber replacement. 199 File Error • It may indicate camera damage. Reduce the number of this error message is correct, restart the printer and complete the setting on the memory card prevented printing or image transfer to [Auto Reset] (p. 159), or format the memory card (p. 157). In this case, write down the error number (Exx) and contact a Canon Customer Support Help Desk...
... a Canon Customer Support Help Desk. Print error • Check the paper size setting. A camera error was detected. Switch to Playback mode to print computer-edited images or images shot with ink absorber replacement. 199 File Error • It may indicate camera damage. Reduce the number of this error message is correct, restart the printer and complete the setting on the memory card prevented printing or image transfer to [Auto Reset] (p. 159), or format the memory card (p. 157). In this case, write down the error number (Exx) and contact a Canon Customer Support Help Desk...

User Guide
Page 202
...Flash (p. 117) Focusing range (p. 109) File size Still images: Resolution Movies: Movie length Protection (p. 134) Favorite (p. 142) My Colors (pp. 106, 148), White balance correction (p. 81) Red-eye correction (pp. 69, 150) Shooting date/time (p. 19) • Some information may not be displayed when viewing images on a TV (p. 168). 202 On-Screen Information Playback (Detailed Information Display) Movies (pp. 54, 122), Switch display (GPS information) (p. 126) My Category (p. 143) Shooting mode (p. 204) ISO speed (p. 102), Playback speed (p. 84) Exposure compensation level (p. 101) White...
...Flash (p. 117) Focusing range (p. 109) File size Still images: Resolution Movies: Movie length Protection (p. 134) Favorite (p. 142) My Colors (pp. 106, 148), White balance correction (p. 81) Red-eye correction (pp. 69, 150) Shooting date/time (p. 19) • Some information may not be displayed when viewing images on a TV (p. 168). 202 On-Screen Information Playback (Detailed Information Display) Movies (pp. 54, 122), Switch display (GPS information) (p. 126) My Category (p. 143) Shooting mode (p. 204) ISO speed (p. 102), Playback speed (p. 84) Exposure compensation level (p. 101) White...
User Guide
Page 213
... Custom white balance 105 D Date/time Adding date/time to images 66 Changing 21 Setting 19 World clock 160 Defaults J Reset all DIGITAL CAMERA Solution Disk 2 Digital tele-converter 111 Digital zoom 62 Display language 22 DPOF 184 Drive mode 108 E Editing Cropping 147 i-Contrast 149 My Colors 148 Red-eye correction 150 Resizing images 146 Erasing 138 Erasing all 138 Error messages 198 Exposure AE lock 101 Compensation 101 FE lock 118 Eye-Fi cards 2, 190 F Face AiAF (AF frame mode 112 Face self-timer (shooting mode 93...
... Custom white balance 105 D Date/time Adding date/time to images 66 Changing 21 Setting 19 World clock 160 Defaults J Reset all DIGITAL CAMERA Solution Disk 2 Digital tele-converter 111 Digital zoom 62 Display language 22 DPOF 184 Drive mode 108 E Editing Cropping 147 i-Contrast 149 My Colors 148 Red-eye correction 150 Resizing images 146 Erasing 138 Erasing all 138 Error messages 198 Exposure AE lock 101 Compensation 101 FE lock 118 Eye-Fi cards 2, 190 F Face AiAF (AF frame mode 112 Face self-timer (shooting mode 93...


