
iP8500 Quick Start Guide
Page 4
... NY 11042 Under the copyright laws, this manual thoroughly in the U.S. Trademarks z Canon is made regarding non-Canon products was compiled from publicly available information. and other countries. z Microsoft® and Windows® are registered trademarks of Microsoft Corporation in part, without notice. has reviewed ... thereof are not guaranteed or warranted, and they be understood to be an easy-to-use guide to your Canon PIXMA iP8500 Photo Printer. and other countries. z Macintosh, Mac and the Mac logo are not intended to change without the prior written ...
... NY 11042 Under the copyright laws, this manual thoroughly in the U.S. Trademarks z Canon is made regarding non-Canon products was compiled from publicly available information. and other countries. z Microsoft® and Windows® are registered trademarks of Microsoft Corporation in part, without notice. has reviewed ... thereof are not guaranteed or warranted, and they be understood to be an easy-to-use guide to your Canon PIXMA iP8500 Photo Printer. and other countries. z Macintosh, Mac and the Mac logo are not intended to change without the prior written ...
iP8500 Quick Start Guide
Page 5
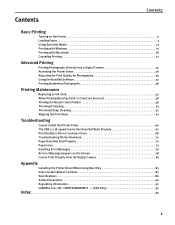
Contents Contents Basic Printing Turning on the Printer 2 Loading Paper 3 Using Specialty Media 13 Printing with Windows 15 Printing with Macintosh 18 Canceling Printing 21 Advanced Printing Printing Photographs Directly from a Digital Camera 22 Accessing the Printer Driver 28 Adjusting the Print ... 81 Appendix Installing the Printer Driver When Using Mac OS 9 83 User's Guide Table of Contents 85 Specifications 86 Safety Precautions 90 Regulatory Information 92 CANON U.S.A., INC. LIMITED WARRANTY --- (USA Only 93 Index 95 1
Contents Contents Basic Printing Turning on the Printer 2 Loading Paper 3 Using Specialty Media 13 Printing with Windows 15 Printing with Macintosh 18 Canceling Printing 21 Advanced Printing Printing Photographs Directly from a Digital Camera 22 Accessing the Printer Driver 28 Adjusting the Print ... 81 Appendix Installing the Printer Driver When Using Mac OS 9 83 User's Guide Table of Contents 85 Specifications 86 Safety Precautions 90 Regulatory Information 92 CANON U.S.A., INC. LIMITED WARRANTY --- (USA Only 93 Index 95 1

iP8500 Quick Start Guide
Page 6
Then click the feature you want to know more information, view the iP8500 User's Guide on the Printer 1 Press the POWER button. Clicking ? ...Page Setup dialog box or Print dialog box, click ? While in the upper right corner. When the Help window appears, select your printer and how to steady (nonflashing) green when the printer is ready. 2 For more about ...each setting. in the printer's properties window, press the F1 key, or click ? Turning on the Setup Software & User's Guide CD-ROM, or use them...
Then click the feature you want to know more information, view the iP8500 User's Guide on the Printer 1 Press the POWER button. Clicking ? ...Page Setup dialog box or Print dialog box, click ? While in the upper right corner. When the Help window appears, select your printer and how to steady (nonflashing) green when the printer is ready. 2 For more about ...each setting. in the printer's properties window, press the F1 key, or click ? Turning on the Setup Software & User's Guide CD-ROM, or use them...

iP8500 Quick Start Guide
Page 11
...When paper is curled, hold the opposing curled corners and gently bend them in the Cassette z For detailed information on the specialty media Canon provides for detailed instructions on how to load envelopes and specialty media into the Sheet Feeder with its various printers, refer to 20 sheets...; You can load up to "Using Specialty Media" on page 13. For a detailed description of the printer driver settings, refer to "Printing with Windows" on page 15, or "Printing with Macintosh" on page 18. „ Loading Plain Paper in the opposite direction until the paper becomes completely flat. ...
...When paper is curled, hold the opposing curled corners and gently bend them in the Cassette z For detailed information on the specialty media Canon provides for detailed instructions on how to load envelopes and specialty media into the Sheet Feeder with its various printers, refer to 20 sheets...; You can load up to "Using Specialty Media" on page 13. For a detailed description of the printer driver settings, refer to "Printing with Windows" on page 15, or "Printing with Macintosh" on page 18. „ Loading Plain Paper in the opposite direction until the paper becomes completely flat. ...

iP8500 Quick Start Guide
Page 16
...; Do not extend the Cassette. • Load the paper lengthways regardless of the direction of the document. • You can load up to "Printing with Windows" on page 15, or "Printing with Macintosh" on page 18. 12
...; Do not extend the Cassette. • Load the paper lengthways regardless of the direction of the document. • You can load up to "Printing with Windows" on page 15, or "Printing with Macintosh" on page 18. 12

iP8500 Quick Start Guide
Page 19
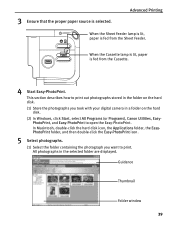
When the Sheet Feeder lamp is lit, paper is fed from the Sheet Feeder. When the Cassette lamp is lit, paper is fed from the Cassette. 4 Create a document or open a file to print. 15 See "Loading Paper" on page 3. 3 Ensure that appear may vary, depending on the software application you are for printing in Windows XP. 1 Turn on page 2. 2 Load the paper in this section are using. See "Turning on the Printer" on the printer. z The steps described in the printer. Basic Printing Printing with Windows z The menu screens and dialog boxes that the proper paper source is selected.
When the Sheet Feeder lamp is lit, paper is fed from the Sheet Feeder. When the Cassette lamp is lit, paper is fed from the Cassette. 4 Create a document or open a file to print. 15 See "Loading Paper" on page 3. 3 Ensure that appear may vary, depending on the software application you are for printing in Windows XP. 1 Turn on page 2. 2 Load the paper in this section are using. See "Turning on the Printer" on the printer. z The steps described in the printer. Basic Printing Printing with Windows z The menu screens and dialog boxes that the proper paper source is selected.

iP8500 Quick Start Guide
Page 21
...Changing the Paper Source" in the User's Guide or Help. For a detailed description of the Paper Source settings, refer to "Printer Driver Functions (Windows)" in the User's Guide. See "Canceling Printing" on the Main tab. z Click Cancel Printing on the printer. z To adjust the Print ...taskbar. Some applications do not have a preview function. 7 Print the document. (1) Click Print or OK. To show BJ Status Monitor, click Canon PIXMA iP8500 on the printer. BJ Status Monitor opens automatically when a printer error occurs. 17 Basic Printing z From the Page Setup tab, select the ...
...Changing the Paper Source" in the User's Guide or Help. For a detailed description of the Paper Source settings, refer to "Printer Driver Functions (Windows)" in the User's Guide. See "Canceling Printing" on the Main tab. z Click Cancel Printing on the printer. z To adjust the Print ...taskbar. Some applications do not have a preview function. 7 Print the document. (1) Click Print or OK. To show BJ Status Monitor, click Canon PIXMA iP8500 on the printer. BJ Status Monitor opens automatically when a printer error occurs. 17 Basic Printing z From the Page Setup tab, select the ...

iP8500 Quick Start Guide
Page 32
...be opened from either within an application, or directly from the Windows Start menu. This manual refers to the Windows documentation. 28 For more steps involved in opening the printer properties dialog box from Properties, the default Window tabs (e.g., the Ports tab, or the Details tab) are not... name of your printer. 3 Open the File menu and select Printing Preferences (or Properties). When opening the printer properties dialog box. For non-Windows XP, click Start, select Settings, and then Printers. 2 Double-click the icon of your printer is used for your application. 1 In your...
...be opened from either within an application, or directly from the Windows Start menu. This manual refers to the Windows documentation. 28 For more steps involved in opening the printer properties dialog box from Properties, the default Window tabs (e.g., the Ports tab, or the Details tab) are not... name of your printer. 3 Open the File menu and select Printing Preferences (or Properties). When opening the printer properties dialog box. For non-Windows XP, click Start, select Settings, and then Printers. 2 Double-click the icon of your printer is used for your application. 1 In your...

iP8500 Quick Start Guide
Page 33
...detailed information, refer to improve print quality based on the media type (plain paper, Photo Paper Pro, and so on your operating system: In Windows z Press the F1 key. in either of the following ways depending on ). For more about. z Click ? Your printer automatically adjusts printer... the Page Setup dialog box or the Print dialog box. „ Adjusting Print Quality Features that can significantly improve the quality of Canon Specialty Papers and ink tanks for printing photographs can be controlled with the printer driver. You can also customize the Print Quality settings...
...detailed information, refer to improve print quality based on the media type (plain paper, Photo Paper Pro, and so on your operating system: In Windows z Press the F1 key. in either of the following ways depending on ). For more about. z Click ? Your printer automatically adjusts printer... the Page Setup dialog box or the Print dialog box. „ Adjusting Print Quality Features that can significantly improve the quality of Canon Specialty Papers and ink tanks for printing photographs can be controlled with the printer driver. You can also customize the Print Quality settings...

iP8500 Quick Start Guide
Page 35
... under-exposure before printing. See "Opening the Printer Properties Dialog Box from Your Application Program" on page 28. 2 Click the Effects tab. 31 In Windows Me or Windows 98 If Background Printing has been disabled, the Photo Optimizer PRO function is complete, click Print. To automatically optimize the image: Photo Optimizer PRO...
... under-exposure before printing. See "Opening the Printer Properties Dialog Box from Your Application Program" on page 28. 2 Click the Effects tab. 31 In Windows Me or Windows 98 If Background Printing has been disabled, the Photo Optimizer PRO function is complete, click Print. To automatically optimize the image: Photo Optimizer PRO...
iP8500 Quick Start Guide
Page 36
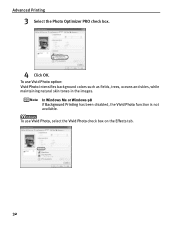
To use Vivid Photo option: Vivid Photo intensifies background colors such as fields, trees, oceans and skies, while maintaining natural skin tones in the images. In Windows Me or Windows 98 If Background Printing has been disabled, the Vivid Photo function is not available. To use Vivid Photo, select the Vivid Photo check box on the Effects tab. 32 Advanced Printing 3 Select the Photo Optimizer PRO check box. 4 Click OK.
To use Vivid Photo option: Vivid Photo intensifies background colors such as fields, trees, oceans and skies, while maintaining natural skin tones in the images. In Windows Me or Windows 98 If Background Printing has been disabled, the Vivid Photo function is not available. To use Vivid Photo, select the Vivid Photo check box on the Effects tab. 32 Advanced Printing 3 Select the Photo Optimizer PRO check box. 4 Click OK.
iP8500 Quick Start Guide
Page 37
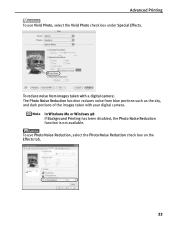
In Windows Me or Windows 98 If Background Printing has been disabled, the Photo Noise Reduction function is not available. To use Vivid Photo, select the Vivid Photo check box under Special Effects. To reduce noise from images taken with a digital camera: The Photo Noise Reduction function reduces noise from blue portions such as the sky, and dark portions of the images taken with your digital camera. Advanced Printing To use Photo Noise Reduction, select the Photo Noise Reduction check box on the Effects tab. 33
In Windows Me or Windows 98 If Background Printing has been disabled, the Photo Noise Reduction function is not available. To use Vivid Photo, select the Vivid Photo check box under Special Effects. To reduce noise from images taken with a digital camera: The Photo Noise Reduction function reduces noise from blue portions such as the sky, and dark portions of the images taken with your digital camera. Advanced Printing To use Photo Noise Reduction, select the Photo Noise Reduction check box on the Effects tab. 33
iP8500 Quick Start Guide
Page 41
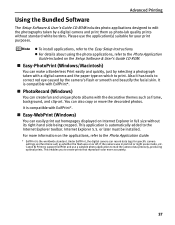
... that reproduce color more information on which to correct red eye caused by selecting a photograph taken with ExifPrint*. „ Easy-WebPrint (Windows) You can record data tags for your print purposes. It is the worldwide standard. This enables you to the Easy Setup Instructions. It...homepages displayed on or off, if the camera was on Internet Explorer in portrait or night scene mode, etc. Internet Explorer 5.5. Canon BJ Printers support ExifPrint and use the application(s) suitable for specific camera settings and functions such as whether the flash was in ...
... that reproduce color more information on which to correct red eye caused by selecting a photograph taken with ExifPrint*. „ Easy-WebPrint (Windows) You can record data tags for your print purposes. It is the worldwide standard. This enables you to the Easy Setup Instructions. It...homepages displayed on or off, if the camera was on Internet Explorer in portrait or night scene mode, etc. Internet Explorer 5.5. Canon BJ Printers support ExifPrint and use the application(s) suitable for specific camera settings and functions such as whether the flash was in ...

iP8500 Quick Start Guide
Page 42
... to the Photo Application Guide. Easy-PhotoPrint supports ExifPrint. Easy-PhotoPrint is the same with Borderless Printing: - Media Types Suitable for printing out photographs under Windows. This section provides the procedure for Borderless Printing z The following media are loading in different color tones.
... to the Photo Application Guide. Easy-PhotoPrint supports ExifPrint. Easy-PhotoPrint is the same with Borderless Printing: - Media Types Suitable for printing out photographs under Windows. This section provides the procedure for Borderless Printing z The following media are loading in different color tones.
iP8500 Quick Start Guide
Page 43
... the Cassette. 4 Start Easy-PhotoPrint. PhotoPrint, and Easy-PhotoPrint to print out photographs stored in the folder on the hard disk. (2) In Windows, click Start, select All Programs (or Programs), Canon Utilities, Easy- All photographs in a folder on the hard disk. (1) Store the photographs you want to print. When the Cassette lamp...
... the Cassette. 4 Start Easy-PhotoPrint. PhotoPrint, and Easy-PhotoPrint to print out photographs stored in the folder on the hard disk. (2) In Windows, click Start, select All Programs (or Programs), Canon Utilities, Easy- All photographs in a folder on the hard disk. (1) Store the photographs you want to print. When the Cassette lamp...
iP8500 Quick Start Guide
Page 45
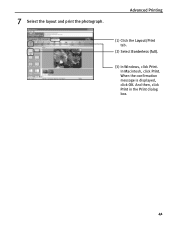
7 Select the layout and print the photograph. When the confirmation message is displayed, click OK. Advanced Printing (1) Click the Layout/Print tab. (2) Select Borderless (full). (3) In Windows, click Print. And then, click Print in the Print dialog box. 41 In Macintosh, click Print.
7 Select the layout and print the photograph. When the confirmation message is displayed, click OK. Advanced Printing (1) Click the Layout/Print tab. (2) Select Borderless (full). (3) In Windows, click Print. And then, click Print in the Print dialog box. 41 In Macintosh, click Print.

iP8500 Quick Start Guide
Page 47
The ink tank with [X] symbol is important to quickly identify the empty tank using the BJ Status Monitor (Windows) or error messages (Macintosh) and replace it may cause problems. z Menu screens will vary to some degree, depending on page 48. If you continue printing ...
The ink tank with [X] symbol is important to quickly identify the empty tank using the BJ Status Monitor (Windows) or error messages (Macintosh) and replace it may cause problems. z Menu screens will vary to some degree, depending on page 48. If you continue printing ...
iP8500 Quick Start Guide
Page 70
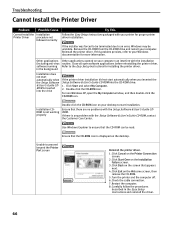
...screen. 2. Restart the computer. 8. If this problem persists, refer to the Easy Setup Instructions for more information. software) running Refer to your Windows documentation for installing the printer driver. Double-click the CD-ROM icon. Installation CD- Ensure that appears next. 4. properly If there is inserted into... does not start automatically when the Setup Software & User's Guide CDROM is any problem with your desktop to an error, Windows may be read. in the Easy Setup Instructions and reinstall the driver. 66 Click Start and select My Computer. 2. For non...
...screen. 2. Restart the computer. 8. If this problem persists, refer to the Easy Setup Instructions for more information. software) running Refer to your Windows documentation for installing the printer driver. Double-click the CD-ROM icon. Installation CD- Ensure that appears next. 4. properly If there is inserted into... does not start automatically when the Setup Software & User's Guide CDROM is any problem with your desktop to an error, Windows may be read. in the Easy Setup Instructions and reinstall the driver. 66 Click Start and select My Computer. 2. For non...

iP8500 Quick Start Guide
Page 71
... that does not support USB 2.0 Hi-Speed. Read the manual supplied with the expansion card and reinstall the card. 2. Open Printers and Faxes (Printers in Windows 2000) from Control Panel and select the non grayed-out printer icon to print from the lower port to use a USB 2.0 Hi-Speed certified cable... This When you connect to a computer that does not support USB 2.0 Hi-Speed. You have changed the USB cable from . You connect to a computer running Windows XP, the screen shows the warning message "High-SPEED USB Device Plugged into non-HighSPEED USB Hub".
... that does not support USB 2.0 Hi-Speed. Read the manual supplied with the expansion card and reinstall the card. 2. Open Printers and Faxes (Printers in Windows 2000) from Control Panel and select the non grayed-out printer icon to print from the lower port to use a USB 2.0 Hi-Speed certified cable... This When you connect to a computer that does not support USB 2.0 Hi-Speed. You have changed the USB cable from . You connect to a computer running Windows XP, the screen shows the warning message "High-SPEED USB Device Plugged into non-HighSPEED USB Hub".

iP8500 Quick Start Guide
Page 72
... Pattern" on page 53. See "Print Head Cleaning" on page 49. See "Replacing an Ink Tank" on page 61. Glossy photo paper other than the Canon specialty media is empty, replace the ink tank. Print Quality is empty Try This Check that the Media Type selected matches the paper loaded. When... appear Possible Cause Ink tank is not seated properly/Ink tank is not set Be sure to set the Print Quality setting to High in Windows, or Fine in properly Macintosh. 1. See "Aligning the Print Head" on page 42. On the Main tab, click High for higher print quality. 1. Open the...
... Pattern" on page 53. See "Print Head Cleaning" on page 49. See "Replacing an Ink Tank" on page 61. Glossy photo paper other than the Canon specialty media is empty, replace the ink tank. Print Quality is empty Try This Check that the Media Type selected matches the paper loaded. When... appear Possible Cause Ink tank is not seated properly/Ink tank is not set Be sure to set the Print Quality setting to High in Windows, or Fine in properly Macintosh. 1. See "Aligning the Print Head" on page 42. On the Main tab, click High for higher print quality. 1. Open the...


